Last Updated on March 20, 2024 by teamobn
Bunk beds are convenient, fun, and affordable. They provide plenty of space for sleepovers and guarantee at least one sleeping spot for everyone.
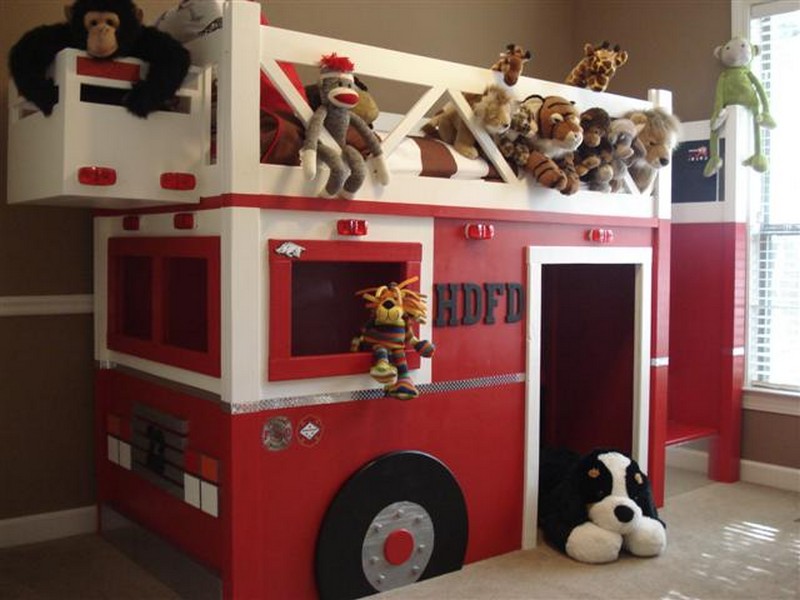
Do you ever find yourself wondering how you can make your child’s bedroom more fun and exciting? Well, why not build them a DIY Fire Truck Bunk Bed?
Not only will it add some personality to their room, but it will also be a functional bed that they can use for years. Having a bed they can play on and sleep in would be so much fun.
Seeing their faces light up when they see their new bed would be great. Plus, it’s a great project for any handy parent to take on. And if you spend a couple of hours every weekend on this project, time shouldn’t be an issue.
Below is our full guide on building a fire truck bunk bed you can use to add that creative spark in your kid’s room.
Constructing a Fire Truck Bunk Bed
Materials
- 1×1 Timber
- 1×4 Timber
- Scrap Timber
- MDF Sheets
- Diamond Plate Vinyl
- Diamond Plate Tape
- Spray Paint
- Steering Wheel
- Hooks
- Cabinet Hinges
- 1″ Bolts
- Trailer Lights
- Red Spinning Lights
- Frog Tape
- Primer & Paints
- Protective Mask
Tools
- Circular Saw
- Cutting Guide
- Measuring Tape
- Saw Horses
- Table Saw
- Wood Clamps
- Power Drill
- Sander
- Kreg Jig
Instructions
Step 1: Design and Planning
- Sketch your fire truck bunk bed design. Include dimensions for each part to ensure it fits in the intended space and meets safety standards.
- Plan where each material will be used in your design. For example, MDF sheets for bed frames, 1×4 timber for rails, and so on.
Step 2: Cutting Materials
- Using the table saw and circular saw, cut the timber and MDF sheets according to your design specifications.
- Sand all edges to remove splinters and rough edges.
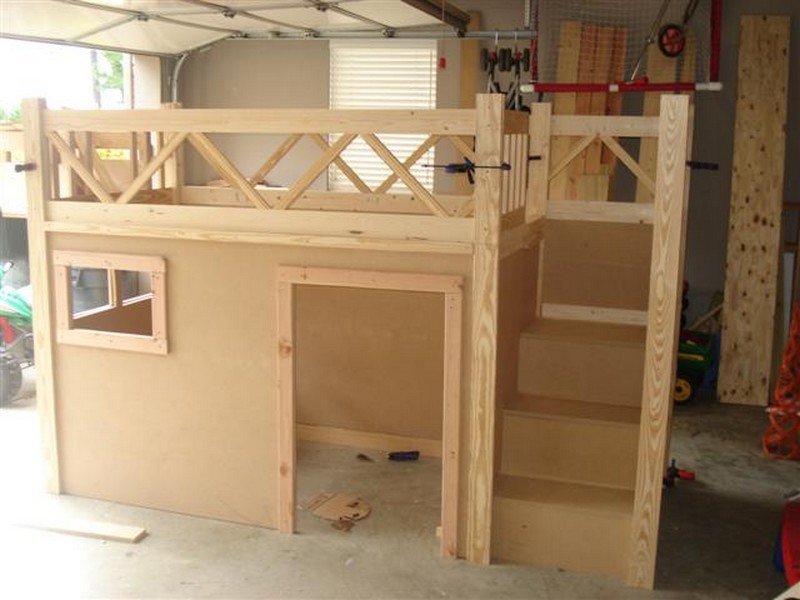
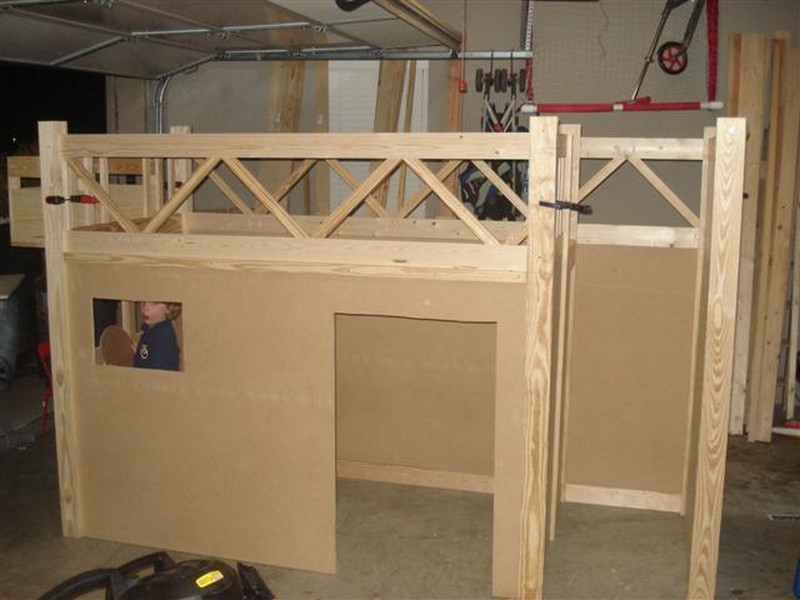
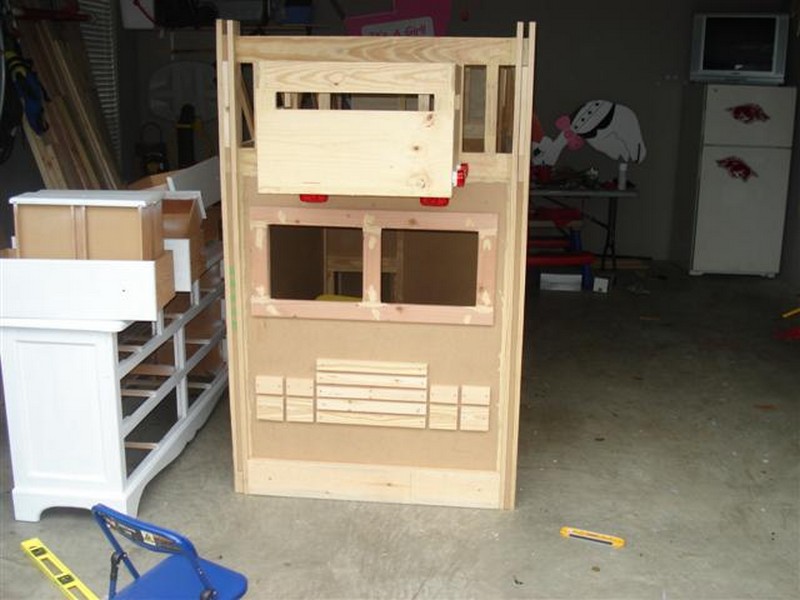
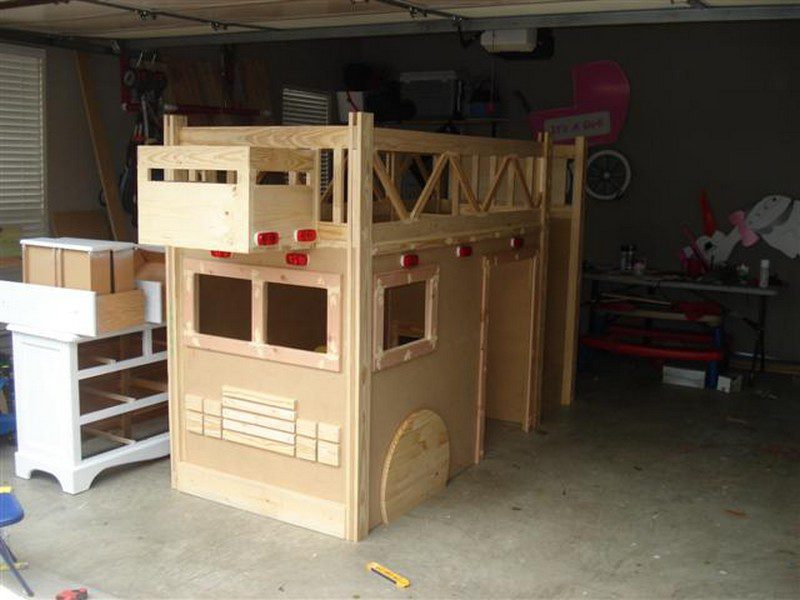
Step 3: Constructing the Frame
- Assemble the bed frame using the cut timber. Use the Kreg Jig to create pocket holes for a cleaner look.
- Secure the frame with wood clamps before drilling in the screws.
- Attach the MDF sheets to the frame to create the bed base and sides.
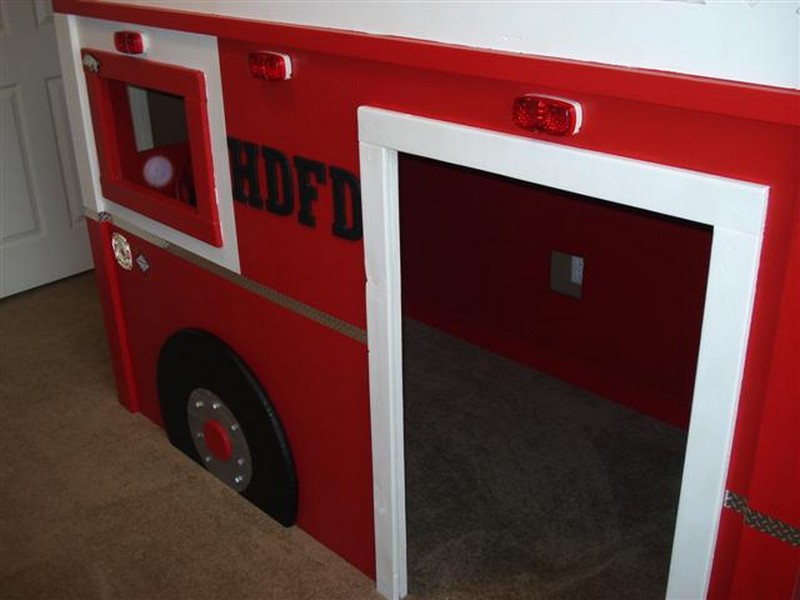
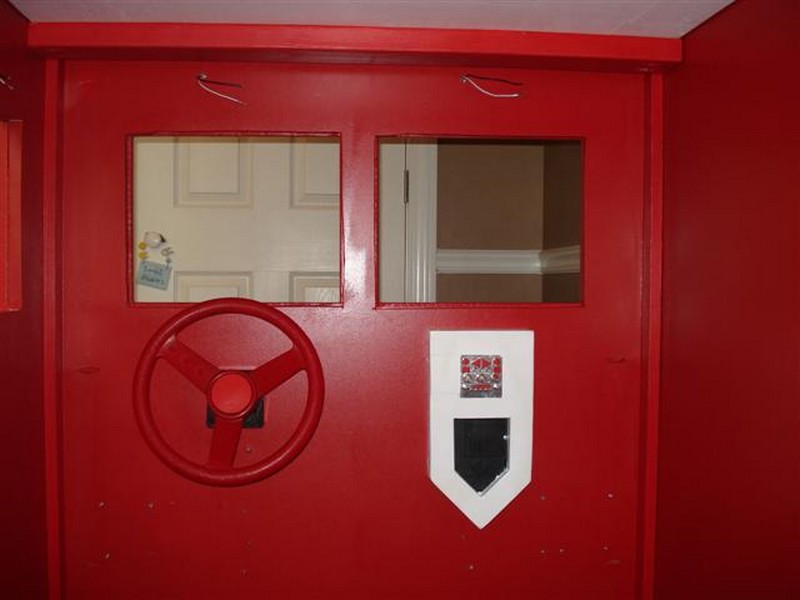
Step 4: Adding the Fire Truck Elements
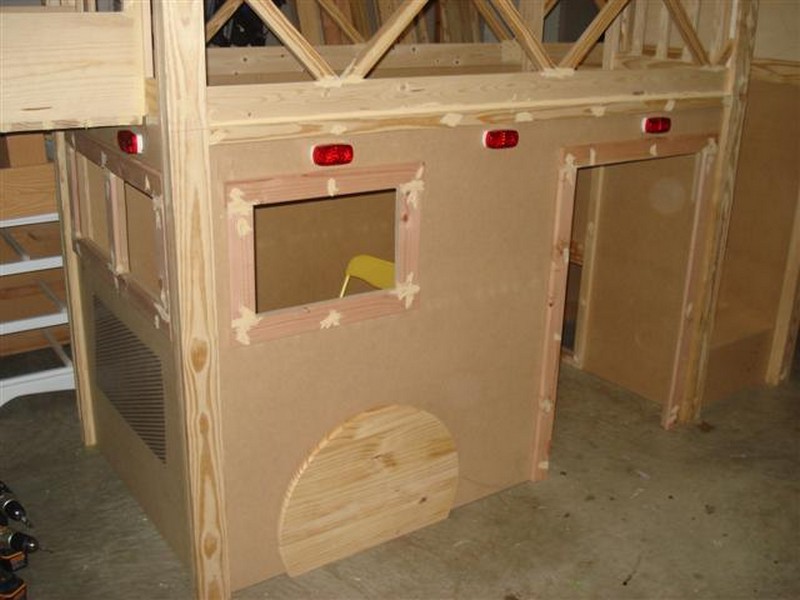
- Use the scrap timber and additional MDF to build the front cab and rear of the fire truck.
- Attach the steering wheel and hooks at appropriate places to mimic a fire truck’s interior and exterior.
- Install cabinet hinges where necessary, especially if you’re incorporating doors or movable parts.
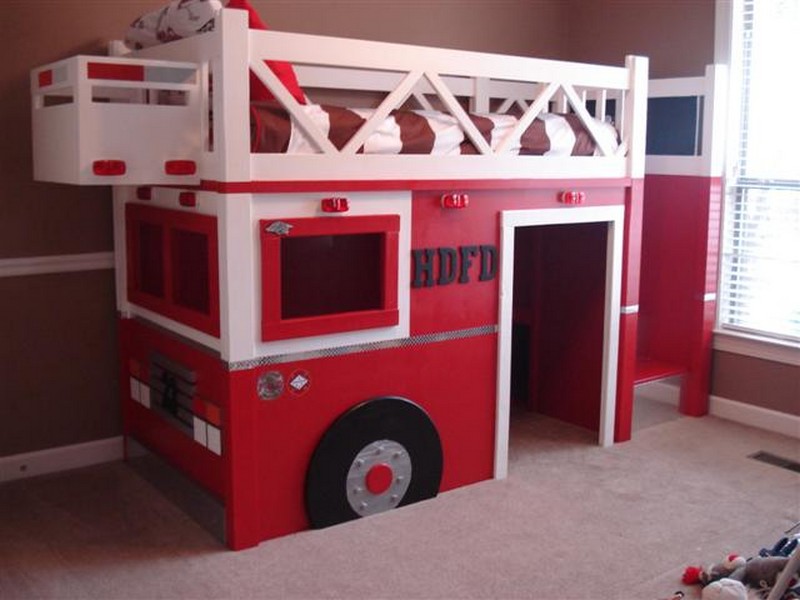
Step 5: Painting and Decorating
- Apply primer to all surfaces before painting. Let it dry completely.
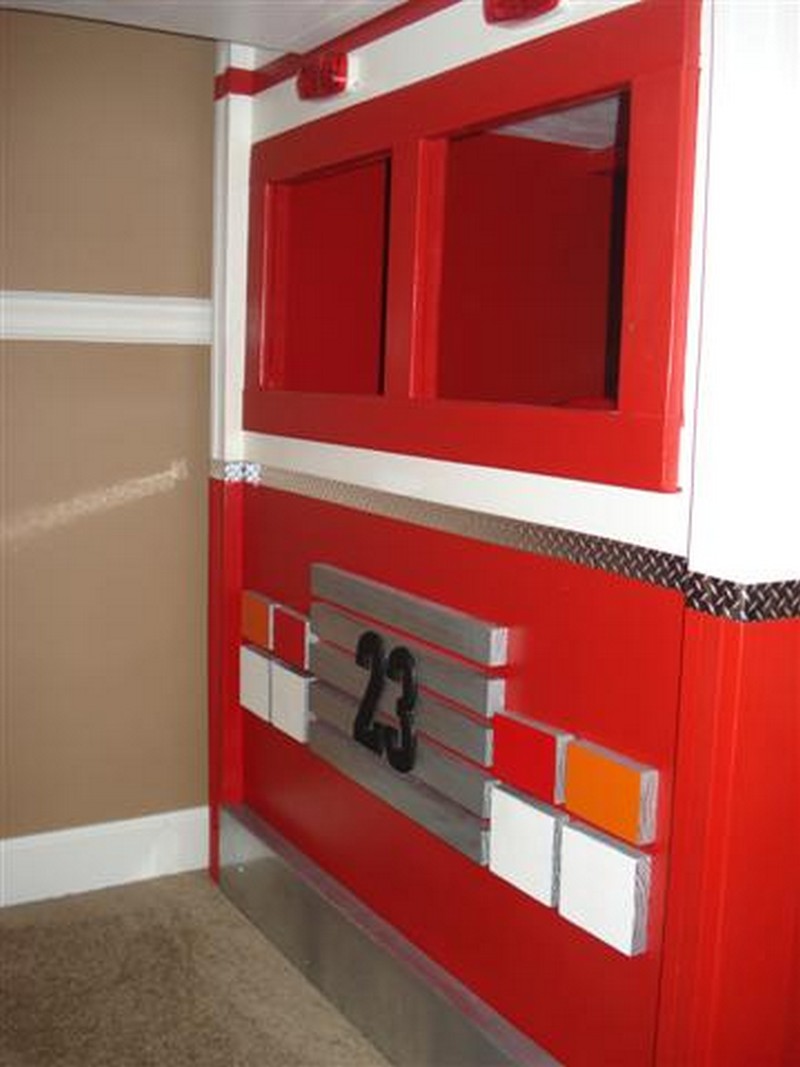
- Paint the bed with red spray paint. Use multiple coats for a vivid color, allowing each coat to dry thoroughly.
- Apply diamond plate vinyl and tape to mimic the look of a fire truck’s details.
Step 6: Lighting and Accessories
- Install trailer lights and red spinning lights. Ensure all electrical components are safely installed and child-proof.
- Use the frog tape for clean paint lines if adding any additional designs or letters.
Step 7: Final Assembly
- Assemble all parts together. Double-check the stability of the bunk bed.
- Secure the bed to the wall if necessary for extra safety.

Safety Tips and Considerations
Creating a DIY Fire Truck Bunk Bed is not just an exciting project; it’s also a commitment to ensuring the safety and well-being of your child. While the allure of a custom, fun, and thematic bed is undeniable, safety must always come first.
This section outlines crucial safety tips and considerations to remember throughout the construction and use of your fire truck bunk bed.
Proper Material Selection
- Non-Toxic Paints and Finishes: Ensure all paints, primers, and finishes are non-toxic and safe for children. This is crucial for the fire truck bunk bed, as kids will spend significant time in close contact with these surfaces.
- Sturdy Timber and Hardware: Choose high-quality timber and hardware to ensure the bed’s structure is secure and withstand children’s play’s wear and tear. The stability of the fire truck bunk bed is paramount to prevent accidents.
Design for Stability and Strength
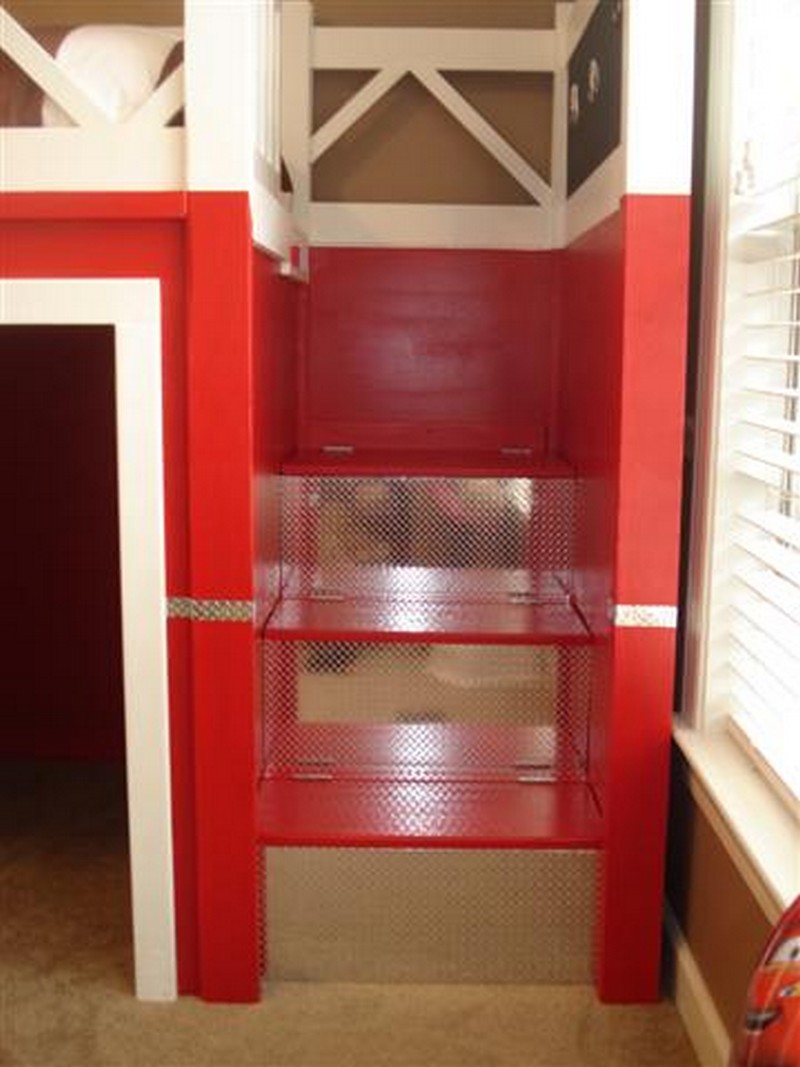
- Secure Railings: Install railings on all sides of the upper bunk to prevent falls. The fire truck bunk bed should have high and sturdy railings to keep your child safe while sleeping or playing.
- Stable Foundation: Ensure the bed’s foundation is solid and well-supported. Check all joints and connections within the fire truck bunk bed structure regularly to confirm they remain tight and secure.
Safe Access
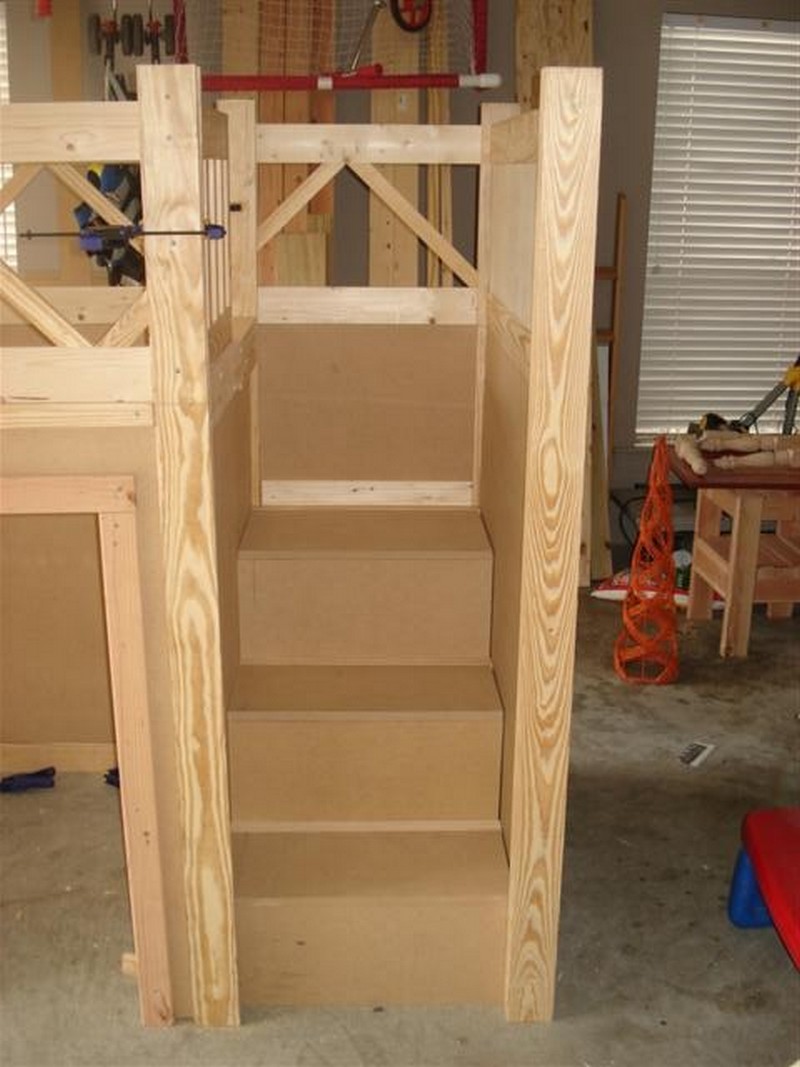
- Sturdy Ladder or Stairs: Provide a safe, sturdy means of access to the upper bunk. If you design the fire truck bunk bed with a ladder, ensure it is firmly attached and has easy steps for kids to climb.
- Non-Slip Surfaces: Consider adding non-slip pads or strips to the ladder or stairs of the fire truck bunk bed to prevent slipping and falling.
Age and Weight Considerations
- Appropriate for Age: The fire truck bunk bed should suit your child’s age and development level. Young children, especially those under six, should not sleep on the top bunk.
- Weight Limits: Adhere to recommended weight limits for upper and lower bunks. Ensure the fire truck bunk bed can support the children’s weight and any additional weight from playtime or sleepovers.
Regular Inspections and Maintenance
- Routine Checks: Regularly inspect the fire truck bunk bed for any signs of wear, loose bolts, or structural weaknesses. Immediate action should be taken to repair any issues and maintain the bed’s safety and integrity.
- Follow Manufacturer Instructions: If using pre-manufactured parts or kits for your fire truck bunk bed, follow all manufacturer instructions and recommendations for assembly and use.
Creating a DIY Fire Truck Bunk Bed is an endeavor that brings joy and excitement to your child’s bedroom. However, it’s essential to prioritize safety at every step, from the initial design and material selection to the construction and daily use. By adhering to these safety tips and considerations, you can ensure that your fire truck bunk bed is a source of endless fun and a safe, secure place for your child to rest and play.
Click on any image to start the lightbox display. Use your Esc key to close the lightbox. You can also view the images as a slideshow if you prefer 😎


Space-Saving Solutions
Creating a fun and engaging bedroom for children often involves incorporating elements that spark their imagination while addressing practical needs. A DIY Fire Truck Bunk Bed serves as a centerpiece that ignites the joy of play and the essence of childhood adventures and offers unique opportunities to implement space-saving solutions.
This section will guide you through innovative ways to maximize bedroom space without compromising the fun and functionality of a fire truck bunk bed.
Integrated Storage
Design the fire truck bunk bed with built-in storage compartments. Utilize the base of the bed and the steps leading to the upper bunk as drawers or cubbies. This approach allows for storing toys, clothes, and bedding, keeping the room organized and clutter-free.
Under-Bed Play Area
Maximize the space beneath the top bunk by creating a cozy play area. This space can be themed around a fire station, complete with a desk that doubles as a command center. It’s a practical use of space that provides a dedicated spot for creativity and study, enhancing the functionality of the fire truck bunk bed.
Foldable Features
Incorporate foldable elements into the fire truck bunk bed design. When not in use, a ladder that folds flush against the bunk bed can save valuable floor space. Similarly, consider a fold-down desk or craft table attached to the side of the bed, providing a workspace that can be tucked away.
Vertical Storage Solutions
Use the vertical space around the fire truck bunk bed by installing shelves and hooks on the adjacent walls. This strategy allows for displaying and storing firefighting-themed toys and books, further enhancing the theme while keeping belongings organized.
Strategic Placement
Position the fire truck bunk bed in the corner of the room to open up the rest of the space for play and movement. This placement also allows for integrating the bed into the room’s overall layout more seamlessly, making the fire truck theme a focal point without overwhelming the space.
Shared Space Configuration
For siblings sharing a room, the fire truck bunk bed can serve as a unifying theme that excites both children. Design the room layout to ensure each child has equal access to the bed and play areas, promoting harmony and shared enjoyment.
Implementing space-saving solutions with a fire truck bunk bed can transform a child’s bedroom into a multifunctional space that encourages play, learning, and rest. By considering integrated storage, foldable features, and strategic room layout, you can create a stimulating environment that captures the imagination while addressing practical living needs.
Conclusion
Building a fire truck bunk bed is an imaginative project that combines fun with functionality, offering children a playful retreat that sparks joy and creativity. This DIY endeavor transforms a child’s bedroom into an adventurous space and introduces practical space-saving solutions to keep the room organized and inviting. Embarking on constructing a fire truck bunk bed promises to be a rewarding experience, resulting in a unique piece of furniture that will be cherished for years to come.
You might also want to check out these DIY triple bunk bed and tractor bunk bed posts.