Timber flooring can add that rich and warm look to your home’s interiors. They’re great for kids, for barefoot comfort compared to walking on tiled concrete floors. They’re also low maintenance than carpeted floors. If you love the idea of timber flooring, but don’t have the budget for it, then a DIY Pallet Flooring could be the solution you’re looking for!
What is the idea of a DIY pallet flooring?
The idea of a DIY pallet flooring is to have your one-of-a-kind flooring at a low cost. Pallet flooring adds a personal touch to your decor. It allows you to reduce renovation expenditures since pallets can be recycled at a low cost. By recycling these used pallets, you will be able to help the environment by lowering the amount of waste the landfills generate and building your own incredible DIY pallet flooring. Remember to evaluate which type of pallet you need before buying or recycling them.
Pallets are generally inexpensive or free. They may not look attractive but there are a lot of things that you can do to wood to bring out its natural beauty. You can paint it, give it a new finish, sand, or bleach it to turn it into a great flooring material. Or you can arrange the planks in an uneven or diagonal pattern, as you would with tiles. The possibilities are endless, plus you won’t have to spend so much on it.

Still, set on converting to timber flooring? Check our gallery of timber flooring ideas for inspiration.
The first step is to get your hands on enough recycled timber pallets to be on your way to having your unique timber flooring!
Constructing a Pallet Flooring
The pallets used to construct a DIY pallet flooring are usually cheap and can also be free if these are recycled from landfills.
Materials
- Old Pallets
- Mineral Spirits
- Wood Finish
- 1″ Nails
Tools
- Table Saw
- Sawzall
- Planer
- Low Nap Wool Applicator
- Face Nailer
Instructions
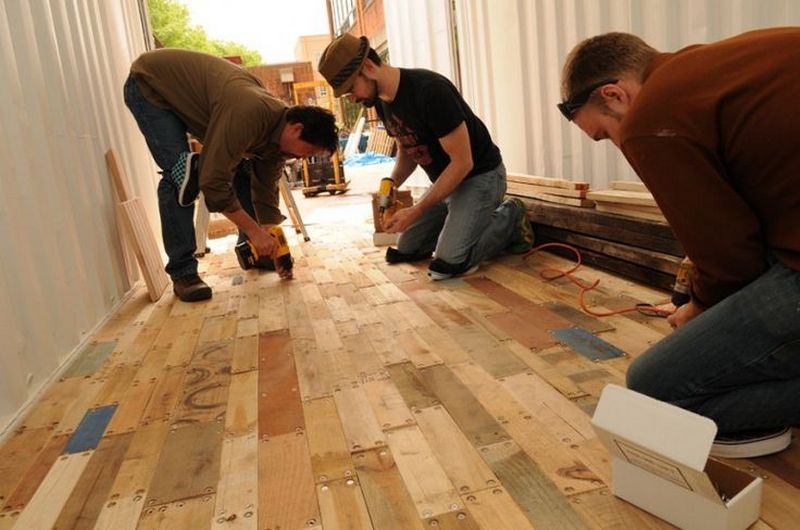
Step 1: Collect and Prepare the Pallets
- Source Quality Pallets: Ensure the pallets are in good condition, free from rot or extensive damage. It’s best to use pallets that have not been treated with harmful chemicals.
- Disassemble Pallets: Use the Sawzall to carefully cut through the nails and disassemble the pallets into planks. This tool will help you preserve the length of the planks and avoid splitting the wood.
Step 2: Clean and Plane the Wood
- Clean the Planks: Apply mineral spirits to the planks using a rag. This will clean the wood and help remove any grease or residues. Ensure you work in a well-ventilated area.
- Plane the Wood: Run each plank through the planer to smooth the surfaces and ensure uniform thickness. This step is crucial for a level floor and comfortable walking surface.
Step 3: Cut to Size
- Measure and Mark: Determine the length needed for each plank to fit your room. Use a measuring tape and a pencil to mark the cutting points.
- Cut the Planks: Use the table saw to cut the planks to your marked measurements. Ensure all pieces are cut straight for a seamless fit.
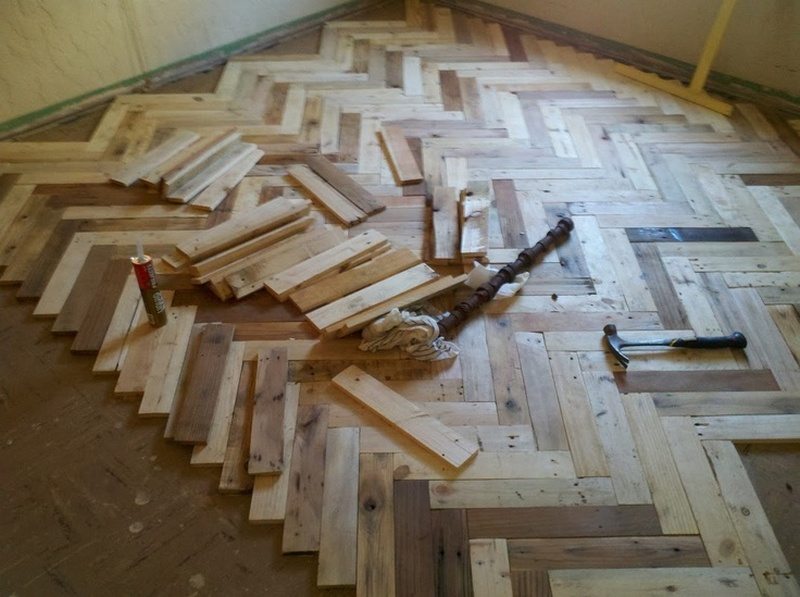
Step 4: Arrange the Layout
- Dry Fit the Planks: Before securing them, lay out the planks on your floor to decide on the pattern and fit. You can arrange them in a traditional straight line, or get creative with patterns like herringbone or diagonal.
Step 5: Secure the Planks
- Nail Down the Planks: Start from one corner of the room and place each plank in position. Use the face nailer and 1″ nails to secure the planks to the subfloor. Ensure each plank is tightly fitted to the next to avoid gaps.
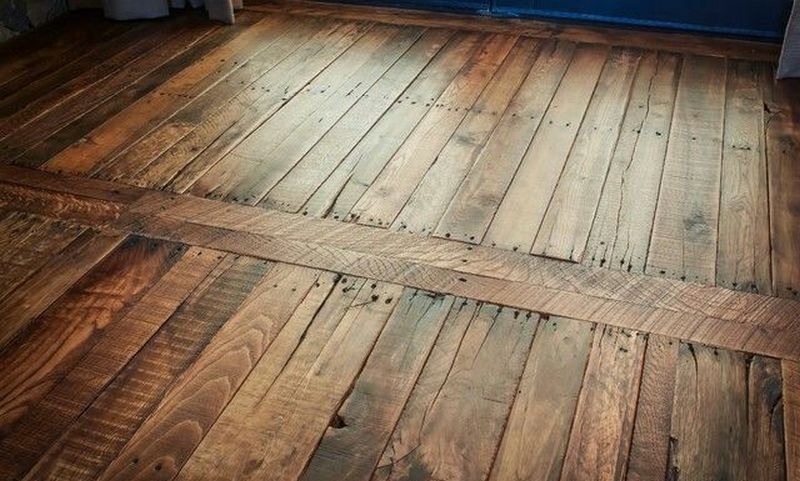
Step 6: Sand and Finish
- Sand the Floor: Once all planks are nailed down, sand the entire floor to eliminate any uneven spots or sharp edges. This step ensures your floor is smooth and safe.
- Apply Finish: Using the low nap wool applicator, apply a wood finish of your choice to the planks. This will enhance the look of the wood and protect your new floor from wear and tear.
Step 7: Final Touches
- Inspect and Clean: Check the entire floor for any missed nails or rough patches. Clean the floor thoroughly to remove any dust from sanding before it settles.
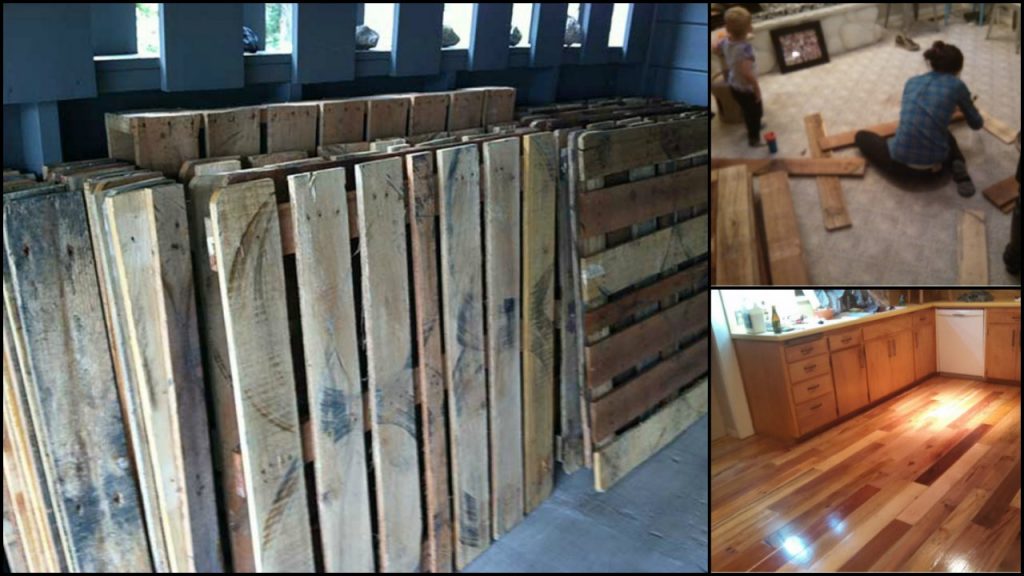
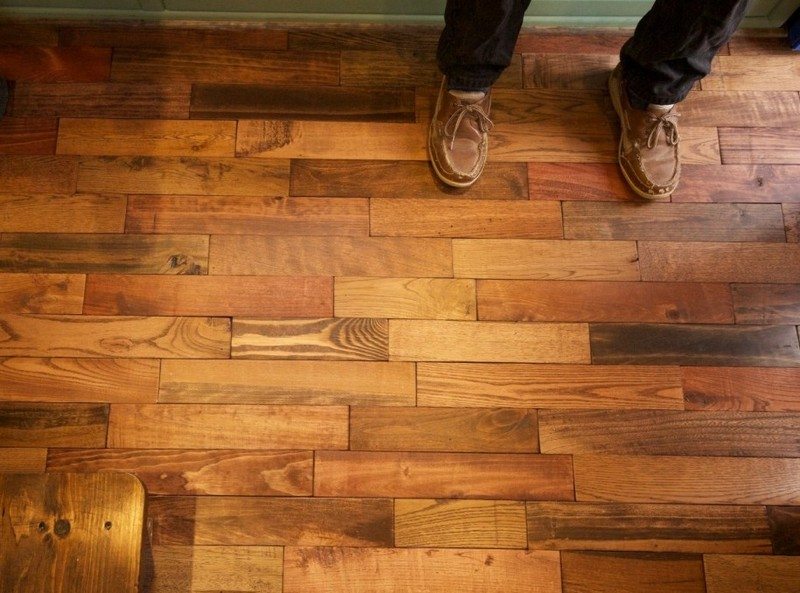
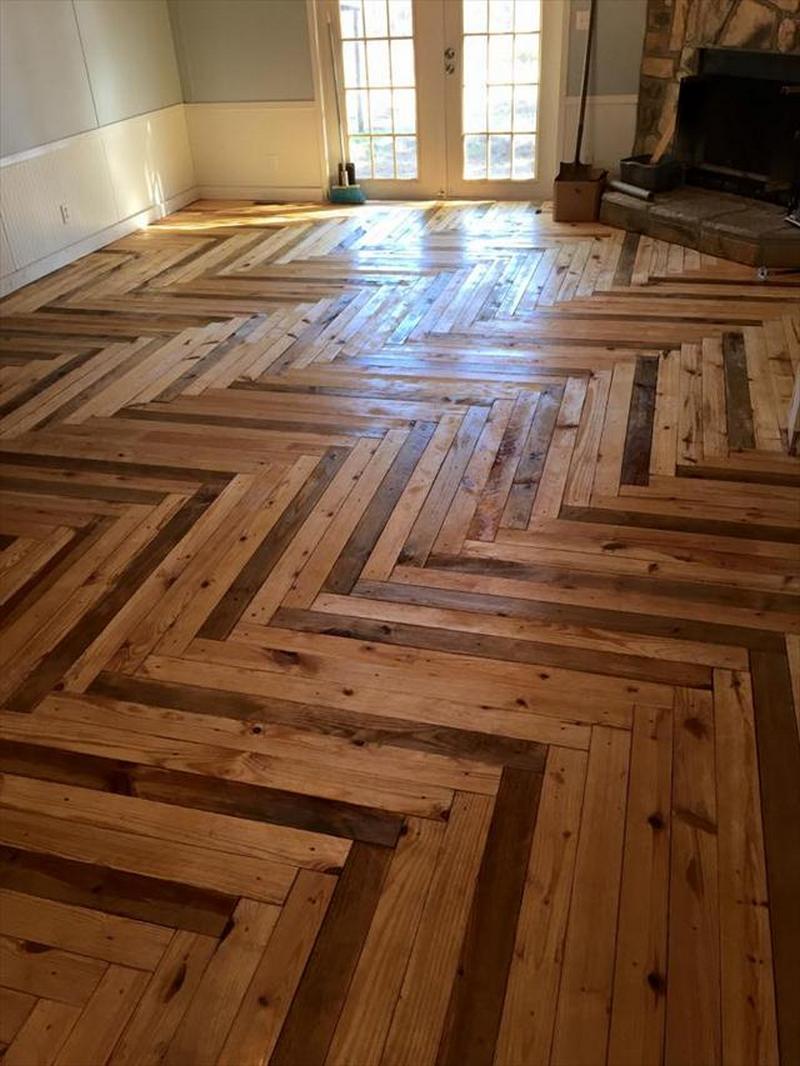
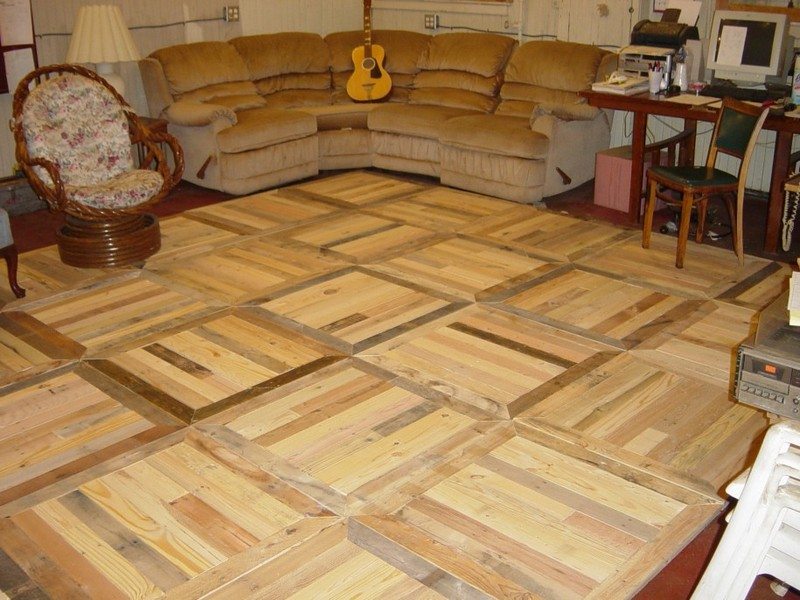
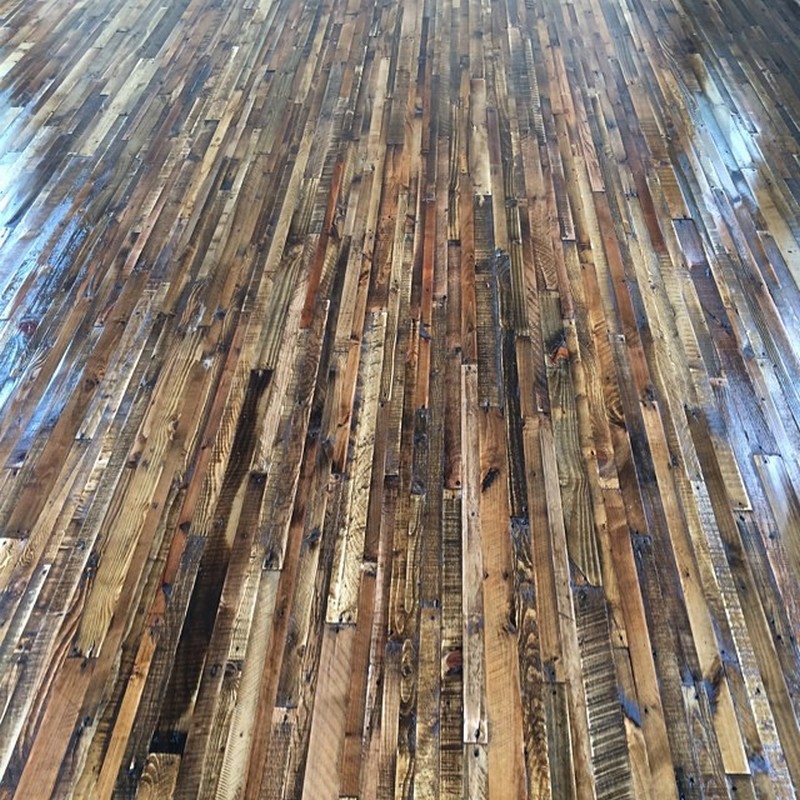
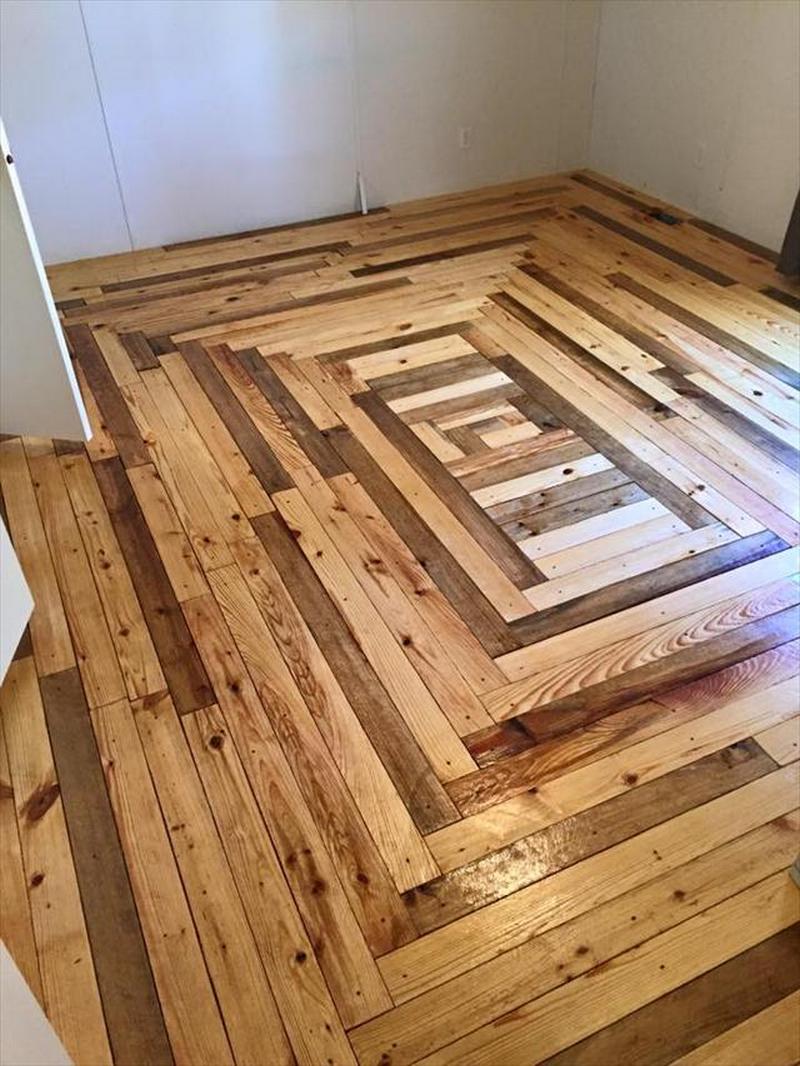
Impressive DIY Pallet flooring design ideas
Below are images of impressive DIY Pallet flooring design ideas.
Click on any image to start the lightbox display. Use your Esc key to close the lightbox. You can also view the images as a slideshow if you prefer 😎


You can get more step-by-step instructions here…
Maintenance Tips and Long-Term Care for Pallet Flooring
Pallet flooring offers a unique and rustic charm to any space, but like any flooring, it requires proper care to maintain its beauty and durability. Here are some essential tips to help you take care of your pallet flooring and ensure it lasts for many years.
Regular Cleaning
- Daily Dusting: Regularly sweep your pallet flooring with a soft-bristled broom or use a dust mop to remove dirt and grit. These small particles can act like sandpaper underfoot, wearing down the finish over time.
- Weekly Vacuuming: Vacuum your pallet flooring weekly using a soft brush attachment to get rid of finer dust particles that sweeping might miss. Ensure the vacuum is set to the wood floors setting to avoid scratches.
- Mopping: Use a damp mop with a mild soap solution for deeper cleaning. Make sure the mop is only slightly damp, as excessive water can seep into the wood, causing damage like swelling or warping.
Preventing Damage
- Use Protective Pads: Place felt pads under the legs of furniture to prevent scratches and gouges on your pallet flooring. These pads should be replaced periodically as they can wear down and collect grit.
- Rugs and Mats: Utilize area rugs or mats in high-traffic areas to minimize wear. Ensure these are non-slip and cleaned regularly to avoid dirt buildup underneath that could scratch the floor.
- Avoid High Heels and Sharp Objects: High heels and sharp objects can dent and scratch pallet flooring. Avoid wearing such footwear on your floor and be cautious when moving sharp or heavy objects.
Managing Moisture
- Address Spills Immediately: Any spills should be wiped up immediately with a dry or slightly damp cloth to prevent water marks or stains.
- Monitor Humidity Levels: Pallet flooring can react to changes in humidity by expanding or contracting. Try to keep indoor humidity levels consistent, ideally between 35% and 55%, to avoid warping or cracking.
Periodic Maintenance
- Refinishing: Over time, your pallet flooring may start to show signs of wear. Refinishing the surface can restore its original shine and provide additional protection. This usually involves sanding down the existing finish and applying a new top coat.
- Deep Cleaning: Occasionally, it might be necessary to conduct a deep clean or polish to restore the luster of your pallet flooring. Use products specifically designed for wood floors and follow the manufacturer’s instructions.
Long-Term Considerations
- Regular Inspections: Periodically inspect your pallet flooring for signs of damage or wear. Early detection of problems like loose planks or lifted edges can save you from more extensive repairs down the line.
- Professional Help: If you encounter serious issues with your pallet flooring, such as large areas of damage or persistent squeaks, it might be best to consult a professional. They can provide expert advice and services to ensure your floor is properly repaired and maintained.
These care and maintenance advice will help you to keep your pallet flooring looking great and working great for many years to come. Recall that routine maintenance and quick resolution of any possible problems are the secrets to long-lasting wood flooring.
Design Patterns and Creative Layouts for Pallet Flooring
Pallet flooring offers a versatile and eco-friendly option for those looking to add a unique touch to their home or office space. With a bit of creativity, you can transform ordinary wood pallets into a visually striking floor.
Here, we explore various design patterns and creative layouts to enhance the aesthetic appeal of your pallet flooring.
Classic Straight Lay
- Simple and Elegant: The straight lay pattern involves aligning the pallet planks parallel to each other across the room. This traditional layout works well in any space, providing a clean and orderly appearance that enhances the room’s dimensions.
- Versatility: While simple, this pattern allows the natural beauty of the wood to stand out, making it a perfect choice for those who prefer a minimalist decor.
Herringbone Pattern
- Dynamic Visual Impact: Arrange your pallet flooring planks in a herringbone pattern to create a visually dynamic effect. This pattern involves positioning the planks in a zigzag formation, resembling a fish skeleton.
- Suitable for Any Room: The herringbone layout is particularly suited for larger rooms or hallways where the pattern can fully unfold and become a focal point.
Diagonal Layout
- Room Expansion Effect: Installing pallet flooring diagonally can make small spaces appear larger. This layout involves setting the planks at a 45-degree angle to the walls, guiding the eye diagonally across the room.
- Unique Appeal: The diagonal pattern adds a unique twist to the room, offering a more contemporary look compared to traditional layouts.
Mixed Width Installation
- Rustic Charm: For a more rustic and textured look, mix different widths of pallet planks. This layout adds depth and interest to your pallet flooring, creating a more custom and handcrafted appearance.
- Creative Freedom: Mixing widths allows for a high degree of customization. You can vary the placement randomly or create a repeating pattern for a more structured look.
Parquet-Inspired Designs
- Artistic and Luxurious: Drawing inspiration from traditional parquet floors, you can cut pallet planks into smaller pieces and assemble them into geometric shapes, such as squares, triangles, or hexagons.
- Sophistication and Style: This approach lends a sophisticated air to any room, making your pallet flooring not just a functional surface but also an expression of art.
Checkerboard Pattern
- Playful and Eye-Catching: Alternating two different shades of pallet wood can achieve a checkerboard effect. This playful design is ideal for children’s rooms or creative spaces.
- Color Contrast: Using stained and natural wood alternately can enhance the checkerboard pattern, adding an extra layer of visual interest to your floor.
Your pallet flooring can represent your own style and improve the look of your room if you select the appropriate design pattern. Pallet flooring offers almost limitless design options, from a straightforward straight lay to a complex parquet-inspired pattern.
Conclusion
Creating pallet flooring is an affordable and environmentally friendly way to give any area distinctive personality. Durability and long-lasting beauty are features of this environmentally friendly option when installed and maintained correctly. Accept the inventiveness of do-it-yourself projects and turn used pallets into an eye-catching, useful flooring option.
If you liked this project, you will also like viewing these Pallet recycling ideas…