Last Updated on November 24, 2025 by teamobn
If you’re looking for a sleek, contemporary bookshelf that doubles as decor, this 5‑layer zigzag bookshelf is a perfect weekend project. It uses a single plywood board, basic tools, and about an hour of work to create a compact display that looks great against a wall or as a room divider.
In this guide, you’ll learn:
- What materials and tools you need
- How to cut and assemble the zigzag layers
- How to finish and style the bookshelf
- Extra ideas for using it to divide space and match your decor
Contents
- 1 Project at a Glance
- 2 Why Build a Zigzag Bookshelf?
- 3 Building a ZigZag Bookshelf
- 4 Benefits of a Zigzag Bookshelf Design
- 5 Using a Zigzag Bookshelf as a Space Divider
- 6 Best Materials for a Zigzag Bookshelf
- 7 Zigzag Bookshelf Frequently Asked Questions
- 8 Conclusion
Project at a Glance
- Project: 5‑layer zigzag bookshelf
- Time: About 60 minutes (plus drying time for paint or stain)
- Difficulty: Beginner – Intermediate
- Ideal for: Small spaces, modern interiors, and room dividers
- Best use: Books, plants, decor, photos, and collectibles
Why Build a Zigzag Bookshelf?
Shelves are essential for any room’s organization and storage. A zigzag bookshelf not only holds books and decor, it becomes a design feature on its own.
This design:
- Uses both vertical and horizontal space efficiently
- Breaks away from the typical boxy bookshelf
- Adds a sculptural, geometric element to blank walls
- Works beautifully in living rooms, offices, bedrooms, and studios
You can also use the zigzag bookshelf as a space divider to subtly separate areas in an open‑plan room while keeping things airy and light.
Building a ZigZag Bookshelf
What Materials Are Needed to Build a Zigzag Bookshelf
- At least a quarter of a plywood sheet, 96″ long x 12″ wide x 3/4″ thick
- At least 60 1.25″ brads for the nail gun
- Wood glue
- Sandpaper
- Optional: wood filler (for nail holes), paint or wood stain, clear sealer
What Tools Are Needed for This Build
- Table saw (or circular saw with guide, if needed)
- Nail gun (or drill and wood screws as an alternative)
- Measuring tape
- Pencil
- Square (for right angles)
- Clamps (helpful but optional)
- Safety gear: safety goggles, ear protection, dust mask
How to Build a Zigzag Bookshelf
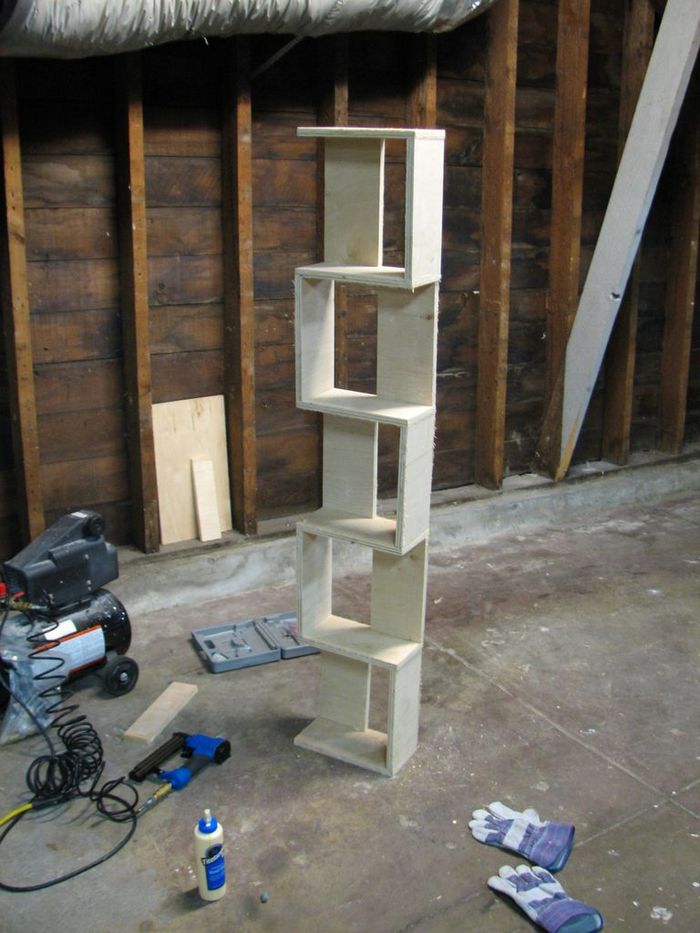
Step 1: Cut the Plywood Strips
- Lay the 96″ x 12″ x ¾″ plywood on a sturdy workbench or on sawhorses.
- Measure and mark every 6 inches along the long (96″) edge.
- Use a square to extend each mark across the width of the board.
- Set the table saw fence to 6″.
- Carefully cut the board into 16 equal strips, each 6″ wide x 12″ long x ¾″ thick.
You should now have 16 uniform strips. Wear safety goggles and ear protection while cutting, and take your time so the cuts stay straight and clean.
Step 2: Sand All Edges Smooth
- Take each strip and check for splinters, rough saw marks, or chipped corners.
- Use medium‑grit sandpaper to smooth down the cut edges and any rough faces.
- Follow up with fine‑grit sandpaper for a smoother finish if you plan to stain the wood.
Sanding at this stage makes assembly easier and ensures your finished bookshelf looks neat and “store‑bought.”
Step 3: Assemble the First Zigzag Layer
- Lay one strip flat on your work surface.
- Apply a thin line of wood glue to one end.
- Stand a second strip perpendicular to the first to form an “L” shape. Use a square to make sure it’s at a true 90‑degree angle.
- Hold the joint steady (or clamp it) and secure it with a couple of brads using your nail gun.
- Glue the back edge of the upright piece and attach a third strip at the back horizontally to act as a support brace. Nail it in place.
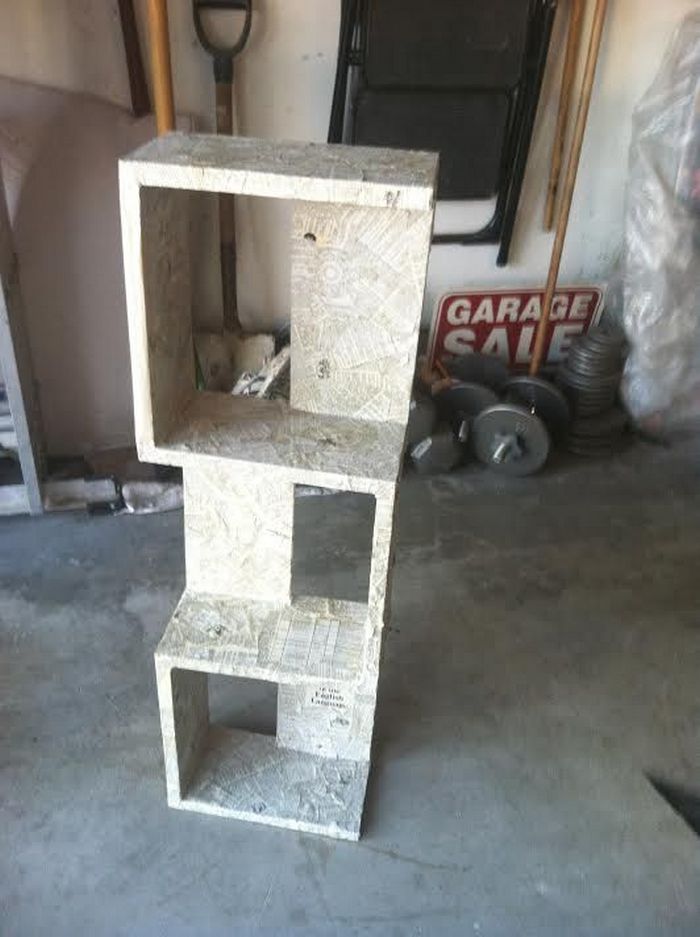
This first three‑piece unit becomes the base layer of your zigzag pattern and helps set the shape for all the layers that follow.
Step 4: Build Up the Zigzag Layers
- For the second layer, position new strips so they run in the opposite direction from the first layer. This is what creates the signature zigzag effect.
- Apply wood glue along the contact edges where the new strips meet the layer below.
- Hold or clamp them in place and secure with brads.
- Continue adding strips, always alternating the direction of each new layer.
Check as you go that the lines stay straight and the layers remain square. Small adjustments early make a big difference in how the finished shelf looks and how stable it is.
Step 5: Finish Assembling All 5 Layers
- Keep repeating the pattern until you’ve built 5 distinct layers of zigzag shelves, using up all 16 strips.
- As you approach the final layer, double‑check that everything is aligned and that your joints are tight.
- Add extra brads where needed for stability, especially at key joints that bear the most weight.
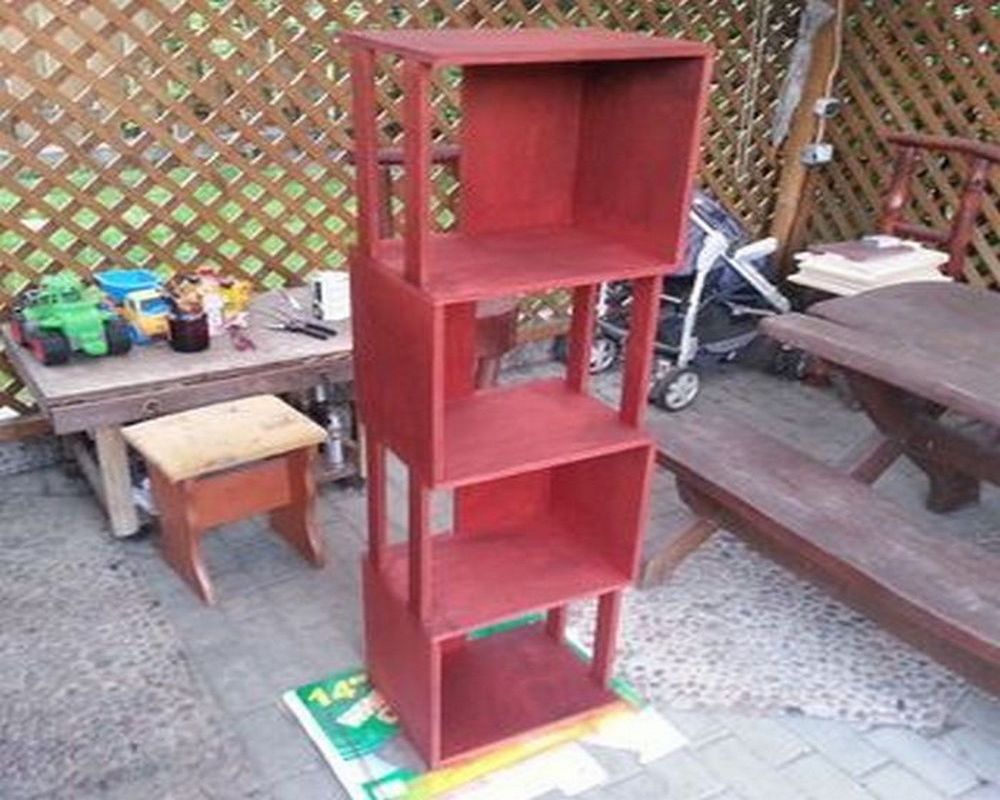
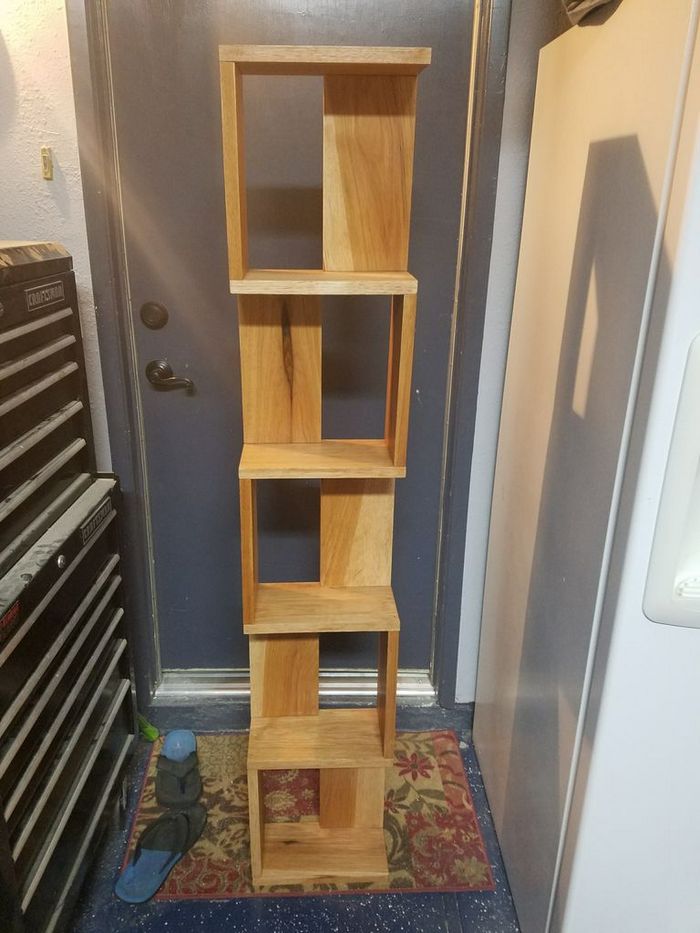
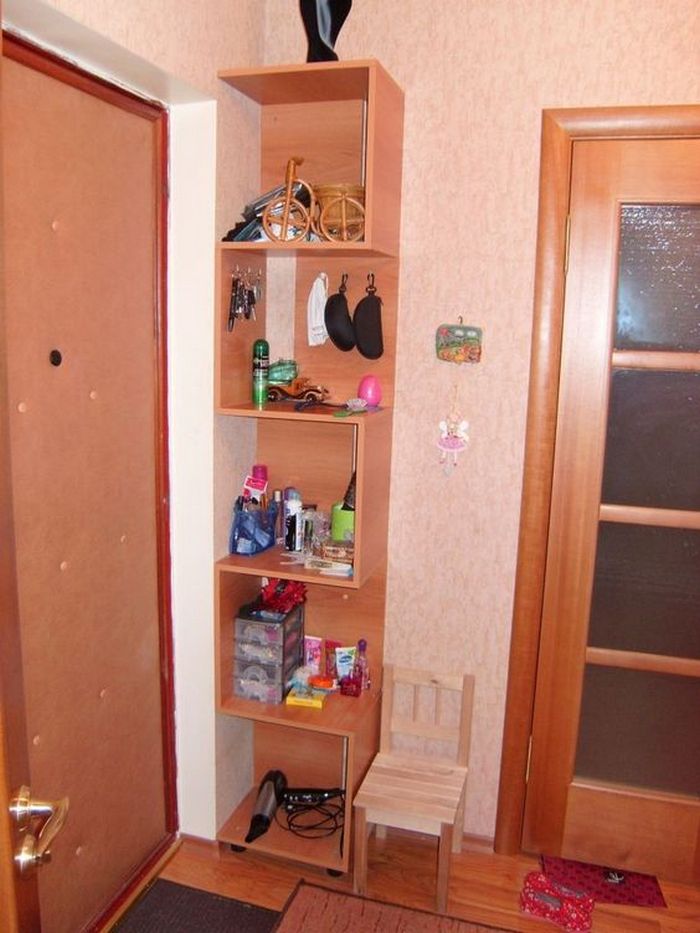
At this point, you should have a single, solid zigzag bookshelf structure. It will look like a series of staggered “steps” or “Z” shapes stacked vertically.
Step 6: Final Sanding and Finishing
- Give the entire bookshelf a thorough once‑over with sandpaper, focusing on corners, joints, and any dried glue squeeze‑out.
- Fill visible nail holes with wood filler if you want a cleaner, more polished look. Let it dry and sand smooth.
- Wipe off all dust with a dry cloth or tack cloth.
- Apply your chosen finish:
- Stain to highlight the wood grain
- Paint for a bold, modern statement
- Clear sealer for a natural look
- Allow the finish to dry completely according to the product instructions before moving or loading the shelf.
Choose a color or stain that matches your existing décor. Dark stain gives a more sophisticated, modern feel, while bright paint can turn the bookshelf into a playful focal point.
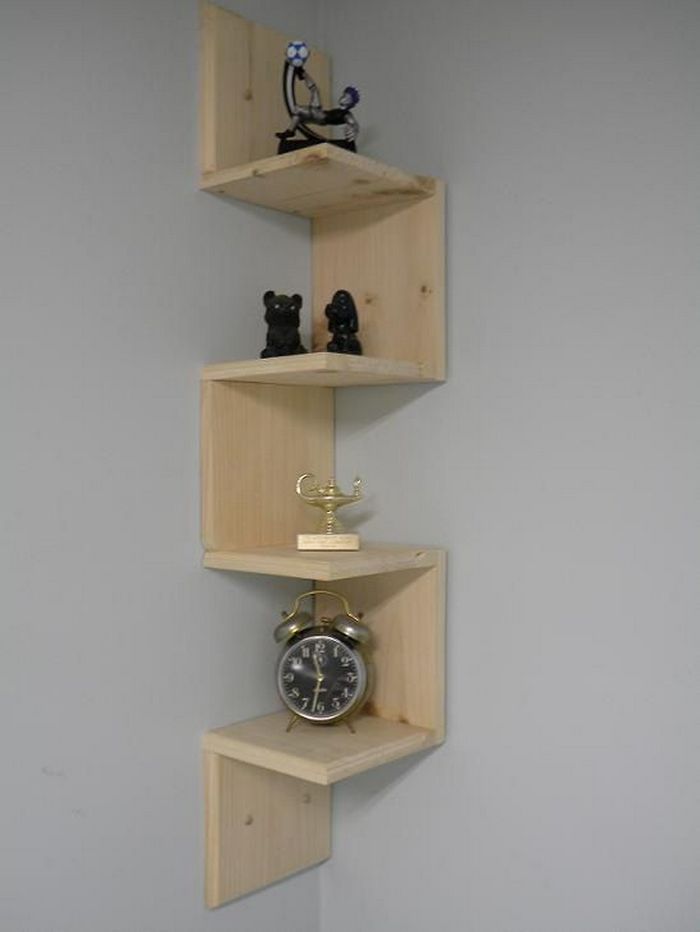
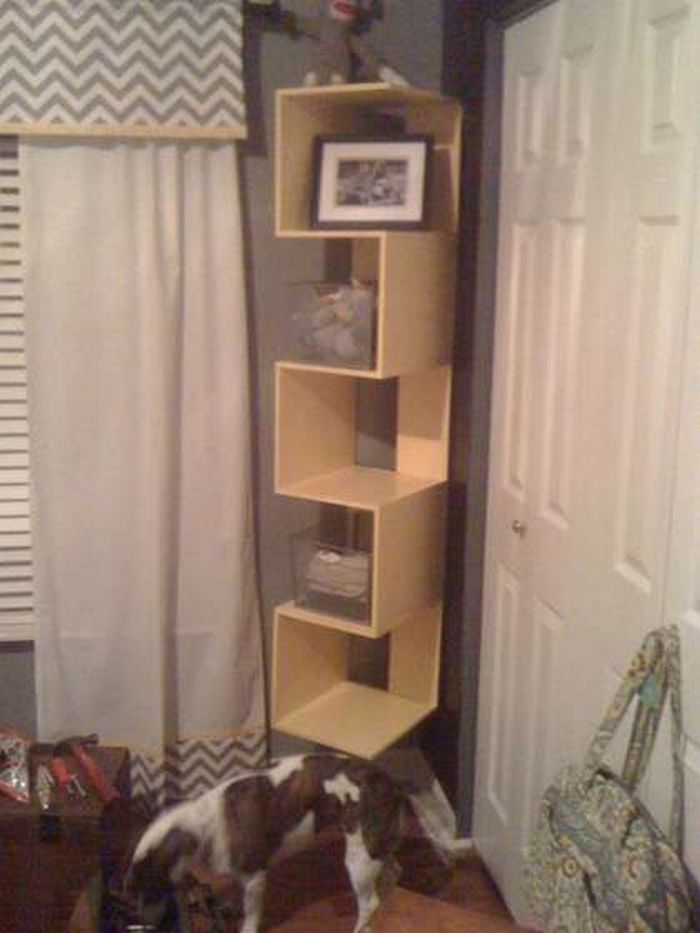
Step 7: Set Up and Style Your Zigzag Bookshelf
- Move the finished bookshelf to its final location — either against a wall or used as a space divider in a larger room.
- If you have kids or pets, consider anchoring the bookshelf to the wall or securing the base for extra safety.
- Style the shelves with a mix of:
- Books (stacked vertically and horizontally)
- Small plants
- Picture frames
- Decorative objects and mementos
Vary the height and color of items to keep each zigzag section visually interesting without overcrowding it.
Click on any image to start the lightbox display. Use your Esc key to close the lightbox.


You can get more step-by-step instructions here…
Benefits of a Zigzag Bookshelf Design
A zigzag bookshelf is more than a simple piece of furniture. It combines modern design with everyday practicality.
Modern, Eye‑Catching Design
The angular, geometric form instantly sets a zigzag bookshelf apart from standard bookcases. Its clean lines and staggered surfaces create a dynamic look that pairs well with:
- Contemporary and minimalist interiors
- Industrial lofts and studios
- Eclectic, art‑filled spaces
It can act as a focal point in a room or quietly complement other modern furniture.
Space‑Saving and Functional
The zigzag shape makes efficient use of both vertical and horizontal space. You get:
- Plenty of room for books, decor, and storage bins
- A compact footprint that works in smaller rooms
- Open, easy‑to‑reach shelves at different heights
This is especially useful in apartments, home offices, and other small spaces where every inch counts.
Flexible Decor Piece
Because of its distinctive form, a zigzag bookshelf adapts easily to many styles. It can:
- Sit neatly in a corner
- Frame a TV stand or seating area
- Stand alone as a sculptural piece
- Act as a low‑profile room divider
Change the finish and what you put on it, and it can read as bold and modern, warm and rustic, or clean and minimal.
Easy Access and Organization
The open shelves make it simple to see and reach everything you store:
- Keep frequently used books and files at arm’s height
- Display collectibles at eye level
- Reserve higher shelves for lighter or less-used items
The layout naturally encourages you to group items and keep things tidy.
Stable, Durable Construction
When built from quality ¾″ plywood and assembled with glue and brads, the zigzag bookshelf:
- Distributes weight evenly across the structure
- Reduces the risk of tipping when used properly
- Stays solid and reliable over time
For households with children or pets, anchoring the shelf and avoiding overloading any single point helps maintain stability and safety.
Using a Zigzag Bookshelf as a Space Divider
A zigzag bookshelf is an excellent way to re‑shape open spaces without building walls.
Transforming Open Rooms
Place the bookshelf between two areas such as:
- Living room and home office
- Sleeping area and lounge area in a studio apartment
- Dining area and lounge zone in an open‑plan space
You get a visual boundary and extra storage at the same time, while light and air still flow through the open design.
Balancing Privacy and Openness
A zigzag shelf provides:
- Enough height and visual structure to create a sense of separation
- Enough openness to keep conversations and sightlines intact
For example, you can separate a desk area from the rest of the living room so work feels more focused, but you don’t feel closed in.
Adding Style While Dividing Space
When used as a divider, the bookshelf becomes part of the room’s architecture. Fill it with:
- Coordinated decor that looks good from both sides
- Plants to soften the angles
- Baskets or bins to hide clutter
It functions as both a partition and a decorative feature, adding style instead of just blocking off space.
Best Materials for a Zigzag Bookshelf
Your choice of material affects the look, cost, sustainability, and durability of the bookshelf.
Solid Wood
Solid wood is strong, adaptable, and visually appealing.
- Hardwoods like oak and maple offer excellent durability and a rich finish.
- Softwoods like pine are more affordable and easy to work with, though they may dent more easily.
When sourced responsibly, solid wood can also be a more sustainable option that fits with eco‑friendly home decor.
Plywood
Plywood is a popular choice for zigzag bookshelves and DIY projects like this one.
- Generally more affordable than solid hardwood
- Provides uniform strength in multiple directions, which is helpful for angled designs
- Easy to paint or stain to match any interior
Quality matters: higher‑grade plywood will resist warping and handle heavy loads better than cheaper, low‑grade sheets.
Metal
Metal zigzag shelves offer a sleek, industrial look and excellent durability.
- Great for modern or loft‑style interiors
- Typically have a slimmer profile, which can make small rooms feel more open
- Often combined with wood or glass for contrast
Metal versions are usually purchased ready‑made rather than fully DIY’d, unless you have metalworking tools and experience.
Composite Materials
Composite materials, such as MDF or particleboard with veneer, can be an affordable and lightweight option.
- Less expensive than solid wood
- Easy to paint for a smooth, modern finish
- Best suited for lighter loads and indoor use only
If you go this route, choose higher‑quality products and avoid exposing them to moisture to keep them looking good longer.
Zigzag Bookshelf Frequently Asked Questions
- How long does it take to build this zigzag bookshelf?
- Most DIYers can build the basic structure in about 60 minutes, not including drying time for paint or stain.
- What size plywood do I need for this project?
- You’ll need at least a quarter sheet of 96″ x 12″ x ¾″ plywood, cut into sixteen 6″‑wide strips.
- Can I build this bookshelf without a nail gun?
- Yes. You can use wood screws and a drill instead. Pre‑drill pilot holes to prevent splitting, and expect the build to take a bit longer.
- How much weight can a zigzag bookshelf hold?
- With ¾″ plywood, good glue joints, and properly placed brads or screws, each shelf layer can hold several hardcover books or decorative items. Avoid concentrating heavy weight in one small area, and anchor the shelf if you’re concerned about tipping.
- Is this project suitable for beginners?
- Yes – this is a good project for a confident beginner with basic tool experience. The cuts are straightforward, and the assembly is repetitive once you’ve built the first layer. Just be sure to follow safety precautions when using the table saw and nail gun.
Conclusion
Building a zigzag bookshelf is a fast, satisfying project that gives you both practical storage and a striking design feature. With just a single plywood board, some glue and fasteners, and about an hour of work, you can create a unique piece that looks great in almost any room.
As you stack each zigzag layer, you’re not only building a bookshelf – you’re creating a custom conversation piece that reflects your style and creativity.
If you enjoyed this project, take a look at our other creative shelf ideas next, including our DIY diagonal bookshelf and floating shelves for even more ways to add storage and personality to your home.