If you’re dreaming of big holiday curb appeal without the big price tag, cheap diy outdoor Christmas decorations are your new secret weapon. With a handful of dollar-store finds, basic tools, and a dash of creativity, you can craft pieces that look custom and last for seasons. This guide walks you through 15 approachable projects, complete with materials, steps, and cost-saving tips.
Contents
Cheap DIY Outdoor Christmas Decorations
Create festive appeal on a budget with cheap diy outdoor Christmas decorations. Use simple steps to transform your yard into a winter wonderland that shines bright all season long outdoors.

Laser-Engraved Wooden Welcome Sign
This laser-engraved wooden welcome sign adds handcrafted charm to your entry. Personalized text or snowflake motifs catch holiday lights and warmly invite guests.
Durable plywood, sealed for weather, keeps it bright all season. As a focal point in cheap DIY outdoor christmas decorations, it delivers custom style and low cost.
Materials and Tools
- 1/4″–1/2″ plywood board (outdoor-grade if possible)
- Fine- and medium-grit sandpaper
- Exterior wood sealer (spar urethane or outdoor polycrylic)
- Outdoor acrylic paint or stain (optional for color wash)
- Painter’s tape and rags
- Hanging hardware (D-rings/sawtooth hanger), screws, and twine/ribbon
- Drill and small drill bits, screwdriver
- Foam brush/paintbrush
- Laser engraver and computer with vector design (SVG) software
- Safety glasses and proper ventilation for laser use
Step-by-Step Process
- Create or download an SVG with your greeting and motifs sized to your board.
- Sand smooth, wipe clean, and apply a light base stain or paint wash if desired; let dry.
- Apply a thin coat of exterior sealer; this helps crisp engraving and paint-fill later. Dry fully.
- On a scrap of similar wood, test laser power/speed for clear engraving without excessive scorching.
- Secure the board flat, run the engraving pass, and inspect for uniform depth and clarity.
- Mask around engraved areas with painter’s tape; dab paint into the recesses; peel tape carefully.
- Apply two thin coats of exterior sealer to all sides and edges for weather protection; dry between coats.
- Install D-rings or a sawtooth hanger; tie twine/ribbon if hanging, or mount to a garden stake.
- Place near the door or path, ensuring it’s sheltered from direct ground contact and firmly secured against wind.
- Wipe clean as needed; add a fresh sealer coat annually for longevity.
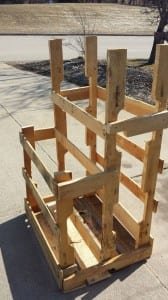
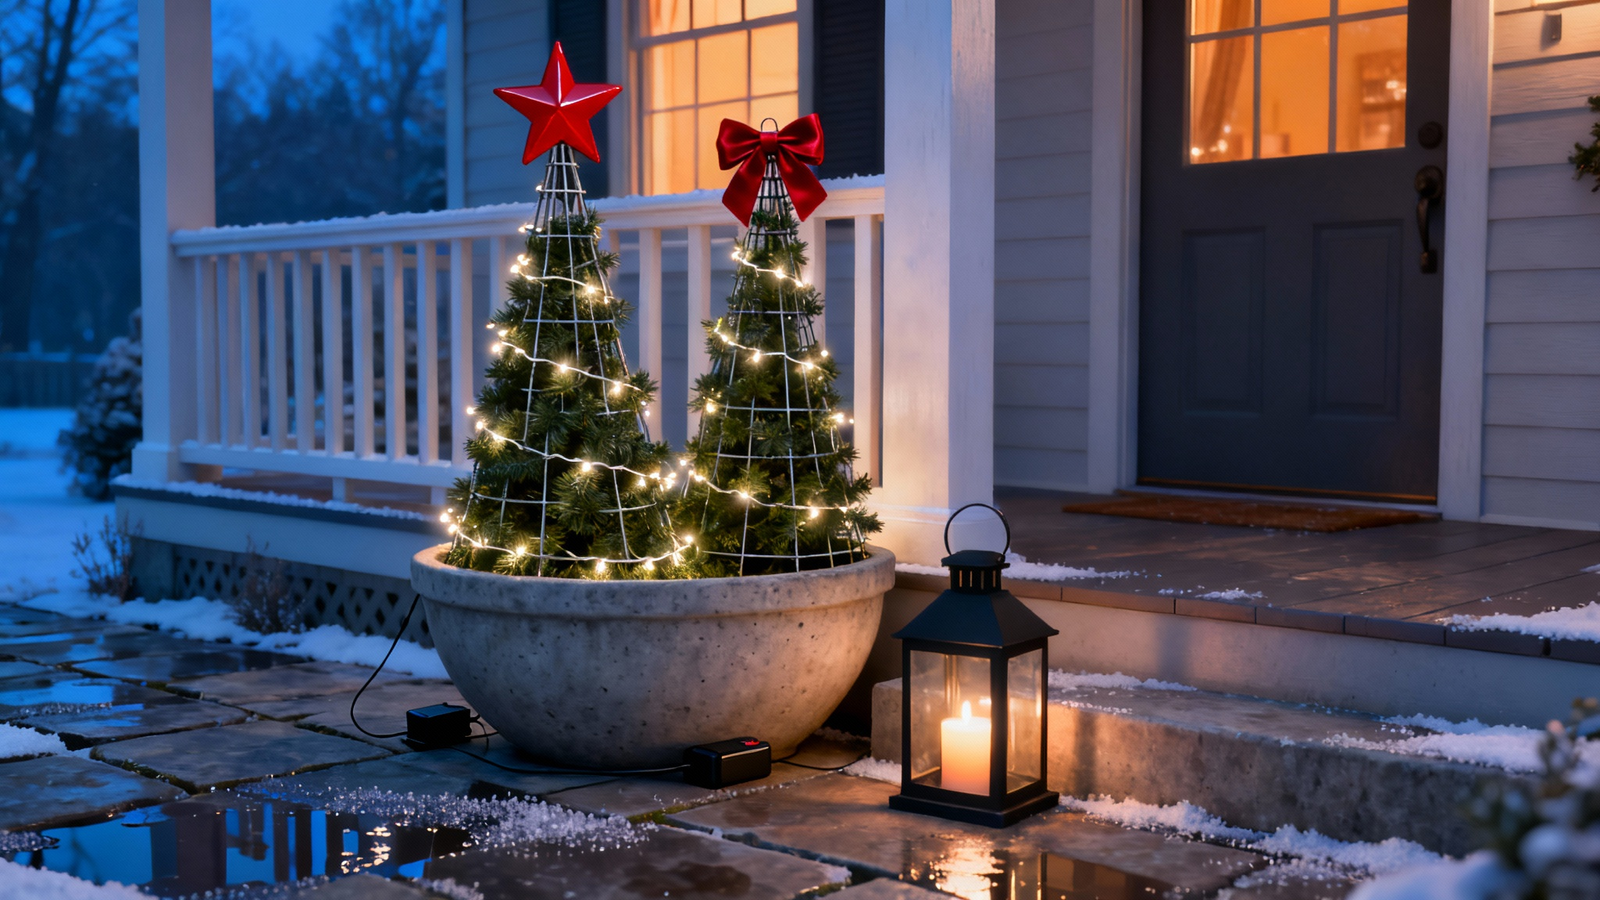
Tomato Cage Evergreen Trees
Tomato cage evergreen trees turn garden frames into festive cone shapes wrapped with garland and lights. Lightweight, they accent porches, pathways, and yards.
Built in minutes with zip ties and string lights, trees thrive outdoors all season. As cheap DIY outdoor Christmas decorations, they deliver curb appeal, storage, and style.
Materials and Tools
- Tomato cages (one per tree)
- Green garland or deco mesh (9–18 ft per tree, depending on size)
- Outdoor LED string lights
- Zip ties or floral wire
- Optional star or bow toppers
- Ground stakes or landscape pins
- Extension cords and outdoor-rated timer
- Weather-resistant clear acrylic sealer (optional)
- Scissors or wire cutters
- Work gloves
Step-by-Step Process
- Invert the tomato cage so the prongs meet at the top; zip tie them together to form a cone.
- If using a topper, attach a short zip tie loop at the tip to anchor it later.
- Starting at the base, wrap garland or mesh tightly around the cone, overlapping slightly; secure every 6–8 inches with zip ties.
- Fluff and adjust the wrap to hide the cage and create an even, tree-like profile.
- Test the lights, then spiral them from bottom to top with even spacing; secure the cord on the back with zip ties.
- Add a star or bow at the tip; tuck any extra cable neatly down the back.
- Place the tree outdoors and stake the base with landscape pins or tie discreet fishing line to nearby anchors for wind resistance.
- Connect to an outdoor-rated extension cord and timer; keep all connections elevated off the ground.
- Optional: Lightly spray with clear acrylic sealer to help shed moisture (avoid spraying bulbs).
- At season’s end, snip zip ties to flatten the wrap and store compactly in a labeled bin.
PVC Candy Cane Stakes
PVC candy cane stakes turn simple plumbing pipe into walkway markers with classic red-and-white stripes. Lightweight, durable, and weather-friendly, they line paths, beds, and porches.
Heat, bend, and tape 1/2-inch PVC to form cane hooks, then stake and light them. As cheap DIY outdoor Christmas decorations, they deliver curb appeal.
Materials and Tools
- 1/2″ PVC pipe (2–3 ft per stake)
- Red electrical or vinyl tape
- Heat gun or pot/kettle with hot water
- PVC cutter or hacksaw
- Measuring tape and marker
- Ground stakes or heavy-gauge landscape pins
- Optional: mini LED string lights, zip ties, clear acrylic sealer, PVC end caps
- Safety glasses and work gloves
Step-by-Step Process
- Measure and cut PVC to your desired height (typically 36–42 inches).
- Soften the top 6–8 inches with a heat gun on low, or dip in near-boiling water for 30–60 seconds.
- Bend the softened section over a round form (paint can) to create the cane hook; hold until cool or quench.
- Spiral-wrap red tape evenly from bottom to top for classic stripes.
- Add an end cap or drill a small hole near the base to secure to a ground stake.
- If lighting, wrap mini LEDs and secure with clear tape or zip ties; test the strand.
- Install along walkways at consistent spacing; drive stakes 6–8 inches into soil for stability.
- Connect any lights to an outdoor-rated timer; keep electrical connections elevated and protected.
- Optional: Lightly spray a clear acrylic sealer to help preserve the striping.
- Store flat or upright in a cool place to prevent warping between seasons.
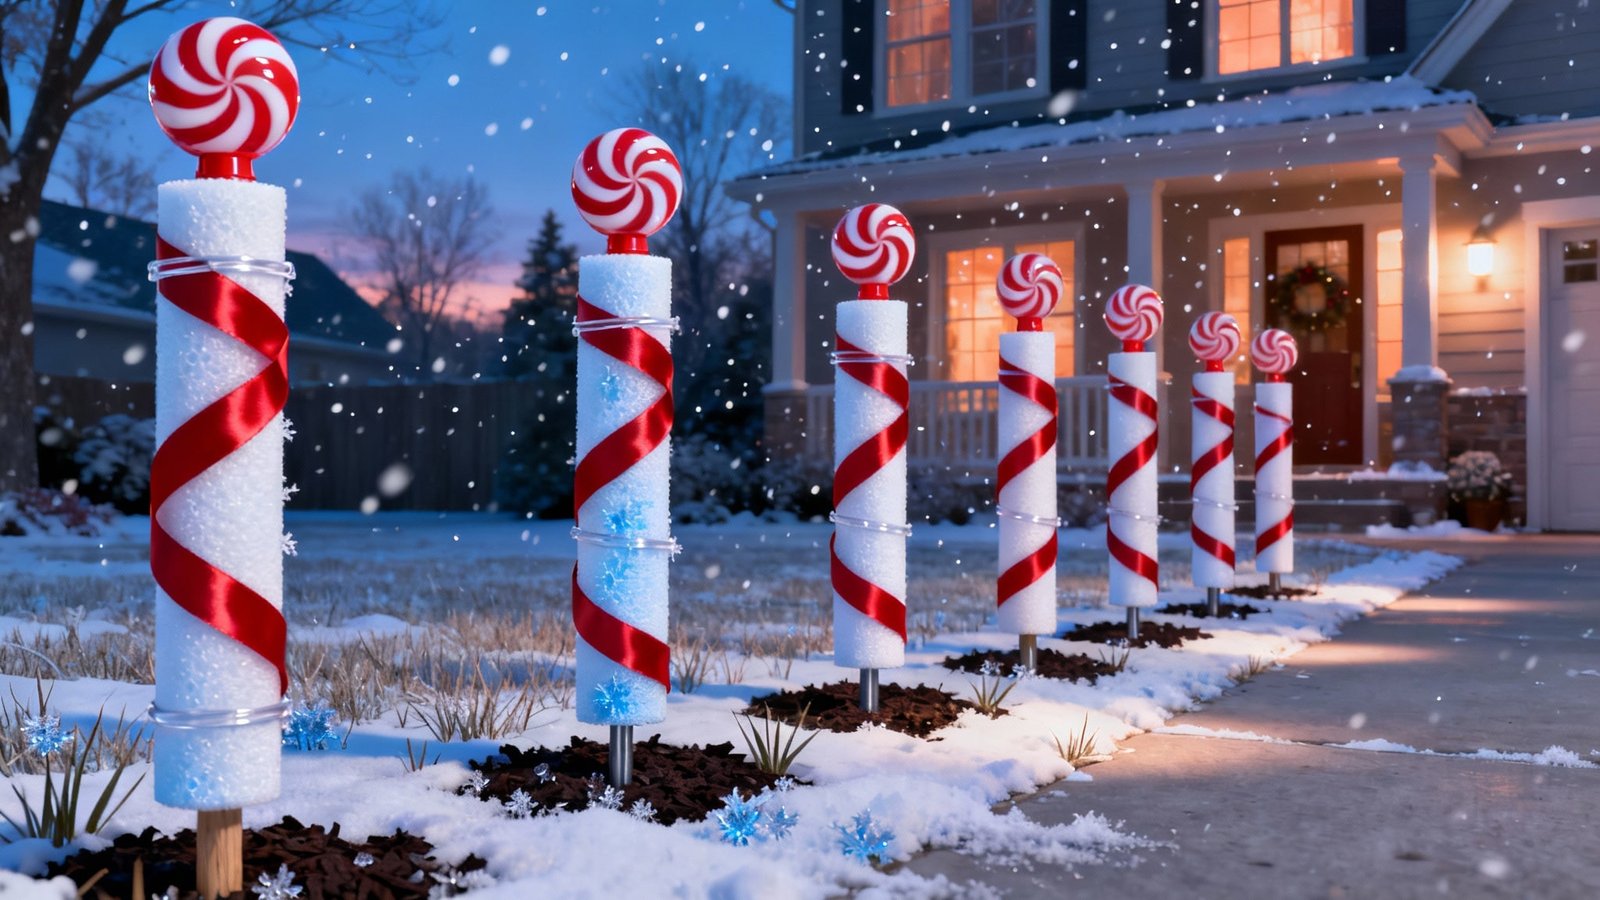
Pool Noodle Peppermint Poles
Pool noodle peppermint poles mimic oversized candy sticks that brighten walkways, porches, and planters. Lightweight, safe, and splashproof, they assemble fast with tape, stakes, and a little clear sealer.
As cheap DIY outdoor christmas decorations, budget-friendly poles customize in height and color and light with mini LEDs for curb appeal.
Materials and Tools
- White pool noodles
- Red duct tape or vinyl tape
- Wooden dowels, garden stakes, or rebar
- Clear acrylic sealer (spray)
- Craft knife or scissors
- Measuring tape and marker
- Optional: solar path light tops or mini LED string lights
- Optional: clear packing tape, ribbon bows, zip ties
Step-by-Step Process
- Measure and mark desired pole height; trim noodles cleanly with a craft knife.
- Insert a wooden dowel or stake into the noodle’s center to add rigidity, leaving 6–8 inches exposed at the bottom for ground anchoring.
- Spiral-wrap red tape from bottom to top to create even peppermint striping.
- Press tape edges firmly; add a small band of clear tape at ends to prevent lifting.
- For lighting, either cap with solar path light tops or wrap mini LEDs, securing the wire on the “back” side with clear tape or zip ties.
- Lightly spray a clear acrylic sealer over the taped surface to improve moisture resistance; avoid spraying bulbs or solar cells.
- Push stakes 6–8 inches into soil along walkways or beds, then slide noodles over the stakes for a snug fit.
- Space poles evenly (about 2–3 feet apart) for a balanced line and tidy cable runs.
- If using plug-in lights, route cords to outdoor-rated timers; keep connections elevated and shielded from water.
- Add ribbon bows near the tops for a finished look; store upright and cool after the season to prevent deformation.
Tin-Can Punched Luminaries
Tin-can punched luminaries turn recycled cans into twinkling path lights with star and snowflake patterns. Frosty pinholes cast charming shadows along steps, porches, and garden beds.
Quick to make, low-cost, and weather-hardy, they’re perfect for cheap DIY outdoor Christmas decorations. Use LED candles for safety; cluster several for a vintage glow.
Materials and Tools
- Clean, empty tin cans (labels removed)
- Water and freezer (to ice-fill cans)
- Hammer
- Nails (various sizes) or center punch/awl
- Pattern template, tape, and marker
- LED tea lights or mini LED string lights (outdoor-rated)
- Towel, work gloves, safety glasses
- Optional: spray paint, clear acrylic sealer, wire/twine, small drill bit, sandpaper/file
Step-by-Step Process
- Remove labels/adhesive, rinse cans, fill with water, and freeze solid.
- Tape on a printed template or dot a simple snowflake/star pattern with a marker.
- Rest the frozen can on a folded towel or in a loaf pan to prevent rolling.
- Lightly tap nails or an awl along the pattern; vary hole sizes for sparkle.
- Optional: Add two opposite holes near the rim for a wire handle.
- Let ice thaw out; drain and dry. Deburr holes with a small file or sandpaper.
- Spray exterior for color; let dry fully.
- Mist with clear acrylic sealer for moisture resistance.
- Place an LED tea light inside or thread a short LED strand through the holes.
- Group along walkways or steps; keep off direct soil, and secure against wind with stones or discreet wire.
Conclusion
These cheap DIY outdoor Christmas decorations use simple materials, deliver big curb appeal, and are easy to customize to your style. Mix warm lantern glow with candy-stripe pops and evergreen texture for a festive, layered look that welcomes guests. Gather your supplies, follow the steps, and enjoy a magical holiday display you made yourself during the holidays.