Last Updated on October 31, 2025 by teamobn
Make thoughtful, handmade wood gifts for just a few dollars using scrap or inexpensive lumber. These DIY projects are simple, beginner‑friendly, and highly customizable — perfect for holidays, birthdays, Mother’s/Father’s Day, teachers, or housewarming gifts.
Contents
- 0.1 Key takeaways
- 0.2 What you’ll learn
- 0.3 Recommended Tools and Materials
- 0.4 Personalization Tools (Optional)
- 1 5 Affordable DIY Woodworking Gift Ideas (Beginner Projects)
- 1.1 Rustic Wooden Coaster Set (Under $5, ~45 min, Beginner)
- 1.2 Personalized Picture Frame (Under $10, ~60 min, Beginner)
- 1.3 Mini Herb Planter Box (Under $8, ~45 min, Beginner)
- 1.4 Floating Wall Shelf (Under $10, ~30–45 min, Beginner)
- 1.5 Wooden Phone Stand (Under $5, ~15–20 min, Beginner)
- 1.6 Bill of Materials & Cost Summary
- 2 Safety Tips for Affordable DIY Gifts Woodworking
- 3 Conclusion
Key takeaways
- Budget: $2–$12 per gift
- Time: 15–60 minutes per project
- Skill: Beginner; basic hand tools
- Personalization: wood-burning, stencils/paint, laser engraving, custom stains
What you’ll learn
- 5 detailed gift builds with materials, tools, steps, tips, and common mistakes
- A consolidated bill of materials with cost ranges
- A simple wood species and finishes cheat sheet
- Practical safety essentials for small-shop projects
- FAQs and printable checklist for quick shopping and building
Recommended Tools and Materials
Some links below are affiliate links. If you buy through them, we may earn a small commission at no extra cost to you. We only recommend tools and materials we personally use or have tested on these projects.
Use these affordable essentials:
- Entry-level drill/driver kit – reliable torque and long battery life
- Random orbital sander – faster, swirl‑free sanding for small projects
- Trim router – easy chamfers and edge profiles for a pro finish
- Wood‑burning pen (pyrography) – simple personalization without a laser
- Basic finishes – food‑safe mineral oil, beeswax blend, water‑based polyurethane
Personalization Tools (Optional)
Personalization makes budget gifts feel premium. A desktop laser (for example, a Glowforge) can quickly engrave names, dates, and simple inlays, which is especially helpful for batches or craft‑fair inventory.
Prefer to keep costs low? You can achieve clean results with a wood‑burning pen, stencil + acrylic paint, or letter stamps — no specialized equipment required.
5 Affordable DIY Woodworking Gift Ideas (Beginner Projects)
Each of these projects uses leftover wood, requires minimal tools, and suits first‑time makers.

Rustic Wooden Coaster Set (Under $5, ~45 min, Beginner)
Turn 1×6 pine scraps into a polished set of 4–6 rustic wooden coasters. Sand them smooth, finish with stain or oil, and glue felt pads underneath to protect surfaces.
What are the tools and materials needed to make these rustic wooden coasters?
- 1×6 pine offcuts,
- felt pads
- stain or oil
- hand or miter saw
- sanding block/RO sander
- brush/rag
How do you create these rustic wooden coasters?
- Cut 4–6 wood squares.
- Round the corners and sand (120 → 220 grit).
- Apply your finish and stick felt pads underneath.
- Personalize – Add your touch with wood-burning, stenciled initials, or painted designs.
Tip: Use a stop‑block on your saw for uniform sizes. Common mistake: Skipping felt pads can scratch tables.
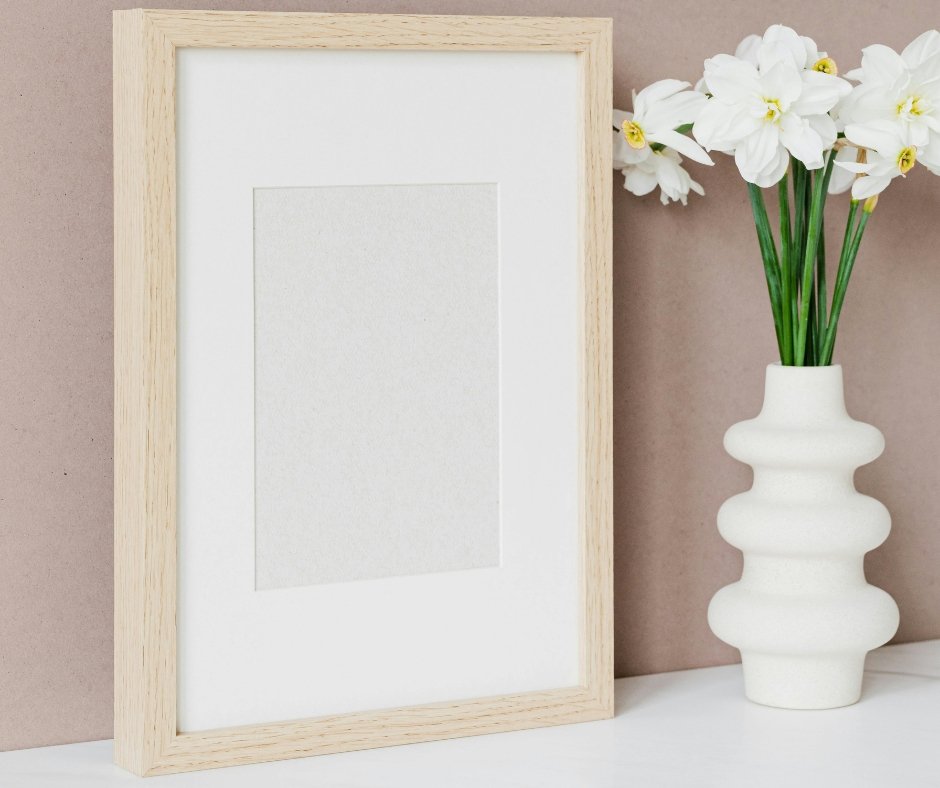
Personalized Picture Frame (Under $10, ~60 min, Beginner)
Create a 5×7 or 4×6 frame from ½″ poplar strips joined at clean 45° miters. With just a few hand tools, you can craft an elegant frame that enhances any photo.
What are the tools and materials needed to make this personalized picture frame?
- ½″ Poplar strips
- Glass/acrylic,
- Cardboard backing
- Hanging hardware
- Wood glue
- Miter box/saw
- Square
- Clamps
- Small rabbet plane or trim router (optional)
How to make a Personalized Picture Frame?
- Cut the frame pieces with 45° angles.
- Dry-fit, then glue the corners together.
- Cut a rabbet (groove) or attach thin stops to hold the picture.
- Sand and finish the frame.
- Add hanging hardware on the back.
Personalize it:
- Carve initials, paint designs, or engrave a date.
Pro Tip: Use blue painter’s tape to hold corners together during glue-up.
Avoid this: Misaligned corners — always check with a square before the glue dries.
Mini Herb Planter Box (Under $8, ~45 min, Beginner)
Build a small cedar or pallet‑wood planter that fits 2–3 herb pots for a kitchen windowsill. It’s rustic, water‑resistant, and stylish.
What are the materials needed to make this Mini Herb Planter Box?
- Cedar or pallet boards
- Exterior screws
- Waterproof wood glue
- Outdoor finish
- Saw
- Drill/driver
- ⅛″ bit
- Sander
Measurements:
- Length: 16–18 inches (fits 2–3 small pots, 4–5″ wide each)
- Width: 6 inches
- Height: 5 inches
- Wood thickness: ¾ inch (common for cedar or pine boards)
How to Make a DIY Herb Planter Box
- Cut wood pieces:
- 2 long sides – 18″ × 5″
- 2 short ends – 6″ × 5″
- 1 base – 18″ × 6″
- Drill 3–4 drainage holes evenly spaced in the base.
- Assemble using wood glue and finish nails or screws.
- Sand and finish with outdoor sealer or food-safe oil.
Personalize it:
- Stencil herb names (like Basil, Mint, Thyme) or add rope handles on each end.
Pro Tip: Cedar resists moisture and gives off a fresh scent — great for kitchen use.
Avoid this: Forgetting drainage holes — your herbs’ roots will rot.

Floating Wall Shelf (Under $10, ~30–45 min, Beginner)
A minimalist 1×4 floating shelf turns scrap wood into clean wall décor. Ideal for plants, candles, or photo displays.
What are the materials and tools needed to make a Floating Wall Shelf?
- 1×4 board (cut to your desired length, e.g. 24–36 inches)
- Hidden shelf bracket or keyhole hangers
- Screws and wall anchors
- Saw
- Drill
- Level
- Sander
How to make a floating shelf?
- Cut the board to length.
- Sand all sides until smooth.
- Install the hidden bracket or keyhole hangers on the back.
- Mount the shelf to wall studs or use anchors for support.
- Finish with stain or paint.
Personalize it:
- Add a routed edge or two-tone stain for style.
Pro Tip: Pre-finish the board before hanging to prevent drips on your wall paint.
Avoid this: Missing the studs — always use a stud finder for secure mounting.
Wooden Phone Stand (Under $5, ~15–20 min, Beginner)
Perfect for desks or nightstands, this simple stand cradles your phone securely at a reading angle.
What are the tools and materials needed to make a wooden phone stand?
- Small piece of hardwood or plywood (about 3×6 inches)
- Saw
- File or chisel
- Sander
How to make a wooden phone stand?
- Cut the base to roughly 3×6 inches.
- Cut a slot at a 10–15° angle, about ⅜ inch wide and ½ inch deep for the phone to rest.
- Test fit your phone — adjust if needed.
- Chamfer or round the edges for comfort.
- Sand and finish with oil or clear coat.
Personalize it:
- Add engraved initials or line the slot with felt for a soft touch.
Pro Tip: Test the viewing angle with and without a phone case before final sanding.
Avoid this: Cutting the slot too tight — remove a little at a time for the perfect fit.
Bill of Materials & Cost Summary
| Category | Items | Notes |
|---|---|---|
| Woods | pine, poplar, birch plywood, cedar | Free offcuts often work great |
| Finishes | mineral oil, beeswax, spar urethane | Outdoor or food‑safe options |
| Hardware | screws, felt pads, brads, backing clips | Buy small multipacks |
| Abrasives | 120/180/220‑grit papers | Pre‑cut sheets save time |
| Estimated Total | $35–$60 (for all 5 builds) | assuming scrap sources |
Craft‑fair pricing tip: As a starting point, aim for ~3× material cost or $8–$15 for small gifts (coasters, phone stands), adding $3–$5 for personalized engraving or wood‑burned designs.
Safety Tips for Affordable DIY Gifts Woodworking
Safety is key when you work on affordable diy gifts woodworking. You can avoid injuries and protect your tools with simple precautions. These guidelines cover your work area, protective gear, and tool operation. Keep safety front and centre as you craft unique wood gifts.
Organize Your Work Area
Start each project by preparing a clean workspace. A clear area reduces the risk of trips or falls. Keep your floor free of offcuts and loose cables. Store tools where they cannot roll or fall.
Arrange a stable workbench or table at the right height. Good posture reduces strain on your back and shoulders. Anchor boards with clamps instead of holding them by hand.
This simple step makes affordable diy gifts woodworking safer.
Wear the Right Protective Gear
Always wear eye protection to guard against flying wood chips. Safety glasses or goggles should fit snugly and block side splashes. Hearing protection helps when you use loud power tools. Disposable earplugs or earmuffs both work well.
A dust mask prevents you from inhaling sawdust. Choose one rated for fine particles and wood dust. Work gloves can protect your hands from splinters. Just make sure gloves do not catch in rotating blades.
Operate Tools with Care
Read the manual before you use any power tool. Learning safe operation helps you avoid mistakes. Check blades and bits for wear or damage before each use. Replace dull parts to maintain safe cutting performance.
Keep your hands away from moving parts at all times. Always use push sticks or holders for narrow cuts. Never override safety features on tools to speed up work. Following these steps ensures that affordable diy gifts woodworking projects remains a safe hobby.

Handle Materials Safely
Lift larger wood pieces with proper technique or ask for help. Use your legs, not your back, when you lift heavy boards. Trim nails or staples from reclaimed wood before cutting. This prevents jamming or kickback on saws.
Store lumber flat or in racks to prevent warping and falling.
Stack thinner boards vertically with support behind them. Label rough and smooth sides to avoid confusion. A good organisation reduces waste and keeps you safe.
Manage Dust and Fire Risks
Sawdust can build up and create a slippery or flammable hazard. Clean sawdust away regularly with a brush or vacuum. Avoid using compressed air to clear dust around electronics. This disperses fine particles into the air.
Keep rags soaked in finish or oil in a sealed metal container.
Oily rags can self-ignite if left in a pile. Store any flammable liquids in approved containers away from heat. This ensures a safe shop and reduces fire risk.

First Aid and Emergency Preparedness
Keep a first aid kit within arm’s reach in your workshop. Include bandages, antiseptic wipes, and burn ointment. Know how to treat splinters, cuts, and minor burns. Review basic first aid steps so you can act quickly.
Post emergency contact numbers on a wall near the exit. Have a fire extinguisher rated for wood and electrical fires. Inspect its pressure gauge monthly to ensure readiness. This small effort can be life-saving during an accident.
Conclusion
These five affordable DIY woodworking gift ideas show how a few simple tools and leftover wood can become thoughtful presents. Each idea takes minimal time, materials, and skill yet delivers high‑impact results.
You can craft coasters, frames, planters, shelves, and phone stands with a budget under $12 per gift.
Frequently Asked Questions
- What are the most affordable DIY woodworking gift ideas?
- Coasters, bookmarks, phone stands, bottle opener mounts, and small planters — most can be made for $2–$8 using scrap pine, poplar, or birch ply.
- Can beginners make these gifts with only hand tools?
- Yes. A handsaw or miter box, hand drill, sanding block, clamps, and a square are enough. Power tools simply speed things up.
- What wood is best for budget-friendly gifts?
- Pine and poplar for low cost, birch plywood for stability, cedar for planters, and maple/walnut offcuts for premium accents like cutting boards
- How can I personalize gifts without a laser?
- Use a wood‑burning pen, stencils + acrylic paint, or letter stamps. These options are affordable, fast, and look great.
- What finishes are food-safe for cutting boards?
- Pure mineral oil or a beeswax/mineral oil blend. Reapply when the board looks dry — usually monthly with regular use.
- What are common mistakes to avoid on small wood gifts?
- Skipping felt pads on coasters, drilling too deep for candle holders, sloppy miter alignment on frames, and forgetting drainage holes in planters.
- How do I choose a budget finish for indoor vs. outdoor gifts?
- Indoors: water‑based polyurethane or shellac. Outdoors: spar urethane. Always follow label cure times before gifting.
- Is pallet wood safe for DIY gifts?
- Use heat‑treated (HT) pallets only and avoid methyl bromide (MB). Remove nails/staples, clean, and sand thoroughly.
- How much does it cost to make several different gifts?
- Assuming you have basic tools and use scrap, expect $35–$60 total for all five projects due to shared finishes and hardware.
- What’s the typical time per gift for beginners?
- 15–60 minutes each: phone stands ~20 min, coasters ~45 min, frames and cutting boards ~60 min, planters and shelves ~40–45 min.