Last Updated on August 11, 2025 by teamobn
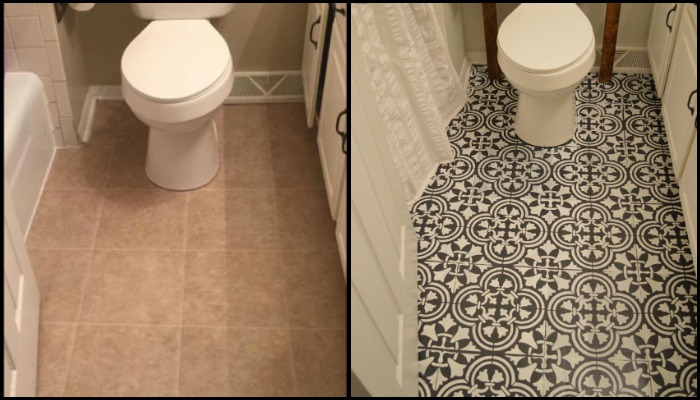
Want to give your bathroom a revamp? Makeover, renovation, revamp – they all usually require big budgets especially when you want a totally different new look. You can do that by repainting your bathroom walls or even just changing your floor tiles to give them a totally new look! If you’re on a tight budget or don’t want to put in a lot of work, here’s a great idea that uses floor tiles to make a significant impact.
Chalk paint is a much cheaper and easier option than completely redoing your floors, and it can give your space a whole new look. You can either use one tile colour to create a border around the room’s perimeter or get creative and use different colours and patterns to create a design. Chalk paint is also a great way to add some personality to your space without spending much money or time.
Chalk paint is a versatile type of paint that can be used to create a matte, chalky finish on a variety of surfaces. It is a popular choice for furniture and walls, as it can be easily distressed to create a shabby chic look. When using chalk paint, be sure to prep the surface properly and use a high-quality paintbrush for the best results.
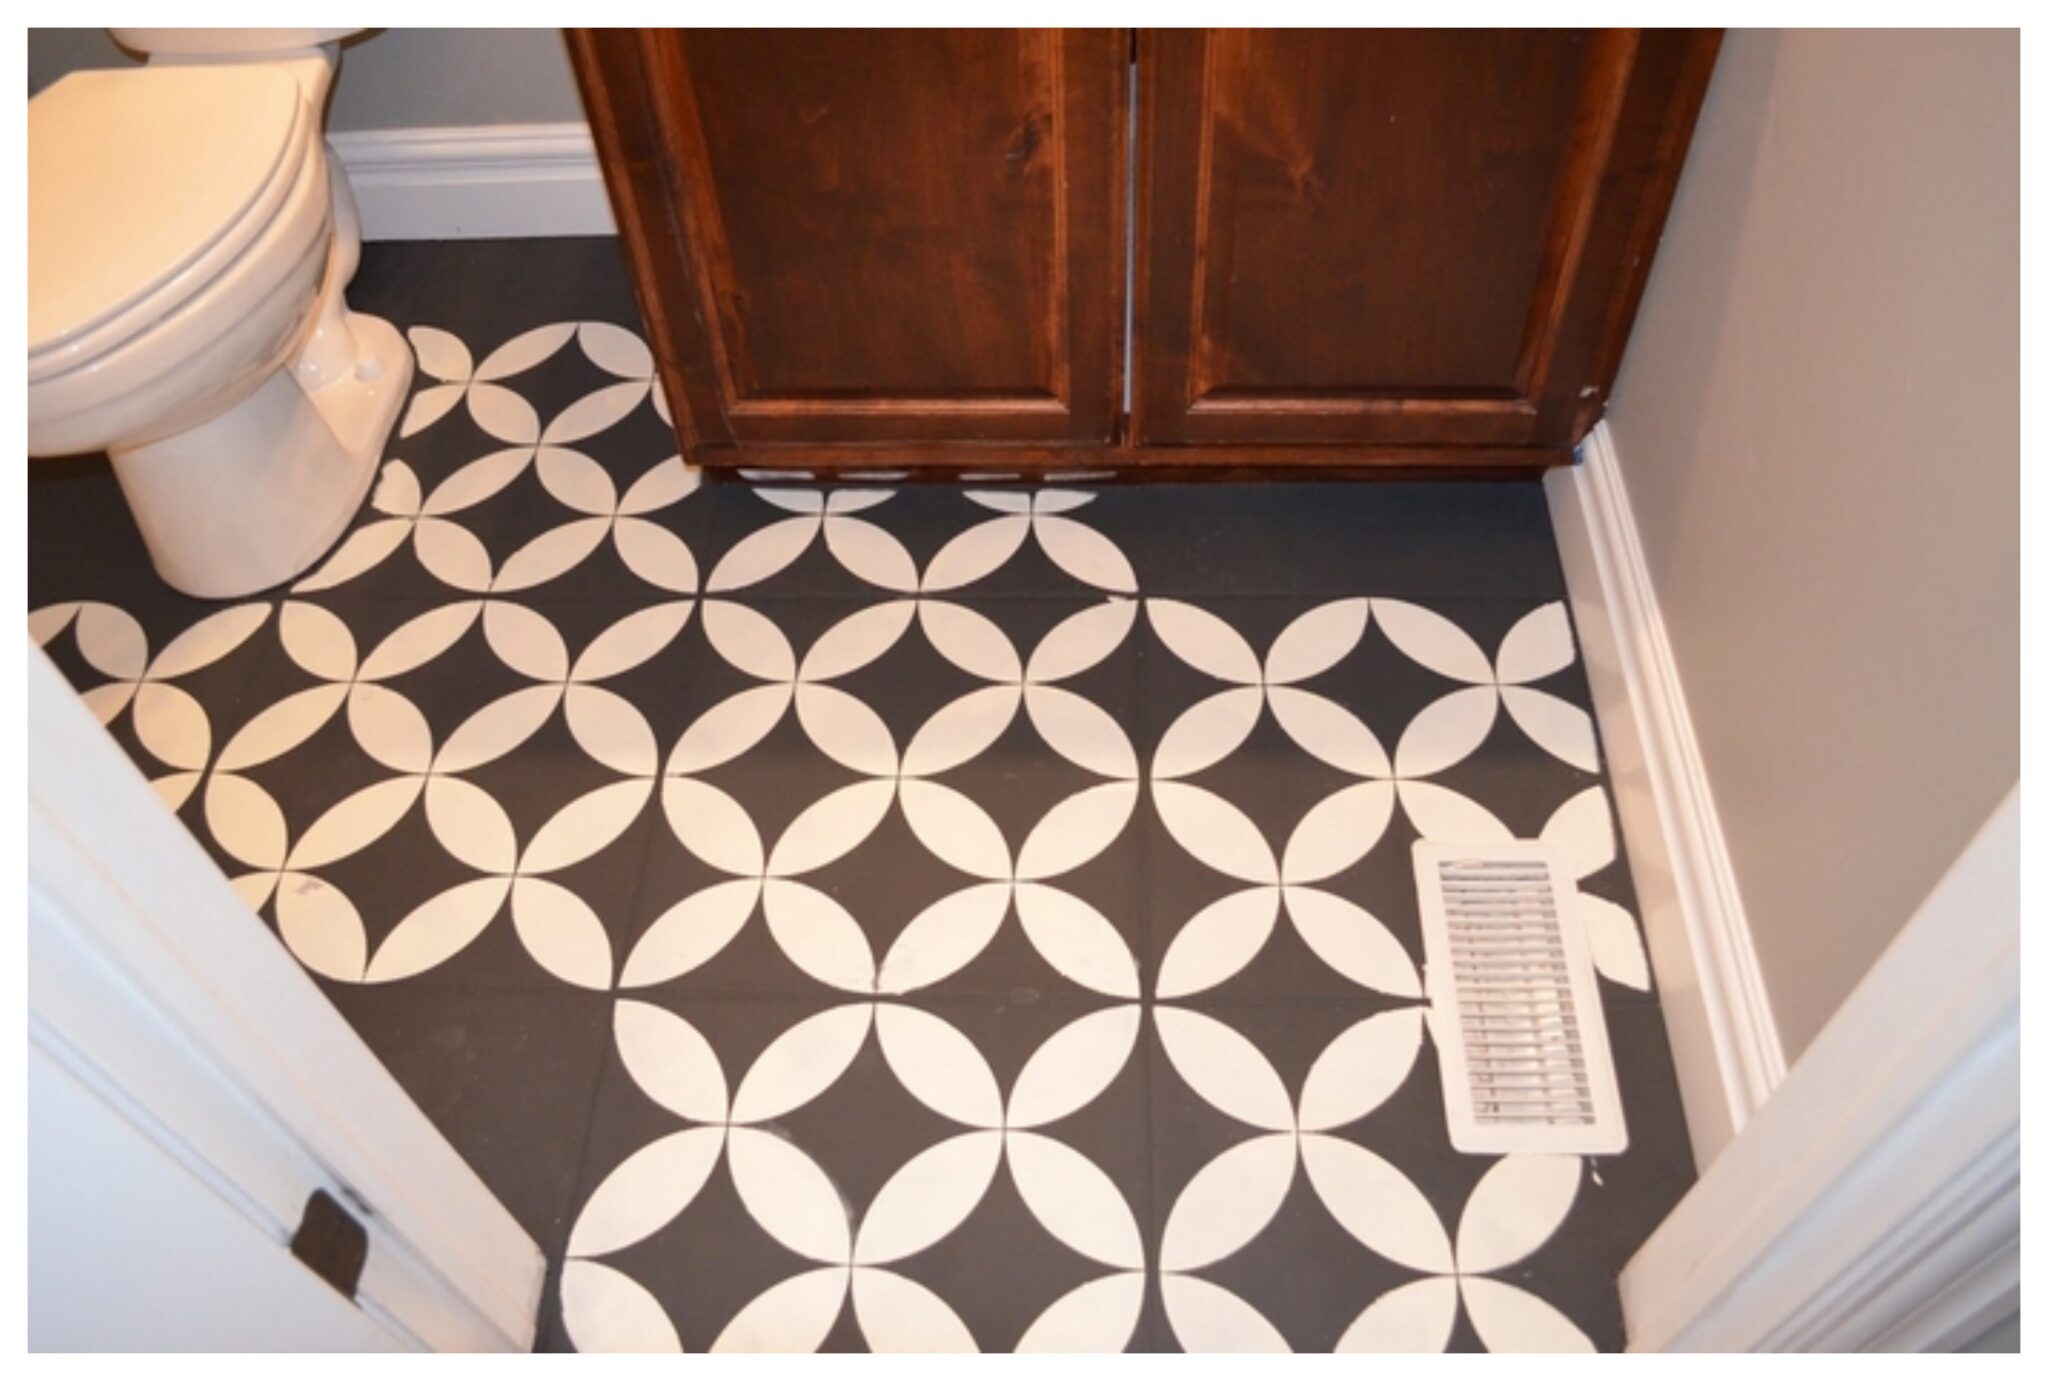
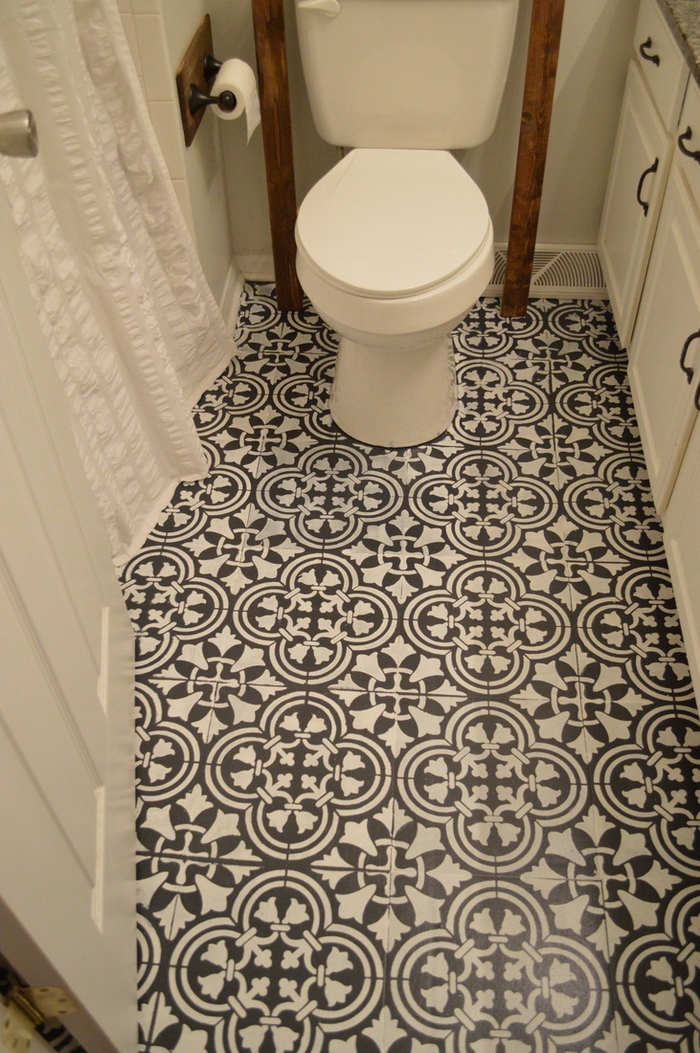
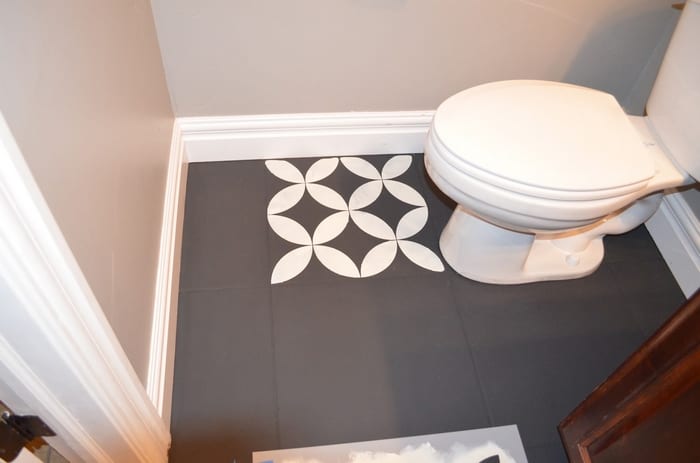
If you’re looking for a fun and unique way to update your home, why not try chalk paint on your tiles? You can design it with any stencil pattern you desire, and it’s a great way to add a pop of colour or personality to your space. Plus, it’s an easy and inexpensive project that you can do yourself.
Your local store is a great place to start if you’re looking for a beautiful stencil to use on your tile project. However, if you can’t find a stencil that’s the perfect size for your tiles, there are companies that accept custom stencil orders online. Custom stencils are a great way to get the exact design you want, and they’re also perfect for ensuring that your design is the right size for your tiles.
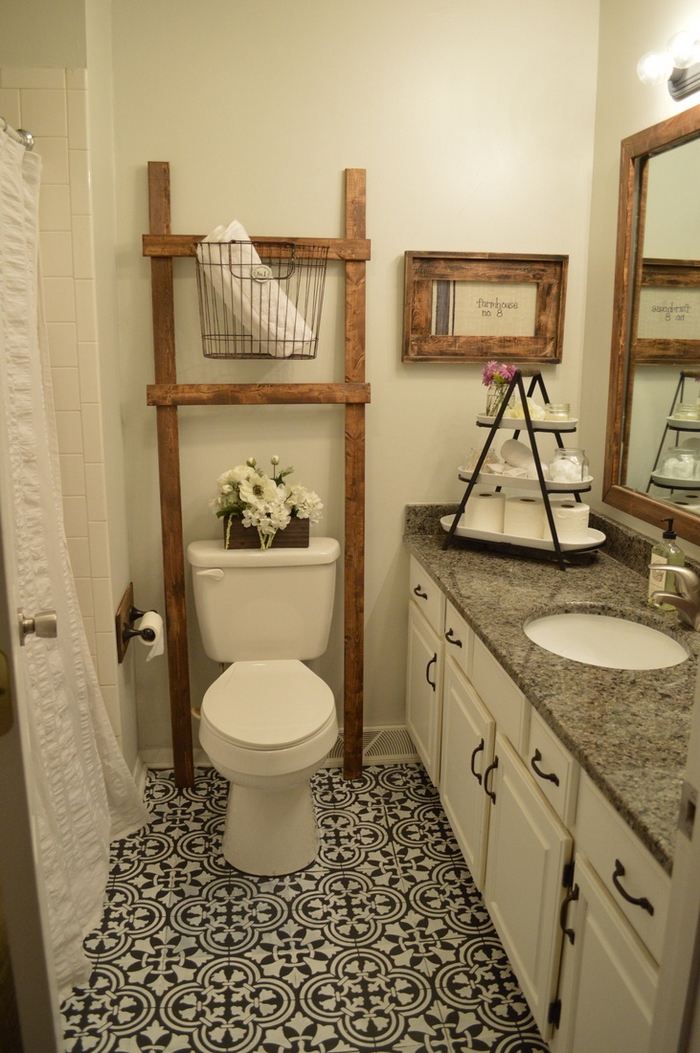
Yes – this DIY project really works. It will stick and it won’t chip as long as you apply it properly 😉
And the first and probably the most important thing you need to do is to clean the entire surface thoroughly. Because if you paint with some dirt still left on your floor, you’ll end up with spots and lines where the paint did not stick. And this will be very obvious if you are using dark-coloured paint! So vacuum it, mop it and just make sure there are no debris, dust or hair strands on your floor.
We also prepared an album of this project so you can easily view it for your inspiration. It includes some images from Susanna’s project (Livin’ the Life of Riley) which was inspired by the original blog post as well!
Contents
Applying Chalk Paint Floor Tiles
You’ll need these materials:
- Old White & Graphite Chalk Paint (you can use any two colours that you desire)
- Matte Finish Polyurethane (sealant)
- Painters Tape
And these tools:
- Foam Roller
- Synthetic Paintbrush
- Custom Stencil
- Thin Craft Paintbrush
Steps:
- Prep the space. Remove rugs, floor vents, and anything that touches the tile. Vacuum and mop until the surface is squeaky clean. Let it dry completely.
- Mask carefully. Use painters tape along baseboards, the toilet base, tub edges, and thresholds. Press the tape down firmly so paint can’t creep under.
- Stir your paint. Open Old White and Graphite and mix each well. Don’t shake the cans. You don’t want bubbles.
- Cut in edges. Use a synthetic paintbrush to paint the perimeter in Old White. Brush a thin band where the roller can’t reach.
- Roll the first base coat. Load a foam roller with Old White. Off-load excess on the tray. Roll a thin, even coat across the tiles. Cross-roll to level the finish. Avoid puddles in the grout.
- Dry fully. Follow the can’s recoat time. Touch a hidden spot. If it’s no longer tacky, you’re ready for the next coat.
- Roll the second base coat. Apply another thin coat of Old White for solid coverage. Let it dry per label.
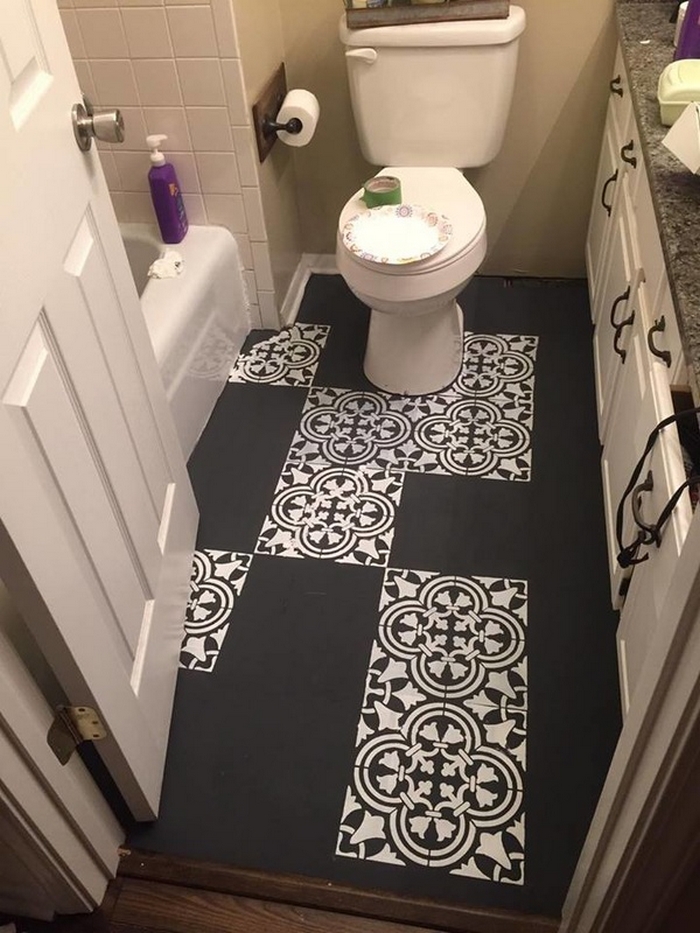
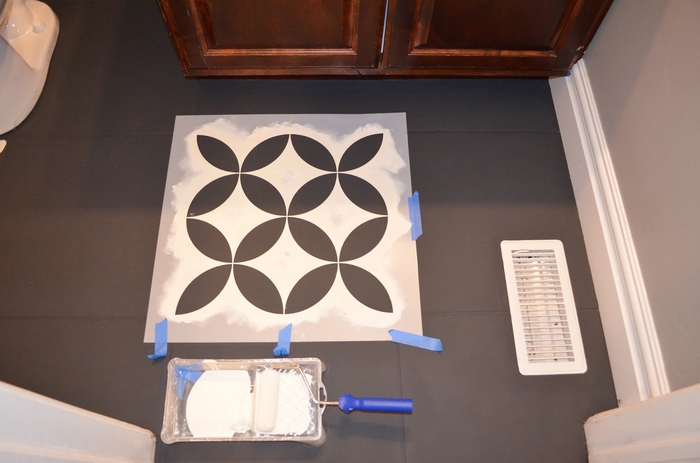
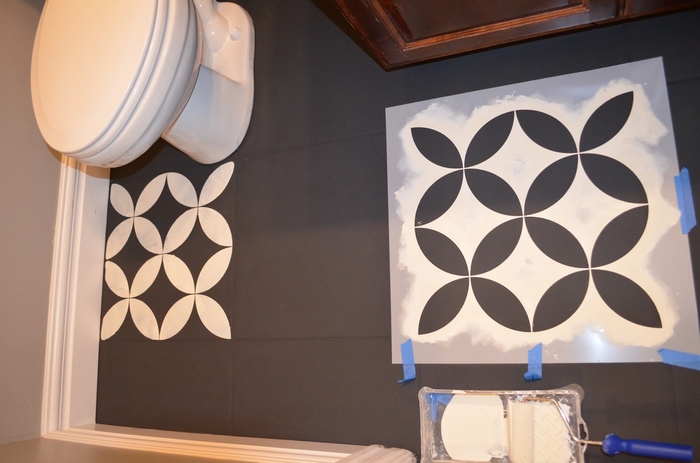
- Plan the stencil layout. Dry-fit your custom stencil on one tile. Align to the grout so repeats line up. Pick a starting corner that lets you back out of the room.
- Load for stenciling. Pour a little Graphite onto the tray. Lightly load the foam roller. Off-load until the roller looks almost dry. Less paint means cleaner edges.
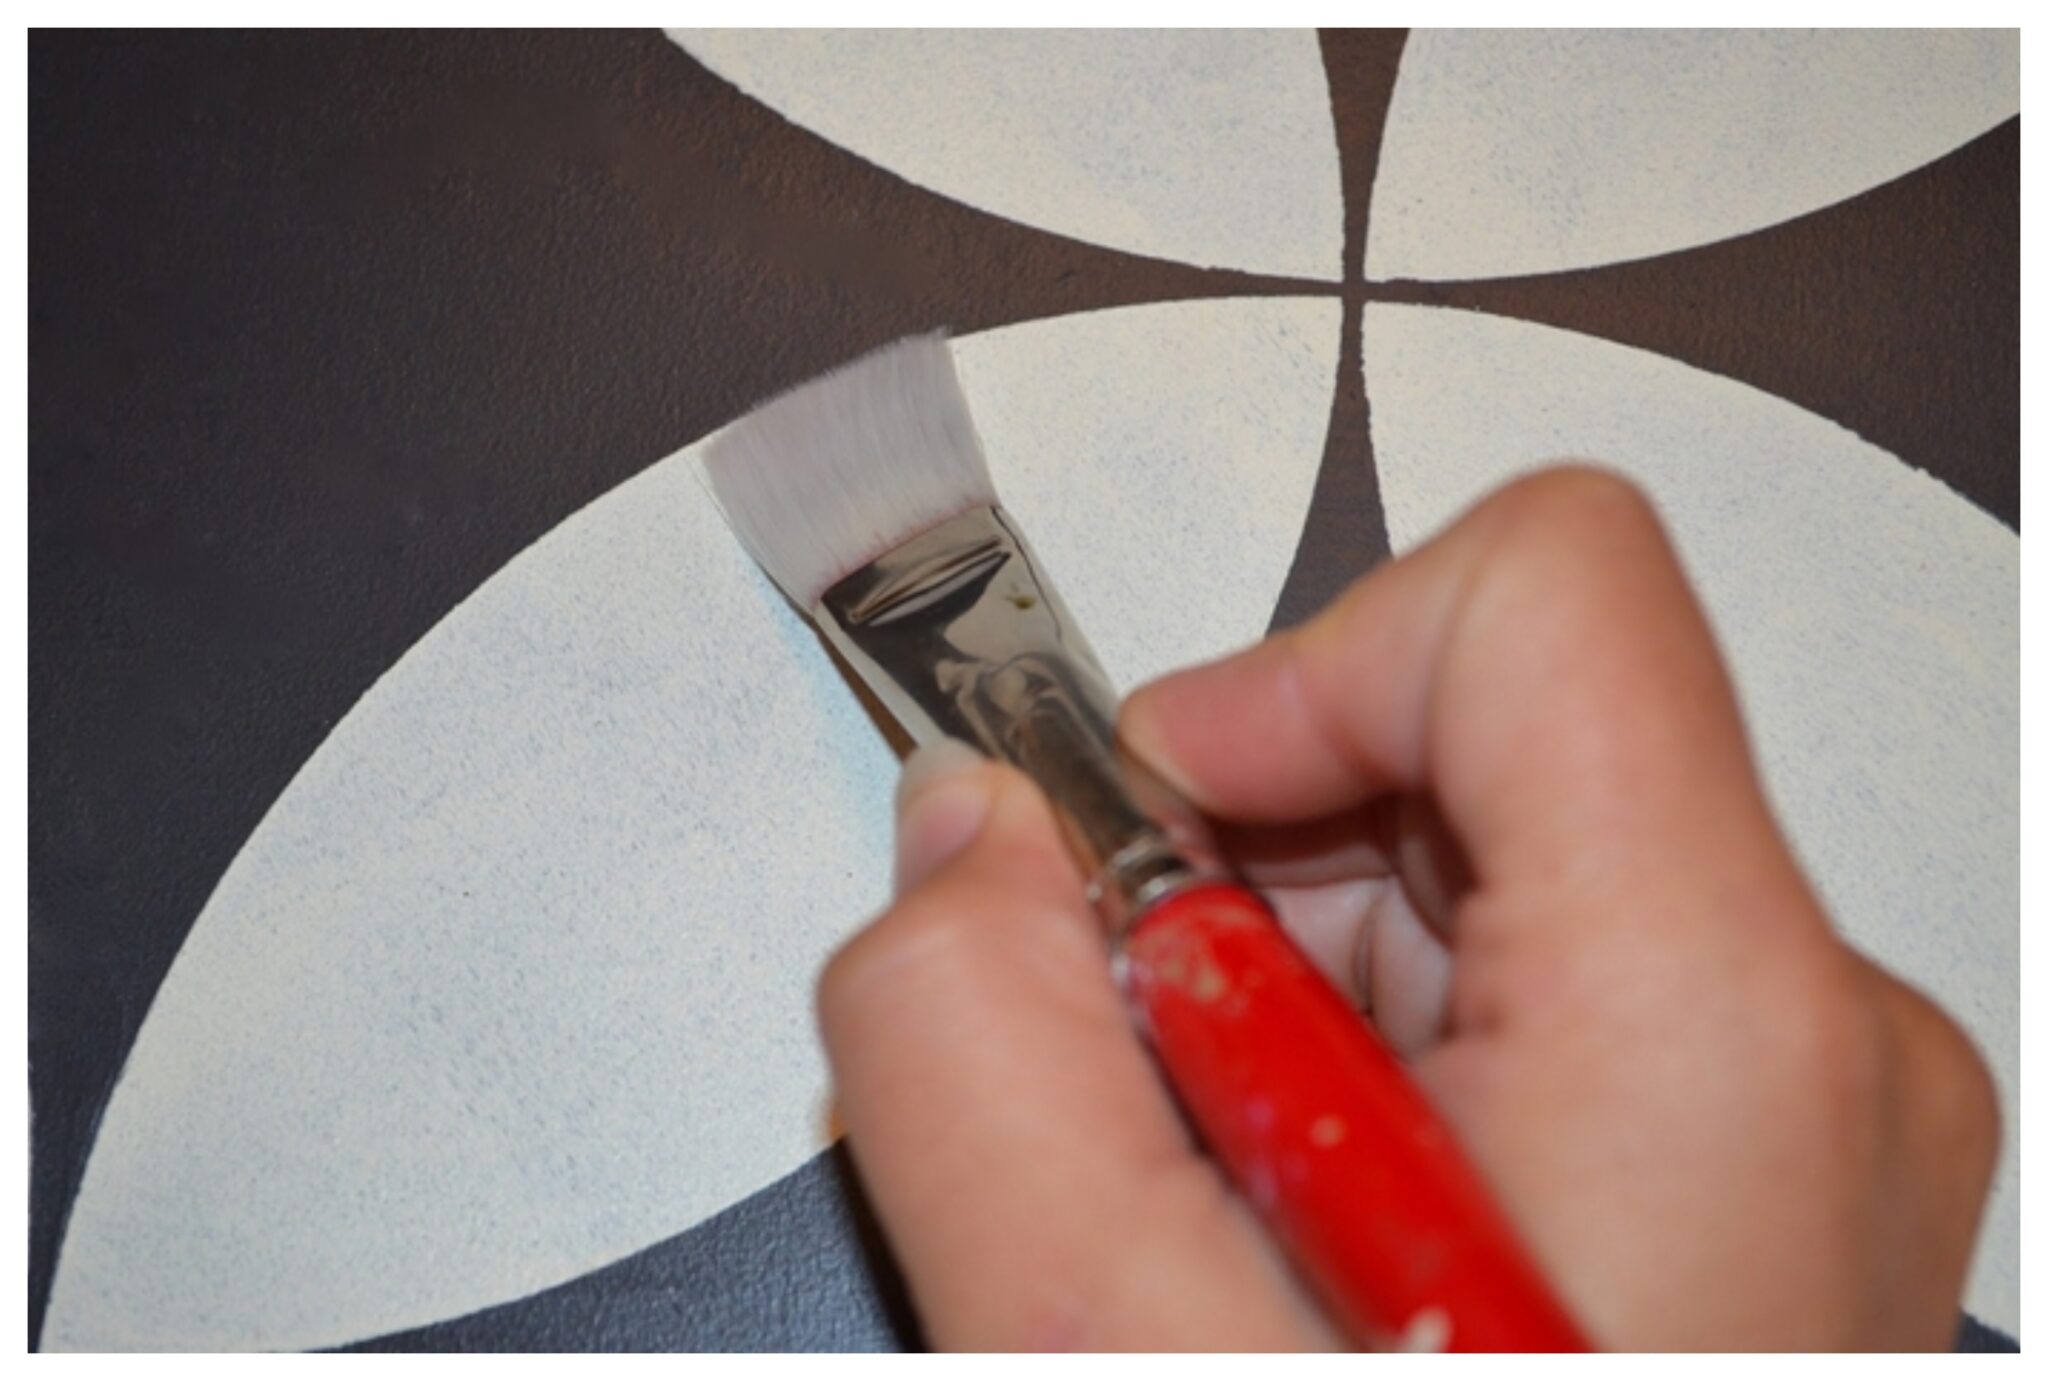
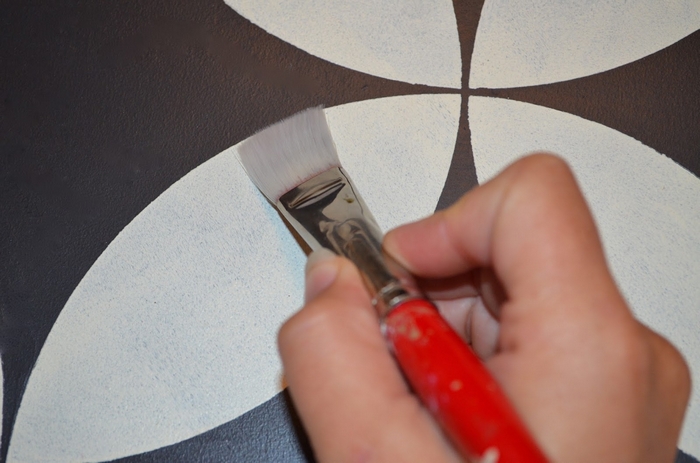
- Stencil the first tile. Hold the stencil flat with one hand or low-tack tape. Roll from the center out using gentle pressure. Use the thin craft paintbrush to reach edges and corners.
- Lift and move. Carefully lift the stencil straight up. Reposition to the next tile using the grout lines as guides. Wipe the back of the stencil if you see any paint build-up.
- Work in sections. Continue the repeat across the floor. Keep your body off fresh tiles. If needed, switch to the craft brush for partial tiles along walls.
- Touch up. After the pattern dries, use Old White with the thin craft brush to clean any stencil bleed. Sharpen lines with a steady hand and a tiny amount of Graphite.
- Seal the pattern. When the paint is bone dry, roll a thin coat of matte finish polyurethane. Keep a wet edge. Don’t overwork the roller.
- Add more protection. Apply a second thin coat of polyurethane after the first coat’s recoat window. Do a third coat for high-traffic bathrooms. Let each coat dry as directed.
- Cure before use. Avoid shoes for 24 hours. Light traffic after 48 hours if the finish feels hard. Hold off on rugs and wet mopping for seven days so the sealer can fully cure.
- Maintain the finish. Sweep grit often. Mop with a pH-neutral cleaner. Skip harsh scrubbing pads so you don’t scuff the topcoat.
Pros and Cons of Chalk Paint Floor Tiles
Chalk paint floor tiles can refresh a bathroom fast without ripping out a single tile. Understanding the tradeoffs helps you plan the project, protect the finish, and set realistic expectations.
Advantages That Make This Method Shine
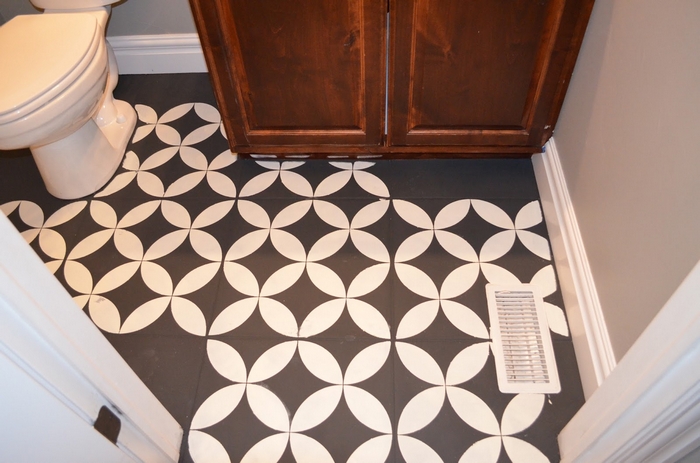
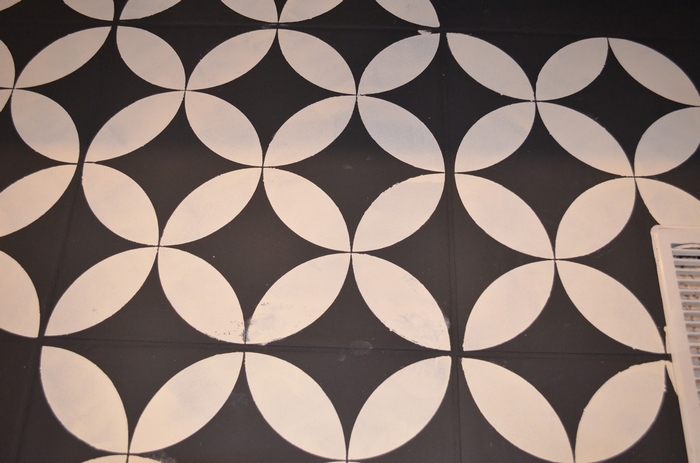
Cost stays low compared with new tile or professional coatings. Speed is a win since you can complete most work over a weekend. Design freedom is huge. You can pick any color pairing, scale a stencil to your tile, and create borders or medallions. Repairs are simple. Touch up color, then reseal a small spot. Odor is typically mild with water-based products. Photography loves the matte look. Patterns read crisp on camera and in person.
Limitations You Should Accept Up Front
Durability depends on prep. Poor cleaning or skipped deglossing leads to early wear. Moisture is a constant in bathrooms. Standing water and daily steam strain any paint film. Showers and wet rooms aren’t the right place for chalk paint. Abrasion happens at doorways and in front of the vanity. Plan for periodic resealing. Movement at grout and subfloor joints can hairline crack the coating. Radiant heat floors expand and contract seasonally. That cycle stresses finishes. Matte topcoats can feel slick when wet if you skip anti-slip measures.
Best Rooms and Use Cases
Powder rooms are ideal. Guest baths with light daily use are next. Laundry rooms without floor drains also work well. Primary baths can succeed outside direct splash zones if you’re diligent about sealing and maintenance. Outdoor areas, shower pans, and commercial restrooms ask too much of this system.
How It Compares With Other Options
Two-part epoxies give higher chemical and water resistance but cost more and require strict mixing windows. Floor enamels offer toughness yet often need primers and longer cure times. Tile decals are fast and renter friendly, though edges can lift at grout. Microcement creates a seamless look but needs skilled application and a bigger budget. Chalk paint floor tiles win on price, creativity, and ease of refresh. They trade away some long-term durability in wet environments.
Longevity Expectations and Refresh Cycle
Well-prepped floors that are sealed correctly handle normal bathroom traffic for years. High-wear spots will telegraph first. Plan to add a maintenance coat of sealer when you notice dulling or scuffs that don’t clean off. Small color chips touch up quickly. Clean, let dry, dab color, then protect with two thin sealer coats. Thoughtful upkeep stretches the life of the finish without a full redo.
Chalk Pain Floor Tiles Gallery
Click on any image to start the lightbox display. Use your Esc key to close the lightbox.![]()
Surface Prep That Makes Paint Last
Great results start before the first dip of the roller. Careful cleaning, deglossing, and layout decisions make chalk paint floor tiles bond stronger and wear longer.
Deep Clean for a Squeaky Surface
Remove rugs, hardware, and floor vents. Vacuum to capture grit in grout. Wash with a degreaser that’s safe for tile. Rinse with clean water until the surface squeaks under a fingertip. Let it dry completely. Soap residue kills adhesion, so don’t skip the rinse.
Degloss Shiny Tile Without Adding Products
Glossy glazes resist paint. Scuff with a fine abrasive pad using light, even pressure. Focus on tile faces, not just grout. Wipe away dust with a damp, lint-free cloth. Allow to dry. If you prefer a liquid deglosser, follow the label and ventilate well.
Grout, Cracks, and Flexible Joints
Inspect grout. Patch missing or crumbling sections and allow them to cure per the product. Scrape away silicone at perimeters where paint won’t stick. Replace with paintable flexible caulk after coating and sealing. Fill hairline chips that could show through a stencil. A level field makes patterns read sharp.
Tape and Dust Control Pay Off Later
Run painters tape tight along baseboards, the toilet base, tub skirts, and thresholds. Press edges with a putty knife to stop bleed. Create a clean exit path so you never step on fresh paint. Vacuum again just before coating. Dust now becomes bumps later.
Temperature, Humidity, and Dry Time
Aim for a stable room between 18 and 27°C. Moderate humidity helps paint level without slowing dry times too much. Keep windows cracked and the fan running for airflow. Avoid coating during long, hot showers. Steam slows curing and can flash the finish.
Test Patch for Confidence
Pick a spare or hidden tile near a corner. Clean and scuff it exactly as planned. Apply a small base coat, let it dry, then press painter’s tape on the edge and pull. Good adhesion leaves no lift. If it lifts, clean better and scuff more. Only move forward when the patch passes.
Layout Decisions Before You Open Paint
Find the longest, straightest grout line and use it to square your stencil repeats. Dry-fit the stencil and place low-tack reference tabs of tape. Mark a logical start that lets you back out of the room. Skip pencils that can telegraph through light colors after sealing.
Sealing Chalk Paint Floor Tiles for Bathrooms
Sealing locks in color, resists moisture, and makes cleaning simple. A water-based matte polyurethane keeps the chalky look while adding a tough, clear shell.
Choose the Right Sheen and Plan the Coats
Matte disguises small surface flaws and photographs beautifully. Satin adds a soft glow and boosts cleanability at the cost of showing more laps. Most bathrooms benefit from two to three thin coats. Thin beats thick for clarity and scratch resistance. Overbuilding a single coat traps moisture and can haze.
Set Up for a Clean First Coat
Let the stencil work dry fully. Vacuum, then tack with a lint-free cloth to lift specks. Pour polyurethane into a lined tray to avoid skin forming in the can. Use a fresh foam roller reserved only for sealer. Keep a spare on hand. Once a roller starts to drag, swap it.
Roll Technique for a Level Film
Load lightly and off-load in the tray. Start along the far wall and work toward your exit. Roll in smooth, overlapping passes with light pressure. Cross-roll to level texture. Keep a wet edge. Don’t chase every tiny miss while the sealer is tacking. You’ll cover it on the next coat. Watch for puddles at grout and along edges. Tip off those areas with a nearly dry roller.
Second and Third Coats for Durability
Follow the label’s recoat window. Lightly de-nib dust with a brown paper bag or an ultra-fine pad once the coat is dry. Wipe clean. Apply the second coat the same way. Add a third coat at thresholds, in front of the vanity, and near the toilet where abrasion is highest. Even coverage matters more than sheer film thickness.
Anti-slip Without Spoiling the Look
Wet floors can be slick. If you need more traction, mix a fine anti-slip additive into the final coat following the label. Test on a spare tile to confirm feel and clarity. Another option is to leave the film as is and place a washable, non-rubber bath mat once the finish cures.
Ventilation and Cure Schedule
Keep air moving using the exhaust fan and an open window if available. Avoid heavy steam during the first week. Foot traffic in socks only for the first 24 hours if the film feels firm. Light use after 48 hours is typical. Hold bath mats and wet mopping for seven days. Full hardness develops with time and airflow.
Edge Cases and Problem Solving
If you see lap marks, let the coat cure. Knock them back gently with an ultra-fine pad, wipe, and apply a thin leveling coat. Cloudiness often means moisture. Increase airflow and warmth, then allow more time before the next coat. Small chips that appear later are easy. Touch up color with a thin craft brush, let it dry, and dab two thin coats of polyurethane over the repair.
Cleaning and Long-term Care
Use a pH-neutral cleaner and a damp microfiber pad. Skip abrasive powders and oil-soap products that haze the film. Sweep grit often to prevent micro-scratches. Felt pads on hampers or stools protect high-wear zones. When the floor looks tired, scuff lightly and roll one maintenance coat wall to wall. Your pattern pops again, and the film regains uniform sheen.
Conclusion
Applying chalk paint floor tiles is a budget-friendly way to refresh a bathroom without demolition. Success hinges on meticulous prep, thin base coats, and light-handed stenciling for crisp lines. Seal with multiple thin coats of matte polyurethane to resist moisture and simplify cleaning. Respect cure times, use pH-neutral cleaners, and plan occasional touch-ups to keep the finish sharp. With realistic expectations and good habits, you’ll get a custom look that lasts and can be refreshed whenever your style changes.
For more creative bathroom flooring, check out our pebble shower floor guide!