Last Updated on November 5, 2025 by teamobn
Contents
- 1 Quick Answer
- 1.1 Why This Build?
- 1.2 What Are the Materials Needed to Build This Tailgate Wall Bench?
- 1.3 How to Build a Tailgate Wall Bench?
- 1.3.1 Step 1: Drill the Tailgate Pivot Holes (Photo Shows Drilling Ends of the Tailgate)
- 1.3.2 Step 2: Mark and Drill the Angle Brackets to Match the Pivot Holes
- 1.3.3 Step 3: Dry Fit on a Flat Surface
- 1.3.4 Step 4: Insert Hinge PIN Through Tailgate and Angles
- 1.3.5 Step 5: Washer, PIN, and Lock One End
- 1.3.6 Step 6: Repeat on the Other End
- 1.3.7 Step 7: Use a Temporary Support at Seating Height
- 1.3.8 Step 8: Drill Through the Angles and Wall; Install Through-Bolts
- 1.3.9 Step 9: Install the Long Interior Brace Angle
- 1.3.10 Step 10: Attach Support Cables/Chains
- 1.3.11 Step 11: Remove the Temporary Table; Verify Hinge Action
- 1.3.12 Step 12: Install the Latch-Stop Bolt
- 1.3.13 Step 13: Finish and Protect
- 1.4 Additional Refinements to Improve the Project
- 1.5 Tailgate Wall Bench Design Variations
- 2 Conclusion
Quick Answer
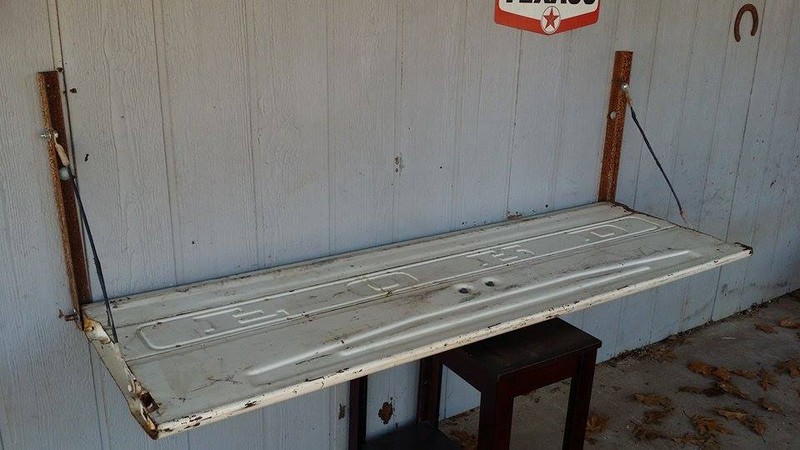
A wall‑mounted tailgate bench uses two short angle‑iron brackets at the sides, a 6′ backer angle on the opposite side of the wall, and a hinge rod through the tailgate pivots. Support cables keep the bench level when open.
Expect 2–4 hours build time, $60–$150 in hardware (tailgate extra), and a conservative 300–400 lb distributed load when properly anchored into studs or masonry. Follow the exact steps, safety notes, and wall‑type instructions below.
Why This Build?
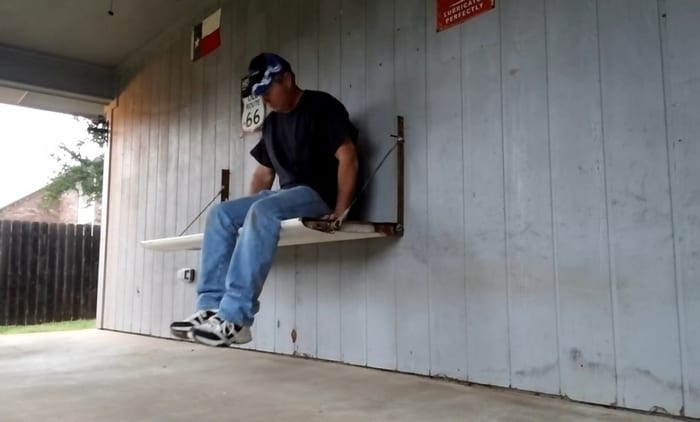
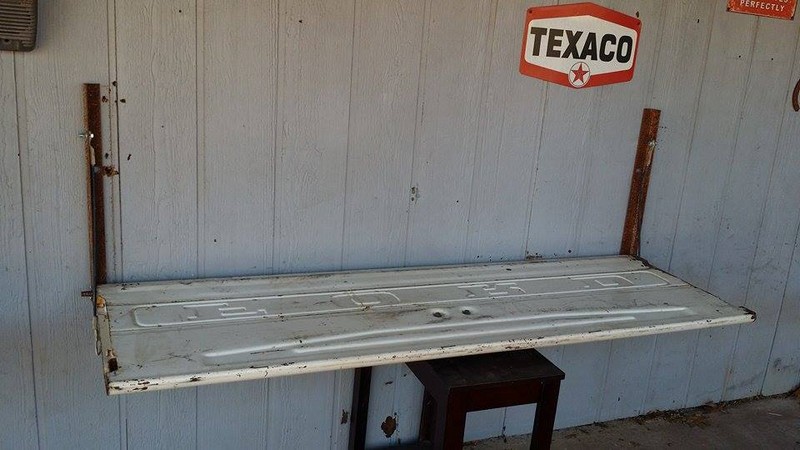
Vintage tailgates make sturdy, character‑filled seating. This version keeps the original latch functional, folds up neatly when not in use, and looks great on a porch, patio, or garage wall. It’s a straightforward metal/fastener project most intermediate DIYers can complete in a day.

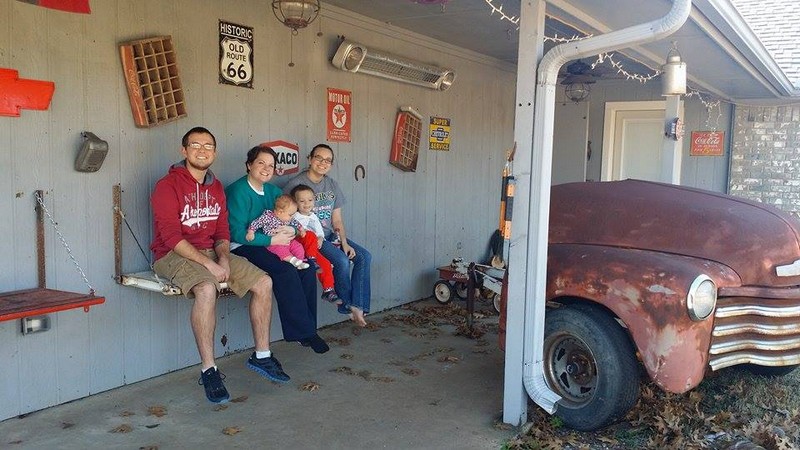
What do you think of a wall bench? Well, having just purchased a home, my wife and I decided the entire house belonged to her except for the garage and back porch and the yard. She may have made a mistake!
For many, vintage gas stations hold a particularly wistful charm. Maybe we miss those old service bays equipped with all the tools necessary to do everything from oil changes to brake replacements. Or maybe it’s just the look of a long-gone time that still holds some significance in our lives.
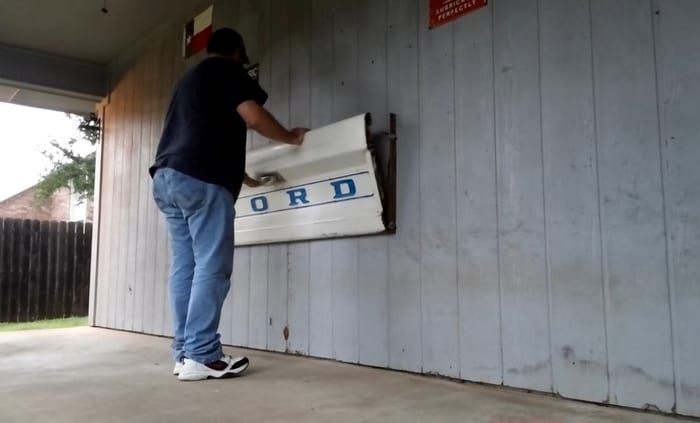
A friend gave me this old Ford tailgate after I told him I was decorating my back porch in vintage gas station/ feed store style. I decided to make a working wall bench out of it while also using it for decoration.
Click on any image to start the lightbox display. Use your Esc key to close the lightbox.![]()
What Are the Materials Needed to Build This Tailgate Wall Bench?
- Vintage truck tailgate (with working pivots and latch)
- 2 × side brackets: 20″ × 1.5″ angle iron (approx. 1/8″ thick)
- 1 × backer: 6′ × 1.5″ angle iron (approx. 1/8″ thick)
- Hinge rod: 6′ length of 1/8″ steel pipe or 1/2″ rebar
- 2 × stove bolts: 2.5″ × 8″ with matching nuts and 1/2″ flat washers (Grade 5+ recommended)
- 2 × medium snap rings or cotter pins (for hinge retention)
- 1 × 1/4‑20 Allen head bolt (1.5″ length) for latch stop
- 2 × steel support cables with thimbles and clips (choose a total load rating above expected use; 1/8″–3/16″ typical)
- Optional fasteners for wall type (see “Wall Types & Anchors”):
- Wood studs: 5/16″–3/8″ lag screws, 2.5″+ length
- Concrete: 3/8″ wedge anchors (2.25″+ embedment)
- Solid brick: 5/16″–3/8″ sleeve anchors (per spec)
- Corrosion protection: rust converter (if needed) and enamel or clear coat
Estimated cost (hardware only): $60–$150 (tailgate not included)
How to Build a Tailgate Wall Bench?
Turn a vintage truck tailgate into a sturdy, space-saving wall bench with this one-day build. The process uses simple steel angles, a hinge pin, and your tailgate’s original latch to create a fold-down seat that’s both functional and nostalgic.
Before you start, gather all materials, confirm your wall can support the load, and plan your mounting height so the open tailgate sits at a comfortable seat height.
Follow the steps below for cleaner alignment, safer anchoring, and longer-lasting, weather-resistant results.
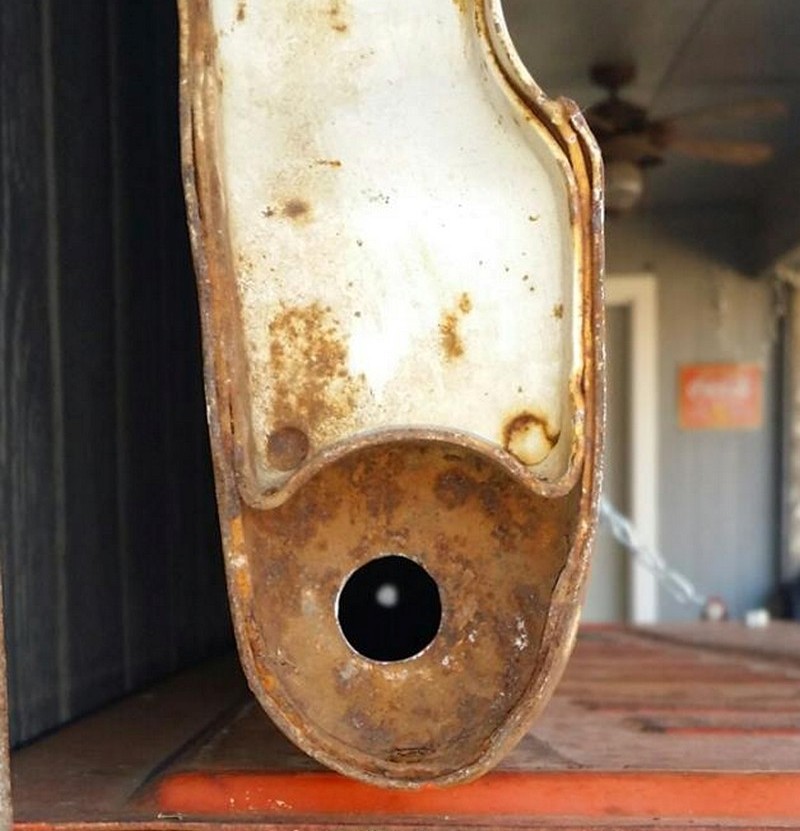
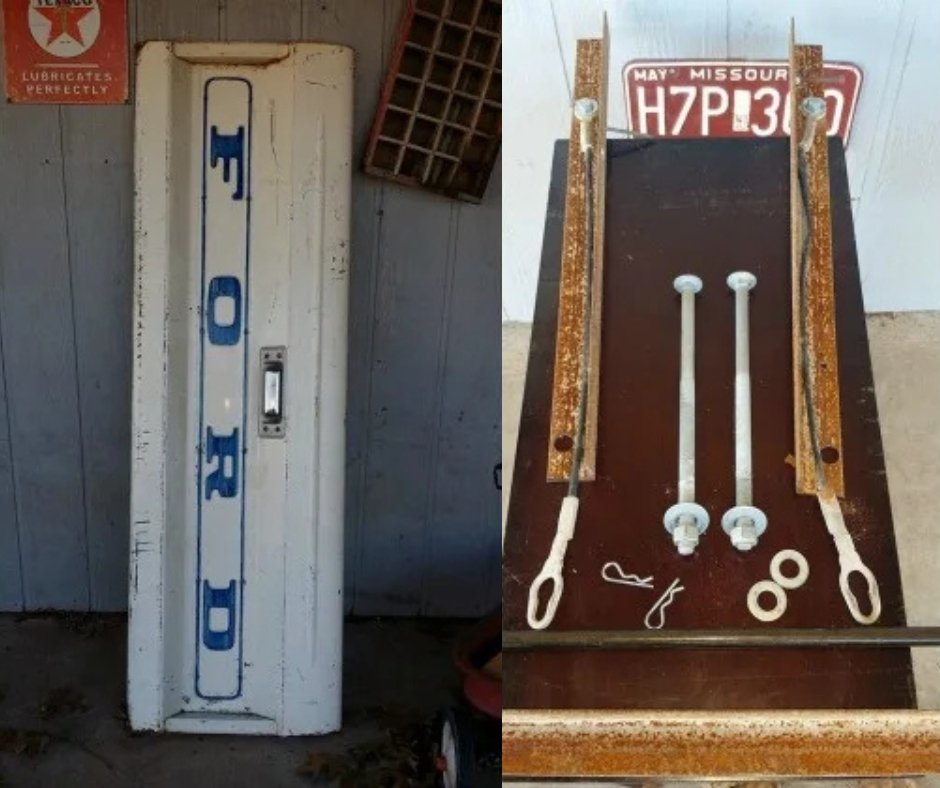
Step 1: Drill the Tailgate Pivot Holes (Photo Shows Drilling Ends of the Tailgate)
Goal: Create a clean 5/8″ hole through the round hinge “pivot” at each end of the tailgate so a straight hinge pin/rod can pass through the tailgate and the two angle brackets.
- Identify the pivot:
- Look at each bottom corner of the tailgate. Find the round/half-round hinge knuckle where the tailgate used to rotate on the truck.
- Mark the true center of that round piece:
- Use a combination square or a small ruler to find the midpoint across the diameter of the round knuckle.
- Draw a small crosshair at the geometric center of the round.
- Tap a center punch on that point so the drill doesn’t wander.
- Drill the hole straight through the pivot knuckle:
- Start with a small pilot bit (e.g., 1/8″), then step up (e.g., 5/16″) and finish at 5/8″.
- Keep the drill square to the face of the pivot so the hole is straight.
- Deburr both sides.
Notes and tips:
- Some tailgates already have a factory hole or thin sleeve in this area; use that as your guide and enlarge to 5/8″ if needed.
- You’re drilling through the hinge knuckle only, not through the big flat face of the tailgate.
- Repeat the same process on the other end so both pivot holes are directly opposite and aligned.
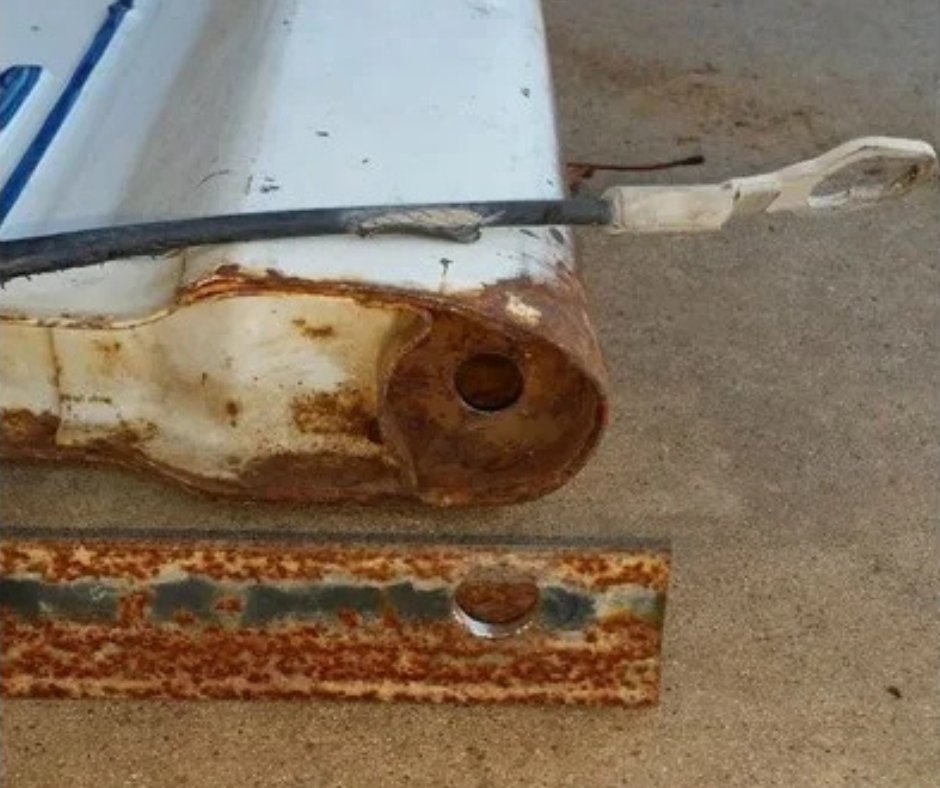
Step 2: Mark and Drill the Angle Brackets to Match the Pivot Holes
- Clamp angle to tailgate side. Transfer the hole centers to the angle’s web.
- Drill 5/8″ holes. Deburr.
Improvements:
- Use a drill press if available for clean, square holes.
- Paint/prime drilled areas to prevent rust.
Tips and checks:
- Keep both angles at the same height relative to the tailgate so the hinge pin stays level.
- If you have a drill press, drill the 5/8″ holes in the angles there for cleaner, square holes.
- Prime/paint the drilled edges to prevent rust before final assembly.
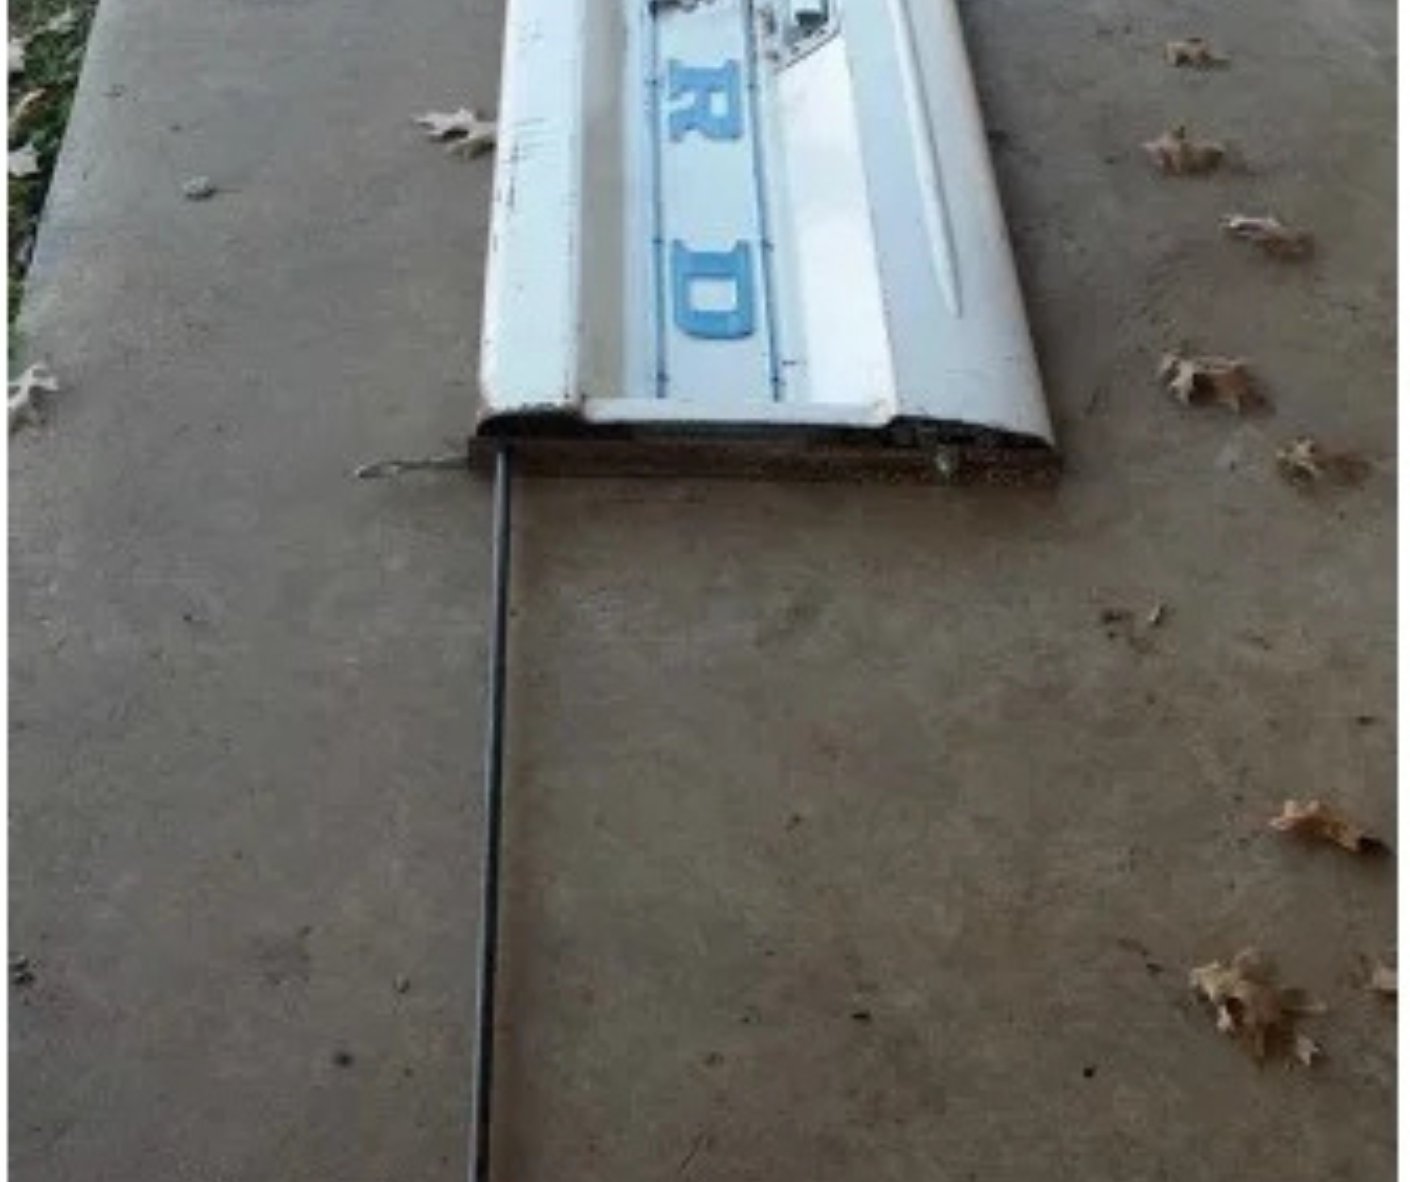
Step 3: Dry Fit on a Flat Surface
- Lay components flat as they’d hinge. Verify symmetry and clearance.
Improvements:
- Use shims to achieve even gaps so the hinge pin won’t bind.
- Label “Left/Right” to avoid swapping during install.
Step 4: Insert Hinge PIN Through Tailgate and Angles
- Slide the 1/8″ pipe through all three pieces like so.
Improvements:
- Confirm the pin is straight. If using rebar, grind high spots so it pivots smoothly.
- Consider a smoother, corrosion-resistant rod (e.g., 1/2″ cold-rolled steel) for longevity.
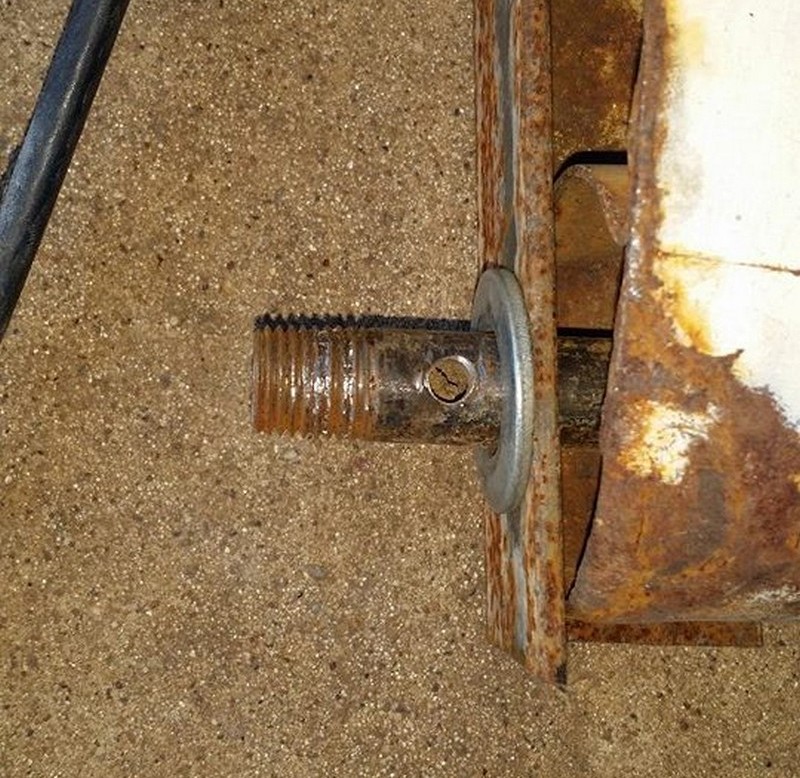
Step 5: Washer, PIN, and Lock One End
- Add a 1/2″ flat washer to the end of the hinge pin.
- Drill a 1/8″ cross-hole near the washer; insert cotter pin or snap ring.
Improvements:
- Drill as close as safely possible to the washer for minimal end play.
- Alternative: Use a clevis pin and hairpin clip for serviceability.
Step 6: Repeat on the Other End
- Pull the angle snug against the tailgate shoulder.
- Washer + cross-hole + cotter/snap ring.
Improvements:
- If lateral slop exists, add a second washer as a shim or use a thrust washer.
Step 7: Use a Temporary Support at Seating Height
- Level the tailgate at desired finished height (typical seat height 17–19″).
- Temporarily screw the angles to the wall to hold position.
Improvements:
- Use a laser level for accuracy.
- Verify swing clearance so the gate folds down without hitting obstructions.
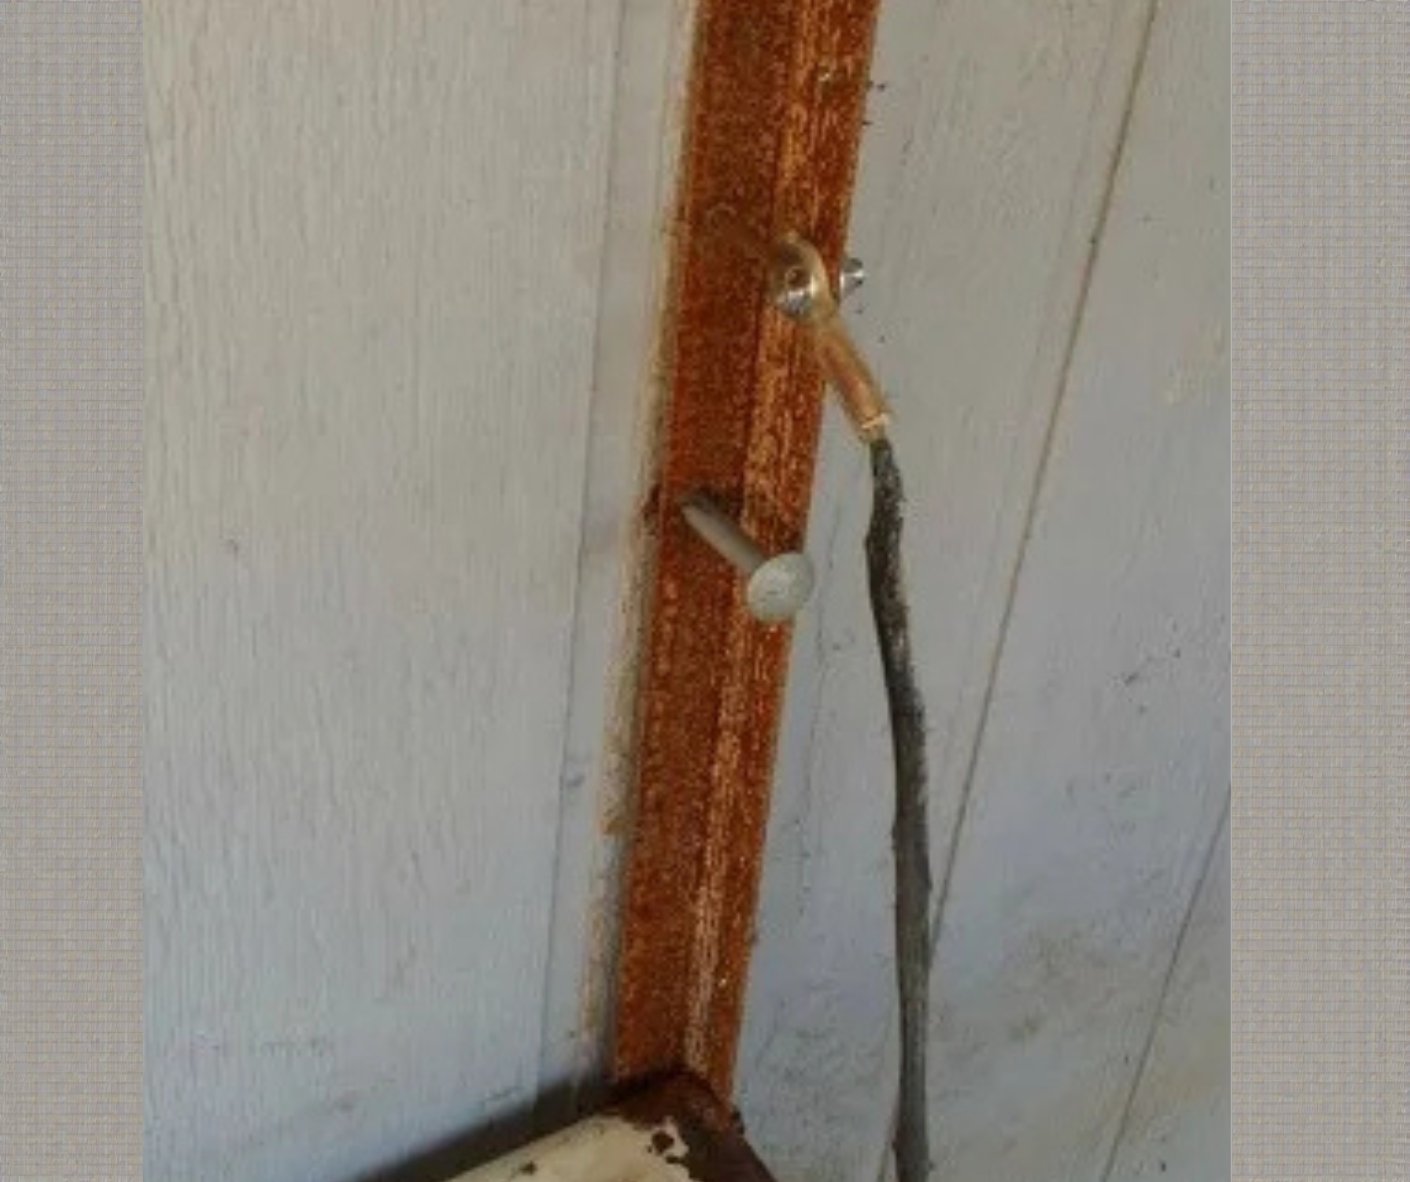
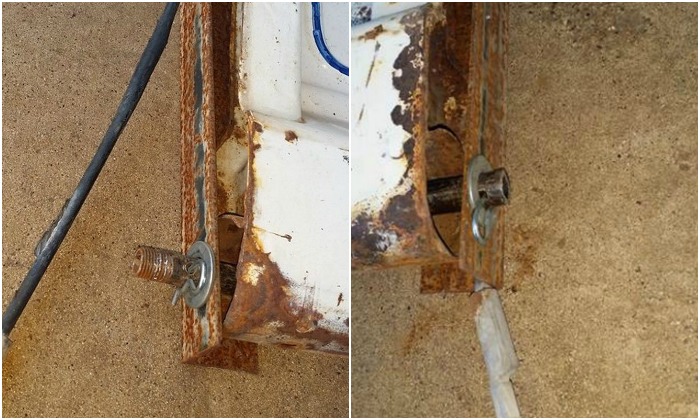
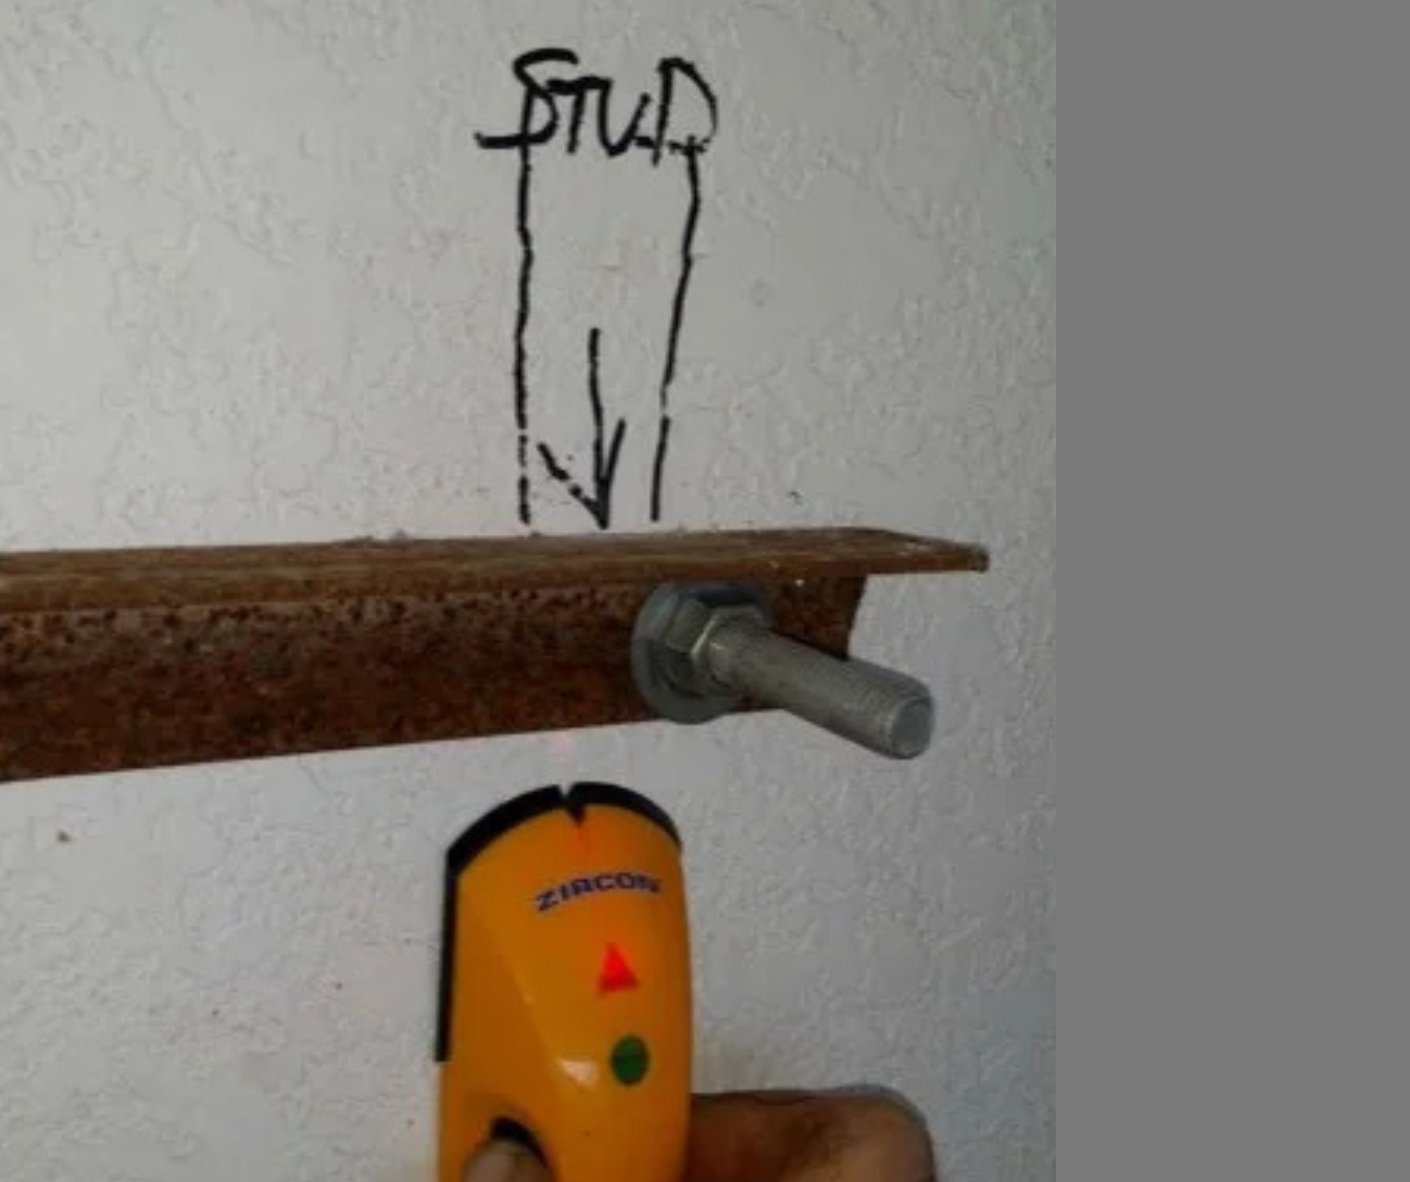
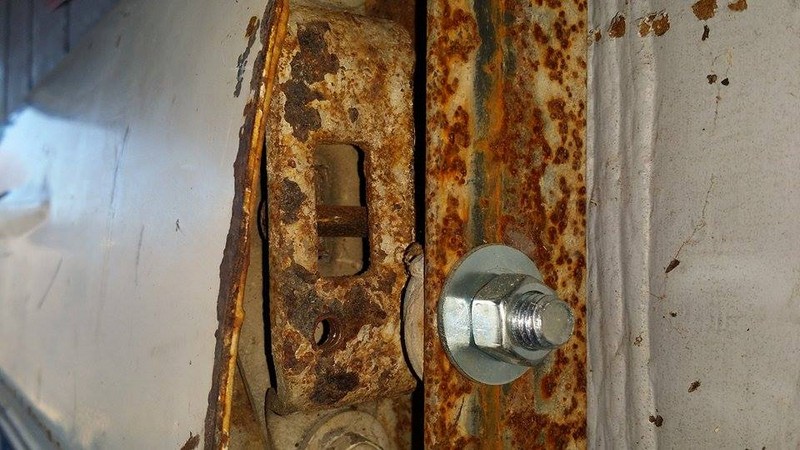
Step 8: Drill Through the Angles and Wall; Install Through-Bolts
- Measure down 6″ from the top of the angles (per original), mark, and drill through the angle and the wall.
- Insert 8″ bolts from the exterior side.
Improvements:
- Best practice: hit studs. Use a stud finder and adjust spacing to match stud locations.
- For masonry, use sleeve/wedge anchors sized appropriately (e.g., 3/8″).
- Add exterior-grade fender washers under bolt heads to spread the load.
Step 9: Install the Long Interior Brace Angle
- From the interior side, mark and drill the 6′ backer angle to the bolt pattern.
- Install washers and nuts; tighten evenly.
Improvements:
- Place the long angle so it spans at least two studs; add lock washers or nylon insert nuts.
- Consider a continuous 3/4″ exterior plywood backer against drywall for load distribution, then the angle on top.
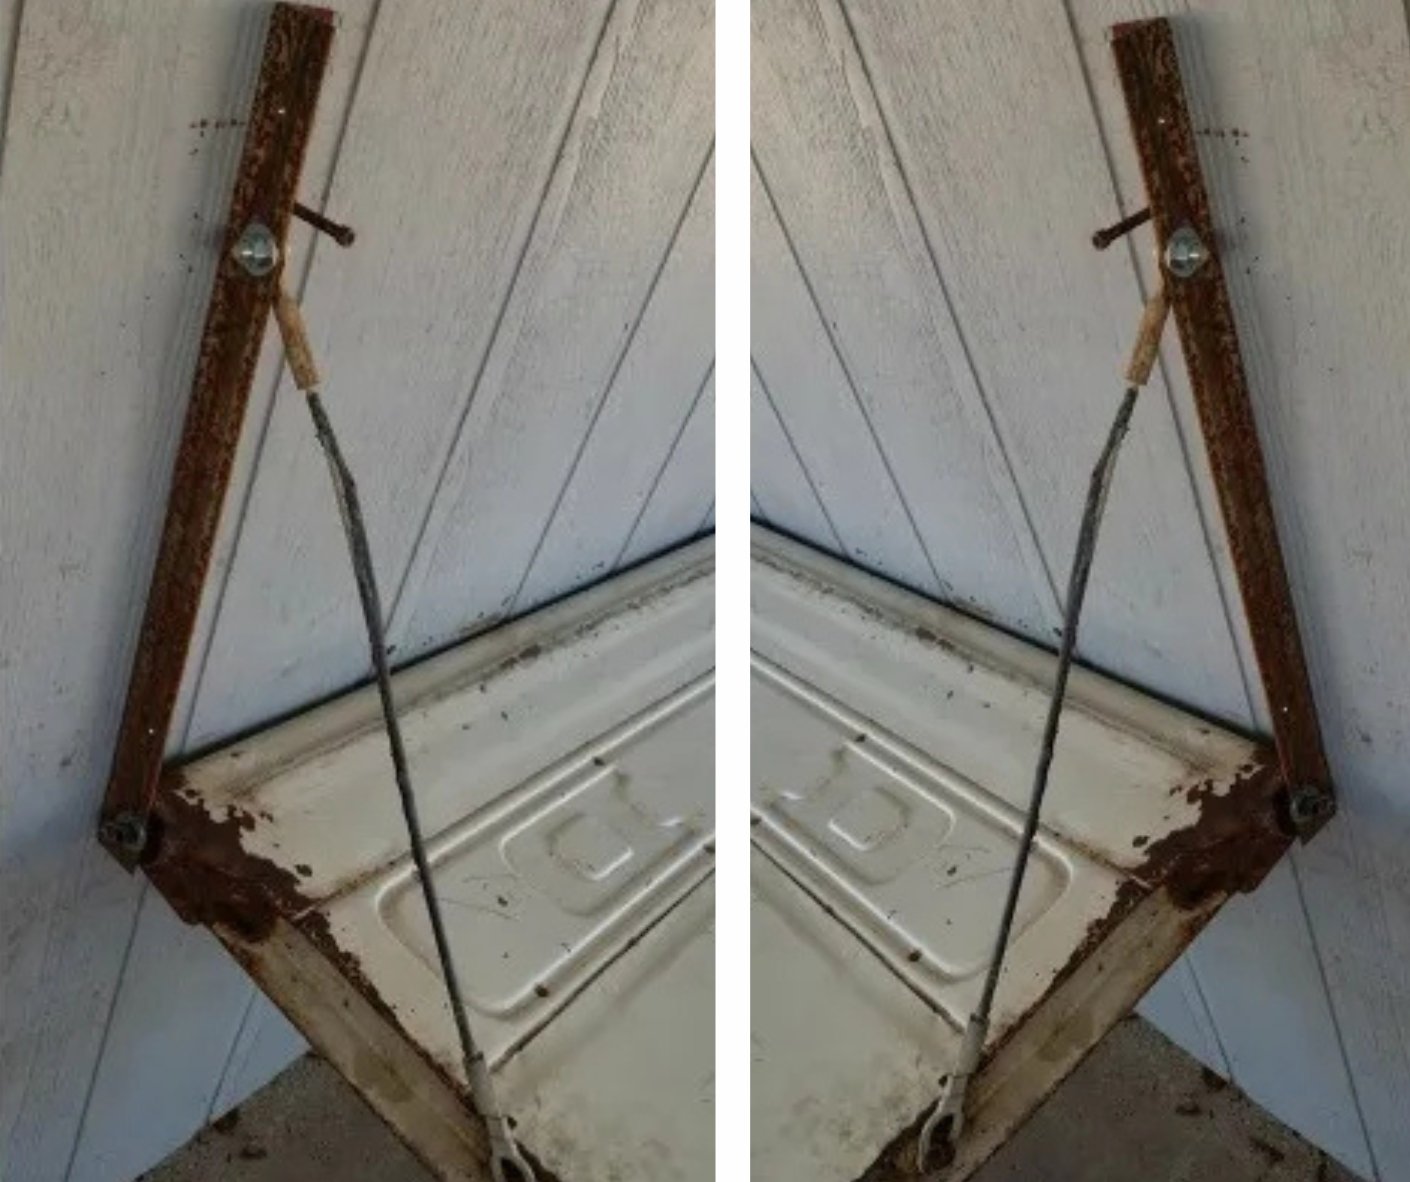
Step 10: Attach Support Cables/Chains
- Install eye bolts or tabs on both the angle brackets and tailgate sides.
- Connect with cables or chains using quick links/turnbuckles; set seat to level when open.
Improvements:
- Use PVC-coated, stainless, or galvanized cable with crimped thimbles and sleeves.
- Add turnbuckles for fine leveling and to remove slack.
- Verify load rating exceeds expected seating load (e.g., 400–600 lb total).
Step 11: Remove the Temporary Table; Verify Hinge Action
- Test smooth opening/closing.
Improvements:
- If binding occurs, slightly enlarge the 5/8″ holes in the angles or dress the hinge pin.

Step 12: Install the Latch-Stop Bolt
- Close tailgate with the bolt placed between angle and latch pin to find contact point.
- Mark the angle, drill tap-size hole, tap 1/4-20 threads, and install the Allen bolt as a fixed striker.
Improvements:
- Add a jam nut or thread locker so it won’t back out.
- Option: Install a rubber bumper where it contacts to reduce rattle and protect paint.
- If your latch doesn’t align perfectly, use an adjustable bumper stud or a small striker plate.
Step 13: Finish and Protect
- Clean, prime, and paint exposed steel (angles, hinge pin). Consider clear-coating the tailgate to preserve patina.
- Lubricate hinge pin lightly with dry lube.
Improvements:
- Add drip caps or silicone sealant around exterior penetrations.
- Consider adding wood slats or a thin outdoor cushion for comfort.
- Add cable safety stops (secondary chain) for redundancy.
Additional Refinements to Improve the Project
- Fastener upgrade: Use hot-dip galvanized or stainless hardware outdoors.
- Corrosion isolation: Add nylon washers/spacers between dissimilar metals to reduce galvanic corrosion.
- Hidden hinge option: If you want a cleaner look, replace the pipe with a continuous piano hinge rated for outdoor use; weld/rivet to the tailgate and angle.
- Load testing: After installation, perform a progressive sit test. Recheck all nuts/bolts after 24 hours and again after one week.
- Wall types:
- Wood stud wall: Through-bolts to an interior 6′ angle or 3/4″ plywood backer over studs.
- Solid masonry: Use sleeve/wedge anchors; avoid plastic anchors.
- Hollow CMU: Use toggle bolts rated for shear, or fill cells and set anchors.
- Comfort and safety: Round over any sharp edges on the tailgate and angles. Add reflective tape at the edges if installed in dim areas.
My family and I enjoy sitting out here now and firing up the old bbq grill (that old 51 Chevy truck clip is another project. It is a bbq grill). I hope you enjoy your tailgate bench just as much as we do ours. Now go find a tailgate before they’re all gone!
Here’s a quick video showing all the steps.
I’ve got lots of other projects over on my Youtube Channel DRMD421. Stop in and have a look sometime!
Tailgate Wall Bench Design Variations
A tailgate wall bench can transform any outdoor space into a unique and charming seating area. Whether you’re aiming to capture the nostalgia of vintage vehicles or looking for a modern twist on this classic DIY project, there are numerous design variations to choose from.
Here, we explore different styles that can suit any preference or outdoor décor theme, ensuring your tailgate wall bench becomes a standout feature.
Classic Vintage Style
For those who cherish the allure of old-school charm, a classic vintage tailgate wall bench is a perfect choice. Selecting a tailgate from a well-known vintage truck model, such as a Chevrolet or Ford from the 1950s or 1960s, can instantly evoke a sense of nostalgia.
To enhance the vintage feel, consider using distressed metal finishes or preserving the original paint and logos to maintain authenticity. This style suits traditional gardens or homes with rustic décor.
Modern and Sleek
If your aesthetic is more contemporary, consider a modern design for your tailgate wall bench. Opt for a tailgate with a minimalist design and a monochromatic color scheme. You can add a sleek finish by sanding down the tailgate to a smooth texture and applying a high-gloss paint.
Integrating metal accents or even incorporating elements like glass or industrial-grade plastics can elevate the look, making it a perfect fit for modern landscaping or minimalist outdoor spaces.
Functional Add-ons
Enhancing your tailgate wall bench with functional features can increase both its utility and appeal. For a more versatile design, add built-in storage under the seat or integrate foldable cup holders to improve convenience. LED lighting is another practical addition that can provide ambiance and functionality, making your tailgate wall bench not only a place to sit but also a feature element that lights up your outdoor space during evenings.
Each of these design variations allows you to personalize your tailgate wall bench to fit your taste and the functionality of your outdoor area. Whether you choose a retro, modern, or highly functional design, your tailgate wall bench is sure to be a conversation starter at any outdoor gathering.
Conclusion
Building a tailgate wall bench requires attention to detail and careful planning to ensure both aesthetic appeal and structural integrity. Once completed, this unique piece not only enhances your outdoor living space but also serves as a functional and conversation-starting feature. Enjoy the satisfaction of a DIY project well done as you relax on your new tailgate wall bench.
If you have any questions, just use the comment box and I’ll happily respond!