Last Updated on November 21, 2025 by teamobn
Project Overview
Make a durable, rodent‑resistant chicken feeder from a single length of 3″ (75 mm) PVC pipe. This simple gravity feeder reduces spillage, keeps feed cleaner, and is easy to refill and clean — a great weekend DIY project for backyard flocks.
What You’ll Get From This Post
- Clear materials & tools list
- Step‑by‑step numbered build with time estimates
- Photos to take at each stage (shot list + alt text suggestions)
- Troubleshooting, cleaning & maintenance tips
- Short cost comparison and customization ideas
- Ready‑to‑use FAQ for the page
Quick Facts
- Time: ~30 minutes.
- Difficulty: Easy.
- Estimated Cost: $25–$40 depending on local prices.
- Materials are sized in both imperial and metric units where relevant.
If you’re raising chickens, you know the joy and rewards they bring – fresh eggs, natural pest control, and endless entertainment. But you also know the challenges, especially when it comes to feeding them in your chicken coop.
Traditional feeders often result in wasted feed, attract unwanted pests such as rodents, and can quickly become unsanitary. These issues not only cost you money but can also compromise the health and well-being of your beloved flock.
That’s where a well-designed chicken feeder comes in, and a DIY PVC chicken feeder is one of the most effective, economical, and easy-to-build solutions available.
This project isn’t just about saving a few dollars; it’s about creating a healthier, more efficient environment for your chickens and a more peaceful routine for you.
Why is this project so important for every chicken keeper?
- Minimize Waste, Maximize Savings
- Traditional open feeders are an open invitation for chickens to scratch out and waste feed. Our PVC design uses gravity to deliver feed only as needed, drastically reducing spillage and saving you money on expensive feed.
- Pest Control Made Easy
- Rodents and wild birds are notorious for raiding chicken feed, often carrying diseases. The enclosed nature and elevated design of this PVC feeder make it significantly harder for pests to access, protecting your flock from potential health risks.
- Improved Hygiene and Health
- Keeping feed clean and dry is crucial for preventing mold and bacterial growth, which can lead to sick chickens. This feeder keeps feed protected from dirt, droppings, and moisture, ensuring your birds always have access to fresh, uncontaminated food.
- Convenience and Durability
- Easy to fill and built from robust, weather-resistant PVC, this feeder is designed to withstand the elements and the daily hustle of a busy coop. It means less frequent refilling for you and a reliable food source for your chickens.
In this guide, we’ll walk you through each simple step to construct your own PVC chicken feeder. You’ll be surprised how quickly and affordably you can transform your chicken-feeding routine, making it cleaner, more efficient, and ultimately, more rewarding for both you and your happy hens.
Let’s get started!
Building a PVC Chicken Feeder
PVC chicken feeders are great because it’s so easy to fill. You’ll never have to worry about your chooks running out of food because you can just keep it topped up with their regular supply of feeds.
What materials are needed to build a PVC Chicken Feeder?
- 3″ (75 mm) PVC pipe — 4 ft (1.2 m) (or adjust length to suit flock size)
- 1 × 90° PVC elbow (3″ / 75 mm)
- 2 × PVC end caps (3″ / 75 mm) — one can be removable for cleaning
- PVC cement (optional, for permanent assembly)
- Feed (pellets/granules appropriate for your chickens)
Estimated material cost: $25–$40 total (prices vary by region; check local hardware).
What tools are needed to build this PVC Chicken Feeder?
- PVC cutter or heavy‑duty razor knife (cutting safety gear recommended)
- Measuring tape and marker
- Sandpaper or file (to smooth cut edges)
- Optional: drill with hole saw if you prefer a circular feeding port instead of a cut half‑circle
Estimated tool time: 30 minutes build; less if you already have tools.
Click on any image to start the lightbox display. Use your Esc key to close the lightbox. You can also view the images as a slideshow if you prefer ![]()


How to build a DIY PVC Chicken Feeder?
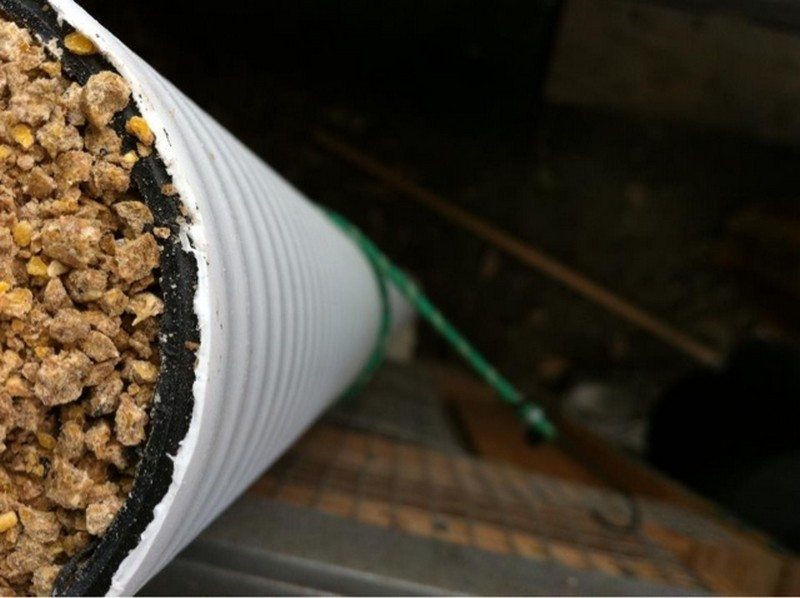
Step 1: Measure and Cut the PVC Pipe
- Measure and mark the length you want. A 4‑foot (1.2 m) section is a good standard: long enough to feed several birds but still easy to handle. If you have a larger flock, choose a longer pipe or plan multiple feeders.
- Mark clearly with a permanent marker, then cut on a stable surface using a PVC cutter or sharp razor knife. Cut slowly and steadily for a clean edge.
- Finish the cut edge with sandpaper or a file to remove burrs so birds won’t injure themselves and caps seal cleanly.
Safety: Wear safety glasses and gloves while cutting. Common mistakes & fixes: uneven cuts — re‑mark and sand; burrs left on the cut — sand well.
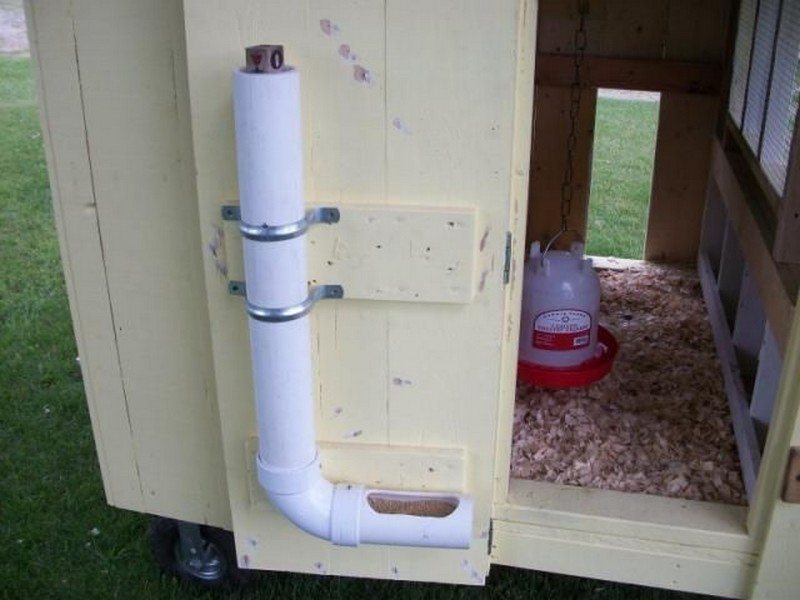
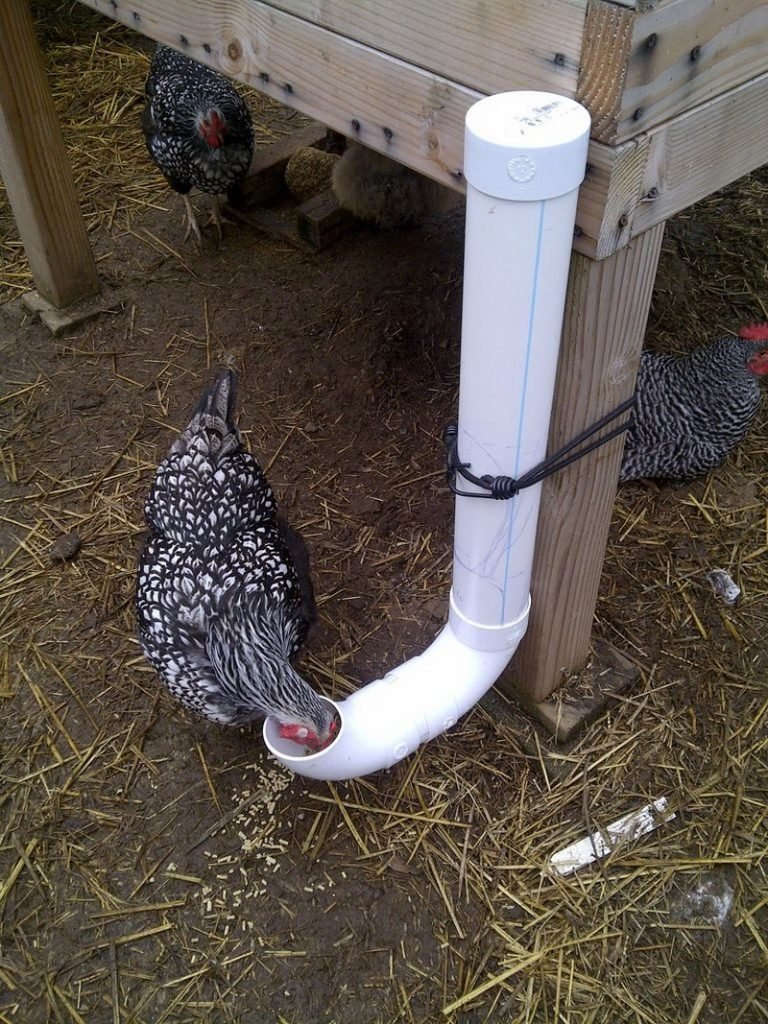
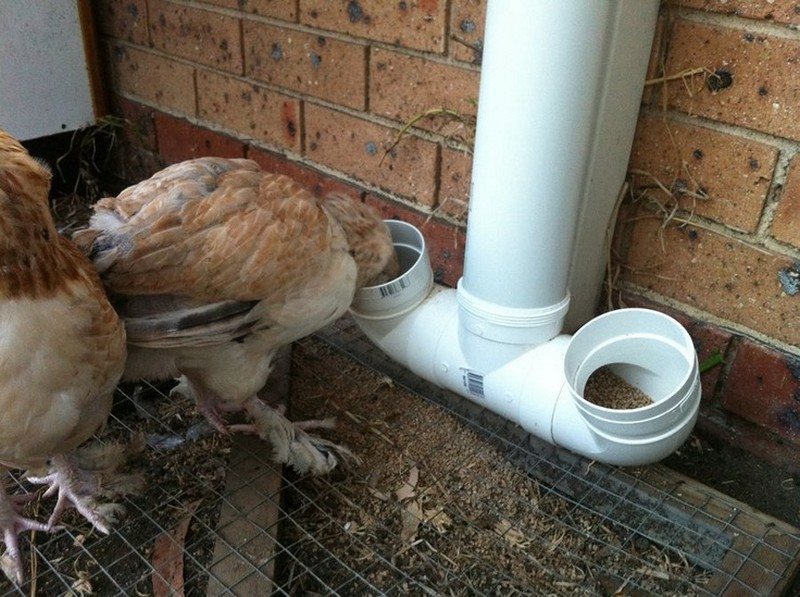
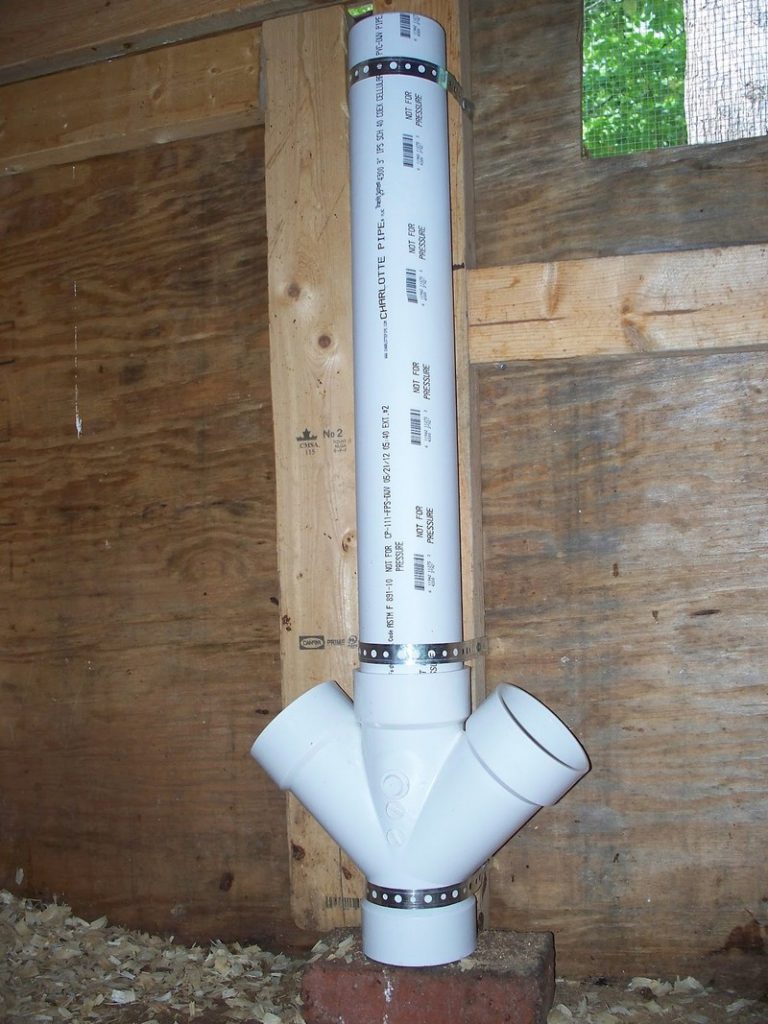
Step 2: Dry‑Fit and Orient the 90° Elbow
- Slip the 90° elbow onto one end of the cut pipe without glue first so you can test positioning. Think about which way you want the feeding opening to face relative to coop layout.
- Orient the elbow so the port will be slightly concave (facing up a little) — this helps reduce spillage and keeps rain out.
- Decide now whether you’ll permanently glue the elbow (PVC cement) or keep it removable for future disassembly and cleaning.
Tip: Dry‑fit everything before gluing. If you glue, follow the product’s cured time before using.
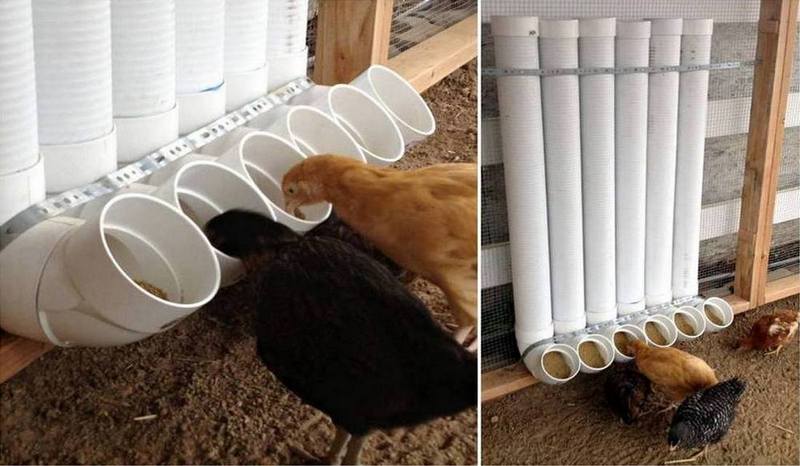
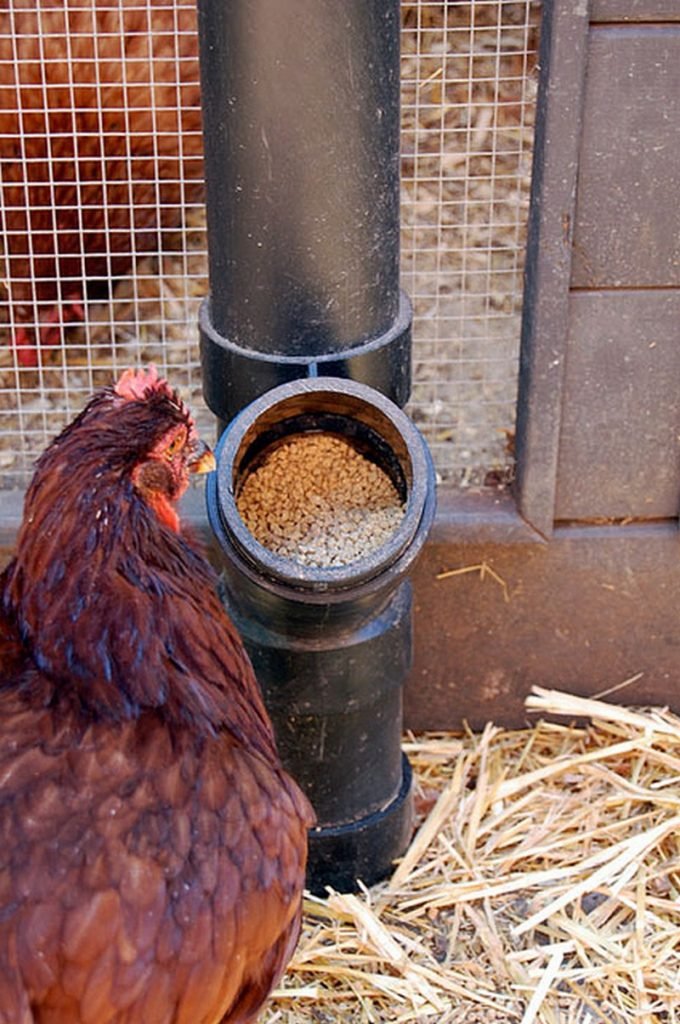
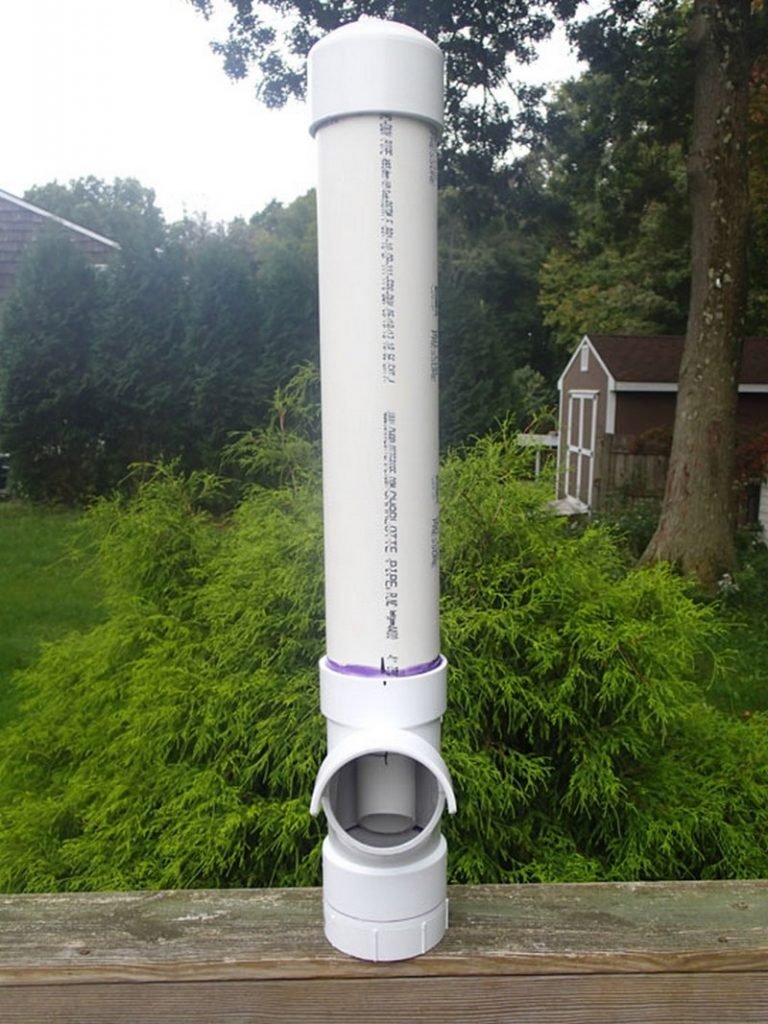
Step 3: Mark and Cut the Feeding Port
- On the elbow or near the elbow end of the pipe, mark a feeding opening. A half‑circle approx. 2.5–3″ (65–75 mm) wide is a good starting point for adult chickens; for large breeds you can go slightly larger.
- If you’re using a longer pipe with multiple birds, cut several ports spaced ~6–12″ (15–30 cm) apart.
- Methods: Cut a neat half‑circle with a razor knife, small saw, or use a 2.5–3″ hole saw for a circular port. Smooth all edges with sandpaper.
- Test the opening by letting a little feed settle and having a chicken try it — you may need to slightly widen or lower the port for easy access.
Common mistakes & fixes: port too large → more spillage (reduce size or add a small lip); port too small → birds can’t reach (widen slightly).
Step 4: Cap the Top for Refilling
- Attach an end cap to the top of the PVC pipe. For easiest refilling, use a removable cap (friction or threaded if available). If you prefer permanence, glue it with PVC cement.
- If you expect this feeder to sit outdoors, make sure the cap seals reasonably well to keep moisture out — add a small silicone bead if concerned about rain.
Tip: removable top cap = easier refilling and inspection; glued cap = more secure from curious predators but harder to clean.
Step 5: Cap or Make the Bottom Removable
- Attach the second cap at the bottom (elbow end). For cleaning, a removable bottom cap is very helpful — you can empty the feeder and rinse thoroughly.
- If you glued the elbow permanently, still leave a removable bottom cap if possible. If you make the bottom removable, consider using a short length of pipe as a “plug” so the cap is easier to grab and doesn’t get lost.

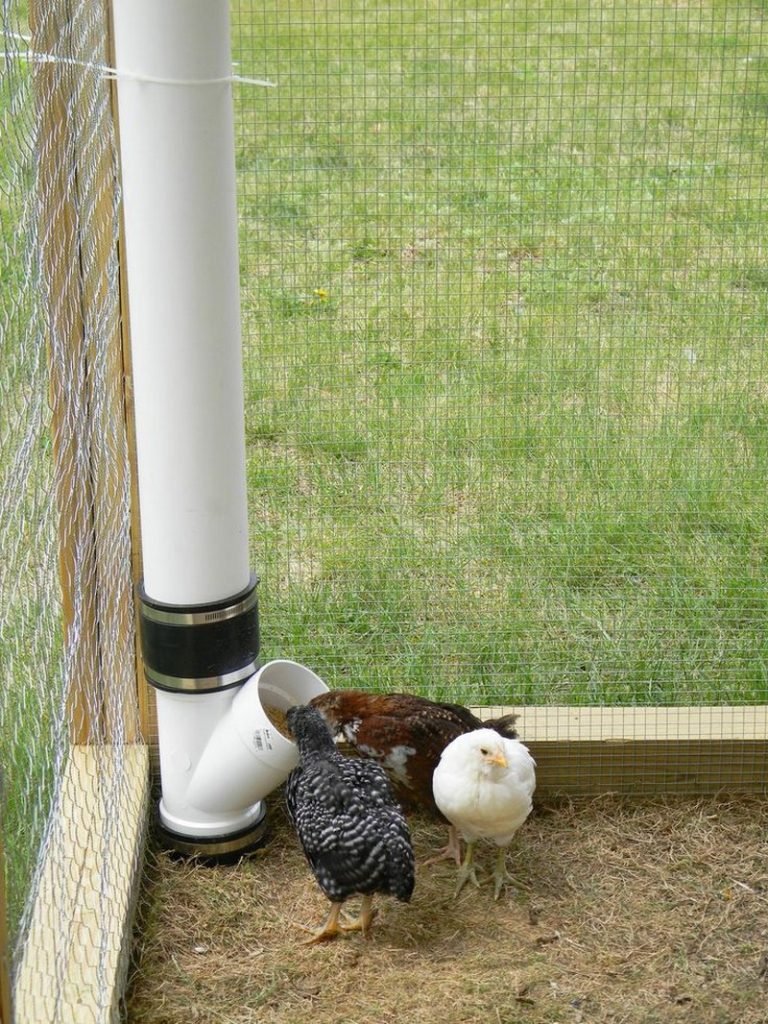
Step 6: Install and Position the Feeder
- Pick a location inside the coop or run that is dry and accessible to the birds. Avoid placing under areas where chickens perch and drop droppings.
- Height: Set the feeding port at roughly the height of your chickens’ backs when standing (this minimizes scratching into the feeder). For most adult breeds this is a range of about 8–16″ (20–40 cm) above ground — measure a representative bird and match.
- Mounting: Hang with sturdy wire or chain through a top bracket or use a wall/post bracket. Make sure it’s stable and cannot be easily tipped or dragged by the birds.
- Leave a small clearance below the port so feed can fall into the access area but not onto the ground. Raising the feeder a few inches (30 cm+) helps deter rats.
Tip: a little play in the hang lets multiple birds approach; a rigid mount prevents swinging which can spill feed.
Step 7: Fill, Test, Observe and Adjust
- Fill the feeder with the feed you plan to use (pellets/crumbles work well). Watch the chickens feed for several minutes to check for ease of access and spillage.
- If too much feed is spilling, try: reducing port size, raising the feeder slightly, or adding a small lip/edge around the port. If chickens struggle to reach, lower the feeder or enlarge the port.
- Observe for the first 24 hours: check for signs of rodents, moisture ingress, or birds fighting over access. Make minor adjustments as needed.
Troubleshooting quick guide:
- Birds can’t reach → lower feeder 1–2 in (2.5–5 cm) or widen port slightly.
- Too much spillage → make port smaller or add lip; raise feeder.
- Rodents present → raise feeder higher, cap feed at night, clean up spilled feed.
Step 8: Routine Cleaning and Maintenance
- Schedule a regular check every 1–3 weeks depending on humidity and use. Empty the feeder, remove caps, rinse interior with water and scrub with a brush; use mild detergent if needed, then rinse thoroughly and dry before refilling.
- Inspect for cracks, chewed areas, or loose fittings — replace parts as necessary. If you used PVC cement, check glued joints for leaks or looseness.
- During wet seasons, check daily for clumping or mold. Keep the feeder under cover or add a small roof to protect from rain.
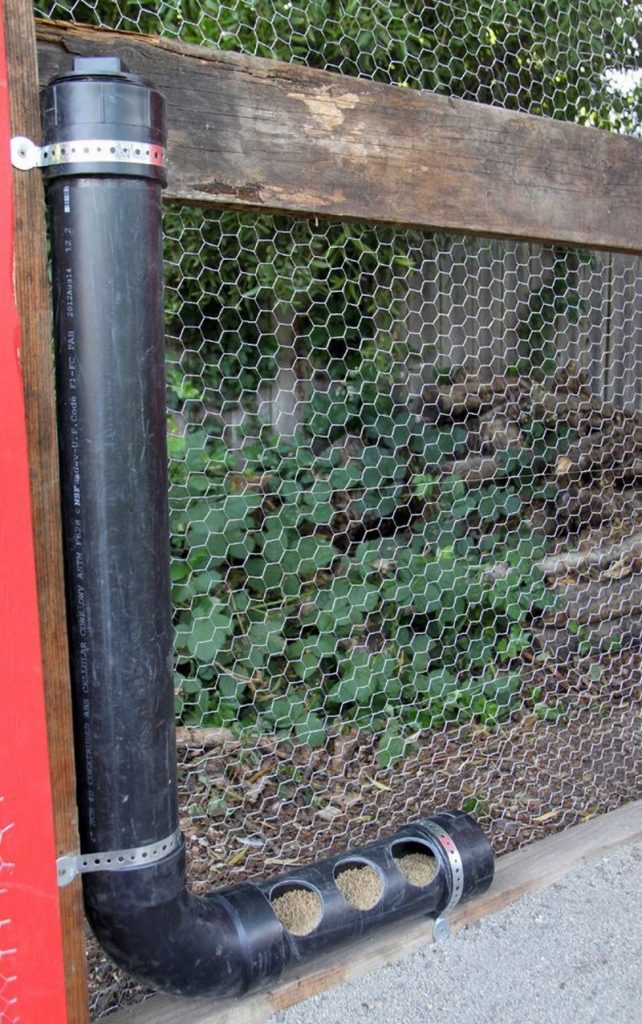
Final tips and optional upgrades
- Multiple ports: if you have several birds, cut extra ports spaced 6–12″ (15–30 cm) apart so more birds can eat simultaneously.
- Larger diameter: for very large flocks consider 4″ (100 mm) pipe to increase capacity.
- Weather protection: add a small roof or position the feeder under an overhang to keep feed dry.
- Security: use a lockable cap or a simple clip to secure top cap overnight if rodents are active.
- Record keeping: note the date you built/last cleaned the feeder and keep photos — helpful if you iterate on the design.
Quick Checklist Before You Walk Away
- Smooth all cut edges, caps fit snugly, elbow oriented to reduce spillage, feeder mounted at correct height, tested with feed and birds, and you know how to remove the bottom cap for cleaning.
Customizing Your PVC Chicken Feeder
Creating a PVC chicken feeder that perfectly fits your needs and the specific requirements of your coop is one of the key advantages of a DIY project. Here’s how you can customize your PVC chicken feeder:
- Adjusting the Size
- Opt for a shorter length of PVC pipe. A 2-3 foot length can be more manageable in smaller spaces.
- Consider using a longer PVC pipe or multiple feeders if you have many mouths to feed. You can also use a wider diameter pipe to hold more feed.
- Multiple Feeding Ports
- Cut additional feeding ports in the PVC pipe. This allows more chickens to feed at the same time and reduces crowding.
- Color and Design
- Give your PVC feeder a splash of color using non-toxic, weather-resistant paint. This not only adds a decorative touch but can also blend with your coop’s design. Add decorative stickers or decals for a personal touch. Ensure they are weather-resistant and non-toxic.
- Height Adjustments
- Install a system that allows you to adjust the height of the feeder. This can be particularly useful as your chickens grow or if you have breeds of different sizes.
- Additional Features
- Add a cover or shelter over the feeder to protect it from rain. This keeps the feed dry and prevents spoilage. Modify the feeding port to include barriers or edges that reduce spillage. This can be especially useful if you notice a lot of feed wastage.
- Mobility
- If you need to move the feeder frequently, consider adding a handle or creating a stand with wheels. This makes relocation easier and more convenient.
- Securing the Feeder
- To prevent wildlife or pets from accessing the feed, install a lockable cap on the top of the feeder.
- Incorporating a Water System
- Consider designing a dual-feeder system that includes both feed and water. This can be an efficient space-saving solution.
By customizing your PVC chicken feeder, you not only meet the specific needs of your chickens but also add a personal touch to your chicken coop. These modifications can improve the functionality of the feeder and make your chicken-raising experience even more rewarding.
Cost Analysis: DIY PVC Chicken Feeder vs. Store-Bought
When deciding between a DIY PVC chicken feeder and a store-bought option, cost is a significant factor. Here’s a breakdown to help you make an informed decision:
Cost of DIY PVC Chicken Feeder
- PVC Pipe (10-foot, 3-inch diameter): Approximately $15-$20.
- 90-Degree PVC Elbow Fitting: Around $3-$5.
- PVC End Caps: About $2 each, totaling $4.
- PVC Cement (optional): Around $5-$10.
- Tools: If you already have a razor knife or PVC cutter, there’s no additional cost.
- Total DIY Cost: Approximately $27-$39.
Cost of Store-Bought Chicken Feeder
- Basic Plastic Feeders: Range from $15-$30, but may not be as durable or large.
- Metal Feeders: Higher quality, costing anywhere from $30-$60 or more, depending on size and features.
- Advanced Feeders (with pest-resistant features, etc.): Can cost over $60.
- Total Store-Bought Cost: Approximately $15-$60+.
Cost Comparison
- Initial Investment: DIY PVC chicken feeders are generally more cost-effective, especially if you already have the necessary tools.
- Longevity and Durability: PVC feeders are durable and long-lasting, potentially offering better value over time compared to some cheaper plastic store-bought options.
- Customization: DIY feeders allow customization without additional cost, whereas store-bought feeders with specific features (like pest resistance) can be more expensive.
- Maintenance Costs: Both DIY and store-bought feeders require minimal maintenance, but DIY feeders can be repaired or parts replaced at a lower cost.
Building a PVC chicken feeder can be more economical, especially if you are looking for a durable, customizable, and long-lasting solution. While store-bought feeders offer convenience, they may not always provide the same level of customization or cost-effectiveness as a DIY option. Ultimately, the choice depends on your budget, needs, and whether you value customization and the satisfaction of building something yourself.
Frequently Asked Questions About PVC Chicken Feeders
How long does a PVC chicken feeder last?
Can the PVC chicken feeder be used for all types of chicken feed?
Is it difficult to build a PVC chicken feeder?
How often should I clean my PVC chicken feeder?
Can I adjust the height of the feeder?
Are PVC chicken feeders rodent-proof?
Will the feeder work in a free-range environment?
Can I paint my PVC chicken feeder?
Is it cheaper to build a PVC feeder than to buy one?
What’s the best way to prevent feed spillage?
Conclusion
Would you be interested in raising chickens? I think it could be a really fun and rewarding experience. Not only would you get to enjoy fresh eggs, but you would also get to watch your chickens running and playing in the yard.
Plus, it can be a great way to teach your kids about where food comes from and how to care for animals.
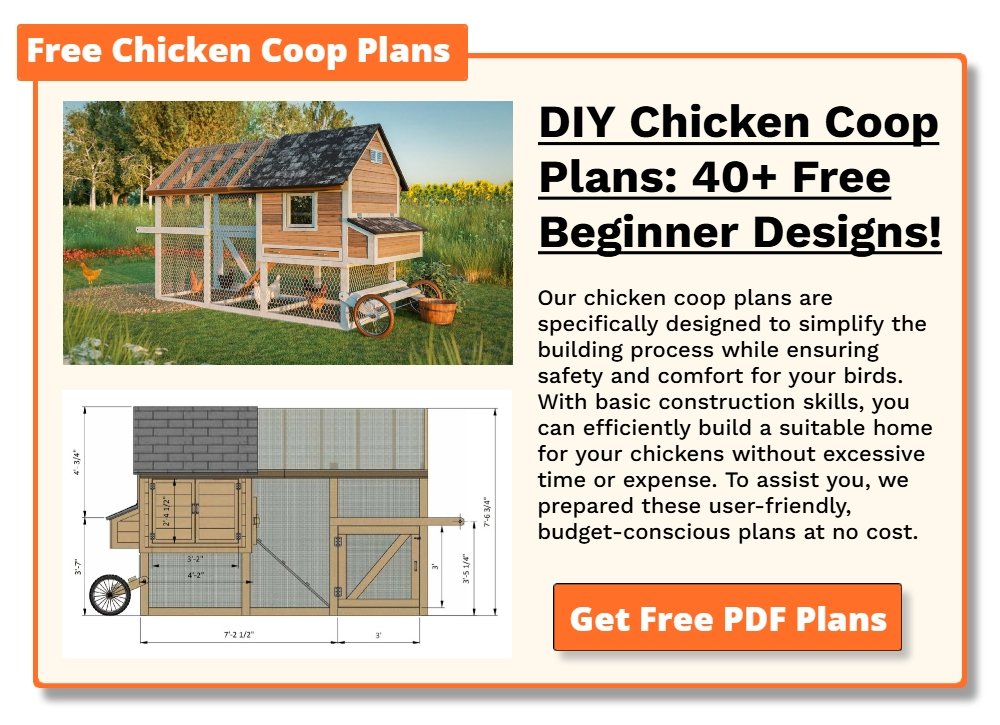
Thanks to Home Farm Ideas for this great project. You can get step-by-step instructions here…
If you liked this, you might also like these other chicken coop projects and chicken water station ideas.