Last Updated on July 10, 2025 by teamobn

Everyone loves backyard fountains. And if you have a small backyard, you might want to think about a DIY fountain to decorate it. There are many DIY fountain designs available in the market and you can easily customize your fountain according to your own needs.
If you’re trying to make your outdoor space more serene, why not consider a water feature? They are becoming more popular, and there are a number of them to choose from.
If you want to install a pond, you need to think about the size of your yard, the conditions, and your budget. If you want to add a pond, consider adding fountains, or you can add a waterfall.
Installing a water feature can be backbreaking work when it comes to digging. It involves a lot of digging, breaking, and pouring.

These processes can be physically demanding, and the water feature itself will practically demand constant maintenance. However, the time and money invested make the effort well worth it, as water features add beauty to a garden.
But you can avoid these strenuous activities by choosing a DIY backyard fountain. This DIY project will not only save you energy but will also save you money. You can choose your desired materials at a lesser price.
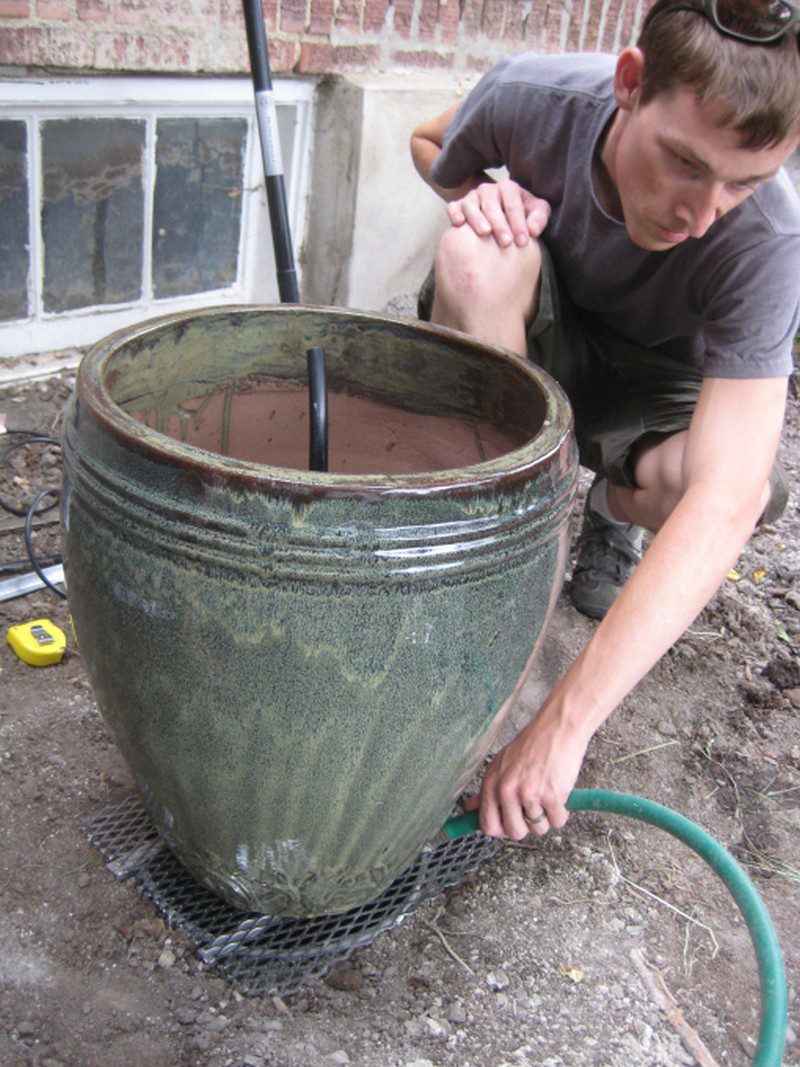
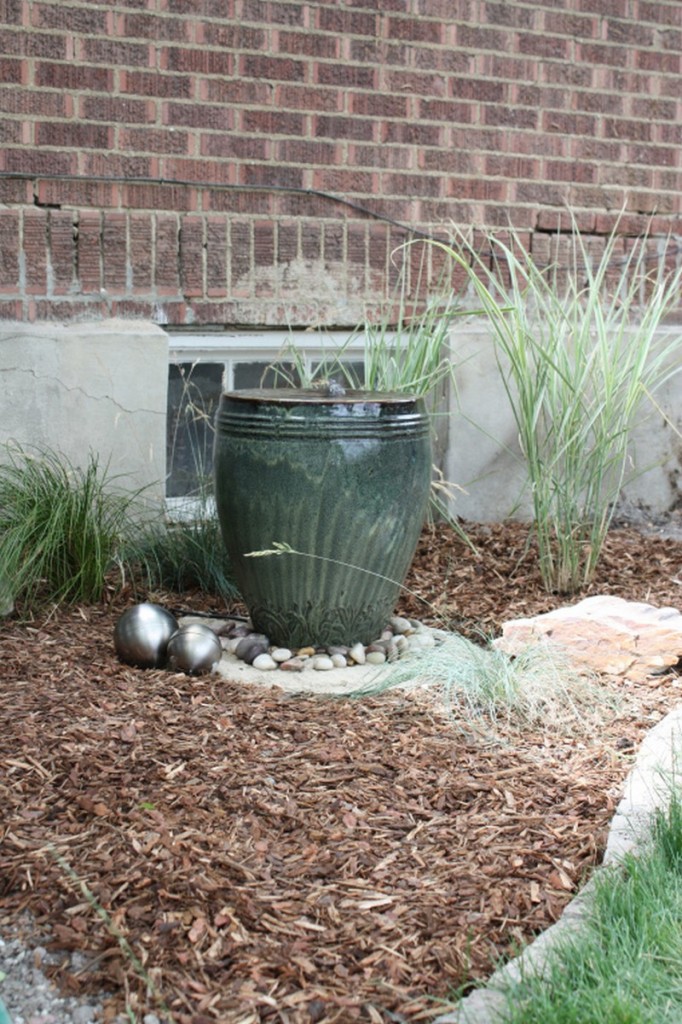
This pot plant water feature will give a great effect without a lot of physical labor. This pot plant water feature holds a lot of water and has a flexible design which makes it very easy to install.
The ceramic pot backyard fountain will be very elegant. The water is recirculated using a small pump and the water falls back into the reservoir and is then reused. The recirculation keeps the reservoir from being overfilled and the pump from being overworked.

The water from the reservoir is replaced with fresh water from a garden hose. The reservoir is made from heavy-duty PVC pipe and can be filled and emptied about 18 times before the water is exhausted.
There are a number of different flow patterns that can be created depending on the speed of the pump, the length of the tubing, the position of the tube in the reservoir, and the angle.
The DIY backyard fountain is a great way to bring natural beauty and healthy elements into a small space.
A fountain can be a good choice for your patio, deck, or yard. If the fountain is small enough, it can be placed in a flower pot, so you can place it on the balcony, or hang it on the patio wall.
Build a Stunning DIY Backyard Fountain for Your Dream Oasis
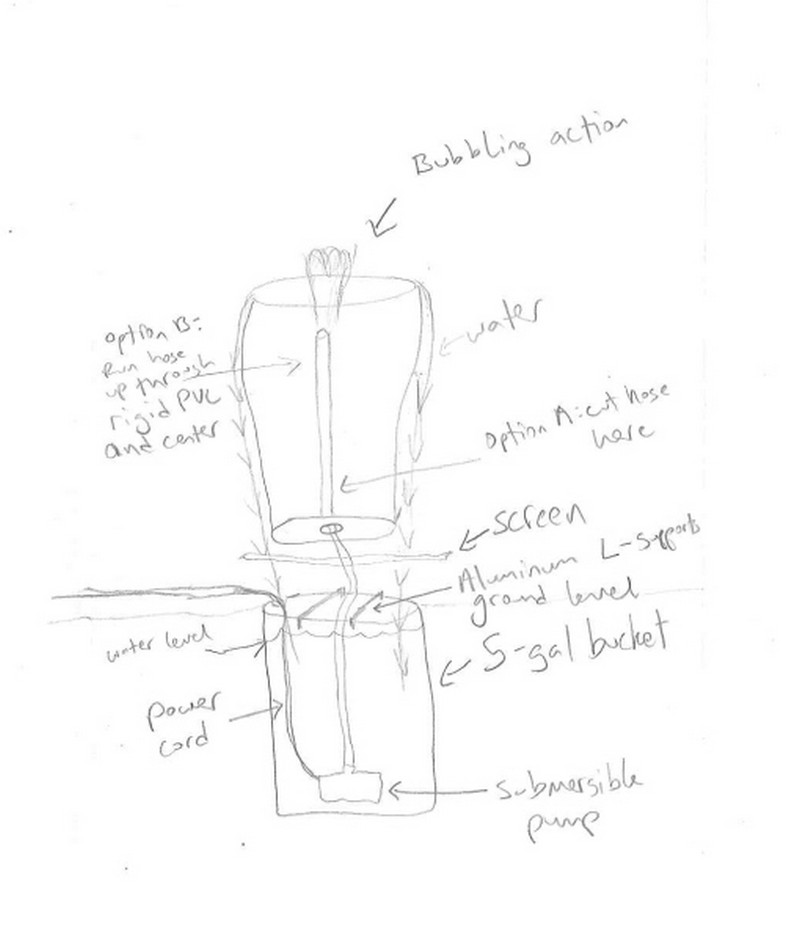
Materials:
- Ceramic pot of your liking (base of the pot must be smaller than the diameter of a 5-gallon bucket)
- 5-gallon bucket (metal)
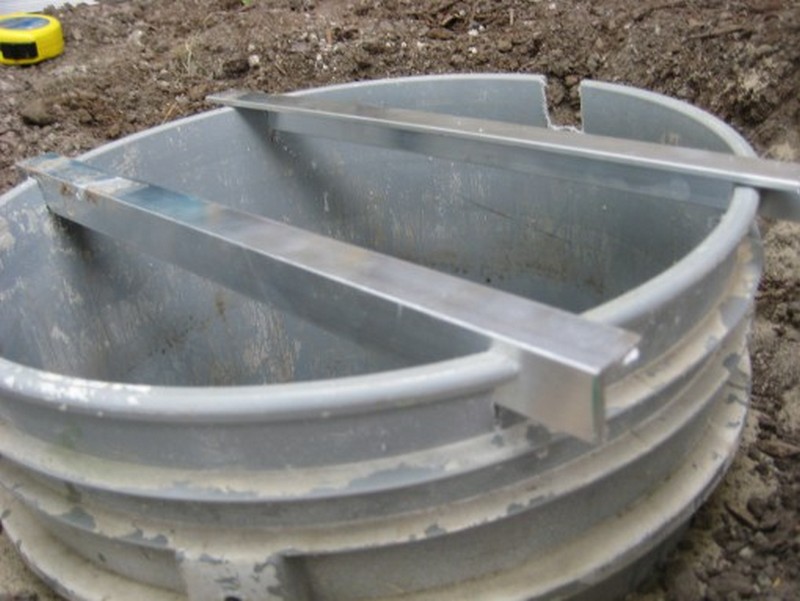
- Aluminum L-brackets
- Screen material – cut about 4-5 inches bigger than a 5-gallon bucket, and with a hole in the middle
- Submersible pump
- Hose – that goes with a submersible pump (technical term)
- Caulking Gun
- Hot Glue
- PVC Pipe – just slightly bigger than the hose
- Decorative Rocks
Tools:
- Shovel
- Hack Saw
- Tape Measure
Steps:
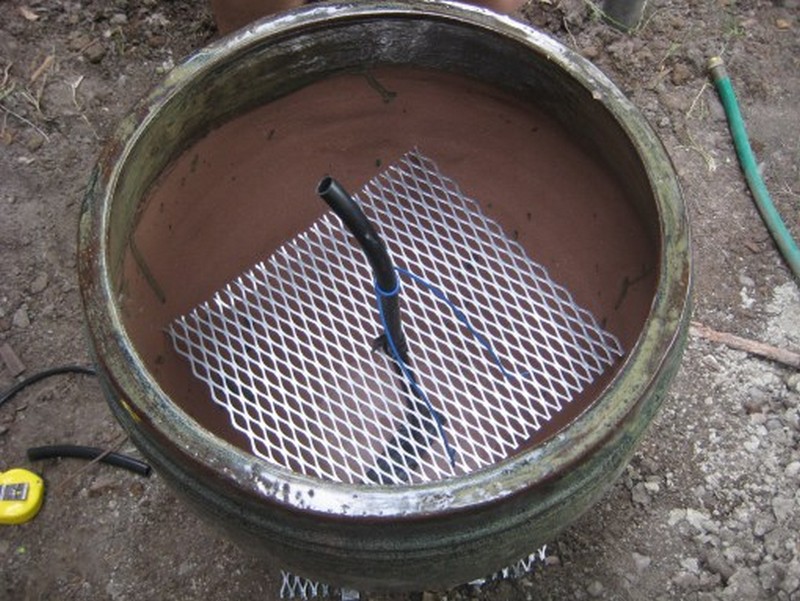
- Measure the ceramic pot base. Confirm it is smaller than the 5-gallon bucket opening so the pot rests inside without slipping.
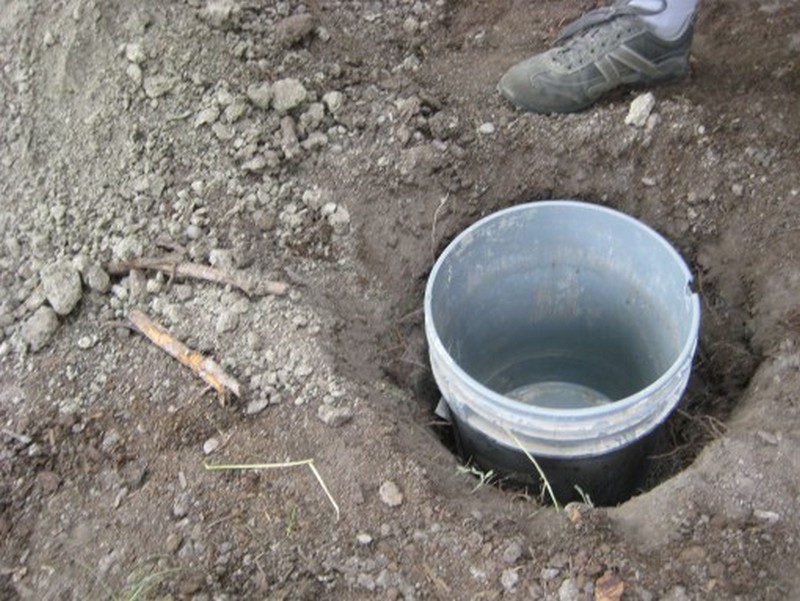
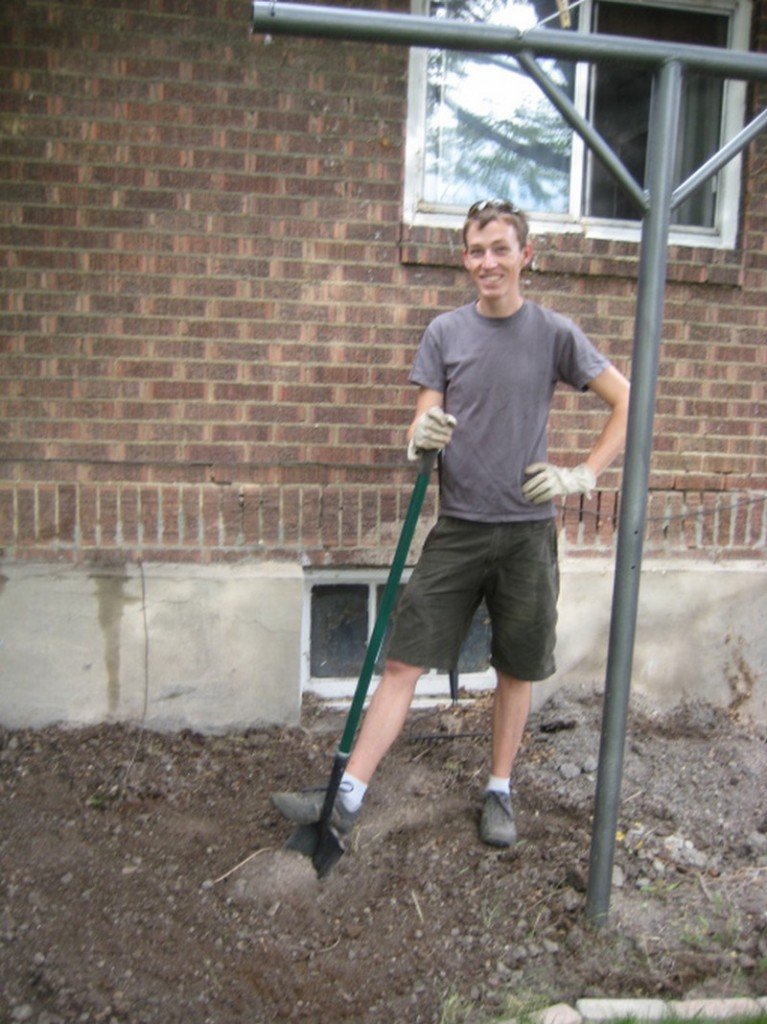
- Pick a level spot close to an outdoor outlet. Mark a circle the size of the bucket on the soil.
- Dig a hole deep enough for the bucket rim to sit one inch below ground. Compact the bottom so the bucket stands flat.
- Drop the metal bucket into the hole. Check it sits level with a tape measure. Back-fill soil around the sides and press firm.
- Use the hack saw to cut a short length of PVC pipe. Make it as tall as the bucket plus two inches. This pipe hides the hose rise.
- Feed the pump’s hose through the PVC pipe. Leave six inches of hose above the pipe to reach the pot’s spout.
- Set the submersible pump at the bottom of the bucket. Route the power cord up the back so it reaches the outlet safely.
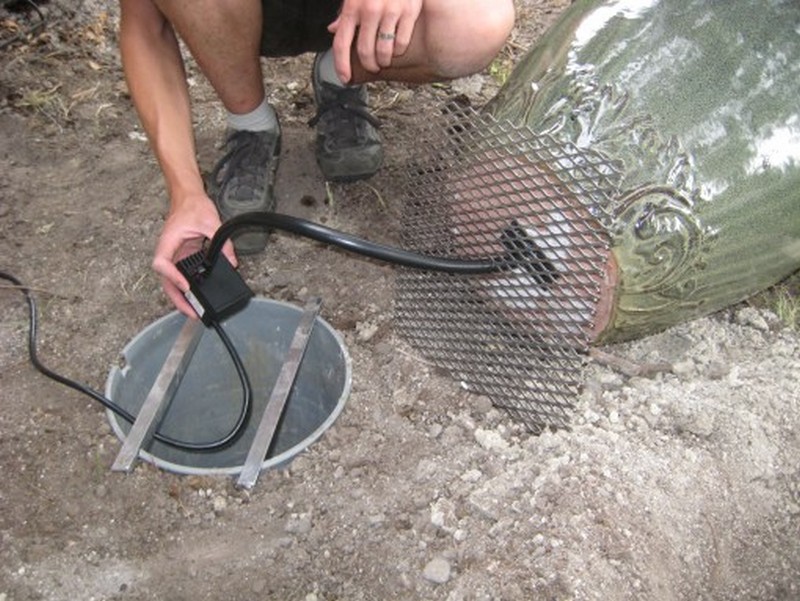
- Trim the screen circle so it overhangs the bucket rim by two inches. Cut a center slit to fit the PVC pipe snugly.
- Slide the screen over the hose and pipe until it lies flat on the bucket rim. Secure it with aluminum L-brackets and hot glue for stability.
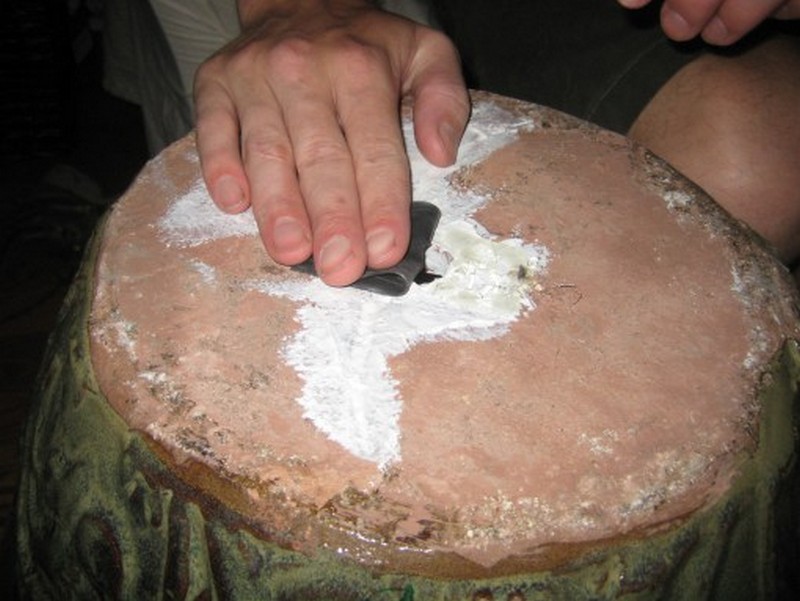
- Seal any screen gaps to the rim with a thin bead of exterior-grade caulk. This stops debris from falling into the bucket.
- Center the ceramic pot on the screen. Thread the hose up through its base drain hole. Add a dab of hot glue around the hose exit to keep it watertight.
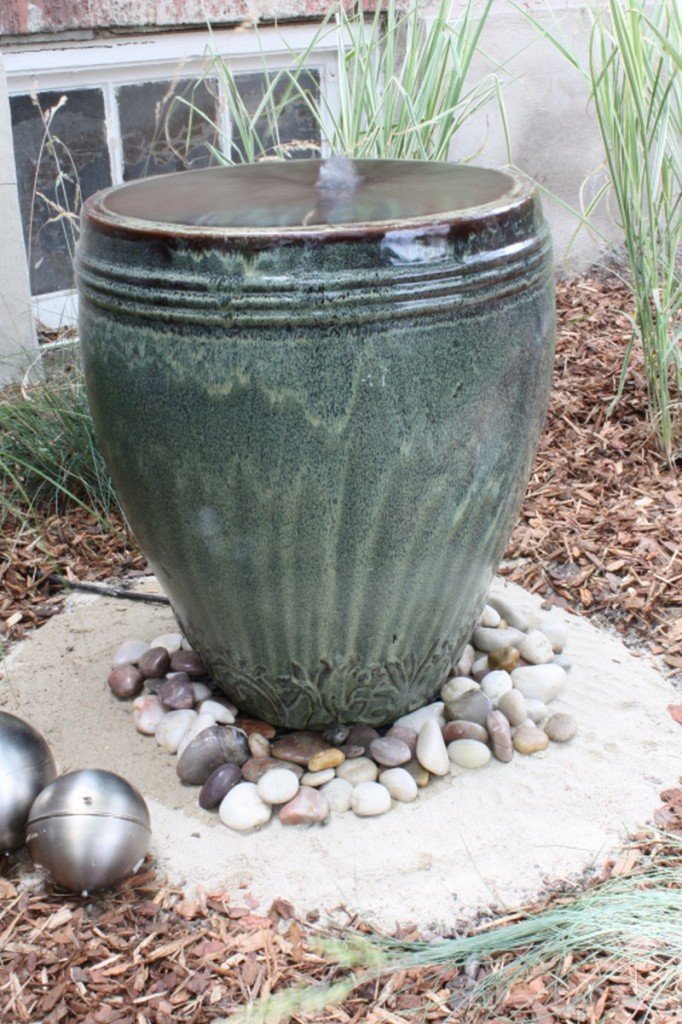
- Fill decorative rocks around the hose inside the pot and across the screen to hide the workings. Top the bucket with water, plug in the pump, and adjust the flow until the diy backyard fountain sends a smooth veil back into its hidden reservoir.
Energy-Efficient Pumps: Choosing Solar Models With Adjustable Flow
Solar power keeps a DIY backyard fountain running without raising the electric bill. Flexible flow controls create calm ripples on quiet mornings or a stronger rush for weekend events.
How Modern Solar Pump Panels Work
Photovoltaic cells turn sunlight into low-voltage current that feeds a brushless motor. The setup stays safe around kids and pets because voltage never reaches household levels. Many kits now include compact lithium batteries that store midday surplus. Your DIY backyard fountain keeps moving when clouds pass or guests linger after dusk.
Sizing the Pump to Fountain Height
Measure the distance from the pump resting on the bucket floor to the spout rim of the ceramic pot. Add a couple of inches to cover friction loss. Check pump “max head” specifications and select a unit rated at least ten percent higher than that number. This margin prevents strain and extends service life. Adjustable speed dials let you drop flow when wind picks up, saving splash loss and preserving water. Quiet magnetic impellers reduce vibration so the fountain becomes background calm rather than white noise.
Seasonal Care for Solar Hardware
Tilt panels about fifteen degrees toward the equator in summer. Increase to thirty degrees in winter. A quick wipe with a microfiber cloth each month clears dust that blocks rays. Clip back vines before they shade the cells. Lift the pump quarterly, rinse the sponge pre-filter, and brush algae off the housing. Store the panel indoors if hail threatens. Simple maintenance keeps a DIY backyard fountain whispering for years on free energy.
Adding Battery Backup for Cloudy Days
Many modern solar kits ship with a small lithium box tucked behind the panel. An MPPT controller optimizes charging and protects cells from overheat. Stored power drives the pump at night, stopping stagnation and mosquito breeding. Hide the black housing behind ornamental grass so the scene stays natural.
Troubleshooting Flow Problems
A weak stream often means the intake sponge is clogged with wind-blown grit or stray potting soil. Pull it out, rinse, and replace in minutes. Hard-water scale wipes off after a short vinegar soak. Keep a spare impeller on hand because swapping a worn rotor is cheaper than a new pump.
Water-Saving Circulation Tips
Run the fountain on a smart timer that cycles thirty minutes on, thirty minutes off during peak sun. Dark river stones lining the reservoir absorb warmth and slow nighttime evaporation. Lay a fine mesh over the pot in spring pollen season to block debris that forces you to top up more often.
Adding Aquatic Plants for Natural Filtration and Pollinator Appeal
Plants turn a DIY backyard fountain into a living pondlet that cleans itself and buzzes with life. Leaves trap nutrients, roots oxygenate water, and blooms lure butterflies to your patio.
Picking Oxygenators and Floaters
Hardy oxygenators like hornwort draw excess nitrogen out of the water column, cutting algae before it starts. Water lettuce floats above, casting gentle shade that cools the pool. Keep growth trimmed so stems never choke the pump intake. Healthy balance means clear water with no chemicals.
Arranging Plant Zones Inside the Pot
Place taller marginals—dwarf papyrus or blue pickerel—toward the back of the ceramic pot for depth. Let shorter floaters drift front and center. Weigh down oxygenator bunches with pebbles around the PVC standpipe so roots stay clear of the hose. Rotate the pot a quarter turn every couple of weeks to give all sides equal sunlight.
Keeping Wildlife and Clarity in Balance
Bees and butterflies gather on broad leaves for safe sipping. A few mosquito fish patrol larvae and add movement. Their waste feeds plant growth, closing the nutrient loop. Slip a mesh guard over the pump when autumn leaves fall so stems cannot foul the impeller and stall water flow in your DIY backyard fountain.
Selecting Plants for Your Climate
Tropical backyards thrive on Salvinia and mosaic plants that grow fast and need weekly thinning. Cool zones do better with miniature water lilies and water forget-me-not that bloom into fall. Always quarantine new arrivals in a tub for three days. This step flushes snails and hitchhikers that could invade the DIY backyard fountain.
Seasonal Pruning and Repotting
Snip yellowing leaves before they sink and decay. Lift each clump in spring, split crowded crowns, and wrap fresh aquatic soil in burlap to hold fine particles. Drop a slow-release pond fertilizer pellet near roots for steady nutrition without staining the water.
Protecting Plants From Curious Critters
Cats sometimes stalk birds at the water edge. Plant thorny sedges on the rim to block ambush spots. Anchor floating islands with clear fishing line so wind cannot blow them into the waterfall path. A simple net hoop overnight discourages raccoons that might uproot tender stems.
DIY BAckyard Fountain Gallery
Click on any image to start the lightbox display. Use your Esc key to close the lightbox. You can also view the images as a slideshow if you prefer 😎


Hidden LED Lighting Designs That Highlight Your Fountain After Dark
Smart lighting extends pleasure past sunset. Gentle glow on tumbling water turns a DIY backyard fountain into the centerpiece of evening gatherings without glaring at neighbors.
Choosing Submersible or Rim Fixtures
Submersible puck LEDs stick to the bucket wall and send shafts of light through rising bubbles. Rim-mounted strips tuck under the ceramic lip and graze the falling sheet for a soft curtain of sparkle. Warm white diodes feel like fireflies while cool white suits modern patio lines. Always pick drivers rated for outdoor duty and tuck them inside a weatherproof box.
Concealing Cables in Rock and PVC
Run low-voltage wire alongside the pump hose inside the PVC standpipe. Any leftover slack weaves under decorative rocks on the screen. Clear silicone pins the line so guests see only water and stone, never hardware. Dark jacket wire vanishes in shadow for a seamless look.
Automating Light Cycles
Plug the transformer into a dusk-to-dawn sensor so fixtures switch on when ambient light drops and off at first blush of morning. Energy cost stays pennies a month. Add a manual override for late-night parties. LEDs generate almost no heat, so nearby foliage stays healthy.
Introducing Color and Motion
RGB kits allow subtle hue shifts that suit mood or occasion. Pale aqua invites meditation while rich amber warms holiday gatherings. Keep saturation modest to avoid cartoon tones. For wildlife photography sessions choose amber or red diodes that do not disturb moths and bats.
Advanced Smart-Home Integration
Pair the transformer with a voice-controlled smart plug. A simple command lights the fountain as friends arrive. Scene presets link warm tones to twilight and cooler blues to dawn yoga. Motion sensors add security by brightening the area if someone approaches after midnight.
Staying Safe and Code-Compliant
Use direct-bury low-voltage cable even if it rests under shallow mulch. Install a GFCI outlet within reach yet outside splash range. Press the test button monthly. Inspect cord grommets for UV cracks each season. Good electrical habits keep the DIY backyard fountain both dazzling and safe year after year.
Your outdoor oasis now pairs sun-powered circulation, living plant filtration, and discreet lighting. Each element works together to cut bills, support local wildlife, and extend enjoyment into the night. A well-planned DIY backyard fountain rewards a single weekend of effort with seasons of gentle sound, clear water, and shimmering light.
Conclusion
Building a DIY backyard fountain transforms plain space into calm retreat. Each step teaches practical skills you can reuse on future projects. Smart pumps, plants, and lights keep upkeep light and costs down. The finished feature invites birds, butterflies, and quiet reflection. Enjoy the gentle sound and sparkle every time you step outside.
If you liked this project, you will also like viewing these water feature ideas…