Last Updated on January 23, 2024 by teamobn

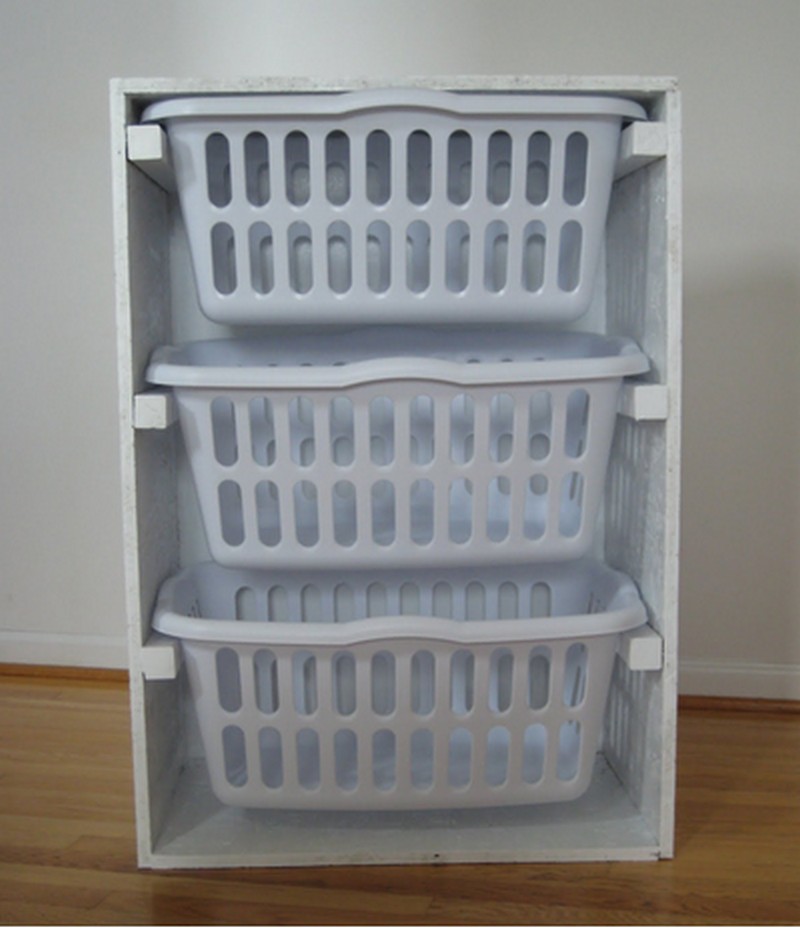
This DIY Laundry Basket Dresser will help organize your laundry rooms better. Even if you do have a well-organized laundry room, you’ve always got another aspect of laundry organization to consider.
That is, how to sort and collect dirty clothes from around your home and then how to return them once they are cleaned.
Well, here’s a simple way to sort your dirty washing. One for colors, one for whites, and one for handwashing.
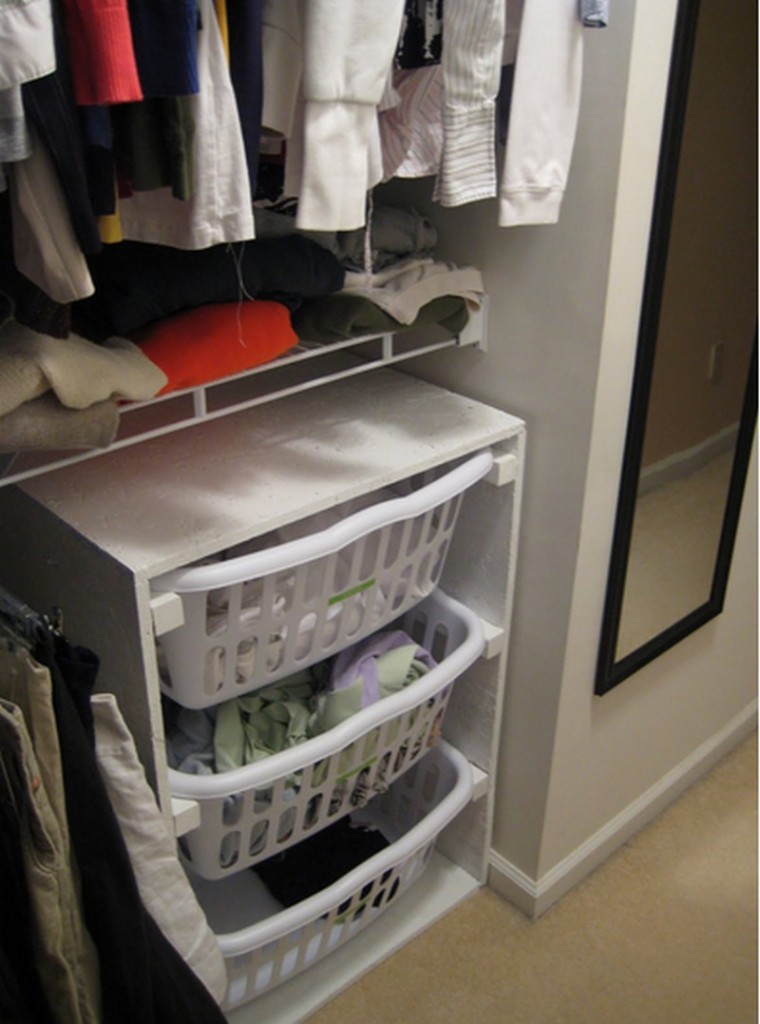
Or if you have a few people in your family, you could have one basket for each member of the house. Put this in your bedroom closet, bathroom, or laundry area for a no-hassle laundry day.
Why not install doors to hide the basket dresser, so you could double it as a display table or even an entryway table? Perfect for small spaces!
How to build this DIY Laundry Basket Dresser?
Materials:
- Composite Wood Sheets
- Screws
- Nails
- Paint
- Baskets
- Angle bars
Tools:
- Steel Tape Measure
- Circular Saw
- Power Drill
- Paintbrush
- Sander
- Level Bar
Measurement
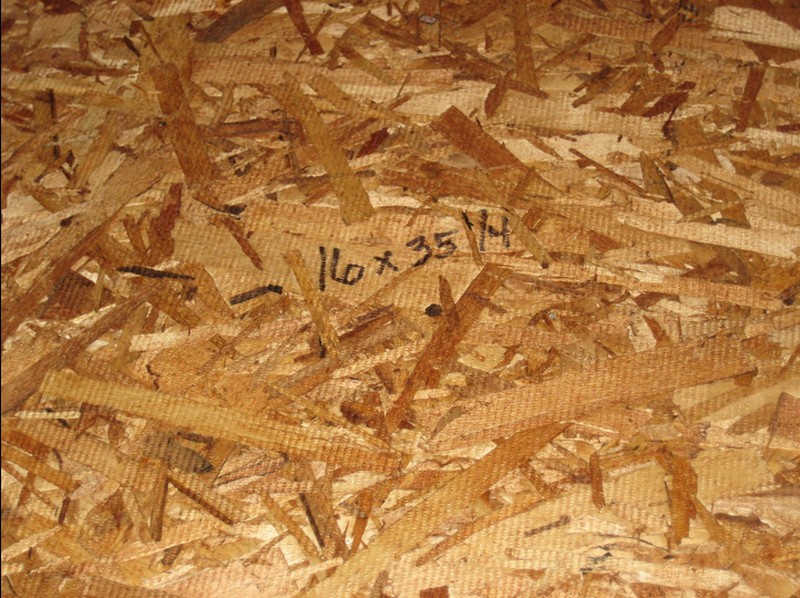
Get the desired height of your laundry basket dresser using steel tape. Mark the composite wood sheets at the desired length.
Place the steel tape on the top of the basket. With the help of a level, align the bottom edge of the steel tape with the bottom of the basket and mark the composite wood sheets.
Remove the steel tape and cut the wood sheets at the mark. Make notches and holes in the steel tape to ensure that it fits the basket and is sturdy.
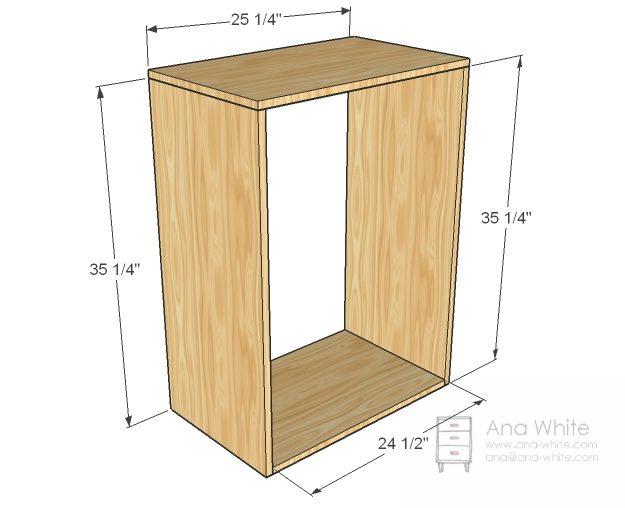
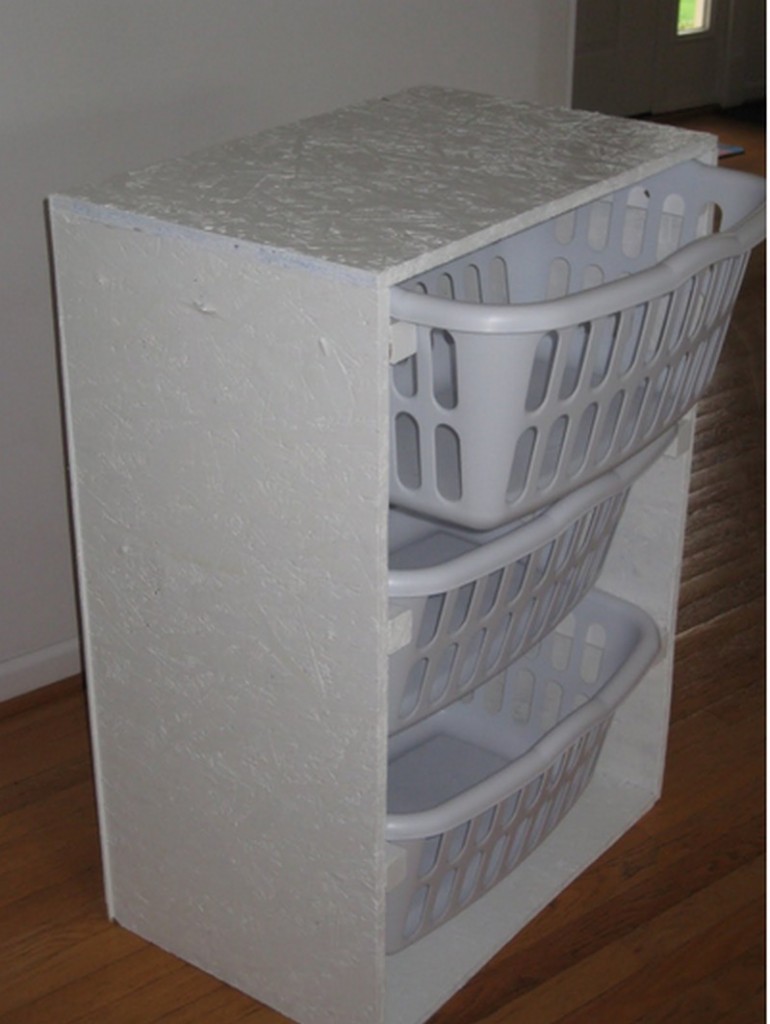
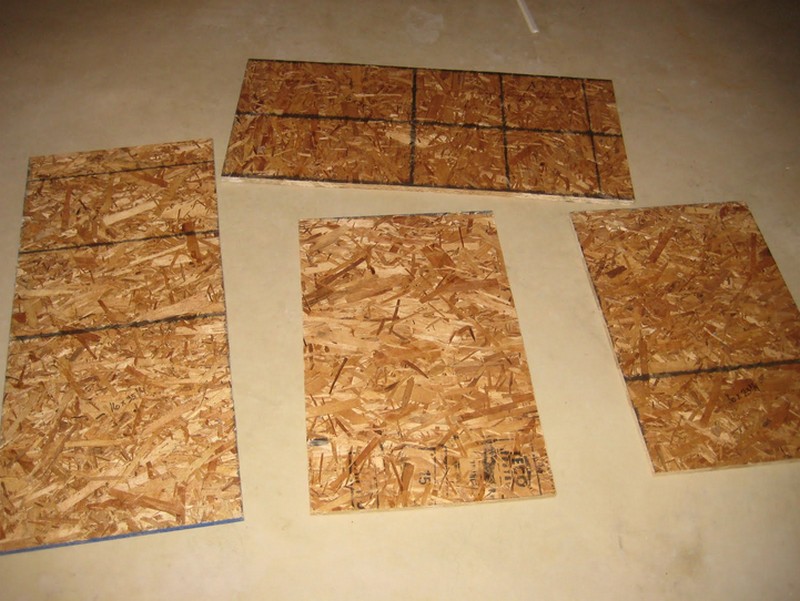
The Parts of the Dresser
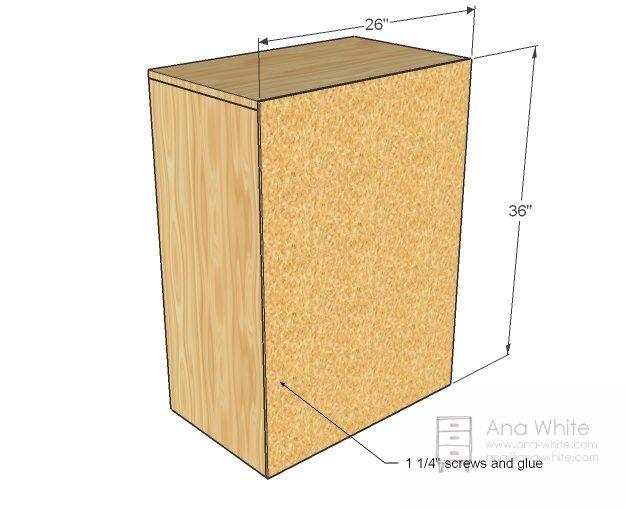
By now, you should be able to create 2 pairs of 2 equal parts of the dresser. The two longer equal parts that you cut will serve as the sidings of your basket. And the other shorter parts will serve as the top and bottom of your dresser.
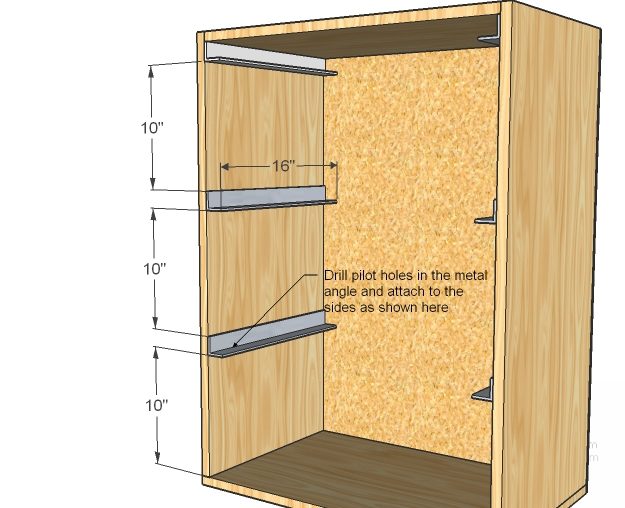
Cut your angle bars, the length of the angle bars should be equal to or a little shorter than the width of your sidings. These angle bars will hold your baskets.
Prepare for the drawer cover. The measurements should be in proportion to the measurement of the height of the siding and the width of the top and bottom parts.
Instructions
Design and Measurements
- Begin by designing your dresser. Decide the dimensions based on your space and the size of the baskets.
- Use the steel tape measure to mark measurements on the composite wood sheets. Ensure accuracy for a well-fitted dresser.
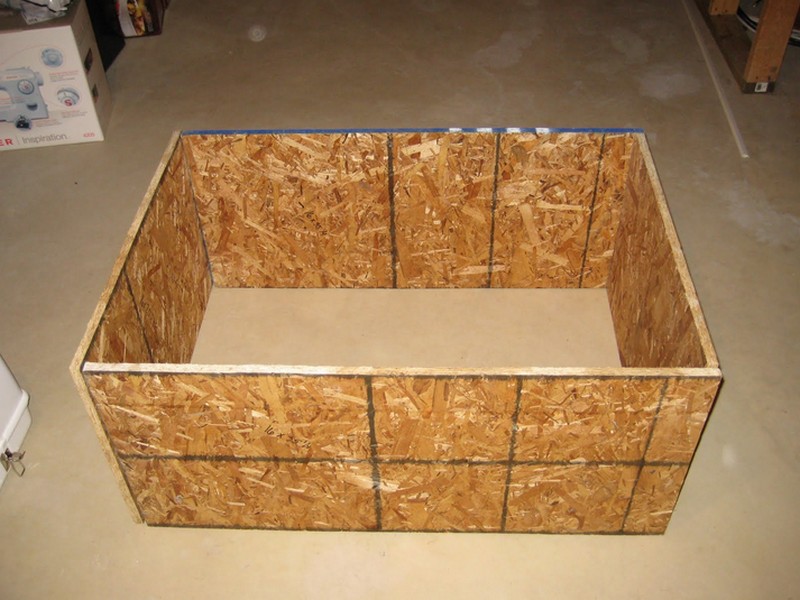
Cutting the Wood
- With the circular saw, carefully cut the composite wood sheets following your measurements.
- You’ll need pieces for the sides, top, bottom, and shelves of the dresser.
Sanding the Wood
- Use the sander to smooth all cut edges of the wood. This step is crucial for safety and aesthetics.
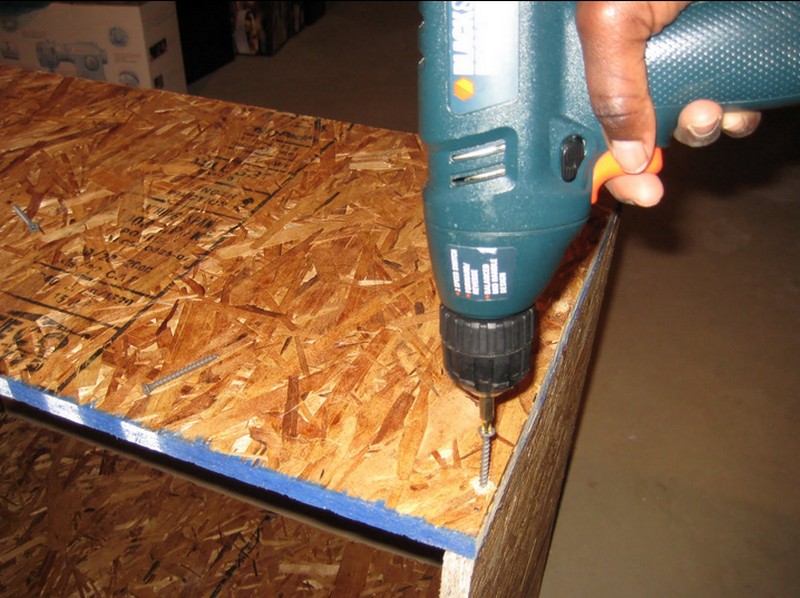
Assembling the Frame
- Start assembling the frame of your dresser. Connect the sides, top, and bottom using screws and the power drill.
- Make sure each joint is secure and the frame is sturdy.
Adding the Shelves
- Measure and cut the angle bars to support the baskets within the dresser.
- Attach these bars inside the dresser frame where the baskets will rest. Use the level bar to ensure they are even.
Securing the Dresser
- Check all connections are tight and secure. Add nails for extra stability if needed.
Painting
- Once the dresser is assembled, paint it with your chosen color.
- Use the paintbrush for a smooth finish. Let the paint dry completely.
Adding the Baskets
- Place the baskets onto the angle bars. Ensure they fit well and slide in and out smoothly.
Final Touches
- Once everything is assembled and painted, check for any sharp edges or loose screws.
- Make any necessary adjustments for safety and functionality.
Would you love to have this gorgeous addition to your laundry rooms?
Click on any image to start the lightbox display. Use your Esc key to close the lightbox. You can also view the images as a slideshow if you prefer 😎
Space-Saving Techniques for Small Laundry Rooms
Small laundry rooms can be a challenge to organize efficiently. The key is to maximize space without compromising functionality. Integrating a laundry basket into your laundry room is an effective way to achieve this.
Vertical Storage Solutions
Maximizing vertical space is essential in a small laundry room. With its tiered structure, a laundry basket perfectly aligns with this need. Its design enables the vertical stacking of laundry baskets, a smart solution for compact spaces. This vertical arrangement of baskets saves precious floor area and keeps laundry sorted and organized.
The height of a laundry basket dresser can be customized to fit your space and needs. If ceiling height allows, you can opt for a taller unit with more baskets. This flexibility makes it ideal for small laundry rooms where every inch counts. Going vertical creates more walking and working space, making your laundry routine more manageable and less cluttered.
Additionally, the vertical design of the laundry basket offers an ergonomic advantage. It reduces the need to bend down repeatedly, making laundry tasks easier on your back. This setup is especially beneficial for sorting laundry, as it allows for clear separation of different types of clothes in an accessible manner.
Overall, using a laundry basket in a vertical storage solution is a smart and efficient way to enhance the functionality of a small laundry room. It optimizes space and contributes to a more organized and physically comfortable laundry experience.
Multi-functional Laundry Basket Dresser
Selecting a multi-functional cabinet is a smart strategy for small laundry rooms. These rack are designed not just to store laundry but also to serve additional purposes. Many come equipped with a flat top surface. This surface can be used as a convenient folding area. It provides a dedicated space to fold clothes right after drying, streamlining your laundry process.
Besides serving as a folding station, the top of the laundry basket can be utilized for storage. It’s an ideal spot to keep laundry essentials like detergents, fabric softeners, and stain removers. This arrangement keeps supplies within easy reach while doing laundry. It also helps in maintaining a clutter-free space.
Some laundry basket feature additional shelves or compartments. These can store items like ironing supplies, sewing kits, or even small cleaning tools. This versatility is especially beneficial in a small laundry room where every bit of storage space counts.
The multi-functional nature of this laundry basket makes them a valuable addition to any laundry room. They save space and enhance the efficiency and convenience of your laundry routine. By combining storage, folding, and even ironing spaces into one compact unit, these dressers offer a comprehensive solution for managing laundry in smaller homes.
Corner Placement
Optimizing corner space is a clever strategy in small laundry rooms. When placed in a corner, a dresser effectively utilizes this often-overlooked area. Usually left vacant, corners can be transformed into valuable storage spaces with the right furniture. A laundry basket designed to fit into corners maximizes room efficiency.
The design of these dressers allows them to integrate seamlessly into corner spaces. This placement not only saves floor space but also helps in maintaining a more organized and open area. By occupying corners, the laundry basket doesn’t interfere with the central workspace of the room, allowing for freer movement and a less cluttered environment.
Furthermore, the corner placement of a laundry basket can enhance room aesthetics. It can create a more balanced look in the room. The rack becomes a functional yet unobtrusive part of the room’s layout. This placement can also make it easier to sort and manage laundry, providing a distinct, dedicated area for laundry storage without disrupting the room’s flow.
Placing a laundry basket in a corner is an excellent way to utilize every square inch of a small laundry room. A practical, space-saving solution that contributes to a neater, more organized space.
These space-saving techniques transform a cramped laundry room into an organized, functional space. Including a laundry basket is smart for anyone looking to enhance their small laundry area.
Decorating and Styling the Laundry Basket Dresser
Decorating your DIY laundry basket enhances its appearance and complements your home decor. Here are some ideas:
Choose a Color Scheme
Selecting the right paint color for your laundry basket is vital for integrating it into your laundry room’s aesthetic. First, consider the existing color palette of your laundry room. A classic white rack can blend seamlessly if your room features light, neutral tones.
A bold black can make a striking statement for a more modern or minimalist space. Don’t hesitate to experiment with colors that reflect your style. Vibrant hues can bring energy to the space, while softer tones create a calming atmosphere.
Another approach is to use a contrasting color for your rack. This can turn the cabinet into an eye-catching focal point in your laundry room. If your room is mostly monochromatic, a bright or deep color rack can break the monotony and add visual interest. The key is to choose a color that complements the room while showcasing your unique style.
Add Decorative Knobs or Handles
Enhancing your basket rack with decorative knobs or handles is a simple yet effective way to personalize it. This addition is not just about aesthetics; it improves functionality by making the baskets more accessible.
When selecting knobs or handles, consider the overall theme of your room. For a modern look, sleek and minimalistic designs work well. If your room has a vintage charm, ornate handles can enhance that old-world feel. Materials like wrought iron or aged brass can add to the room’s cozy and warm ambiance in a rustic setting.
These decorative elements allow you to infuse your personal touch into the space. Whether you choose bold, statement-making handles or subtle, understated knobs, they can significantly elevate the look of your laundry basket. Moreover, they provide an easy and affordable way to update the dresser’s appearance over time, allowing you to refresh your space without a complete makeover.
Use Stencils for a Unique Design
Creating a custom look for your rack can be achieved effortlessly using stencils. Stenciling allows you to add a personal touch and artistic flair to the basket holder.
Whether you prefer elegant floral patterns, contemporary geometric shapes, or simple, clean lines, stencils offer endless possibilities to enhance the dresser’s appearance. These designs can transform a plain basket holder into a striking functional art in your laundry room.
When deciding where to apply stencils, consider both the dresser’s sides and top surface. Stenciling the sides can make the basket holder stand out, especially if it’s visible from different angles in the room.
Alternatively, decorating the top surface can create a visually appealing focal point when viewed from above. The choice of stencil placement depends on how much of a statement you want to make and which parts of the dresser are most visible in your laundry room’s layout.
Incorporate Textures
Adding texture to your basket dresser is another way to elevate its design. One practical and stylish way to do this is by using fabric liners in the baskets. Fabric liners add a visual and tactile dimension to the dresser and serve functional purposes.
Choose fabrics that complement or contrast the dresser’s color and overall design. For instance, a soft, pastel-colored liner can soften the look of a boldly painted dresser, while a vibrant, patterned fabric can add a pop of color to a more neutrally toned dresser.
Besides enhancing the aesthetic appeal, fabric liners are crucial in protecting delicate clothing items. They prevent snags and tears when delicate fabrics come into contact with the rougher surfaces of baskets.
These liners can be easily removed and washed, helping to maintain a clean and fresh environment for your laundry. Incorporating fabric liners adds beauty and practicality to your basket dresser, making it a truly functional piece in your laundry routine.
Top it Off with Decorative Items
Utilizing the top surface of your basket holder for decorative items is a great way to add a personal touch and enhance its charm. This space offers a perfect opportunity for styling, especially if the dresser is placed in a visible area of your home. Consider placing a small indoor plant to bring a touch of nature and freshness into the room.
Alternatively, a tastefully chosen picture frame can add a sentimental touch, reflecting your personality and style. For a more sophisticated look, a chic lamp can serve as a decorative piece and provide additional lighting. This approach of decorating the top surface can transform your basket dresser from a purely functional item into a stylish home feature.
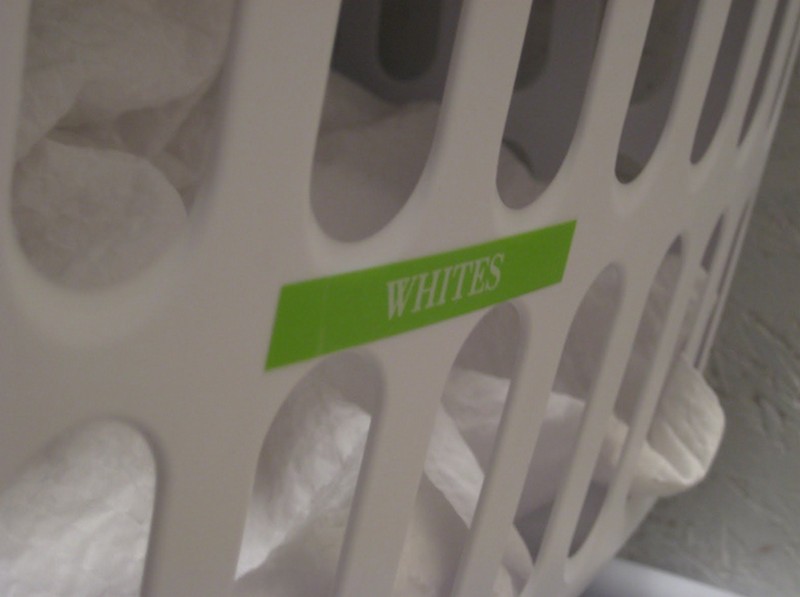
Label the Baskets
Adding labels to each basket in your dresser is a simple yet effective way to bring organization and efficiency to your laundry process. Labels help in easily identifying which clothes go into which basket, streamlining the sorting process.
You can use hang tags attached to each basket or paint or stencil labels onto them. Common categories like “Whites,” “Colors,” and “Delicates” ensure that garments are properly sorted, reducing the chances of laundry mishaps. This practical touch not only aids in laundry management but also adds a visually appealing and orderly aspect to the dresser.
Lighting
Proper lighting can significantly impact the functionality and aesthetics of your basket dresser, especially if it’s situated in a dimly lit area of your home. Add a small lamp on or near the dresser to provide focused lighting. This helps in tasks such as sorting and folding clothes and creates a warm and inviting ambiance.
Another option is to install under-cabinet lighting above the dresser. This type of lighting can illuminate the entire area without taking up extra space, enhancing the dresser’s usability and appearance. Good lighting is essential for practical reasons and elevating the overall look and feel of the space where your basket dresser resides.
FAQ for DIY Laundry Basket Dresser
What materials are needed to build a laundry basket dresser?
To build a laundry basket dresser, you’ll need composite wood sheets, screws, nails, paint, baskets, angle bars, and basic tools like a steel tape measure, circular saw, power drill, paintbrush, sander, and level bar.
How can I customize my laundry basket dresser?
You can customize your dresser by choosing different paint colors, adding decorative knobs or handles, using stencils for unique designs, and selecting fabric liners for the baskets. The size and number of baskets can also be adjusted to fit your needs.
Is it difficult to build a laundry basket dresser?
Building a dresser is a moderate DIY project. It requires basic woodworking skills, including measuring, cutting, and assembling. With the right tools and careful following of instructions, most DIY enthusiasts can complete this project.
Can the laundry basket dresser be used for other purposes?
Yes, the dresser is versatile. Its top can serve as a folding area or a space to store laundry supplies. Some people also use it in bedrooms or bathrooms for additional storage.
How do I maintain and care for my laundry basket dresser?
Regular cleaning with a damp cloth and mild cleaner will keep your dresser looking fresh. Tighten any loose screws and touch up paint as needed. If you use fabric liners, wash them periodically to keep them clean.
What are some space-saving tips for small laundry rooms?
For small laundry rooms, use vertical space by stacking baskets in the dresser. Consider placing the dresser in a corner to utilize underused space. Choose a multi-functional dresser that can double as a storage and folding area.
How do I ensure my laundry basketis safe and stable?
Ensure all screws and nails are tightly secured during assembly. Use a level bar to confirm the dresser is even and stable. Regularly check for any loose parts and tighten them as necessary.
Can I add wheels to my laundry basket?
Yes, adding caster wheels to the bottom of your dresser is possible. This adds mobility, making it easier to move the dresser for cleaning or rearranging your space.
How do I choose the right basket size for my dresser?
Measure the interior dimensions of your dresser and choose baskets that fit comfortably within these measurements. Allow some extra space for easy removal and placement of the baskets.
Can I install doors on my dresser?
Yes, you can install doors on your dresser for a cleaner look. This is especially useful if you want to use the dresser as a multi-purpose piece of furniture in areas outside the laundry room.
Conclusion
Building your laundry basket dresser is a rewarding project that enhances organization and style in your home. This DIY task can be fun and functional with the right tools and materials. The dresser helps sort and store laundry efficiently and serves as a decorative element.
If you liked this project, you will also like viewing these storage ideas…