Last Updated on November 27, 2025 by teamobn
At a Glance:
Build an approximate 8×6 ft pallet shed using recycled pallets for under $500. Total build time: about 12–16 hours (2 weekends). Skill level: intermediate — basic carpentry and use of power tools required.
Key facts:
- Finished footprint: about 8 ft by 6 ft (customizable)
- Estimated cost: under $500 (materials only)
- Estimated total time: 12–16 hours
- Difficulty: intermediate
- Permit needed: check local rules (depends on size and local code)
- Recommended pallet type: HT (heat-treated) — avoid chemically treated pallets
What you will get:
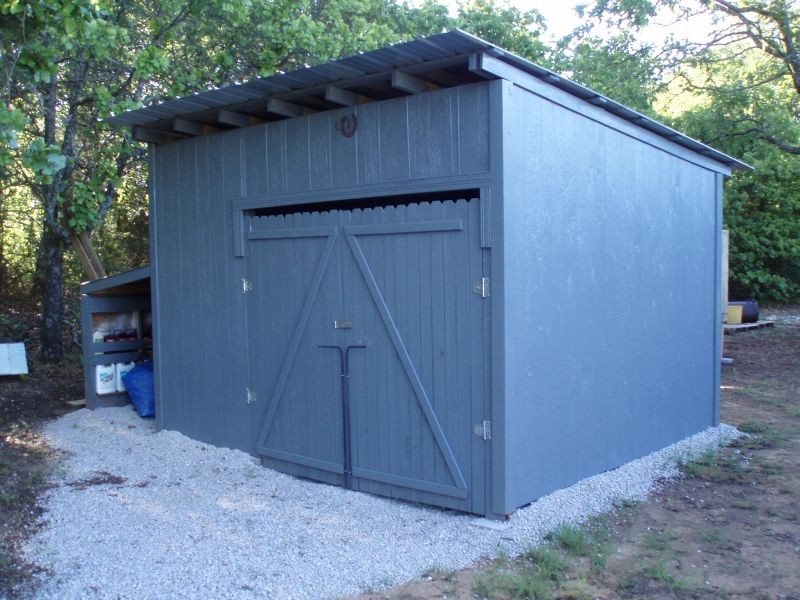
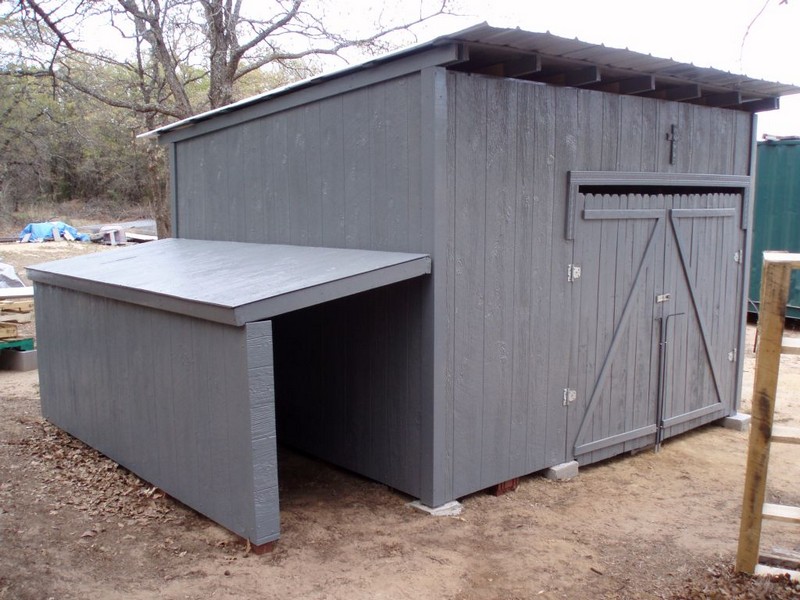
A sturdy, weatherproof backyard shed suitable for tool and equipment storage or a small workshop. The finished shed can hold a lawnmower, bicycles, garden tools, and shelving for smaller items.
Do you need so much stuff that your home and garage are now just overflowing and crowded? Think of all the space you would be able to free up if you had a nice little shed in your backyard!
You can stash your holiday decorations out of the way until you need them. Or you can clear out your closets and make room for your clothes! This is one of the many functional DIY projects that will improve your home.
A pallet shed is an essential feature in many backyards. Where else can you store the tools, lawnmower, and other stuff that simply doesn’t fit in the house? Some sheds even double as a workshop.
This one is all the better because it’s made from recycled pallets!
It’s good for your pocket since pallets are sold at very low prices, if not free. Would you believe that the shed featured here costs less than $500?
And that includes the money spent on all materials – including the concrete, frames, roofing, and exterior pallet shed walls! Not bad for a large, sturdy shed, right?
Don’t forget the good that you are doing to the environment when you use recycled pallets. It helps save our natural resources and reduce landfill waste.
Pallet Shed Guide
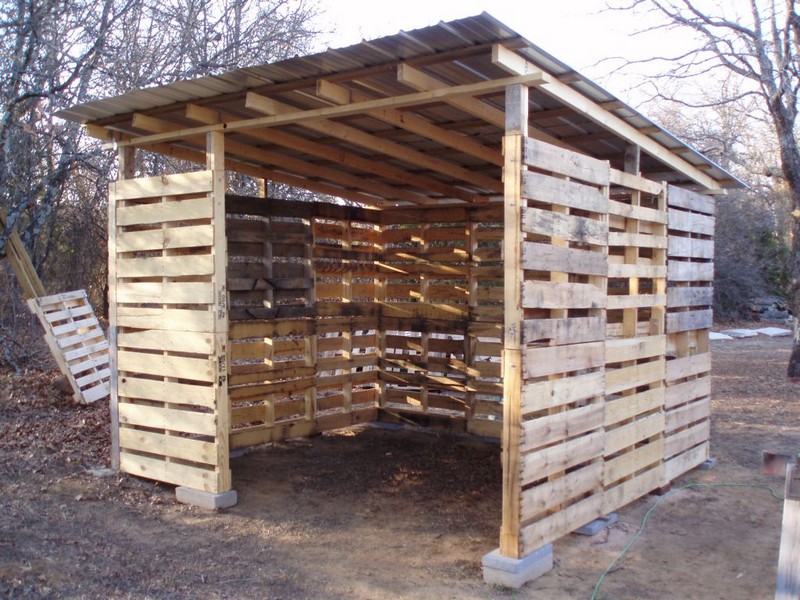
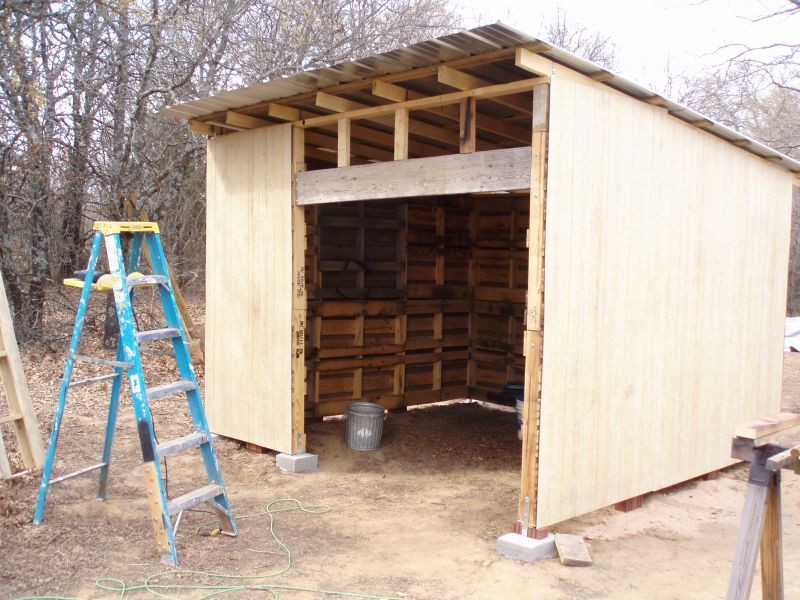
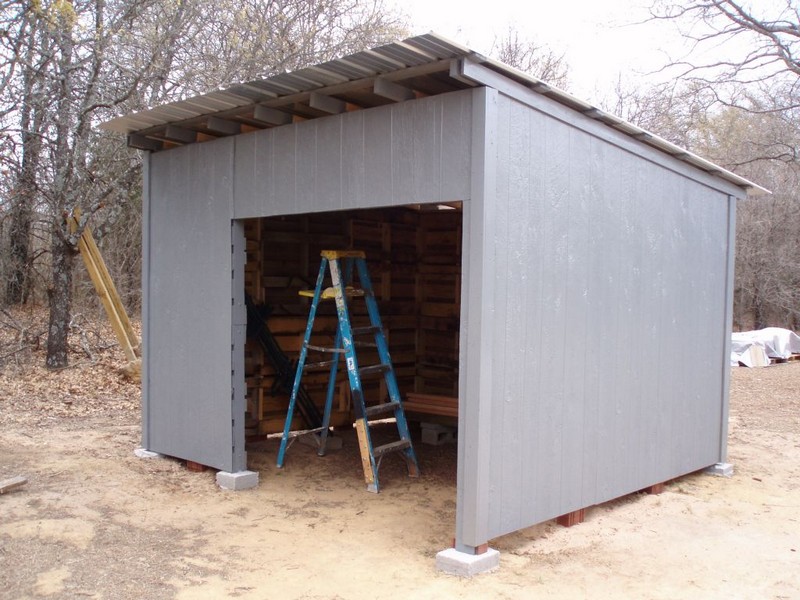
Would this shed work in your location? Follow our pallet shed instructions below. Also, take a look at the photos below showing how this shed was made and be inspired! 🙂
What Are the Materials Needed for Your DIY Pallet Shed
- 10 reclaimed wooden pallets (48×40 in), in good condition, marked HT if possible
- 2×6 timber: 6 pieces @ 8 ft (for base and roof framing)
- 4×8 wood panels: 7 sheets, 16 mm thick (for extra wall strength and interior backing)
- Concrete mix: 6–8 bags (for piers)
- Red bricks: enough to surround piers (optional for finish)
- 1/4 in bolts, 3.5 in long, with washers: 14–20 pieces
- Heavy-duty metal straps: 6–8
- Galvanized sheet metal for roofing: enough to cover ~8×6 roof
- Oil-based exterior paint or wood preservative: 1–2 gallons
- Door hinges and latch: 1 set
- 18 in rebar: 4–6 pieces (for securing piers)
- Melamine board forms for piers (or reusable concrete forms)
What Are the Tools Needed for This Build
- Power drill with bits
- Circular saw or handsaw
- Spirit level
- Tape measure, carpenter’s square
- Shovel & trowel
- Wheelbarrow (for concrete)
- Hammer, wrench set, screwdriver
- Ladder and safety equipment (gloves, goggles, ear protection)
Safety & pallet-chemical warning
- Inspect pallets for HT marking (look for “HT” stamp). Avoid pallets stamped with chemical codes (e.g., “MB” which indicates methyl bromide).
- Wear gloves, eye protection, and a dust mask when cutting or sanding reclaimed wood.
- If you’re adding electricity or plumbing, hire a licensed professional.
- Check local zoning and building codes before building; permits may be required depending on size and location.
How to Build this Incredible DIY Pallet Shed
Step 1: Preparing the Foundation
- Mark out the area for your shed. Clear and level the ground using a shovel.
- Mix concrete in a wheelbarrow and pour it into melamine board forms to create piers. This will be your shed’s foundation.
- Once the concrete is set, place red bricks around each pier for additional support.
Step 2: Building the Frame
Deliverable: Sturdy base frame anchored to piers.
- Cut 2×6 timber to size and assemble a rectangular base. Check for square and level.
- Secure base to concrete piers with heavy-duty metal straps and bolts (use through-bolts where possible).
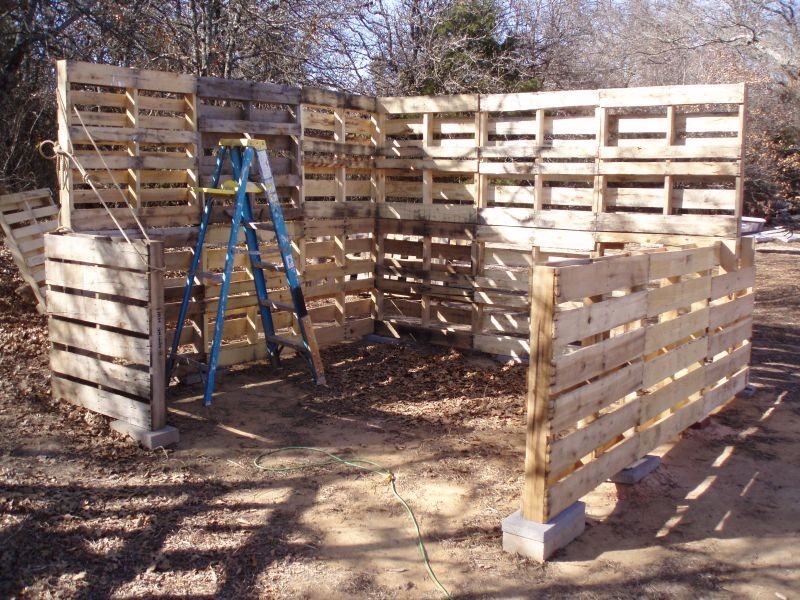
Step 3: Construct Wall Frames
Deliverable: Four framed walls attached to base.
- Cut and assemble wall studs and plates using 2×4/2×6 as required. Include a framed opening for the door.
- Temporarily brace walls, then fix them to the base and to each other. Ensure walls are plumb and square.
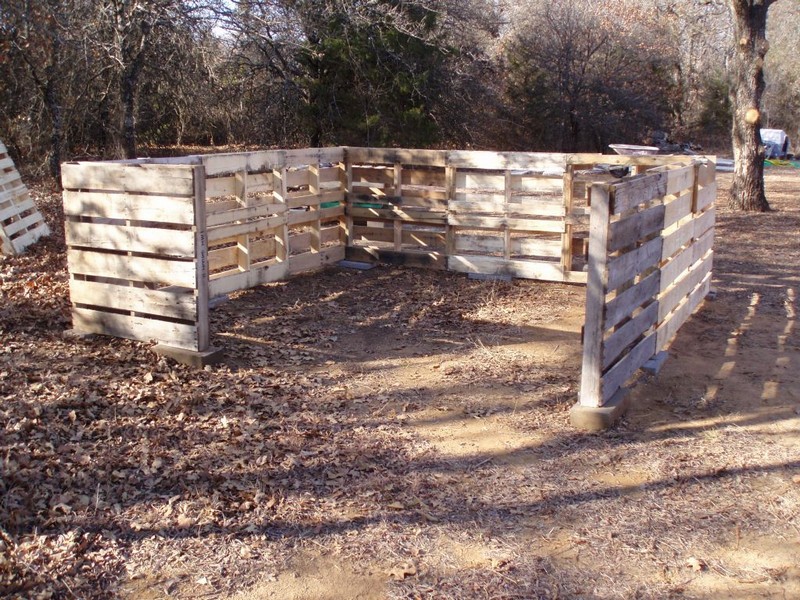
Step 4: Install Pallets as Exterior Wall Panels
Deliverable: Pallet-clad exterior walls.
- Inspect pallets; remove loose boards or nails. Fit pallets to each wall frame and secure with bolts and washers.
- Where gaps exist, cover or reinforce with 4×8 panels for strength and weatherproofing.
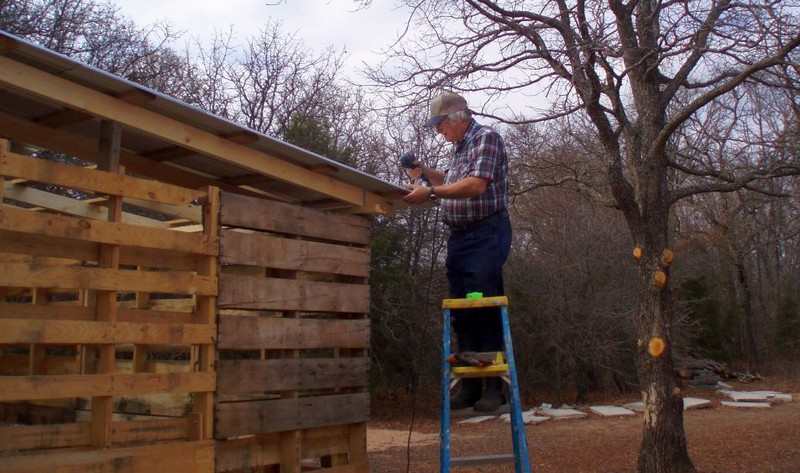
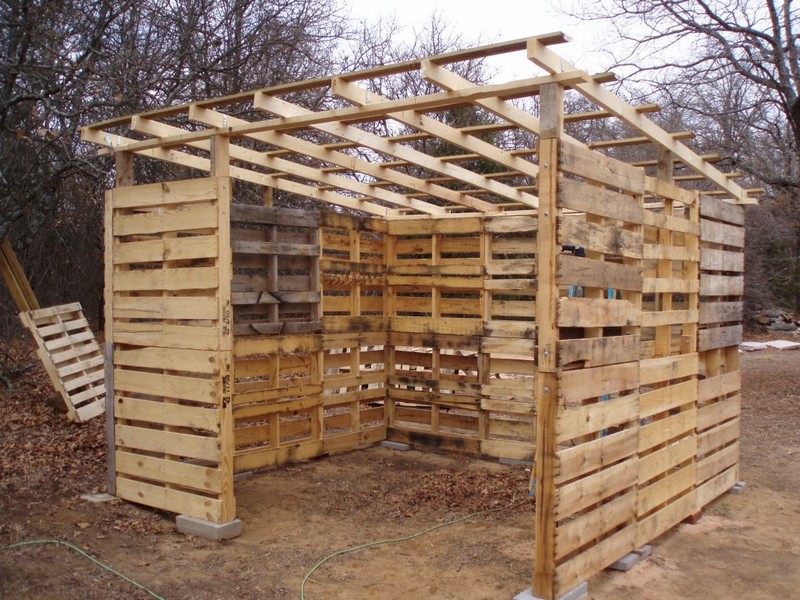
Step 5: Roof framing & Covering
Deliverable: Framed roof with metal roofing installed.
- Build roof rafters using 2×6 timber and secure to top plates. Add ridge board if needed.
- Cover with 4×8 sheathing where desired, then fix galvanized sheet metal or corrugated roofing. Overlap sheets per manufacturer instructions and seal edges with flashing.
Deliverable: Functional door and exterior finish coat.
Step 6: Door assembly & Finishing
- Construct a door from pallet boards or wood panels. Attach with robust hinges and fit latch.
- Fill gaps, sand rough edges, and prime any exposed pallet timber as needed.
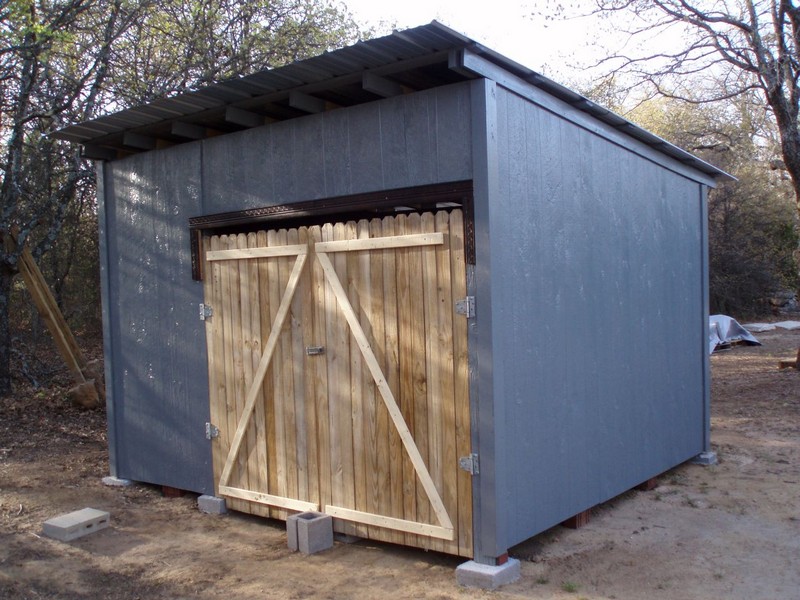
Step 7: Paint, Weatherproof, Inspect & Personalize
Deliverable: Weatherproofed, safe, and personalized shed ready for use.
- Apply oil-based exterior paint or wood preservative to protect from rot and insects.
- Check every bolt and joint for tightness. Add shelves, hooks, insulation, or vents based on intended use.
Final Specs & Suggested Layout
- Approx internal floor area: ~48 sq ft (8 × 6 ft)
- Suggested door width: 28–32 in for easy access to lawnmower/bikes
- Suggested uses: garden tool storage, workshop nook, potting shed, hobby space
Personalization Ideas
- Add shelving along one long wall and pegboard for tools.
- Install a small window for natural light (with flashing & proper sealing).
- Insulate with rigid foam panels and add a small heater for a year-round workshop (hire electrician).
Pallet DIY Backyard Shed Uses and Layouts
Pallet sheds are versatile structures that can serve various purposes. These sheds, crafted from recycled pallets, are not only cost-effective but also customizable to fit different needs. In this section, we explore the multiple uses and layout options for a DIY backyard shed, offering inspiration for your backyard project.
Storage Solutions
Pallet sheds are ideal for decluttering your home and garage. They offer a spacious area to store garden tools, lawnmowers, bicycles, and other outdoor equipment. To maximize space, install shelves at different heights to accommodate various items. Hooks and pegboards on walls are great for hanging tools, keeping them organized and easily accessible.
For bulky items like lawnmowers or wheelbarrows, allocate a specific area near the entrance. This ensures they are easily reachable without moving other items. Consider installing drawers or bins for smaller items like gardening gloves, seeds, or hand tools.
Proper organization in your pallet shed can turn it into an efficient storage solution, keeping your outdoor items safe and well-maintained.
Creative Workshops
For those who love DIY projects, a pallet shed can be an ideal workshop. Start by installing a sturdy workbench, which will be the centerpiece of your workspace. Ensure it’s strong enough to handle various projects, from woodworking to painting. Above the workbench, install shelves or cabinets for storing tools and materials.
Good lighting is crucial, so add bright, energy-efficient lights to illuminate your workspace. The natural wood of the pallets provides a warm, rustic feel, perfect for a creative environment.
Consider adding a pegboard for hanging tools, a vise for stability during work, and even a sound system for entertainment. With these additions, your pallet shed workshop will not only be functional but also a space where creativity thrives.
Recreational Area
Transforming a pallet shed into a recreational area creates a unique space for relaxation and enjoyment. Start by insulating the walls and ceiling to make the shed comfortable year-round. Add cozy seating options like bean bags, a small couch, or cushioned chairs.
For a more inviting ambiance, install windows to let in natural light and provide a view of your garden. Consider adding a small table for books, crafts, or a cup of coffee.
To create an entertainment center, you might include a compact sound system or a small TV. Decorate the space with plants, artwork, or decorative lights to make it more inviting. This recreational pallet shed can be a peaceful retreat for reading, meditating, or enjoying hobbies away from the bustle of the house.
Custom Layouts
The layout of your pallet shed depends on its primary use. For storage, prioritize shelving and floor space. Workshops might need a central work area and tool storage. Recreational spaces require comfortable seating and open areas. Consider the size of your backyard and your specific needs when planning the layout.
Pallet sheds are not just practical; they are also a canvas for creativity. With the right layout and purpose, they can become a valuable addition to any home.
Click on any image to start the lightbox display. Use your Esc key to close the lightbox. You can also view the images as a slideshow if you prefer 😎
Safety Considerations and Building Regulations
Building a pallet shed requires attention to safety and adherence to local building regulations. This section will guide you through key safety considerations and the importance of complying with building codes.
Safety During Construction
Safety is paramount when constructing a pallet shed. Always wear appropriate protective gear, including gloves, safety glasses, and sturdy footwear. Be cautious when handling tools, especially power tools like saws and drills.
Keep your workspace clean and organized to prevent accidents. If you’re working at height, use a stable ladder and never overreach. Ensure all electrical tools are in good condition and use them according to the manufacturer’s instructions. If you’re not experienced in construction, consider seeking help or guidance from someone who is.
Complying with Building Regulations
Before starting your pallet shed project, check local building codes and regulations. Some areas require permits for constructing sheds, especially if they exceed a certain size. Regulations may also dictate the shed’s placement in relation to property lines, main buildings, and utility lines. It’s important to comply with these regulations to avoid legal issues and ensure your shed is safe and legal. In some cases, your shed may need to be inspected upon completion.
Structural Integrity and Weatherproofing
A key aspect of safety is ensuring the structural integrity of your pallet shed. Use quality, sturdy pallets and check for any signs of weakness or damage. The foundation of the shed should be solid and level to prevent structural issues.
Weatherproofing is also crucial, especially in areas prone to harsh weather. Use appropriate materials to protect the shed from rain, wind, and extreme temperatures. Regular maintenance checks are important to ensure ongoing safety and durability.
Fire Safety and Prevention
When constructing and maintaining your pallet shed, consider fire safety. Use non-flammable or fire-retardant materials where possible, especially for insulation and roofing. Keep the shed clear of highly flammable materials, and if you’re storing equipment like lawnmowers, ensure fuel is stored safely. Installing a small fire extinguisher in the shed is a wise precaution.
Electrical Safety
If you plan to install electrical wiring in your pallet shed, it’s crucial to follow electrical safety standards. Use a qualified electrician to ensure all wiring complies with local codes. Proper grounding and the use of weatherproof fixtures can prevent electrical hazards. Regularly check for any exposed wires or faulty electrical connections.
Building Material Safety
Be cautious about the pallets you choose. Some pallets are treated with chemicals that can be hazardous. Look for pallets marked with “HT” (heat-treated) as they are safer and free from harmful chemicals. Avoid using pallets with unknown treatments or markings, as they may contain toxic substances.
Ventilation and Air Quality
Good ventilation in your pallet shed is essential, especially if it’s used as a workshop or recreational area. Proper airflow can prevent the buildup of fumes from paints, solvents, or fuel. Installing windows or vents can ensure adequate ventilation, enhancing both air quality and comfort.
Compliance with Zoning Laws
Understand the zoning laws in your area. These laws dictate what structures can be built and their intended use. Ensure your pallet shed aligns with these laws to avoid future legal complications.
Accessibility and Ergonomics
Consider accessibility and ergonomics, especially if you’ll spend significant time in the shed. Ensure doorways and pathways are wide enough for easy movement, and consider adjustable or ergonomic furniture to prevent strain or injury.
Regular Maintenance Checks
Regular maintenance is key to safety. Inspect your shed periodically for structural damage, leaks, or wear and tear. Routine checks can prevent small issues from becoming major safety hazards.
By focusing on safety and adhering to building regulations, you can build a pallet shed that is not only functional and attractive but also safe and compliant with local standards.
Eco-Friendly Aspects of Pallet Sheds
Pallet sheds are not only practical and cost-effective but also offer significant environmental benefits. This section delves into the eco-friendly aspects of using pallets for building sheds, highlighting how this approach contributes to sustainability.
Recycling and Reusing Materials
A DIY backyard shed exemplify the principle of recycling and reusing, turning what would be waste into valuable resources. Typically, wooden pallets are used temporarily for shipping and storage, and after their initial use, they are often discarded. By repurposing these pallets into shed construction, their life cycle is significantly extended. This not only reduces the amount of wood waste ending up in landfills but also lessens the need for new wood production.
When fewer trees are cut down for new timber, forests and their biodiversity are preserved. Additionally, repurposing pallets often involves minimal processing, which further reduces environmental impact compared to manufacturing new building materials. This approach to building promotes a circular economy, where materials are reused and recycled, minimizing waste and environmental impact.
Reduced Carbon Footprint
Building with pallets significantly lowers the carbon footprint associated with construction. The production of new building materials is an energy-intensive process. It not only consumes a lot of resources but also contributes to high levels of carbon emissions. This includes the harvesting, processing, and transportation of new timber. In contrast, using reclaimed pallets leverages existing materials, which means that the energy already spent on producing them is maximized.
By reducing the demand for new wood products, pallet shed construction contributes to a decrease in overall greenhouse gas emissions. This is a critical factor in combating climate change, as reducing carbon emissions is essential for limiting global warming.
Additionally, a DIY backyard shed often requires less energy for modifications and adaptations compared to traditional building materials, further reducing their environmental impact. Choosing to build with pallets is a sustainable choice that aligns with global efforts to reduce carbon emissions and combat climate change.
Natural Aesthetic and Biodegradability
Pallet sheds not only offer a rustic and natural look but also align with eco-friendly principles. Their earthy appearance allows them to blend seamlessly with outdoor environments, reducing the need for artificial modifications.
This natural aesthetic often eliminates the necessity for synthetic paints and finishes, which can contain volatile organic compounds (VOCs) and other harmful chemicals. These substances can be detrimental to both human health and the environment. By avoiding their use, pallet sheds contribute to a healthier, more natural setting.
Furthermore, the biodegradability of wood used in DIY backyard sheds is a significant environmental advantage. Unlike many construction materials that take centuries to break down, wood decomposes relatively quickly and returns to the earth, enriching the soil without leaving toxic residues.
This natural life cycle of wood makes pallet sheds an excellent choice for those looking to minimize their long-term environmental impact. By choosing a material that is both sustainable in its use and disposal, DIY backyard shed builders make a responsible choice for the planet.
Encouraging Sustainable Practices
Building a pallet shed sets a positive example of sustainable living. It encourages others to consider eco-friendly practices in their construction projects. By building a DIY backyard shed, homeowners can take an active role in promoting sustainability and environmental consciousness in their communities.
FAQ: DIY Backyard Shed
- How durable are pallet sheds?
- Pallet sheds, when constructed properly, can be quite durable. The lifespan largely depends on the quality of the pallets used, weatherproofing, and regular maintenance. With proper care, they can last several years.
- Do I need a permit to build a pallet shed?
- This depends on local building regulations. In many areas, small sheds do not require permits, but it’s always best to check with your local building authority to be sure.
- Can I customize the size of my pallet shed?
- Absolutely! One of the advantages of building a pallet shed is the flexibility in design and size. You can customize it to fit the available space in your backyard and your storage needs.
- Are pallet sheds weatherproof?
- Pallet sheds can be made weatherproof with the right construction techniques and materials, like using weather-resistant paint and ensuring proper roofing.
- Is building a pallet shed eco-friendly?
- Yes, pallet sheds are eco-friendly. They reuse materials that might otherwise end up in landfills and reduce the need for new timber, thereby conserving resources and minimizing environmental impact.
- What maintenance does a pallet shed require?
- Regular maintenance includes checking for and repairing any structural damage, ensuring the roof remains watertight, and treating the wood to prevent rot and pest infestation.
- Can I add electricity or plumbing to my pallet shed?
- Yes, but this requires careful planning and adherence to local building codes. It’s advisable to consult with a professional for electrical or plumbing work.
- How do you shingle and finish a DIY backyard shed?
- To shingle and finish your shed, start by laying a starter strip of shingles along the roof edge to create a solid base. Overlap each row of shingles to cover the nails from the previous layer, securing them with roofing nails for a watertight and uniform finish.
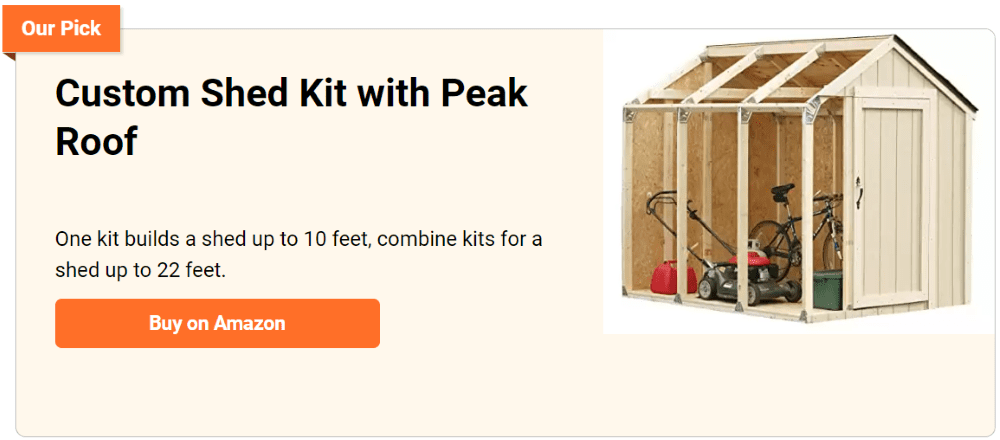
- For doors and windows, prime and paint them before installation, then seal edges with caulk and fill nail holes with wood filler for protection against the elements. Finish by applying a final coat of paint to all surfaces for a polished, weatherproof appearance. If building from scratch feels overwhelming, consider a prefabricated shed kit for a simpler, time-saving option.
- How do you install the exterior trim of a shed?
- Installing exterior trim on a shed enhances its durability and appearance. Start by securing lower brackets, aligning their edges with the siding surface, and pressing them snugly against the soffit before fastening. Wrap corners with trim boards, overlapping the front board over the side for a seamless look.
- Attach fascia boards and level shingle molding with the roof’s plywood edge, notching the fascia for a neat fit around brackets. Finish by applying stain or paint after roofing is complete, ensuring the trim is both protected and visually appealing. These steps guarantee a polished and long-lasting shed exterior.
- How do you lift the roof panels into place on a shed?
- Installing roof panels on a shed requires careful planning and execution to ensure a secure and stable structure. Start by sliding the roof panels gently towards the peak, aligning the notches with the wall’s top edge for a snug fit. Align the central ridge board precisely at the top center of the wall, as this is crucial for structural integrity.
- Secure the panels by driving toenails through the notches into the wall’s top plate, anchoring them firmly. Finalize the structure by nailing the ridge boards together and attaching two collar ties spaced 4 feet apart to prevent roof spreading, ensuring a sturdy and reliable roof.
- How do you install windows on a DIY backyard shed?
- Installing windows on a shed can be simple if you follow these steps carefully. Start by attaching a temporary 2×4 support beneath the window opening to hold the window level while you work. Place the window on the support, center it, and secure it with screws to the wall. Once the window frame is secure, cut and attach side and header trim pieces, ensuring they fit snugly, and shape any curved trim or sill pieces as needed.
- Use a router to create a recess for a 1/4-inch acrylic sheet, then cut the sheet to fit, prime and paint the frame, and seal it with silicone before securing the acrylic with glazing points. Finish by adding optional grid strips and caulking around the window to ensure a weather-tight, polished installation.
- How do you install the soffits on a DIY pallet shed?
- Installing soffits on a shed enhances both its durability and appearance. Begin by aligning the subfascia with a chalk line on your platform and securing it temporarily with toe screws to keep the frame straight. For ease, attach the soffit while the roof frame is on the platform to avoid awkward nailing later.
- Secure the soffit material with 6d galvanized box nails, and choose a durable 12-inch-wide fiber cement board for weather resistance. Cut the material with a circular saw fitted with a carbide blade for clean cuts, and repeat the process for both roof panels to complete the installation efficiently.
- How do you assemble the door frames for a pallet shed?
- Assembling sturdy door frames for a shed requires precision and durable materials. Start by building two identical frames using quality lumber, cutting the wood pieces to exact dimensions and ensuring the corners align perfectly. Stack the frames to form a thicker structure, applying wood glue evenly across the surfaces to create a strong bond.
- Clamp the frames together while the glue sets, ensuring they stay aligned and secure. Finally, reinforce the structure by drilling pocket holes and using screws at strategic points to add extra strength. These steps will result in robust door frames built to withstand everyday use and the test of time.
- How do you attach flashing over the siding seam of a shed?
- Attaching flashing over the siding seam of a shed is essential for a watertight and durable structure. Start by installing the siding panels securely while the walls are flat, using corrosion-resistant nails for stability. Position Z-flashing over the horizontal seam, ensuring it extends beyond the edges to effectively direct water away from the seam.
- Secure the flashing with roofing nails or screws, spacing them evenly to prevent lifting. Seal the top edge of the flashing with exterior-grade caulk to block water ingress and provide an additional protective barrier. These steps help maintain your shed’s integrity and protect it from the elements.
- How do you rout the back of the window trim for a shed?
- Routing the back of the window trim for a shed ensures a snug fit for the acrylic sheet. Start by gathering a router with a straight bit and securing the trim on a stable surface with clamps. Mark the recess area based on the acrylic sheet’s dimensions, then adjust the router’s depth gauge to match the sheet’s thickness for a flush fit.
- Carefully guide the router along the marked outline at a steady pace, checking the depth and width periodically for consistency. Once the recess is complete, smooth the edges with sandpaper and test-fit the acrylic sheet, making minor adjustments if necessary. This process ensures a durable, precise, and visually appealing finish for your shed window.
- How do you mark the angled cuts on the side trim pieces for a DIY backyard shed?
- To mark and cut angled trim pieces for a shed, precision is key. Begin by positioning the side trim pieces along the shed’s top section, ensuring they fit snugly. Use a pencil to mark where the trim meets the top section as a guide for the angled cuts. Measure the exact angles with a protractor or speed square and mark them accurately on the trim.
- Carefully cut along the marked lines using a miter saw or handsaw, double-checking measurements before cutting to avoid mistakes. Once cut, place the trim back onto the shed to verify the fit, making minor adjustments with sanding or recutting if necessary for a perfect finish.
Conclusion
Building a pallet shed offers a unique blend of sustainability, cost-effectiveness, and personalization. This project not only provides a practical solution for storage and space needs but also contributes positively to the environment. By repurposing materials, reducing carbon footprint, and creating something truly unique, pallet sheds are a testament to the potential of eco-friendly DIY projects.
If you liked this project, you will also like viewing these sheds and workshops…