Last Updated on June 16, 2025 by teamobn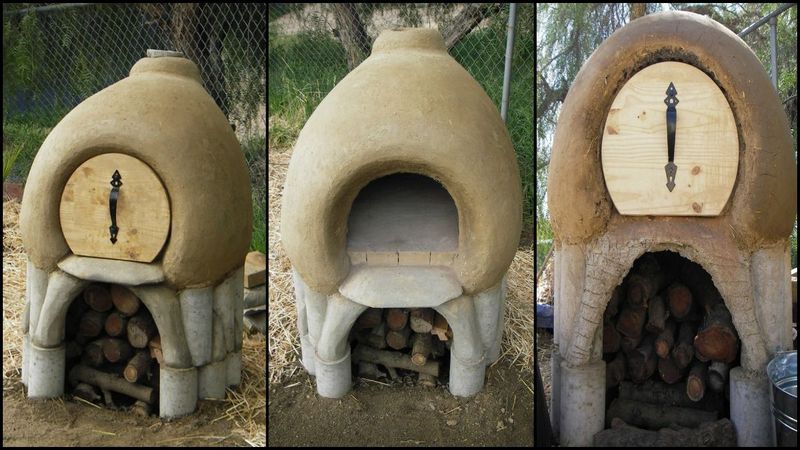
Why order pizza when you can bake your own? Not only do you save money, but you’re also sure that what you serve your family is fresh and nutritious!
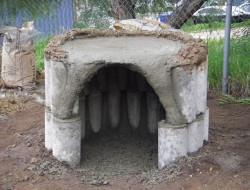
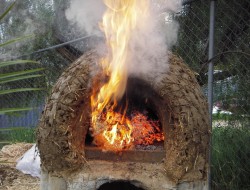
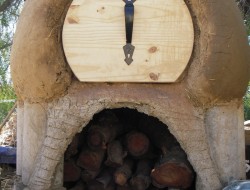
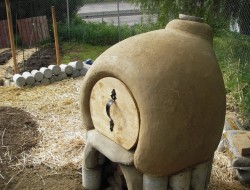
Serving freshly baked pizza and bread in your outdoor living area is a great way to entertain your family and friends. But you don’t have to spend a lot of money to build a full-size outdoor kitchen. This DIY cob oven may look like a pixie house, but it will allow you to bake homemade pizza and bread for years.
What are the materials needed to build a DIY Cob Oven?
Get your family and friends to help you with this project during the weekend. It’s a simple project and is cheaper than buying a new oven that runs on electricity or gas.
Freshly baked pizza and bread anyone?
You’ll need the materials below to build your own sturdy DIY Cob Oven.
Materials:
- Ferro-cement
- Strawbale
- Bricks
- Sand
- Metal Mesh
- Rocks
Tools:
- Trowel
- Sledge Hammer
- Carpenter’s Level
Steps:
- Clear and level your site with a Carpenter’s Level.
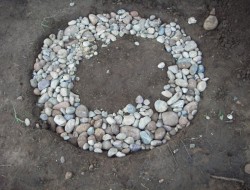
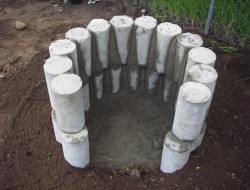
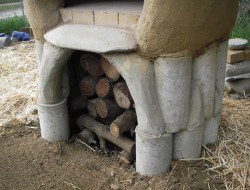
- Lay a bed of Rocks for a stable foundation. Tap them into place with a Sledge Hammer.
- Stack Strawbales over the rock base for insulation. Trim any uneven edges.
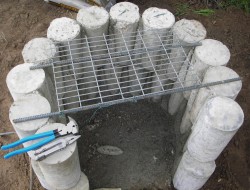
- Stretch Metal Mesh across the strawbales. Anchor it firmly at the edges.
- Mix Sand and cement to make your Ferro-cement slurry. Grab a Trowel to stir.
- Spread a thin layer of Ferro-cement over the mesh. Let it cure until firm.
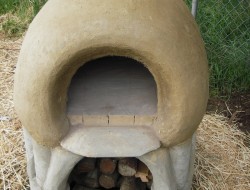
- Arrange Bricks on top of the cured table to form the oven floor. Check level often.
- Bend another piece of Metal Mesh into a dome frame above the bricks. Secure its base.
- Pull straw fibers from the bales and mix them with Sand to create cob. Use your hands or a Trowel.
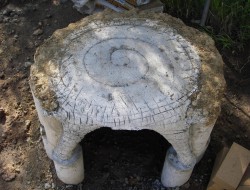
- Apply the Cob mixture over the dome frame. Build up even walls about 4 inches thick.
- Smooth the dome’s surface with your Trowel. Allow the cob to dry slowly for several days.
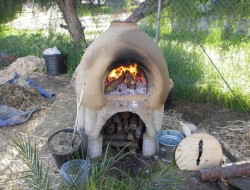
- Start small wood fires inside. Gradually increase the heat over a week.
- Once the dome holds high heat, sweep out embers. You’re ready to bake pizza and bread.
Site Selection and Preparation
Choosing a suitable location lays the groundwork for oven performance and longevity. Attention to sunlight, drainage, and ground stability makes every bake more reliable.
Assessing Sunlight and Wind Patterns
Observe your backyard at different times to map sun exposure and breeze direction. Note spots that receive at least six hours of direct sun each day. Track morning and afternoon wind gusts. A sheltered location behind a hedge or wall traps warmth and prevents drafts from cooling the oven. Ideal sun and wind conditions cut fuel use and deliver consistent cooking temperatures.
Testing Soil Drainage
Good drainage stops water from weakening your foundation. Dig a small hole and fill it with water. Time how long it takes to drain. Fast drainage indicates sandy soil that may need extra compaction. Slow drainage in clay soils can lead to pooling. If water lingers more than an hour, consider adding gravel or installing a simple French drain before building.
Considering Accessibility and Workflow
Position your oven close to prep and storage areas to streamline cooking. Plan space for wood storage, worktables, and seating nearby. Leaving too much distance means wasted steps when handling hot tools or dishes. A clear path also improves safety by reducing tripping hazards. Well-organized workflow makes baking pizza and bread feel effortless and fun.
Planning for Utilities and Storage
Think ahead about water access, lighting, and tool storage. A nearby hook or shelf keeps your trowel, level, and hammer within reach. If you expect evening baking sessions, plan for outdoor lighting or portable lamps. A covered storage box protects extra cob mix and straw in rainy weather. Smart planning prevents last-minute dashes for tools or supplies.
Marking and Excavating the Footprint
Outline your oven base using stakes and string so you avoid mistakes. Measure twice and adjust stakes until the shape is perfect. Use a spade to remove grass, roots, and debris within the marked area. Dig a shallow trench about six inches deep to level your foundation materials. A clean, precise footprint means the next steps go smoothly and saves time later.
Building a Stable Foundation
A strong base supports weight and resists cracking under high heat. Layering materials correctly builds lasting stability.
Laying the Rock and Gravel Layer
Start by placing large rocks evenly at the bottom of the trench. Rocks direct water away from the oven base and improve drainage. Fill gaps with smaller stones until the surface is level. Tamping each layer firmly locks rocks together. This gravel bed forms a sturdy cushion for the brick and ferro-cement layers above.
Compaction and Sand Bedding
Add a one-inch layer of damp sand over the rocks for a stable bearing surface. Lightly mist the sand and use a tamper or the flat side of your sledge hammer to compact it. Compacting reduces settlement and prevents gaps under the bricks. The level, compacted sand ensures your oven floor stays flat and crack-free during use.
Brick Grid Layout and Level Checking
Arrange standard bricks in a tight grid directly on the sand bed. Leave no gaps between bricks to avoid weak spots. Check each brick with your carpenter’s level. Tap low bricks gently with the hammer until they align perfectly. A precise brick grid spreads weight evenly and delivers a smooth cooking surface.
Welding Metal Mesh Reinforcement
Cut a sheet of metal mesh to cover the brick layer plus extra edge overlap. Lay the mesh on top and fold edges up for later layers. Mesh adds tensile strength to the foundation and prevents cracking in the ferro-cement. Secure mesh edges by wedging them under brick edges or tying them to rebar stakes driven into the ground.
Applying the Ferro-Cement Slurry
Mix ferro-cement by combining cement, sand, and water into a thick slurry. Use your trowel to press the slurry into the mesh until it bonds firmly. Smooth the surface to an even coat about one inch thick. Keep the layer damp for 24 hours by misting lightly. Proper curing yields a dense, crack-resistant platform ready for cob construction.
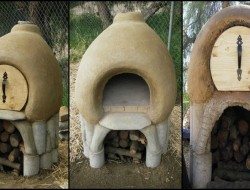
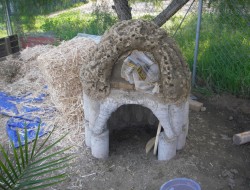
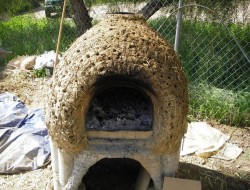
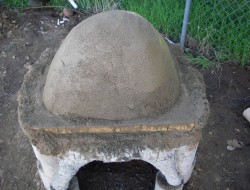
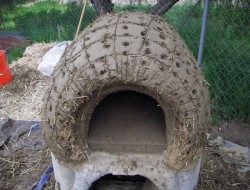
Cob Ovens Gallery
Click on any image to start the lightbox display. Use your Esc key to close the lightbox. You can also view the images as a slideshow if you prefer 😎


Insulating Your Oven for Efficient Heat Retention
Effective insulation keeps more heat inside the cooking chamber. A well-insulated oven bakes faster and uses less wood.
Constructing the Cob Shell
Combine clay, sand, and chopped straw into a workable cob mix. Apply the first layer directly on the cured foundation to build the dome’s shape. Aim for a thickness of three to four inches for strength and thermal mass. Smooth the surface with your trowel, removing air pockets. The dense cob shell absorbs and radiates heat evenly.
Wrapping with Strawbales
After the cob layer cures for several days, enclose the dome with tightly packed strawbales. Trim bales to match the oven’s contour. Secure them against the shell using twine or lightweight wire. Straw traps air and limits heat loss. This natural insulation cuts fuel needs and maintains stable temperatures for long bakes.
Securing Insulation with Mesh
Cover the straw layer with a second sheet of metal mesh. Extend mesh edges beyond the strawbales and secure them under the foundation lip. Mesh holds insulation layers in place and provides backing for the final mortar coat. Ensure mesh is snug but avoid crushing the straw, which reduces its insulating power.
Applying Insulating Mortar
Mix a lightweight mortar by blending sand, clay, and chopped straw fibers until the texture resembles damp sawdust. Trowel it over the mesh to a depth of two to three inches. Work in sections, smoothing each area before moving on. Allow the coat to cure slowly, misting if weather is dry. This layer seals the straw and adds thermal resistance.
Finishing with Plaster and Weatherproofing
Apply a final plaster coat made from lime, sand, and water to protect insulation from rain and wind. Spread it thinly with your trowel, smoothing edges and corners. Lime plaster resists moisture and reflects heat inward. Let it dry for a week before firing. A weatherproof finish ensures your oven stays dry and performs well year after year.
With each step carefully completed you’ll have a durable, efficient cob oven ready for countless gatherings. Proper site prep, a solid foundation, and robust insulation are keys to success. Start planning now and enjoy fresh-baked pizza and artisan bread straight from your backyard.
Conclusion
Building a sturdy cob oven transforms your backyard into a hub of fresh baking and memorable gatherings. You’ll master foundational skills like leveling ground, layering rocks, and pouring ferro-cement to create a durable base. Crafting the cob shell with clay, sand, and straw teaches you hands-on techniques that bond materials into a resilient cooking dome.
Wrapping the dome in strawbale insulation and sealing it with lightweight mortar locks in heat for efficient, consistent bakes. With gradual seasoning fires you’ll strengthen the structure and eliminate moisture, readying the oven for pizza, bread, and more.
If you liked this project, you will also like viewing these outdoor kitchens…