Last Updated on June 12, 2025 by teamobn
When you want to see your garden yield a bountiful harvest of vegetables, fruits, or flowers, you will likely think of using fertilizer. Fertilizer is a material, either organic or inorganic, that is added to soil to supply vital nutrients that promote plant growth.
Different fertilizers contain different nutrients, so it is important to select the right fertilizer for your garden.
Organic fertilizers are much cheaper and sometimes free if you have your own compost bin. Organic fertilizers are environmentally friendly as they do not release harmful chemicals.
While it’s true that
In fact, building your own compost bin is a great way to reduce your household waste and improve your garden’s soil quality at the same time.
You may not realize it, but those kitchen scraps you’re throwing in the garbage are actually a goldmine! By composting kitchen scraps, you keep your trash out of landfills and save yourself from spending money on store-bought compost and fertilizers.
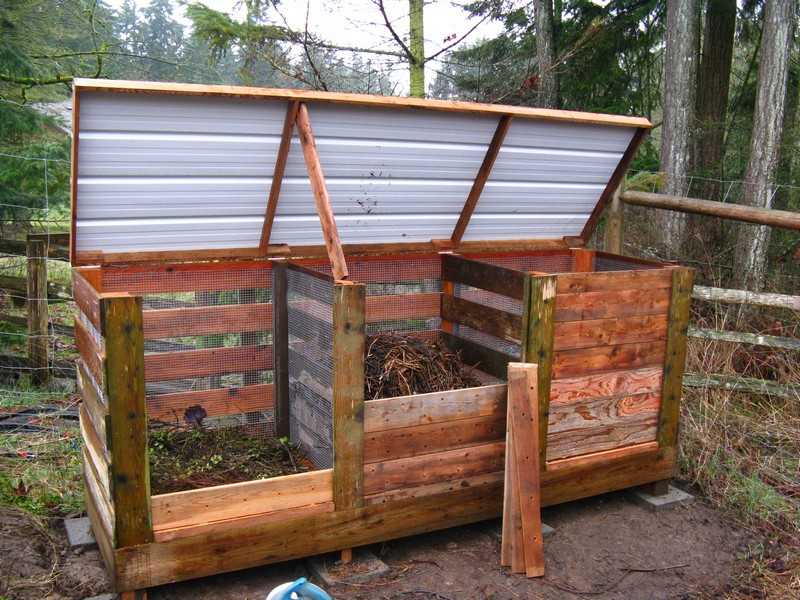
This particular compost bin is a sturdy, rodent, and rot-free container for all your compost. It’s built from reclaimed timber making it extremely affordable. Building this compost bin doesn’t need complex building skills. In fact, you can build it in one day, as long as you have all the needed materials and tools.
By building your own compost bin you’re not only making your garden and produce happy but the environment as well.
Building a DIY Compost Bin
Materials:
- Concrete Pavers
- Reclaimed Cedar and other Lumber
- Hardware Cloth
- Screws / Staple Wires
- Metal Sheet Roofing
Tools:
- Shovel
- Sander
- Table Saw
- Drill
Building the Compost Bin
The Size
The first step is to determine the size of your project. Obviously, the amount of space you have in your backyard, as well as your personal preferences, will play a role in this decision. Once you have a general idea of the size you’re shooting for, you can begin to map out the area.
The Area
The ideal location for your bin is a little further away from your home, as it will produce a strong and unpleasant smell over time. If possible, choose an area that is shady and well-ventilated to help reduce the odour.

The Process
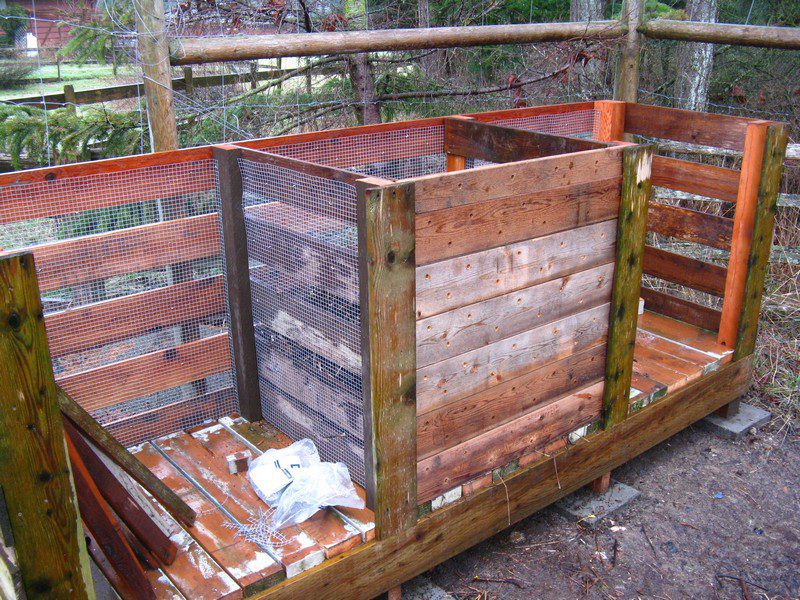
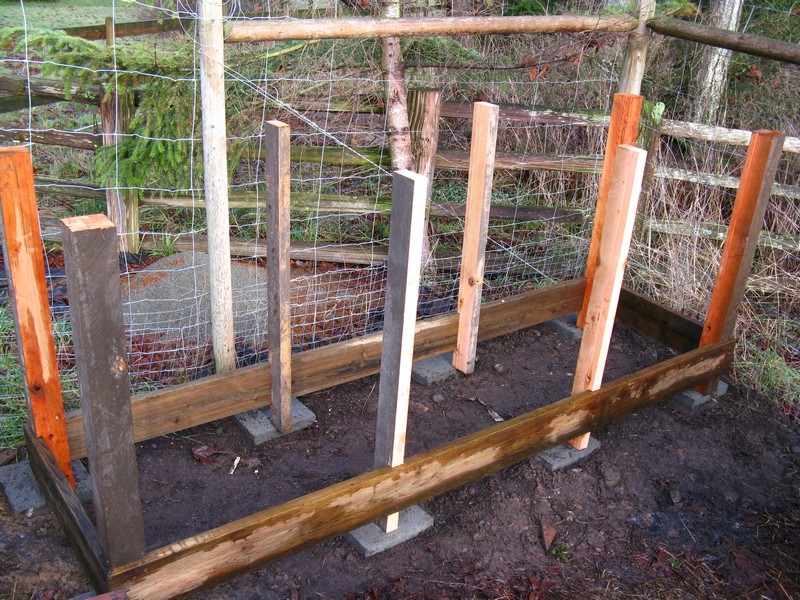
When you are ready to start your bin, lay a layer of concrete pavers on the ground first. This will keep your bin from sinking into the soil when it gets heavy. Then build the frame of your bin, and make sure that each post is placed over a paver so that the bin will have a solid foundation.
Using the reclaimed timbers, you can now complete the frame of your bin. Then cut the hardware cloth to the size of the partition of your bin. After you have cut the hardware cloth to size, use a stapler or screws to attach it to the inside of the bin. Make sure to cover all of the openings, including the bottom, so that no rodents can enter.
Cut the metal sheet roofing to the size of your bin. After you have cut your metal sheeting to size, you can then begin attaching it to the roof of your bin. Make sure that the sheeting fits well and is securely attached.
Would you want it in your backyard? If so, start collecting the materials now.
Click on any image to start the lightbox display. Use your Esc key to close the lightbox. You can also view the images as a slideshow if you prefer ????
Thanks to Backyard Feast for this great project. You can get more details about this project here…
Advantages of a Multi-Bay DIY Compost Bin Setup
Building one container works, yet adding two or three bays levels up your compost routine. The staggered layout keeps every batch organized and running at the right pace.
Faster Processing Through Batch Separation
Each bay holds a different stage of decay, so fresh kitchen scraps never slow mature material. You move partly decomposed matter forward while new greens join an empty chamber. This rotation keeps microbial heat high in the active bay and lets finished compost cool undisturbed.
The result is shorter curing time and a steady stream of rich humus for your beds. A multi-bay diy compost bin turns scattered waste into an orderly production line that keeps your garden fed.
Consistent Workflow That Matches Household Waste Output
Daily peelings and coffee grounds fit straight into the first bay instead of piling on top of older layers. You avoid packing everything together where airflow collapses. The second bay handles partially broken material, giving microbes room to finish their work.
A final bay stores screened compost so it stays dry and crumbly until you spread it. This flow mirrors the rhythm of household waste, so you’re never left wondering where to dump scraps. It also stops half-finished mixtures from contaminating the final product.
Easier Turning for Oxygen and Moisture Control
Turning an entire heap can feel like moving a mountain. With bays, you shovel from one chamber to the next, naturally mixing and aerating as you go. Smaller loads mean less strain on your back and faster exposure of new surfaces to oxygen.
Moisture distributes more evenly, so hot spots and soggy clumps disappear. Frequent turning in manageable portions keeps temperatures steady, speeds decomposition, and minimizes foul odors. Your compost stays fluffy instead of matted.
Reduced Odor and Pest Attraction
Separating fresh waste from curing compost seals odor early. Hardware cloth liners and tight lids on the first bay block rodents. Hot middle bays deter flies because temperatures climb above their comfort zone.
Finished material in the last bay rests cool and dry, so it no longer attracts scavengers. This staged design keeps smells faint and critters frustrated. Your neighbors stay happy, and you won’t find unwanted guests digging through the pile.
Continuous Supply of Finished Compost
A single-chamber heap delivers compost in big, infrequent batches. A multi-bay diy compost bin hands you smaller, regular harvests all season. While one bay cures, another cooks, and a third starts fresh.
You harvest on demand, whether you top-dress seedlings or enrich a new bed. This continuous cycle smooths your gardening schedule and cuts reliance on store-bought bags. You spend less, waste less, and feed soil when plants need it most.

Optimal Green-to-Brown Ratios for Faster Decomposition
Great compost hinges on the balance between juicy greens and dry browns. A well-blended mix keeps microbes busy and trims the weeks a diy compost bin needs to finish.
Understanding Greens and Their Nitrogen Punch
Greens include fruit scraps, veggie peelings, coffee grounds, and fresh grass clippings. They deliver nitrogen, proteins, and sugars that spark microbial growth. Too many greens, however, drown the pile in moisture and create a sour smell.
Aim for smaller pieces to speed breakdown and scatter them in thin layers. Chop large melon rinds or corn cobs so bacteria reach every surface. With enough nitrogen, the pile heats quickly, killing weed seeds and pathogens.
Browns as the Carbon Backbone of Your Pile
Browns cover dry leaves, straw, shredded paper, and sawdust from untreated wood. Carbon gives microbes long-lasting energy and soaks up extra moisture from greens. It also creates air pockets that prevent compaction.
Always shred browns to postcard size so they mingle evenly and release carbon faster. If leaves are waxy, crumple or mow them first. A strong carbon base tempers odors and lets heat rise gently instead of spiking too high.
Simple Ratio Targets You Can Eyeball
The classic rule is roughly three parts brown to one part green by volume. Picture three buckets of dry leaves for every bucket of kitchen scraps. If the heap feels cold after a week, add more greens.
If it smells like ammonia or turns slimy, sprinkle extra browns and fluff with a fork. Treat ratios as a flexible guide, not a rigid formula. Your senses, heat, smell, texture, tell you when the balance is right.
Adjusting Mix for Rainy or Dry Seasons
In a wet spell, greens stay waterlogged and browns rot slower. Keep a reserve of dry straw or cardboard under cover and fold it in when the pile feels soggy. During drought, greens dry out fast, so spray thin layers with a hose while you build. In tropical heat, increase browns to slow rapid decay and hold moisture. In cold regions, boost greens to push internal temperature above fifty degrees Celsius. Seasonal tweaks keep decomposition humming year-round.
Monitoring and Tweaking the Balance Over Time
Check internal temperature twice a week with a compost thermometer. Sixty to seventy degrees Celsius signals peak microbial activity. Turn the pile when heat drops, mixing outer browns into the warmer core.
Sniff for sweet, earthy notes; sour or rotten odors mean the ratio slipped. Feel a handful: it should be as damp as a wrung-out sponge. Make small additions of greens or browns rather than dumping large amounts at once. Regular observation lets you react before problems stall progress.
Common Household Substitutes When Supplies Run Short
If leafy browns are scarce, shred old mail, toilet-paper rolls, or brown paper bags. Skip glossy pages; the inks resist decay. Coffee shops often give free grounds that count as greens. Breweries and juice bars may share spent grains and pulp, rich in nitrogen.
Mix sawdust from untreated timber as a brown, but use it sparingly because it compacts. These everyday sources keep your diy compost bin balanced even when your yard doesn’t supply enough material.
Conclusion
A multi-bay system streamlines each stage of decomposition and keeps your garden stocked with fresh humus. Balanced green-to-brown ratios fire up microbes without overwhelming them. Small, steady adjustments prevent odors, pests, and stalled piles. Your waste turns into nutrient-rich compost instead of filling landfills. Build smart, monitor often, and your diy compost bin will reward you with healthier soil and stronger plants all year.
If you liked this project, you will also like viewing these easy DIY projects…