Last Updated on March 13, 2024 by teamobn
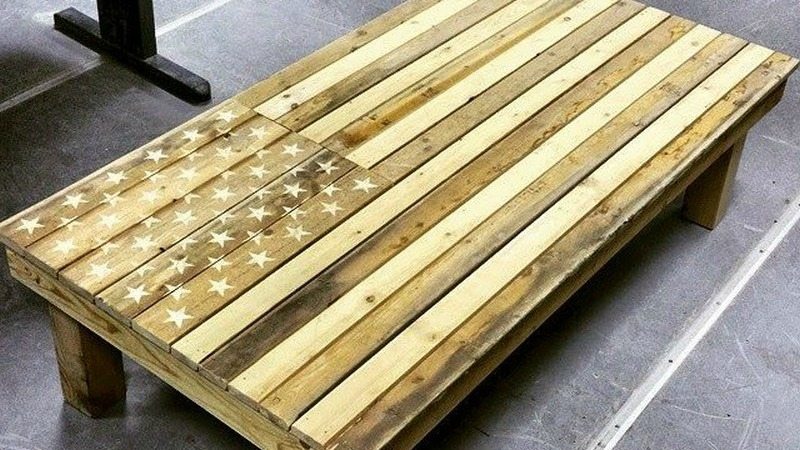
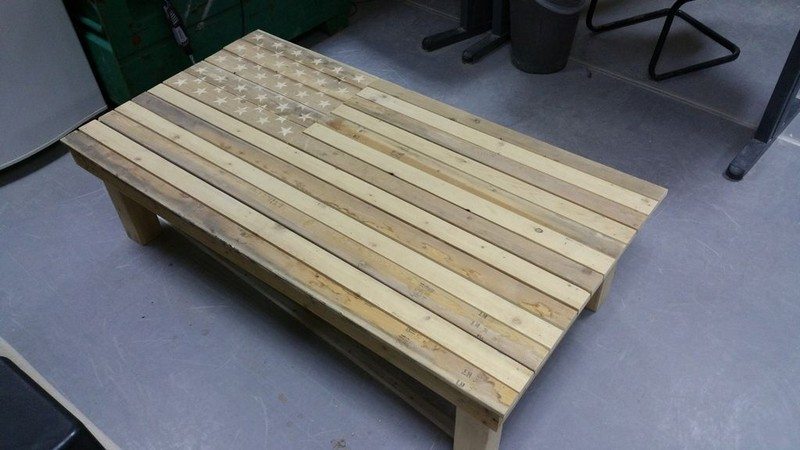
Now, this is impressive DIY furniture expressing patriotism! Do you have some pallets waiting for a project? Why not try making a pallet coffee table with your own country’s flag? 🙂
Historically, flags originated as military standards. Soldiers used flags as field signals. The practice of flying flags indicating the country of origin outside of the context of warfare became common with the maritime flag, introduced during the early 17th century.
Today, flags have come to symbolize a nation and its people, and displaying a flag is often taken as a demonstration of patriotism.
This pallet coffee table was built by a U.S Army Engineering Corp officer during his deployment in the Middle East.
As his pallet coffee table proves, limited tools do not hinder a good-looking and neat DIY furniture project. All you need is careful planning. Measure twice, cut once!
Materials Needed To Make Your American Flag Pallet Coffee Table
Are you willing to take the challenge of building your own American flag pallet coffee table? 🙂
Below is the list of materials required to create this project.
Materials:
- 1×3″, 8′ Boards
- 3 pcs 2×4″, 8′ long Pine
- 1 pc 4×4″, 8′ long Wood
- 1×4″, 8′ long Pine
- 1 lb 1-1/4″ Finishing Nails
- 1 lb 3″ Wood Screws
Tools:
- Circular Saw
- Tape Measure
- Speed Square
- Hammer
- Drill with Driver Bit
- Palm Sander
- Nail Punch
- Dremel
How To Create An American Flag Pallet Coffee Table?
So if you are a new DIYer looking for his or her first pallet project, this one is sure to impress your family and friends! But before you start getting your hands on those pallets, you have to know the important facts about pallets, including the proper way of dismantling them. Below are the steps on how you can create our own American flag pallet coffee table.
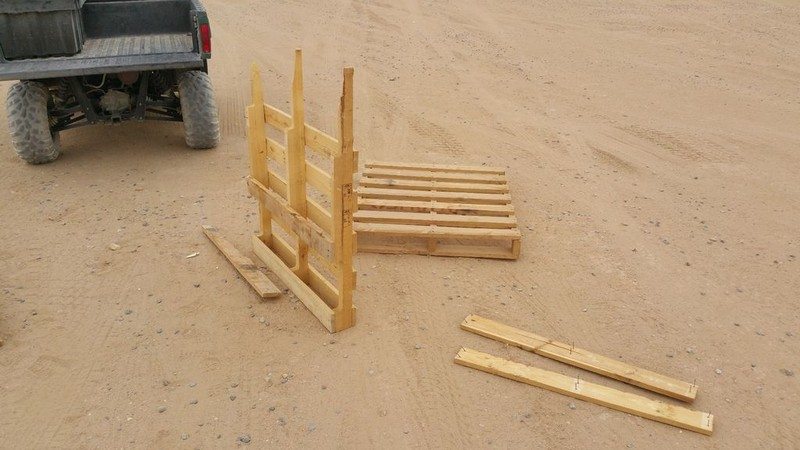

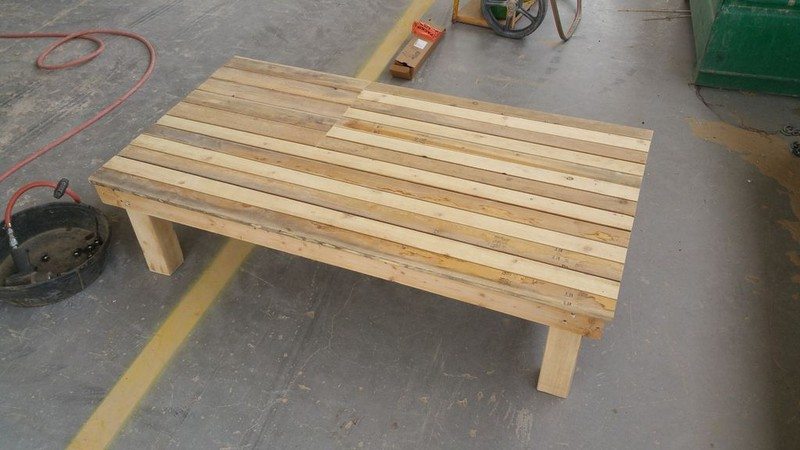
Gathering the materials. Here you want to gather all the materials and tools you need for the project to verify you have them and that they work. This will ensure the project goes quickly and smoothly. I would recommend reading all the directions before starting to see if you want to make any changes to the plan for your pallet coffee table because now is the time to do it. The last photo on this step is a handy reference.
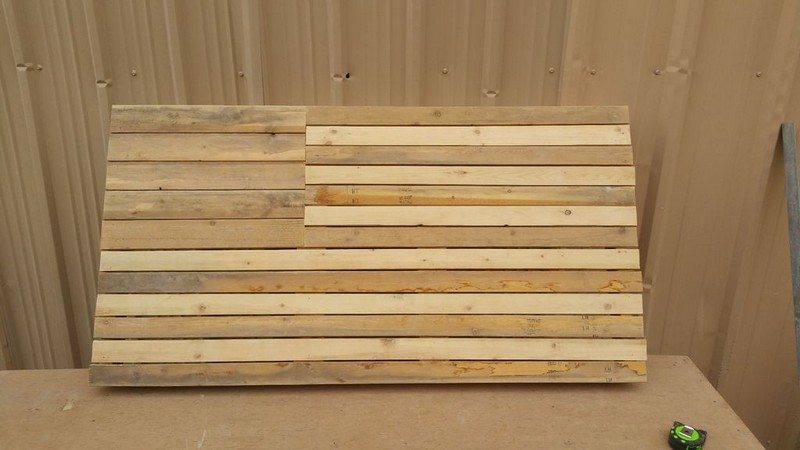
The first step, before you do anything else, is figuring out what size you want for your pallet coffee table. Every other step is based on this. From this, you can calculate the size of everything else (stripes, blue box, stars, etc) which dictates what size cuts you need to make. To keep things simple, and for this tutorial, I will use the dimensions I chose for mine. You also can see one of the many pallets I had to rip apart to make this project.

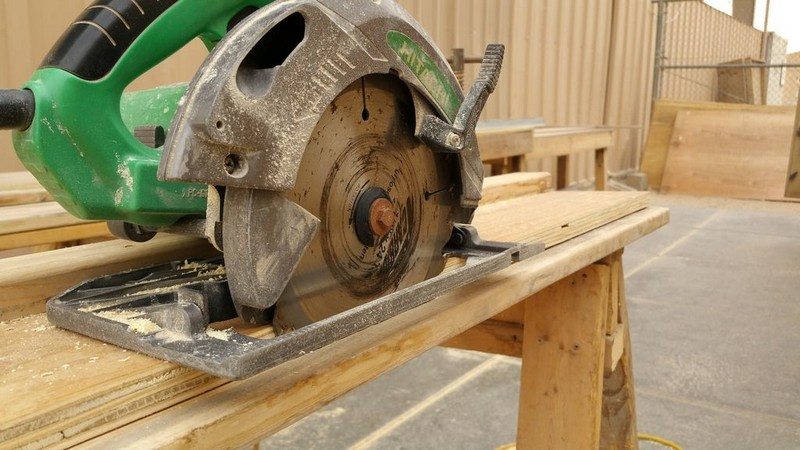
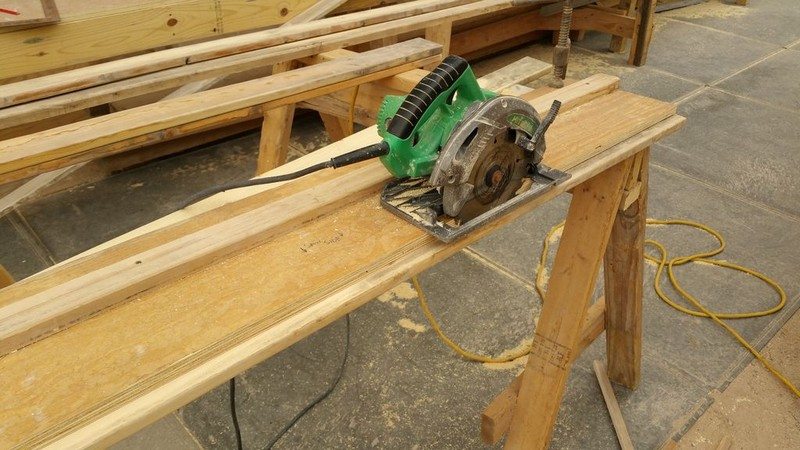
Rip cutting the boards for the stripes.
Here we need to make some rip and cross-cut to wind up with the following board sizes:
- (5) 1″ x 3 1/2″ x 22 5/8″ (Blue Section)
- (7) 1″ x 2 1/2″ x 38 1/2″ (First seven ‘short’ stripes)
- (6) 1″ x 2 1/2″ x 61 1/2″ (Last six ‘long’ stripes)
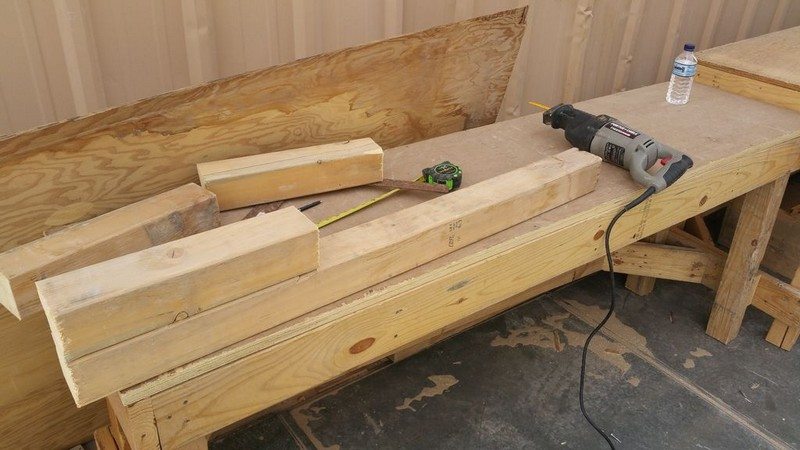
The rip cuts (cuts made the long way on the board) should be done with a table saw. If you do not have one (like me) you can make rip cuts with a circular saw using a jig (like this http://www.todayshomeowner.com/video/homemade-circ…. It is a little harder but certainly doable.
For the cross cuts, a chop saw (miter saw) is the easiest and neatest but a circular saw works too, you just need to make sure you keep your cuts straight.
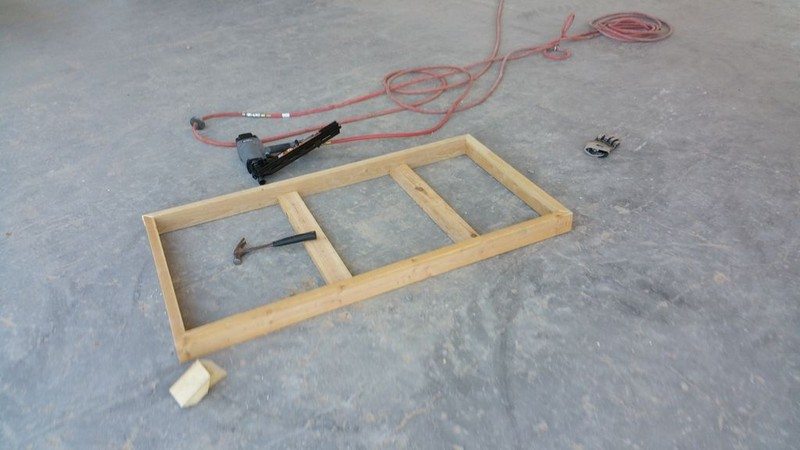
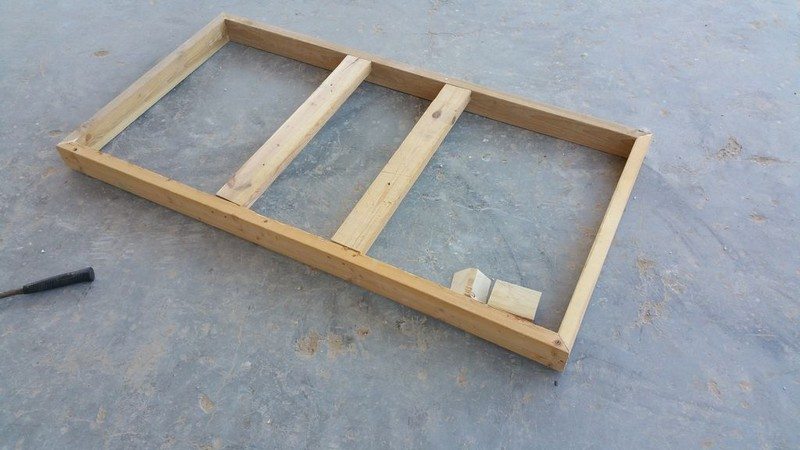
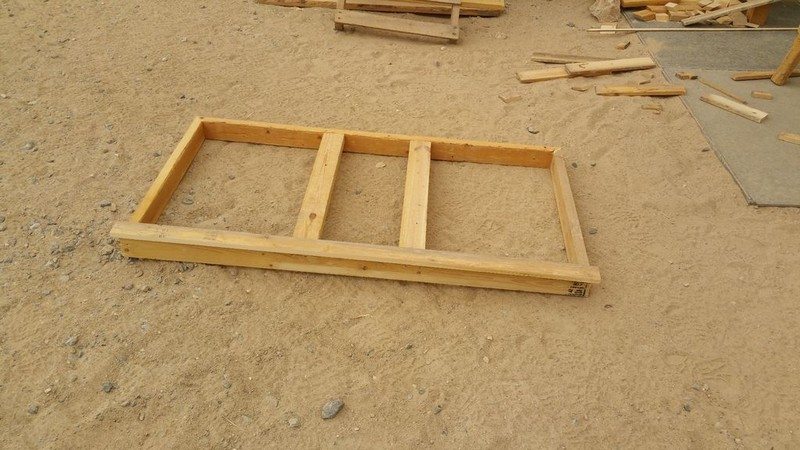
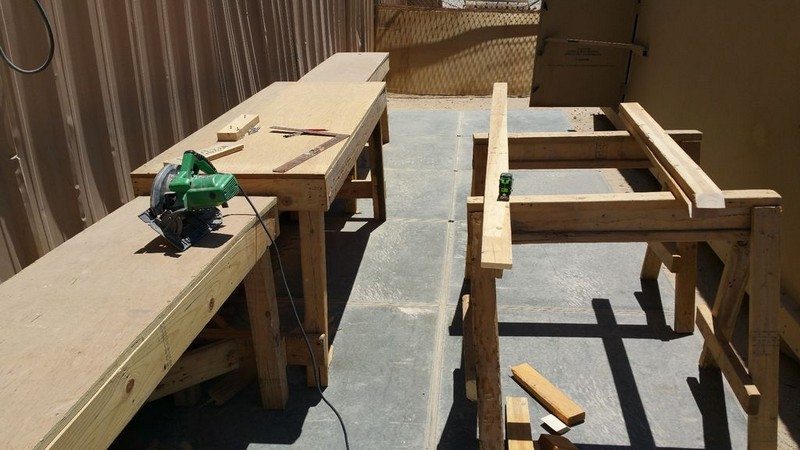
Cutting and assembling the frame.
This is a relatively simple step and if you were able to complete the last step in creating your pallet coffee table without a problem, this should be just as easy. All we are doing here is making rectangular support with two cross beams. The four pieces of outside wood (first and second cut listed below) will have 45-degree mitered ends. The measurement is taken from a large edge. For this, we will need to cut:
- (2) 2″ x 4″ x 59″
- (2) 2″ x 4″ x 30 1/2″
- (2) 2″ x 4″ x 27 1/2″
Once cut, assemble as seen in the pictures. Ensure that the frame is square. The two supports should be 22.5″ on center from the outside edge (to support the small stripes and blue part properly). Secure everything together with the wood screws (glue together too for extra stability).
Pay careful attention here and make sure your frame is perfectly square (use drywall t square if you have one). This will make the rest of the project much easier and prevent you from messing up (like I did because my frame wasn’t square/the wood was warped).
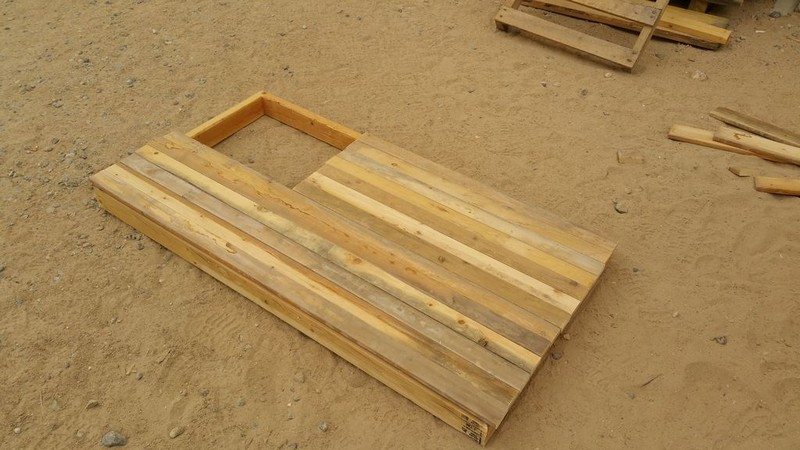

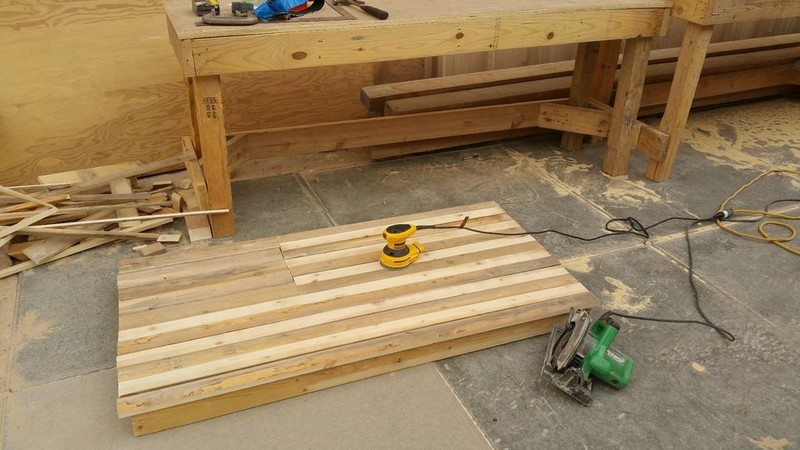
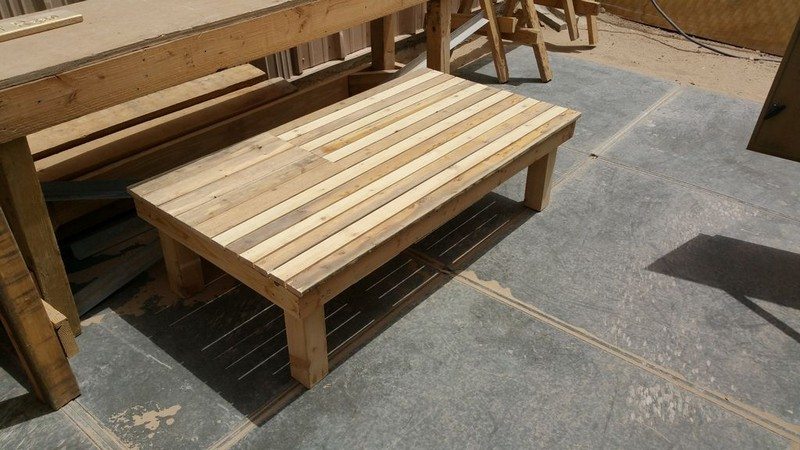
Preparing the boards. Here we lay out the boards for the first time on the frame. I did some playing around to get the boards I think would look best for the red and blue areas. The white ones do not matter because they’re sanded. Once the boards are all placed, remove the boards that correspond to white stripes, and run the palm sander over them enough times to clean them up.
Take the time to place each board carefully and ensure the right wood matches up. If you are near a home depot, it doesn’t really matter and you can just stain every other board which would look just as good. If you are using recycled wood, it is a little more important.
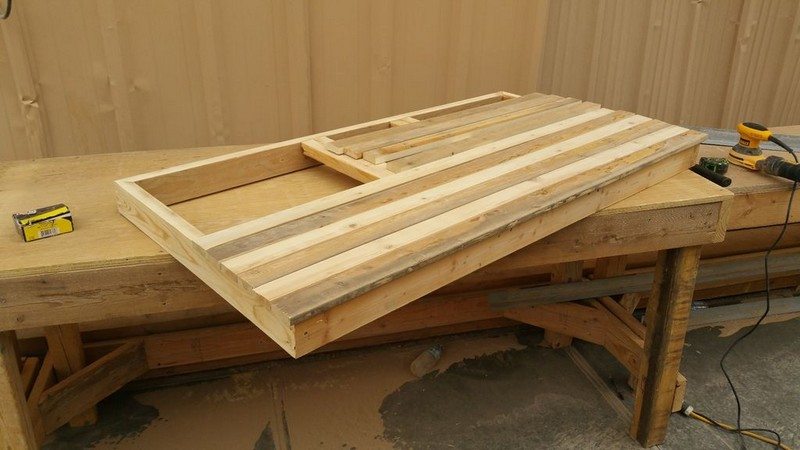
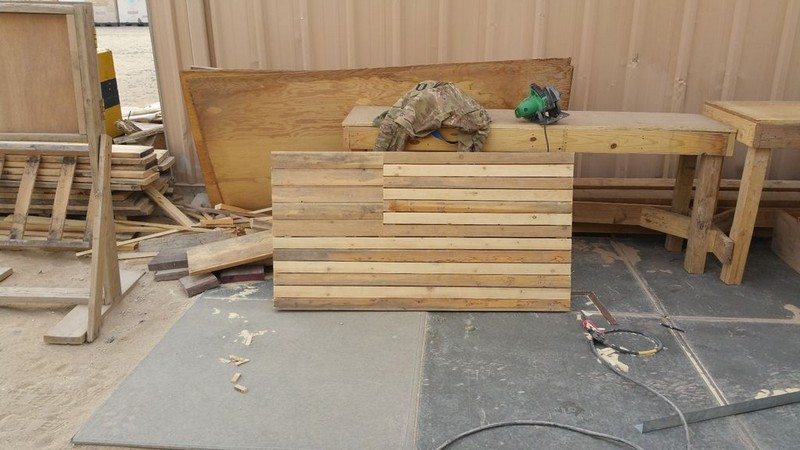
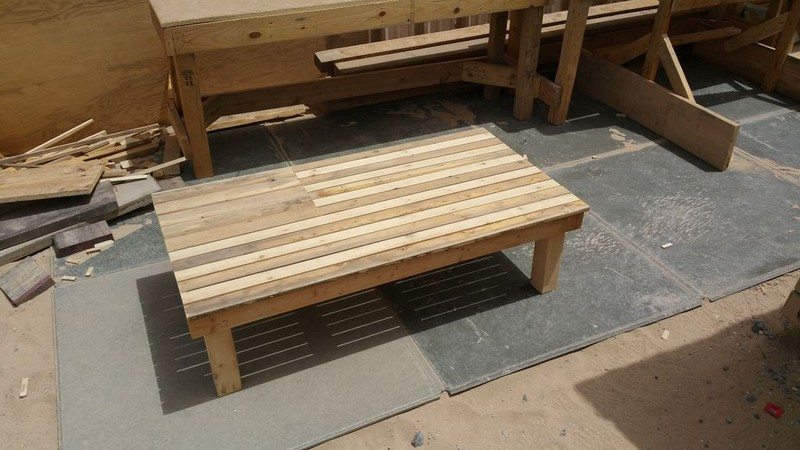
Securing the boards to the frame. The boards should all be played out from the previous step. Now we will secure them all to the frame. Be sure that they all look as you want them to look before you nail them. Once they are almost in, use the nail punch or a framing nail to sink them into the wood. You can place the boards directly against each other if your cuts are perfectly straight (unlikely) or leave a little gap to hide this fact.
Make sure the boards are all square with the frame before nailing in if you don’t want your pallet coffee table to be uneven. Ensure all sanding is complete before nailing as it will be hard to do once they are in.
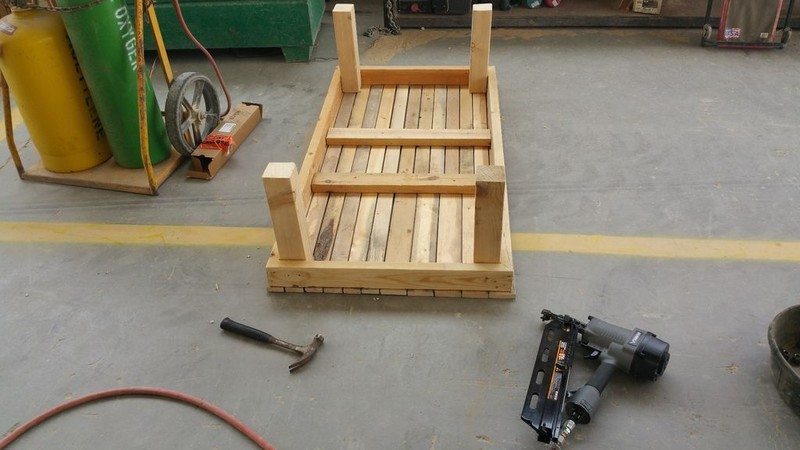
Cutting and securing the legs. Another very simple step (this project is all pretty simple, huh?). Here we will cut four pieces of 4″ x 4″ x 15″.
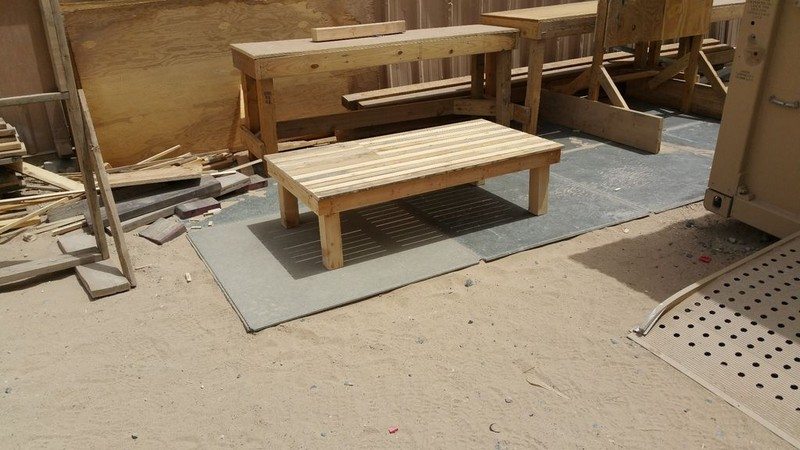
Once the cuts are made, secure the legs to each corner using the screws and a drill. Use a square to verify the legs are straight and that they will be perpendicular to the ground.
Pre-drill all the holes and make sure the legs are straight as this will make the table sit level and look proper if done correctly.
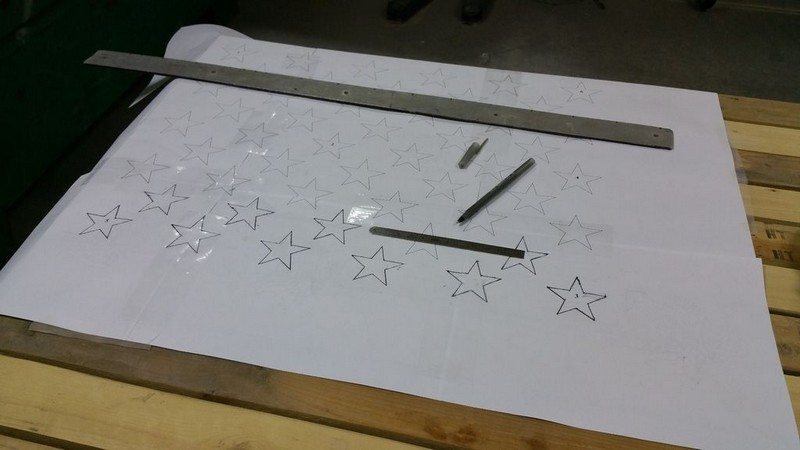
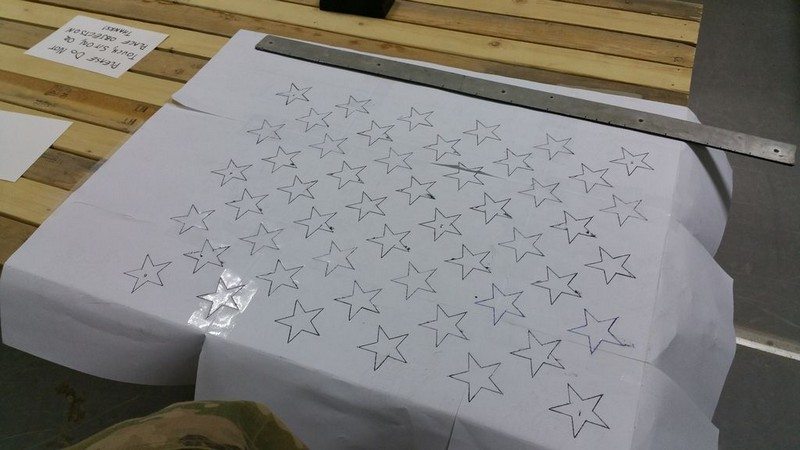
Laying out the stars. For this step, I had to think a little bit about how best to accomplish it and make it look neat. The idea I came up with, although time consumptive, worked very well. I began by going into Microsoft Project and laying out each of the stars on a workspace the same size as the flags. Once this was done, I printed them out, cut them out, and glued them together to make a large stencil. Next, secure the stencil to the pallet coffee table (make sure it’s straight). I used this stencil to then trace each star, using a ruler and a pen.
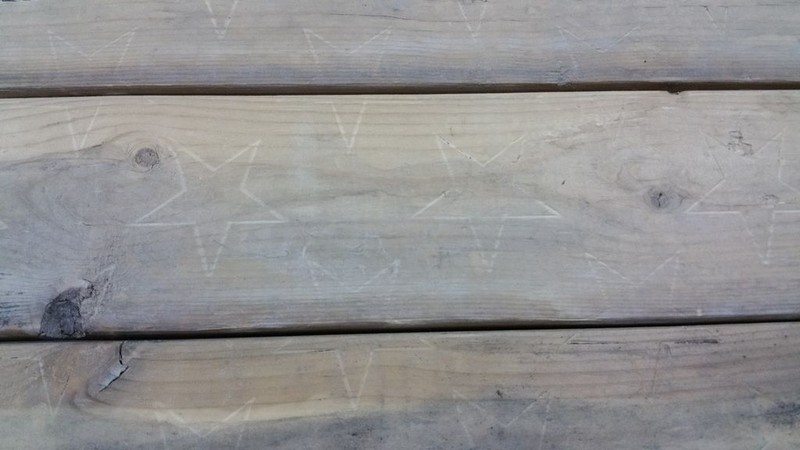
You can see from the photos it leaves a faint outline in the wood. I did this for all 50 stars and then touched up a few areas to make sure I could see them.
Make sure the stencil is aligned properly. You may be able to just attach the stencil and engrave right through the paper but this way is certainly neater.
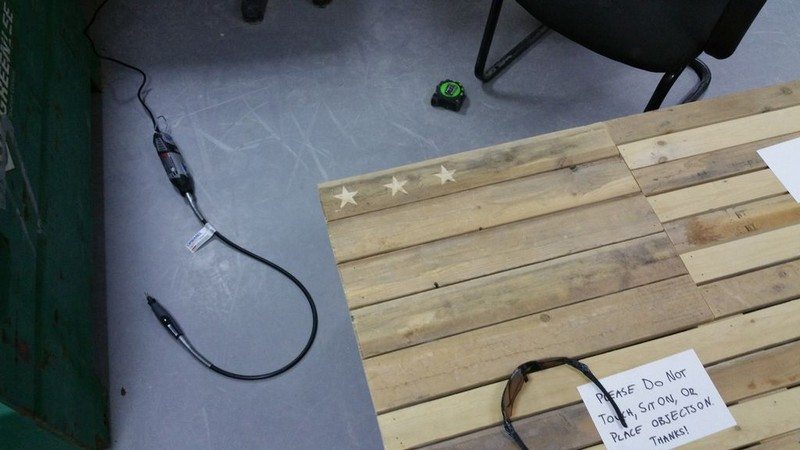
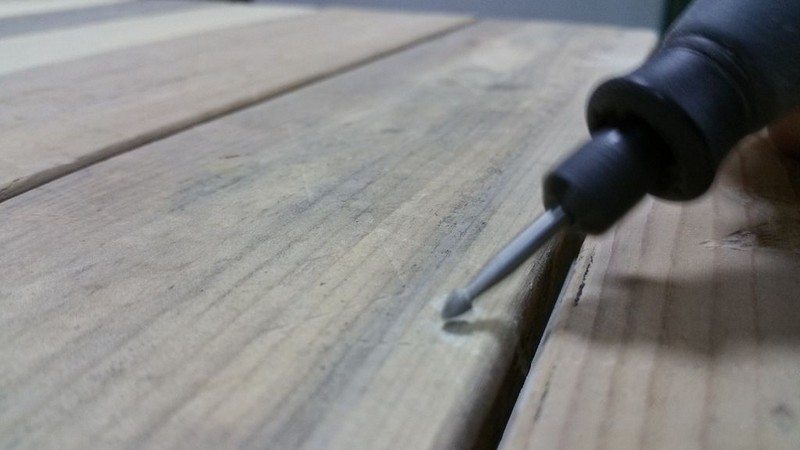
Engrave the stars. Pretty self-explanatory, take the Dremel and colour in the space (engrave) between the stars. I was fortunate enough to have a flex shaft attachment which made this a little easier. Use a pointed bit when making the tips of the stars.
Take your time and be careful. There is no reason to rush this step as this creates one of the most prominent and unique features of the whole project.
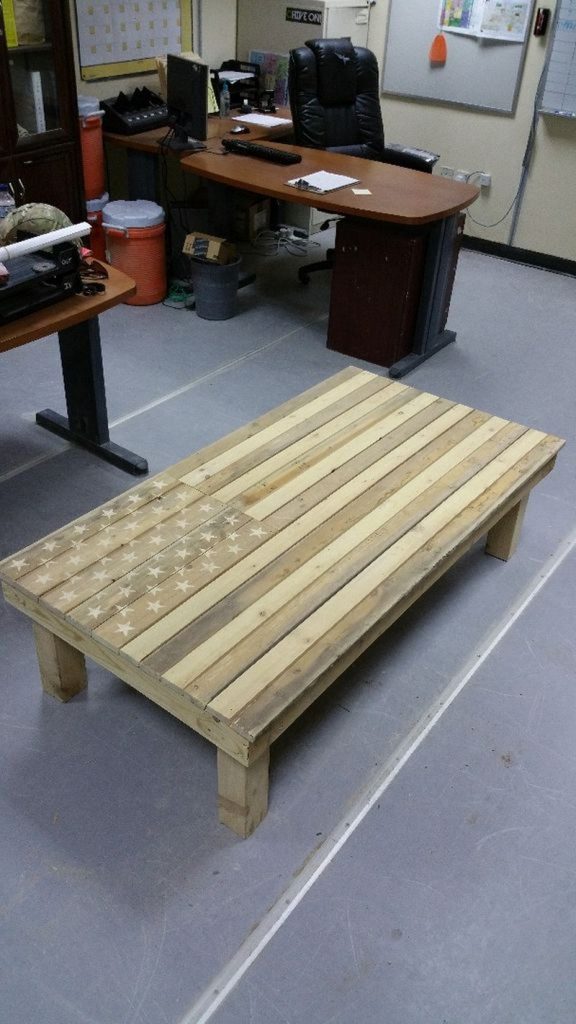
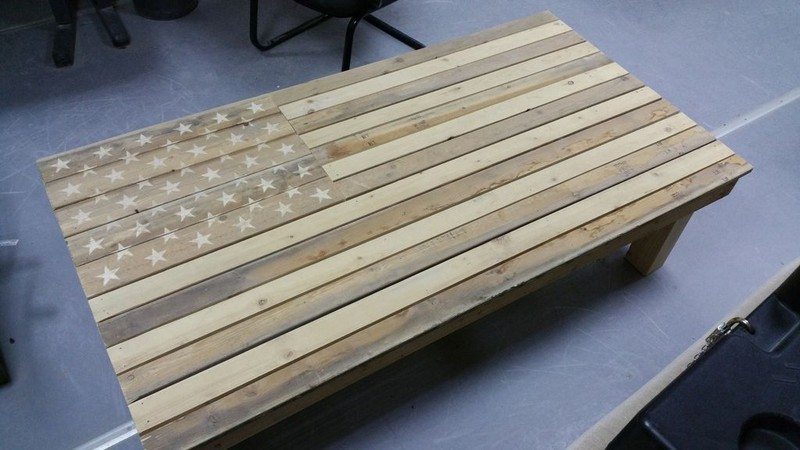
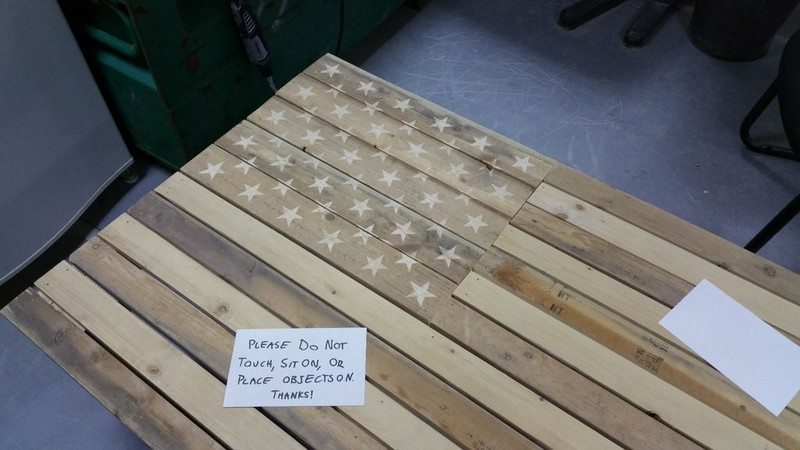
Congratulations on a job well done! You have now, before, a simple project that you can be very proud of and will certainly gather quite a few “wows” at the next outing. You could certainly use some clear sealant on the pallet coffee table at this point to make sure it does not get stained. Other than that, the table is now complete.
Thanks to
If you liked this project, you will also like viewing DIY Pallet Coffee Tables.
Wrapping It Up
Crafting your own American flag pallet coffee table is a rewarding and fulfilling DIY project that allows you to express your patriotism and creativity while adding a unique piece of furniture to your home decor. Through the eight easy steps outlined in this guide, you can transform ordinary wooden pallets into a stunning and functional coffee table that proudly displays the stars and stripes.
As you embark on this DIY adventure, you’ll not only hone your woodworking skills but also unleash your artistic flair as you paint and assemble the components of the table. Each step brings you closer to the finished product, and the satisfaction of seeing your vision come to life is unparalleled.
Beyond the practical aspect of creating a coffee table, this project offers an opportunity to connect with American heritage and symbolism. The American Flag is a powerful emblem of unity, freedom, and resilience, and incorporating it into your home decor serves as a constant reminder of these values.
By repurposing wooden pallets for this American flag pallet coffee table, you’re embracing sustainability and eco-consciousness. Rather than discarding or letting pallets go to waste, you’re giving them new life and purpose as part of your furniture ensemble.
Once your American flag pallet coffee table is complete, it becomes more than just a piece of furniture—it becomes a conversation starter, a focal point of your living space, and a testament to your craftsmanship and creativity. Whether you use it to display cherished mementos, serve refreshments during gatherings, or simply as a place to rest your feet, this coffee table adds character and charm to any room.
This project is highly customizable, allowing you to tailor the design and dimensions of the coffee table to suit your preferences and space requirements. Whether you choose to follow the classic American Flag design or put your own twist on it with alternative colours or patterns, the possibilities are endless.
As you admire your finished creation, take pride in knowing that you’ve not only crafted a functional piece of furniture but also a work of art that reflects your personality and style. Your American flag pallet coffee table is sure to become a beloved addition to your home, eliciting admiration and compliments from family and friends alike.
In essence, this DIY American flag pallet coffee table encapsulates the spirit of creativity, resourcefulness, and patriotism. It serves as a testament to the power of imagination and ingenuity, proving that with a little effort and inspiration, you can transform simple materials into something truly extraordinary.
So, gather your supplies, roll up your sleeves, and embark on this exciting journey of crafting your very own American flag pallet coffee table. With patience, perseverance, and passion, you’ll create a masterpiece that embodies the timeless values of freedom, unity, and pride.
Frequently Asked Questions
1. Where can you find wooden pallets for the American Flag Pallet Coffee Table project?
Wooden pallets can often be found for free or at a low cost from local businesses, warehouses, or construction sites. You can also check online marketplaces or recycling centres in your area.
Some recycling centres accept wooden pallets for recycling. While they may not always give them away for free, they might sell them at a nominal fee. Contact your local recycling centre to inquire about their policy on wooden pallets.
Join local community groups or forums where members often share information about free or low-cost resources, including wooden pallets. These networks can be valuable sources of information on where to find pallets in your area.
2. Do you need to prepare the pallets before painting them?
Yes, it’s important to prepare the pallets before painting to ensure a smooth finish. Start by sanding the surfaces to remove any rough spots or splinters. This will also help the paint adhere better to the wood.
Depending on the type of paint you plan to use and the condition of the wood, you may consider applying a primer before painting. Primer helps seal the wood and provides a smooth base for the paint to adhere to, resulting in better coverage and durability. Choose a primer that is suitable for the type of paint you’ll be using and apply it according to the manufacturer’s instructions.
3. What type of paint should you use for the American flag design?
For the American flag design, you’ll need red, white, blue, and black paint. It’s best to use acrylic or latex paint, as these types of paint adhere well to wood and provide vibrant colours. Make sure to use exterior-grade paint if you plan to place the table outdoors.
4. How do you create the American flag design on the pallets?
Start by painting the entire surface of one pallet white. Once dry, use painter’s tape to create the stripes of the flag, alternating between red and white. After painting the stripes, remove the tape and allow the paint to dry completely before adding the blue field and stars to the top left corner.
5. Can you customize the design of the American flag pallet coffee table?
Absolutely! While the tutorial provides steps for creating an American flag design, you can customize the table to suit your personal preferences. Consider painting different designs or patterns, or even adding stenciled quotes or images to the tabletop.
6. How can you ensure the American flag pallet coffee table is sturdy and stable?
To ensure the coffee table is sturdy and stable, make sure to securely attach the pallets together using screws or nails. Additionally, consider adding extra support beams or braces underneath the tabletop for added stability.
7. Do you need to apply a sealant or varnish to the finished American flag pallet coffee table?
Applying a sealant or varnish to the finished table is recommended, especially if you plan to use it outdoors or in high-traffic areas. The sealant will help protect the paint from chipping or fading and will also make the surface easier to clean.
8. How long does it take to complete this project?
The time it takes to complete this project will vary depending on your skill level and the size of the coffee table. Generally, it can take anywhere from a few hours to a full day to complete all eight steps.
9. Can you use this tutorial to create other types of painted pallet furniture?
Yes, the techniques and steps outlined in this tutorial can be adapted to create a variety of painted pallet furniture pieces. Feel free to get creative and experiment with different designs and colours to suit your style and preferences.


