Last Updated on November 28, 2025 by teamobn
Clay pot flower people are a charming and easy craft that adds a touch of whimsy to any garden or patio. This project is perfect for beginners, crafters, and families looking for a fun activity. In this guide, we will walk you through the simple process of creating your own character using basic terracotta pots and craft supplies.
At a Glance
- Project: Clay Pot Flower People
- Skill Level: Beginner
- Estimated Time: Under 1 hour
- Cost: Low
- Key Materials: Terracotta pots, acrylic paint, jute twine, hot glue gun, and sealant.
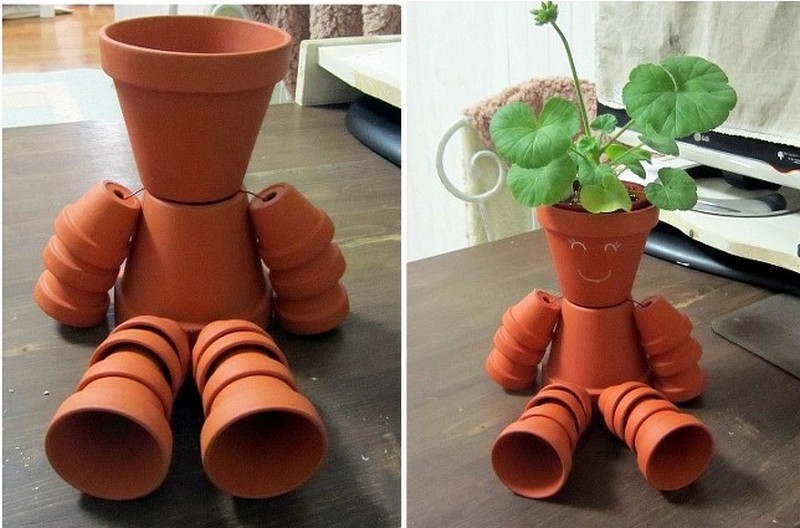
Are you looking for something to do with the kids? Here’s a project that’s great for getting children interested in gardening! A group of cute garden people made of clay pots! 🙂
What other materials could you think of for making the arms and legs of clay pot flower people? Painted clay pots are one of the best designs you can have in your garden. These are not just affordable but also not difficult to make.
There are several ways to use flower pots, one of which is by using these to create lovely planters. You can find these supplies at any hardware store and making the planters is easy. You’re sure to love the results!
With just a few simple steps and the necessary basic materials, make your outdoor living place come alive!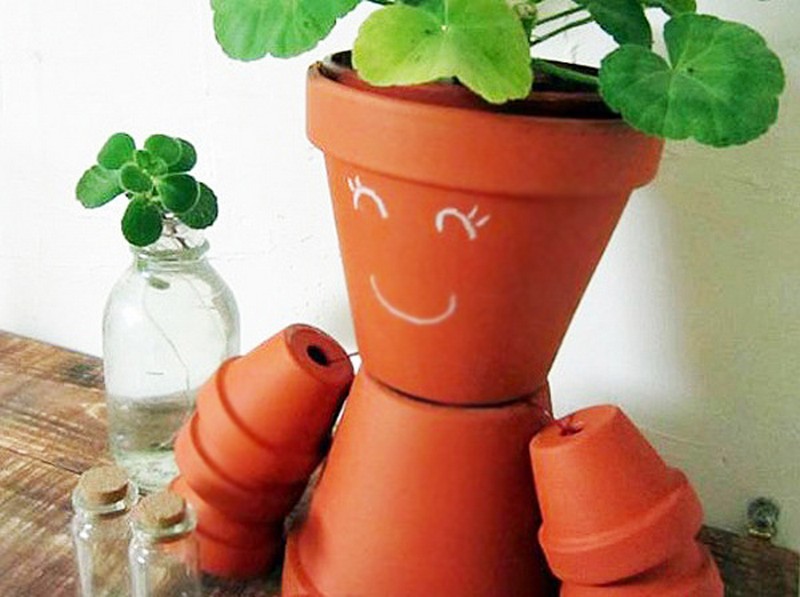
You won’t believe how easy it is to make this decor for your garden. Aside from being simple, this decor is naturally attractive. Too attractive, that your visitors will like it and ask you how to do it themselves.
Making Clay Pot Flower People
What Are the Materials Needed to Make a Clay Pot Flower People
- Clay pots (various sizes):
- 1 large pot for the body
- 1 medium pot for the head
- 4–8 small pots for the arms and legs (depending on how long/adorable you want those limbs!)
- Nylon rope or heavy-duty string: For connecting arms and legs securely.
- Small wooden pieces (popsicle sticks or scrap wood): To reinforce joints and help pots sit properly.
- Acrylic paints & paint markers (optional): To decorate the face, clothing, or patterns.
- Clear outdoor sealant (optional but recommended): Helps protect colors from sun and rain.
- Soil and plants (optional): If you want hair made of cascading plants or a leafy hat.
What Are the Tools Needed for This Project
- Soft cloth or sponge: For wiping pots before painting.
- Scissors or a wire cutter: For trimming nylon rope.
- Hot glue gun (low-temp preferred): Helps secure knots, stabilize joints, and hold reinforcement wood pieces.
- Paintbrushes (various sizes): If decorating your clay friend.
- Tape measure: To keep arms and legs even in length.
How to Make a Clay Pot Flower People
Prep time: ~20–40 minutes
Painting & drying: Allow ~1–2 hours between coats; full cure 24 hours if using sealer.
Skill level: Beginner — no power tools required.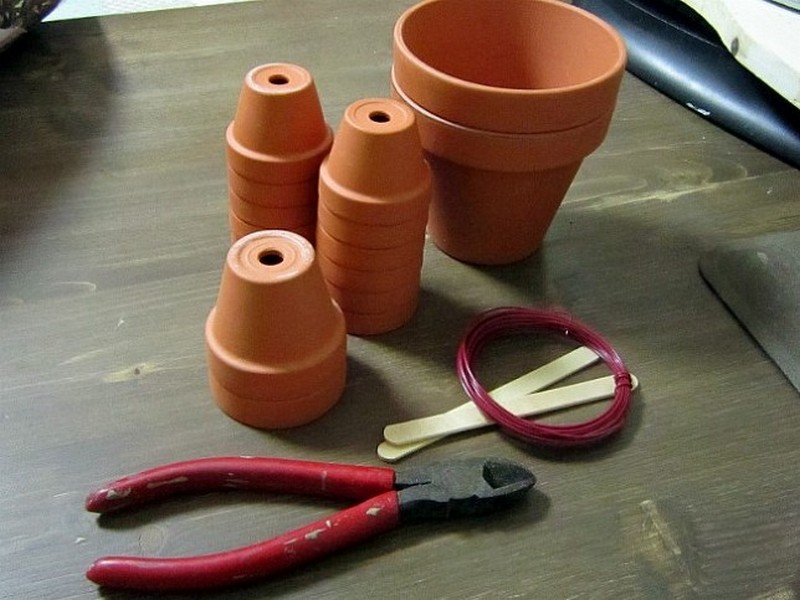
Step 1: Set Up Your Workspace
- Work on a flat, stable table covered with newspaper or a disposable tablecloth.
- Put on old clothes, gloves (optional but good for paint/sealant), and work in a well-ventilated area.
- Lay out all materials and tools within reach: pots, string, wood pieces, paint, brushes, hot glue gun, scissors.
Step 2: Clean the Pots
- Rinse each pot (inside and out) under running water to remove dirt and dust.
- If there’s stubborn grime, scrub gently with a soft brush and a little dish soap.
- Dry completely with a towel and let air-dry 10–15 minutes — paint sticks best to clean, dry surfaces.
Step 3: (Optional but Recommended) Lightly Sand and Prime
- If pots feel very smooth, lightly sand the areas you’ll paint with fine sandpaper (120–220 grit) so paint grips better.
- Wipe away dust with a damp cloth and let dry.
- If you have outdoor acrylic primer, apply one thin coat and let dry 15–30 minutes. This improves coverage.
Step 4: Paint the Pots (Two Thin Coats)
- Plan your color zones before painting (example: big body pot = red dress; medium head pot = skin tone or neutral; small limb pots = white/red).
- Use thin, even coats rather than one heavy coat. Thin coats dry faster and don’t drip.
- Apply the first coat, wait 30–45 minutes (or until touch-dry), then apply the second coat.
- For facial details, wait until base color is fully dry, then draw features using a fine paint marker or a fine brush with black acrylic paint.
- Let painted pots cure fully (ideally overnight).
- Optional: spray or brush on a clear outdoor acrylic sealer once paint is dry to protect from rain and fading. Allow sealer to cure as per product instructions (usually 24 hours).
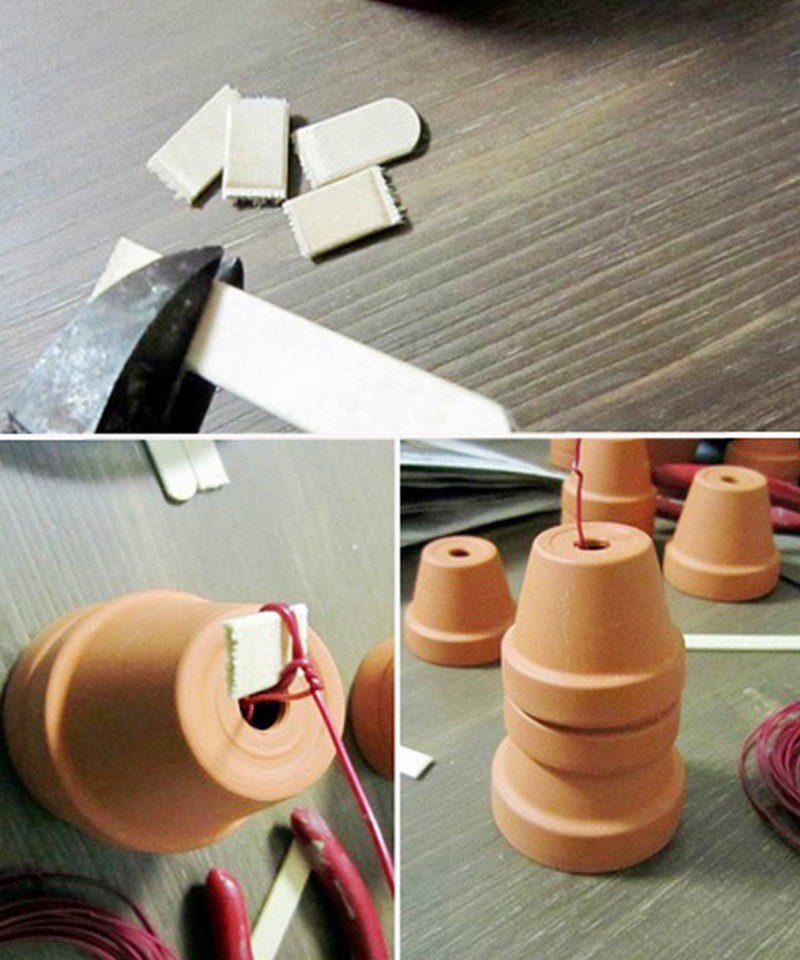
Step 5: Prepare the Limb Connections
- Use the pots’ existing drainage holes for threading string. If the pots don’t have holes where you need them, you can:
- Thread string around the pot neck (under the rim) and secure with knots and hot glue, or
- Use small wooden reinforcement pieces (popsicle sticks) inside the pot to keep knots from slipping.
- Cut macramé cord/nylon string into lengths: two arm strings ~30–40 cm, two leg strings ~40–50 cm — adjust if you want longer limbs. Add ~10 cm extra for tying.
Tip: Tie a double knot and dab hot glue on the knot to lock it — hot glue sets quickly and stabilizes the join.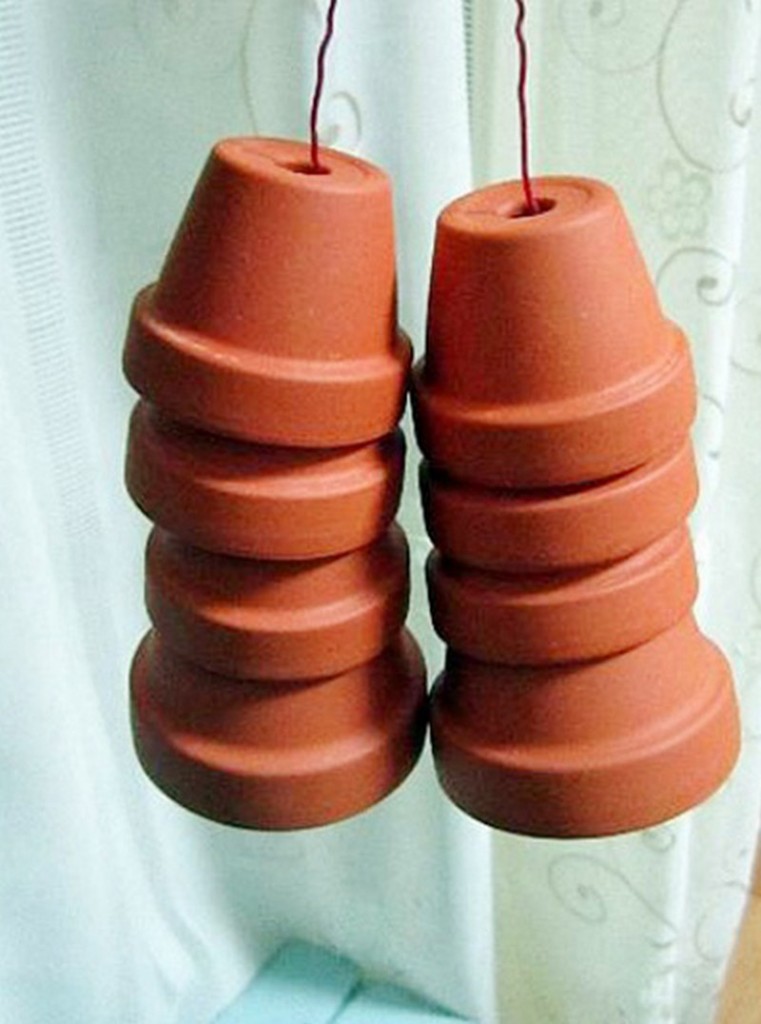
Step 6: Assemble the Arms and Legs
- Thread string through small limb pots: put the string through the drainage hole and tie a secure double knot inside.
- Add a drop of hot glue to the knot for extra hold. If using two small pots per limb, tie between them so they sit snugly.
- If you want “hands” or “feet” that don’t fall off, glue a small wooden disc or bead inside the pot before knotting to act as a stopper.
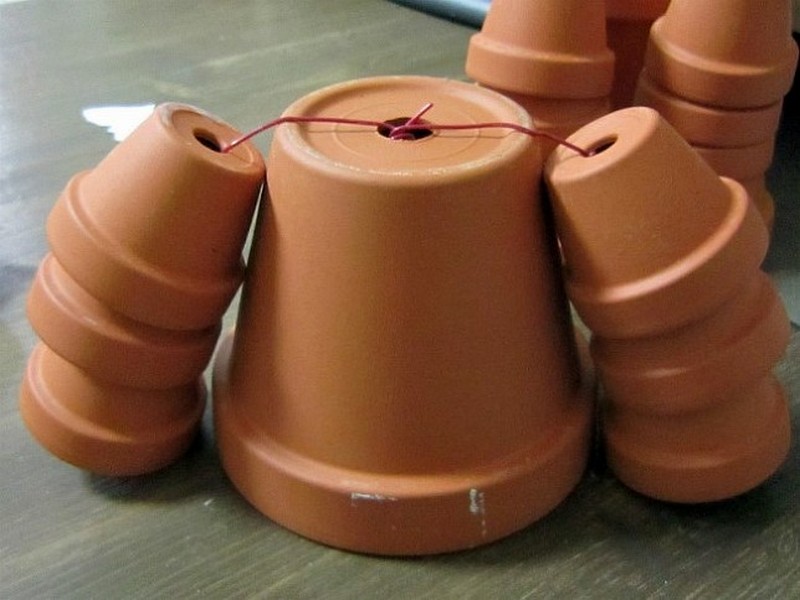
Step 7: Attach Limbs to the Body (Big Pot)
- Turn the large body pot upside down (rim on the ground) so the drainage hole faces up — you’ll use it to thread limb strings.
- Decide limb placement (left/right arms and legs) and mark spots visually.
- Thread each limb string through the top drainage hole(s) or loop the string around the rim beneath the pot’s lip; tie firmly.
- Pull the limbs so they hang naturally; adjust knots to set limb length evenly. Add hot glue at the knot inside the body for stability.
Alternative: If threading through the body isn’t possible, tie the strings around the pot’s neck and glue a small strip of wood under the knot for support.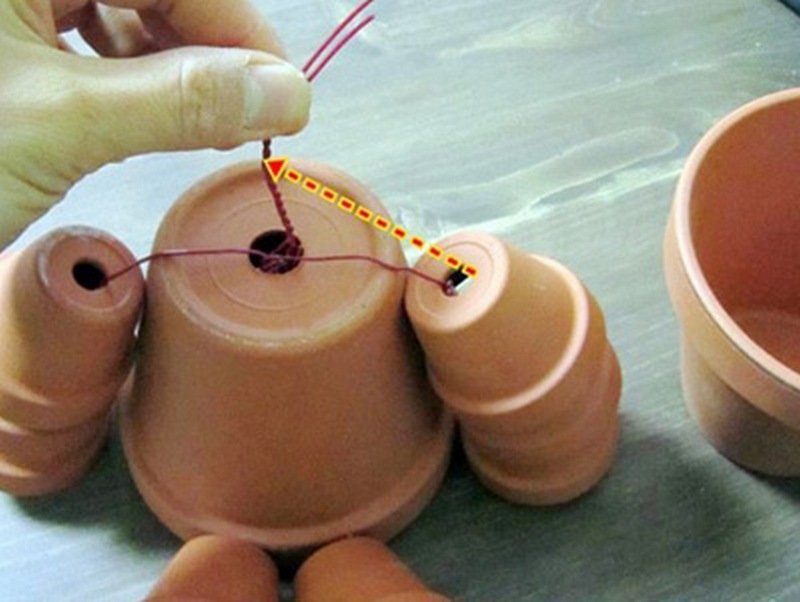
Step 8: Make and Attach the Head
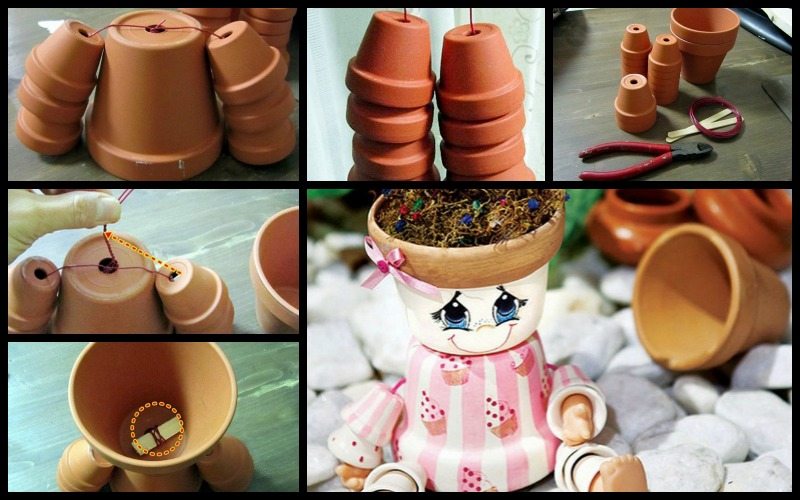
To keep the head stable and prevent it from wobbling or sliding off, you’ll use a small wooden block tied to the macramé cord inside the body pot — just like in the image.
- Prepare a small wooden block
- Use a popsicle stick, scrap wood piece, or any small flat piece of wood (around 5–7 cm long).
- This piece will act like a “brace” so the cord can’t slip through the drainage hole.
- Thread the macramé cord through the body pot’s drainage hole
- From the outside, push the cord through the drainage hole into the inside of the pot.
- Pull enough cord through so you can tie it around the wooden block.
- Tie the cord around the wooden block (important!)
- Wrap the cord tightly around the middle of the wooden block and tie a double or triple knot.
- Make sure the block sits flat — it shouldn’t wiggle.
- This block prevents the cord from pulling back through the small drainage hole.
- Pull the cord upward to lock the block in place
- Gently pull the cord from outside the pot; the wooden block should now sit snugly against the inside of the drainage hole, just like in the image.
- The pot will now “hold” the cord firmly.
- Attach the head pot
- Thread the free end of the cord up through the head pot’s drainage hole.
- Pull the head pot down until it sits evenly on top of the body.
- Tie a knot inside the head pot to secure it, or leave some slack if you want to adjust the tilt.
- Optional: Add hot glue for extra stability
Safety note: Use the glue gun carefully — avoid skin contact and let the glue cool.
Step 9: Add Flower “Hair”
- Fill the head pot (if it’s the type that holds soil) with potting mix and plant a small flowering plant or trailing plant so it looks like hair.
- If the head pot is glued down or sealed, you can glue a faux plant or a small floral foam piece on top and arrange artificial flowers for the hair effect.
10. Final Touches and Display
- Touch up any paint chips or seams with matching paint.
- If you used a sealer, wait the full cure time before placing outdoors.
- Position your clay pot person on flat ground in the garden (or on a patio). If it’s top-heavy, place bricks or small stones under the body rim to stabilize it.
Quick Troubleshooting & Tips
- If a pot cracks: swap to another pot—don’t force a cracked piece.
- Limbs not hanging evenly: measure string lengths before tying and check symmetry by holding limbs up before final knots.
- Paint peeling outdoors: use an outdoor acrylic sealer and avoid placing in full, harsh sun all day.
- Want a family set? Use different pot sizes and slight color variations for personality.
After making one, try to make more, and you will have a group of clay pot flower people touring your garden or a family of clay pot flower people living happily in your garden!
Thanks to Tanya Memme for this great project. You can get step by step instructions here…
Click on any image to start the lightbox display. Use your Esc key to close the lightbox. You can also view the images as a slideshow if you prefer 😎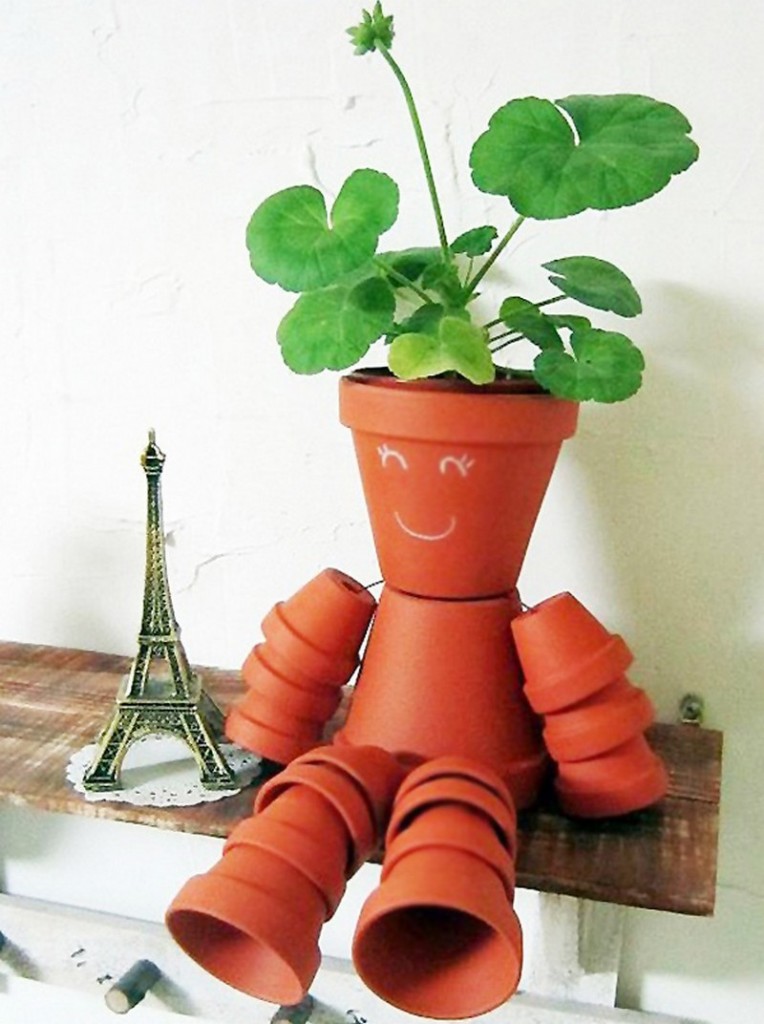

Incorporating Natural Elements
Incorporating natural elements into your clay pot flower people can transform them from charming garden ornaments to vibrant, lifelike figures that seem to interact with their environment. This approach not only enhances the aesthetic appeal of your garden but also encourages a deeper connection with nature.
Using materials like moss, stones, and real plants, you can add texture, color, and a sense of life to your clay pot creations.
Here’s how to bring these natural elements into your clay pot flower people projects.
Moss Hair and Accents
Moss is an excellent material for creating realistic hair or adding green accents to your clay pot people. It’s especially effective for crafting figures that blend into their garden surroundings.
To attach moss, apply a waterproof adhesive layer to the part of the clay pot designated for hair or decoration. Press the moss firmly onto the adhesive, shaping it as desired. Over time, the moss may grow, further integrating your clay pot person into the garden ecosystem.
Stone and Pebble Features
Stones and pebbles can create distinctive features on your clay pot people, such as eyes, buttons, or decorative patterns on their ‘clothes’. These natural materials offer a variety of colors and textures, allowing for a high degree of customization. To adhere stones or pebbles, use a strong outdoor-grade adhesive that can withstand weather conditions. This adds a unique touch to your creations and helps ground them in their natural setting.
Real Plants for Dynamic ‘Hair’
Choosing the right plants for your clay pot people’s ‘hair’ can turn them into living, growing entities within your garden. Select plants based on the amount of sunlight and water they will receive in their location.
Succulents are a low-maintenance option that can mimic hair textures, while flowering plants like petunias or pansies add a pop of color. Plant your chosen flora in the top pot of your clay pot person, ensuring it has enough soil and room to grow. As the plants flourish, they’ll give your clay pot people a lively, ever-changing appearance.
Integrating Natural Elements for Seasonal Themes
Adapting your clay pot flower people to reflect seasonal changes is a delightful way to keep your garden engaging throughout the year. Consider planting bright, blooming flowers atop your clay pot people in spring. For autumn, switch to fall foliage or ivy that changes color with the season. This keeps your garden decor fresh and celebrates the natural cycles of the environment.
Incorporating natural elements into your clay pot flower people enriches your garden with textures, colors, and life. It creates a harmonious blend between art and nature, making your garden a more inviting and interesting space. Experiment with different materials and plants to find the perfect combination that brings your clay pot people to life.
Interactive Clay Pot People
Interactive clay pot flower people bring an element of surprise and delight to any garden. Adding movable parts or incorporating these charming figures into garden activities creates a playful environment that encourages interaction and engagement. Whether for the sheer joy of discovery or to serve a practical purpose, these animated additions can make your garden a more lively and enchanting.
Here’s how to introduce interactivity to your clay pot flower people, making them decorations and active participants in your garden’s story.
Movable Parts for Dynamic Poses
Creating clay pot flower people with movable parts allows you to change their positions, mimicking actions like waving, sitting, or even holding garden tools. Use flexible materials like thick wire or strong nylon strings as joints for the arms and legs. Securing these materials inside the pots before assembling them ensures that the limbs can move while remaining firmly attached. This flexibility invites garden visitors to adjust the poses, adding a sense of whimsy and interaction.
Holding Garden Tools and Accessories
Equip your clay pot flower people with slots or hooks on their hands (small pots) to hold garden tools, watering cans, or signs. This makes them more interactive and turns them into helpful garden companions. For instance, a clay pot person could “hold” a small rake or shovel, or display garden labels indicating what’s planted where. These practical touches add character to your garden and serve functional purposes, making gardening more enjoyable.
Seasonal Outfit Changes
Like fashion, your clay pot flower people can change their look with the seasons. Design them with removable accessories like hats, scarves, or even seasonal decorations that can be easily swapped. Velcro strips or simple hooks can be used to secure these items. Encouraging visitors to change the outfits of your clay pot people according to the season or upcoming holidays adds an interactive element that keeps your garden decor fresh and engaging all year round.
Interactive Games and Challenges
Turn your clay pot flower people into participants in garden games or challenges. Create a scavenger hunt where visitors need to find certain clay pot people based on clues related to their location or the plants they’re associated with.
Alternatively, set up a puzzle or story that can only be solved by interacting with multiple clay pot figures, each providing a puzzle piece. This makes for a fun, engaging garden experience and encourages visitors to notice and appreciate the smaller details of your outdoor space.
Making the clay pot flower people come alive can transform a static garden into a dynamic, engaging environment where visitors can physically interact with the decor.
By adding movable parts, incorporating them into garden activities, and inviting seasonal changes, these clay pot characters become more than just garden ornaments — beloved and interactive members of the garden community. This approach fosters a deeper connection with the garden, making every visit a new adventure.
Frequently Asked Questions
- What sizes and types of pots do I need?
- Most clay pot flower people use one large pot for the body, one medium pot for the head, and 4–8 small pots for the arms and legs. Terracotta is recommended because it’s sturdy, inexpensive, and easy to paint.
- How do I attach the arms, legs, and head securely?
- Limbs are usually attached using nylon rope or strong cord threaded through the pots’ drainage holes. Knots can be reinforced with hot glue and small wooden pieces inside the pot. The head is secured using a cord tied around a wooden block inside the body pot.
- What kind of paint works best on clay pots?
- Acrylic paint is the most popular choice because it dries quickly and sticks well. For outdoor projects, it’s best to use outdoor or weatherproof acrylic paint and finish with a clear sealant to prevent fading.
- Do I need to seal my clay pot flower people?
- Sealing is optional but highly recommended for outdoor display. Use a clear outdoor acrylic sealer to protect the paint from sun, rain, and temperature changes.
- What can I use for the arms and legs besides small pots?
- Common alternatives include wooden beads, chunky rope, bamboo sections, PVC rings, or even old toy parts. Anything sturdy that can be threaded or glued works.
- Can I give my clay pot person real plant “hair”?
- Yes! Many people plant small flowers, trailing vines, succulents, or grasses in the head pot for a fun “hair” effect. If you prefer low maintenance, you can use faux plants, moss, or decorative greenery.
- How do I prevent my clay pot flower person from tipping over?
- Place them on a flat, stable surface and add small rocks or bricks inside the body pot for weight. If your design is tall, consider setting it against a wall, fence, or garden stake for extra support.
Conclusion
Creating clay pot flower people is a delightful way to add personality and charm to any garden space. These whimsical figures invite engagement and creativity by integrating natural elements and interactive features. This unique blend of art and gardening enhances the beauty of outdoor spaces, making them more inviting and enjoyable for everyone.
If you liked this great project. You might also want to check out DIY Clay Pot Lighthouse Ideas…