Last Updated on September 24, 2025 by teamobn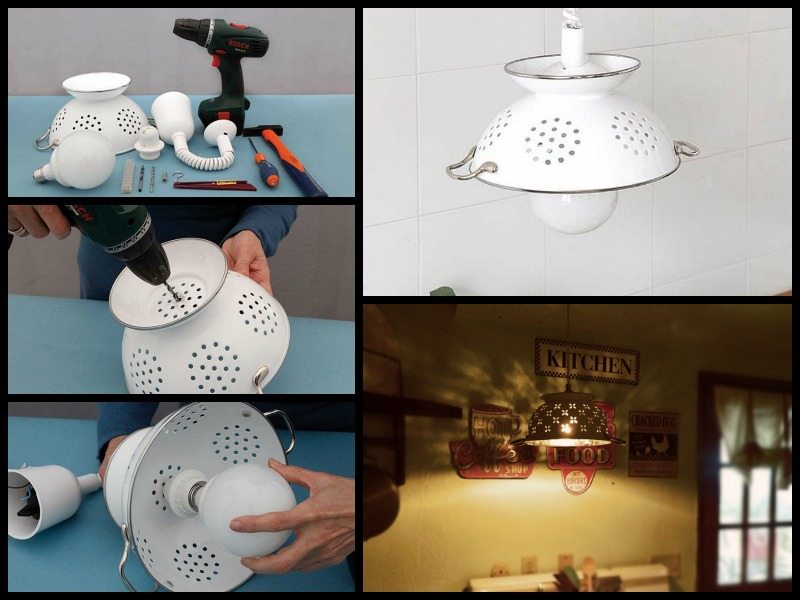
Need a pendant lamp? Maybe your kitchen requires the right lighting to get you on track to accomplish the day’s tasks. From homework to list-making, to cooking, the kitchen counter is a culinary workbench.
And proper lighting – say, recessed downlighting or island-highlighting pendants – will ensure that it’s fit for all of those uses.
The Art of Crafting an Exquisite DIY Colander Pendant Lamp
Despite the many uses that kitchen lighting has, the main one is to enable me to see what anyone Is doing clearly. It is very important, as cooking is one of the most crucial activities that one must do daily and anyone tends to make mistakes sometimes.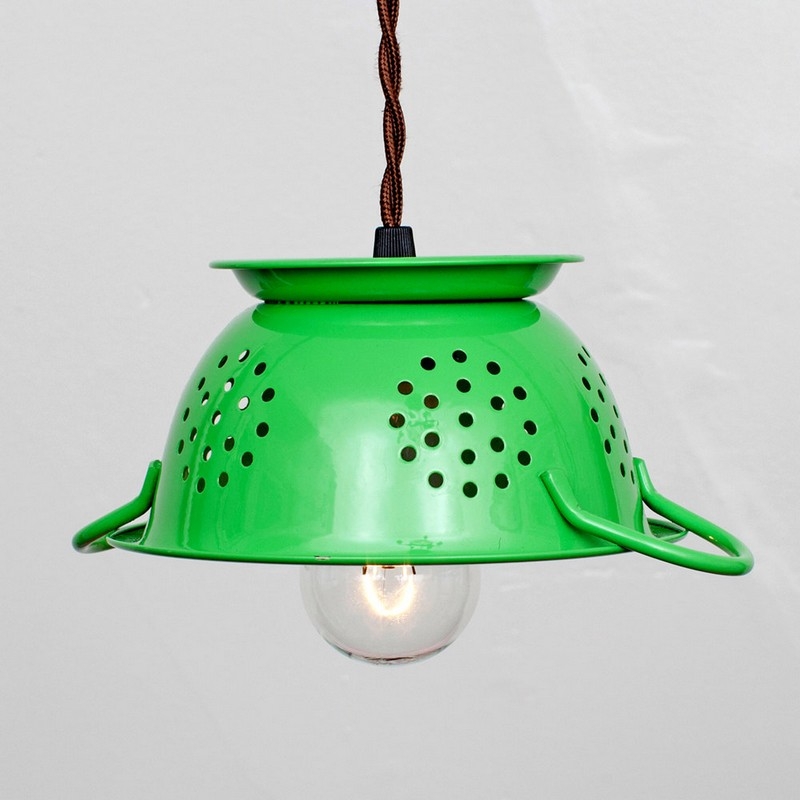
The best lighting for your kitchen is natural lighting. Having windows facing the east is the best. This way, the sun rays will shine directly on the kitchen light, which would make it more useful. However, if this is not possible, then you will need to think of a good lighting alternative.
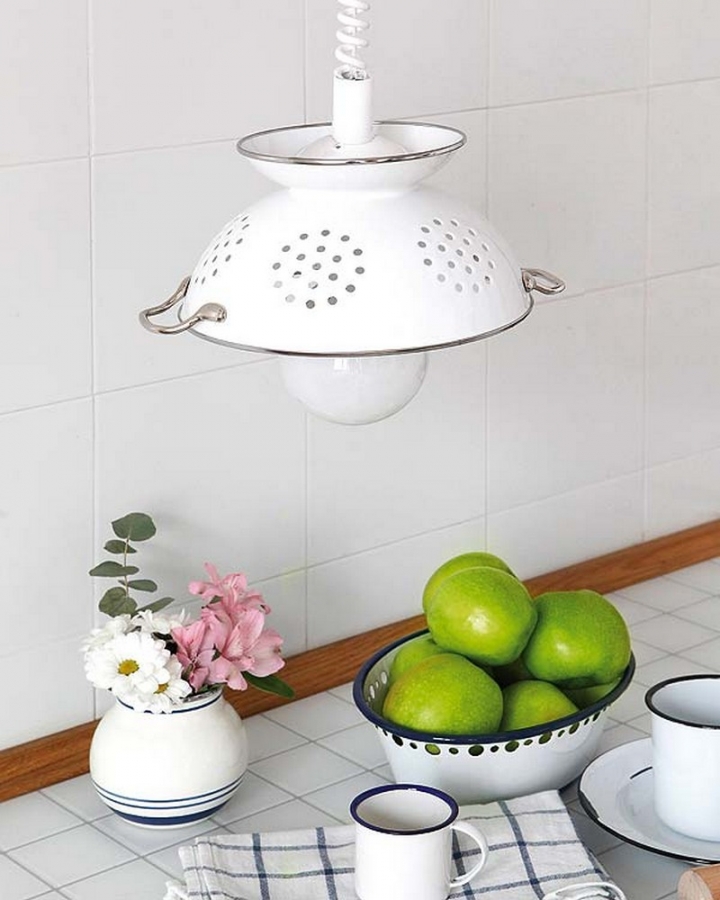
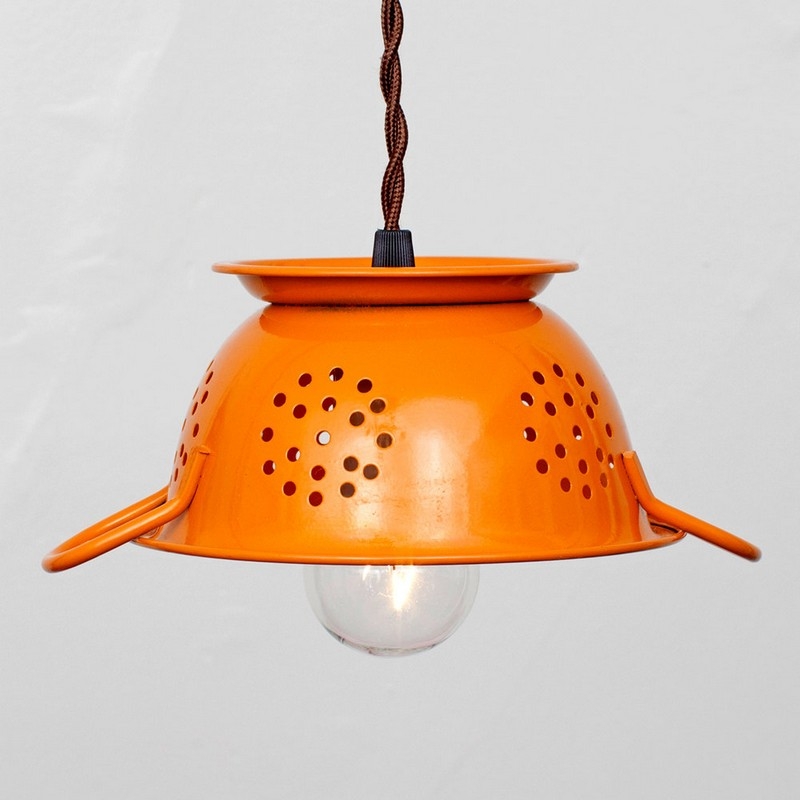
If you’d like an unusual pendant light for your colander, why not consider making one from a colander? Perfect theme lighting for the kitchen, don’t you think? 🙂
Usually, a colander is a kitchen utensil designed to hold food for draining or rinsing. It is also used for stirring and serving food.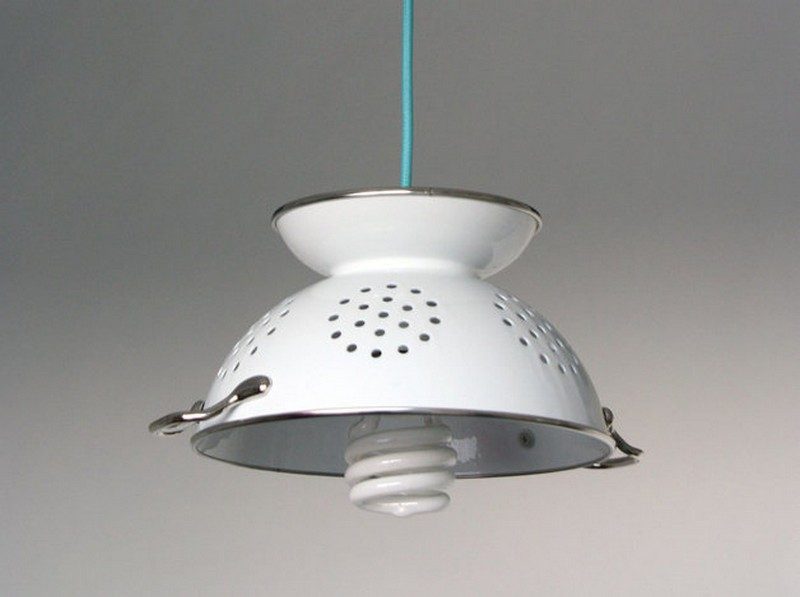
Colanders are typically made of metal or plastic and are available in a range of sizes. Some colanders have a handle or two handles.
A colander can be used in almost any kitchen but is most commonly used when preparing vegetables or pasta. But, would it be a great idea to use it as a pendant lamp?
Well, pendant lamps are modern lighting fixtures that hang from the ceiling by a cord or chain. They’re also known as droplights, ceiling lights and lampshades.
The most common materials used to make pendant lamps are metal, glass and plastic. And the common sizes range from tiny ones with a 6″ diameter to larger ones that can be up to 2 feet in diameter. This is why a colander will be a superb choice for a pendant lamp.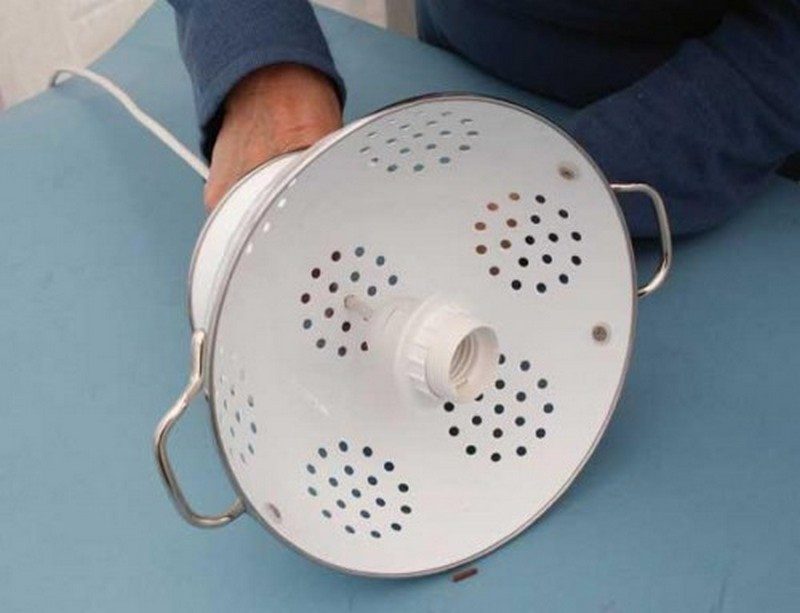
This is a simple project that you can easily do in a couple of hours. The materials needed are affordable, especially if you have a spare colander although you might want to shop for one with an interesting pattern.
You see (and you will!), what’s great about this project is the unique light pattern it makes on your ceiling and upper walls when you turn it on.
Great idea?
Building Your Colander Pendant Lamp
Materials:
- Colander
- Lighting Fixtures
- Hooks
Tools:
- Hole saw/Plasma Cutter/Tin Snips, Awl & Hammer
- Marker
- Drill and drill bits
- Screw Driver
Step:
- Plan the setup. Decide between a plug-in swag or a hardwired ceiling box for your colander lamp fixture. Turn off power at the breaker if you’re hardwiring.
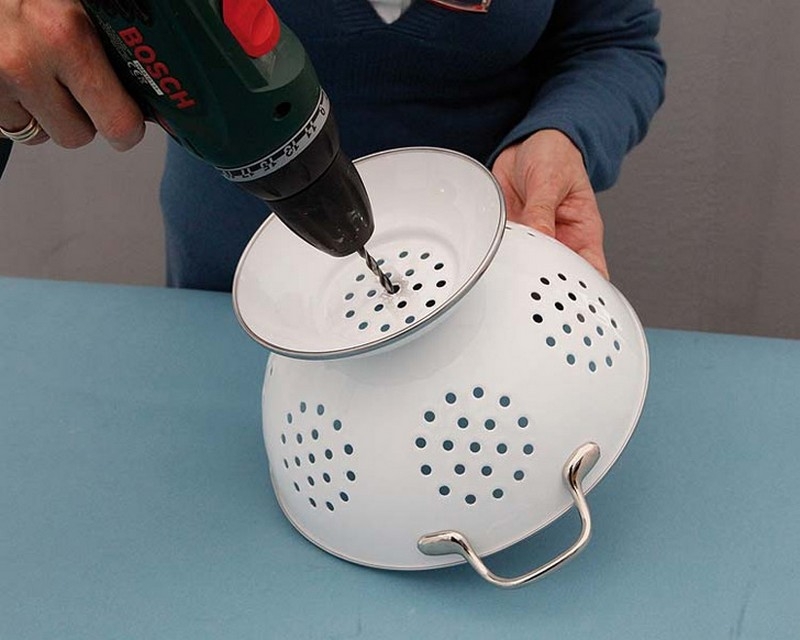
- Find the center. Flip the colander upside down, measure by eye, and mark the center point with a marker. Use painter’s tape as a visual guide if glare makes marking tricky.
- Dimple the mark. Set the awl on your dot and give it a light tap with the hammer. The dimple keeps your pilot bit from skating.
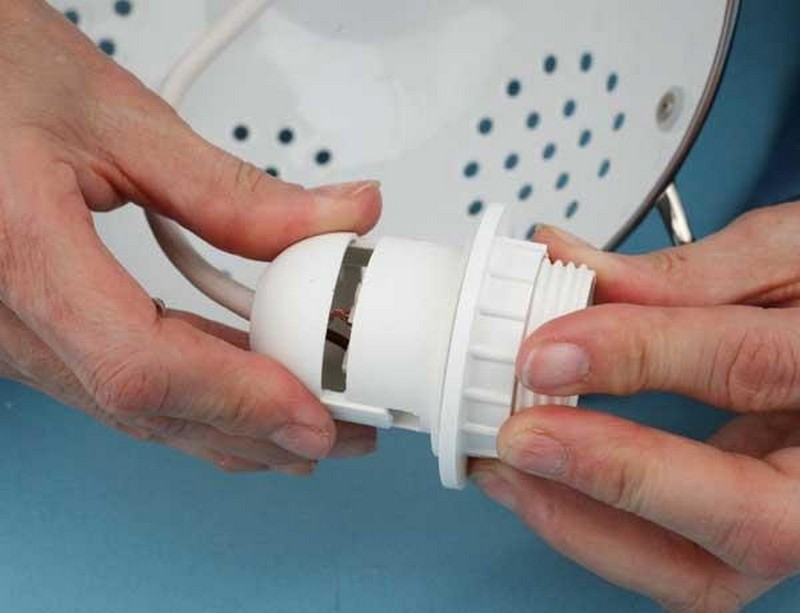
- Drill a pilot hole. Use a 1⁄8 in metal bit through the awl dimple. Keep the drill square to the bowl so the socket will hang straight.
- Enlarge the opening. Use a hole saw or step bit sized to your fixture’s threaded nipple. Thick steel can take a plasma cutter. Thin aluminum can be opened with tin snips after the pilot. Gently “kiss” the edge with the bit to knock down burrs.
- Test-fit the socket. Slide the fixture’s nipple through the hole. Add the kit’s washer or locknut as needed. If the fit is tight, open the hole a hair with the drill.
- Add strain relief. Tie an underwriter’s knot in the cord beneath the socket or tighten the fixture’s built-in cord clamp. This keeps the cord weight off the terminals.
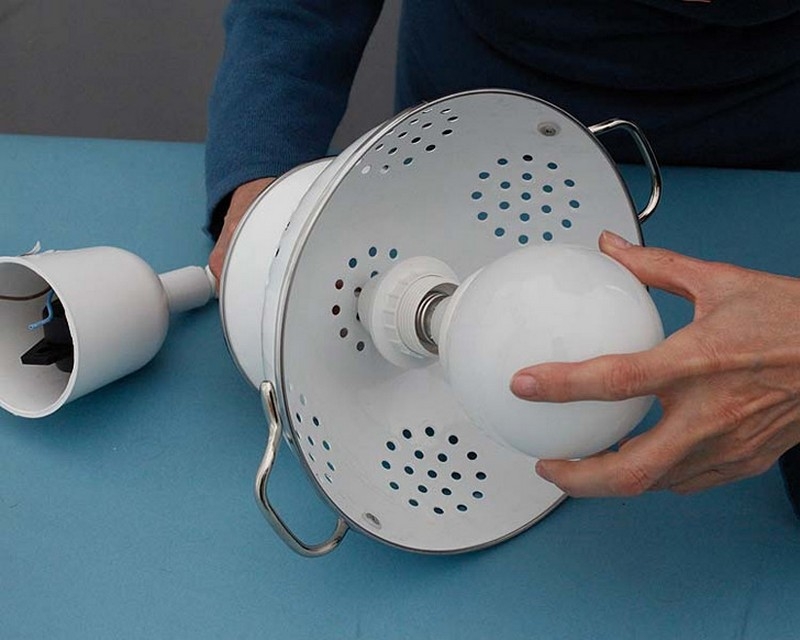
- Secure the shade. Seat the colander against the socket’s shade ring or inside washer and tighten the locknut. The colander should feel snug with no wobble.
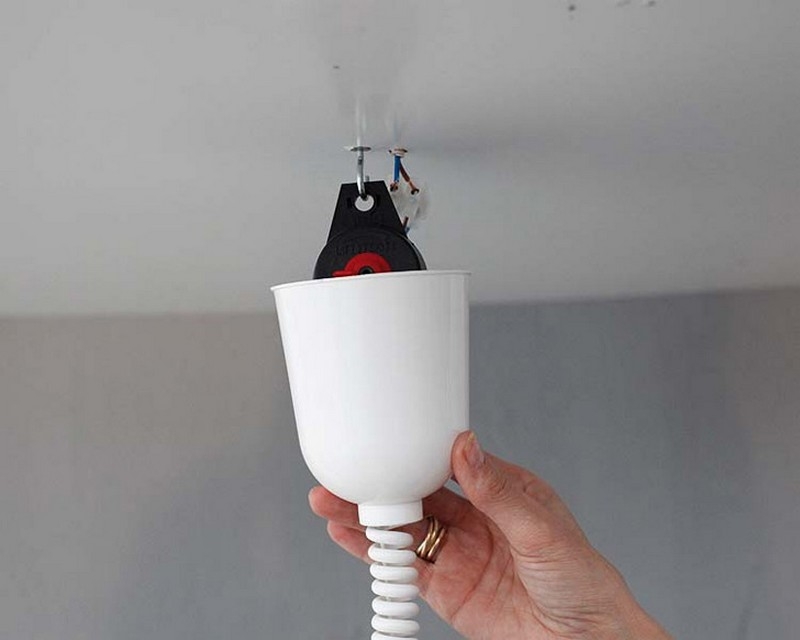
- Place the hook. Pre-drill a pilot into a ceiling joist and twist in the hook. Using anchors rated for your ceiling material is fine when a joist isn’t available.
- Hang and route the cord. Clip the cord over the hook and use extra hooks to swag to your outlet or box. Keep the cord away from heat and moving cabinet doors.
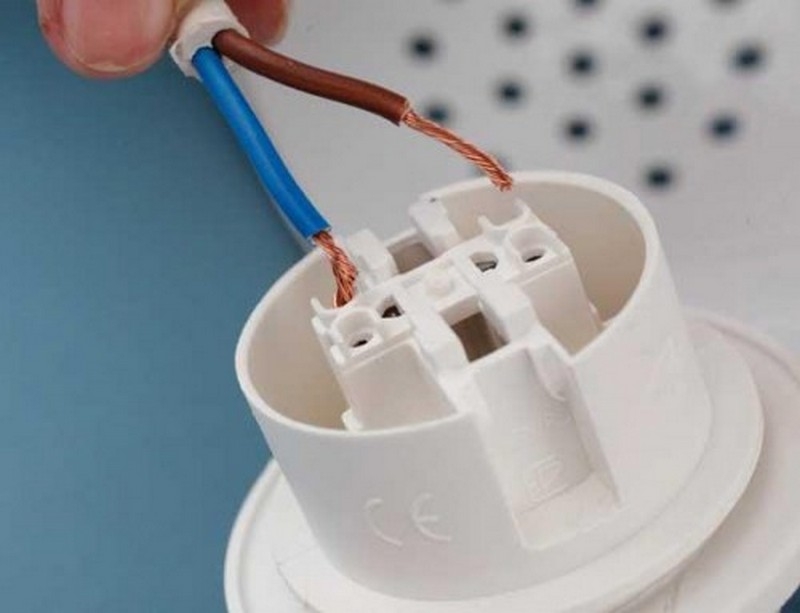
- Wire the connection. For plug-in, you’re done at the outlet. For hardwired, connect hot to hot, neutral to neutral, and ground to ground with proper connectors, then mount the canopy. If you’re unsure, call a licensed electrician.
- Bulb and test. Install a low-heat LED bulb to limit warmth on the metal shade. Power up, check for level, and adjust cord length so the colander lamp fixture sits at a comfortable working height.
Colander Pendant Lamp Gallery
Click on any image to start the lightbox display. Use your Esc key to close the lightbox. You can also view the images as a slideshow if you prefer 😎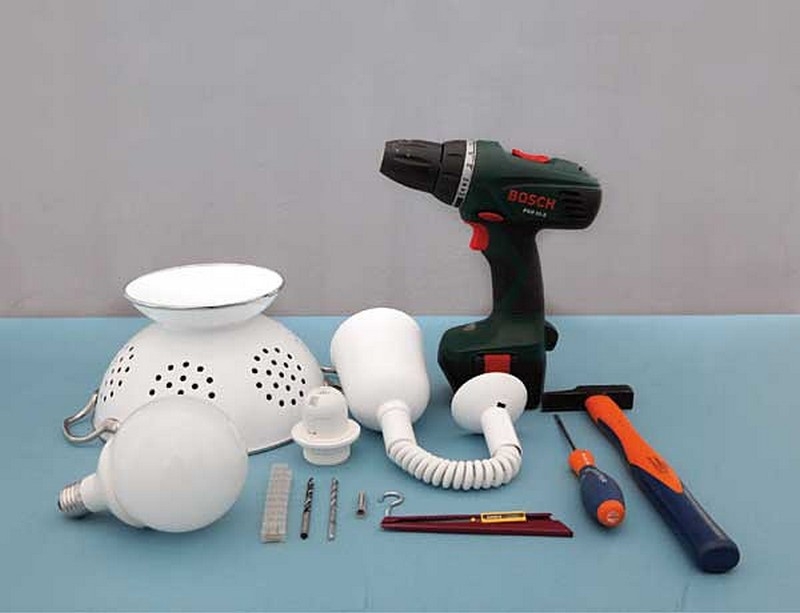


Sconce and Flush-Mount Variations
A colander lamp fixture can adapt easily to walls and low ceilings. You can treat it like a sconce or a flush mount. Plan for safe wiring, support, and glare control.
Sconce Conversion Basics
Turn the colander into a wall sconce by mounting a standard sconce backplate over a junction box, then using a short threaded nipple to hold the socket and shade ring. Add a cord grip or tie an underwriter’s knot for strain relief. Position the colander downlight for task lighting or uplight for ambient wash. A frosted LED softens perforation hotspots. Keep the handle orientation consistent for a tidy silhouette and easy alignment with other fixtures.
Flush-Mount Tactics for Low Ceilings
For flush mounting, choose a shallow canopy and a compact socket so the colander sits close to the ceiling. Use a short nipple and a locknut inside the shade to eliminate wobble. A low-profile LED globe reduces glare and heat. Consider an acrylic diffuser disc behind the holes to calm sparkle while preserving pattern. Keep total drop minimal above door swings and cabinet doors, especially in tight kitchens and hallways.
Shade Orientation and Light Control
Pattern direction changes the room feel. Point holes outward for sparkling texture or downward for punchy task light. A warm 2700–3000K LED flatters wood and painted finishes, while 3500–4000K suits prep zones. If the perforations feel harsh, line the interior with a thin diffuser film or add a frosted globe. Dark interiors mute glitter, light interiors amplify it. Aim the handle toward a wall to hide it in photos.
Outdoor and Porch Use the Right Way
A colander lamp fixture can work outdoors on covered porches when you choose the right hardware. Focus on damp ratings, gaskets, and protected locations. Keep water away from live connections.
Know Your Ratings
Use only damp-rated or outdoor-rated canopy kits under a roof that shields rain. Wet-rated gear is required for direct exposure, though a perforated shade isn’t ideal in storm paths. Add a gasketed canopy, rubber grommets, and corrosion-resistant cord grips. Stainless or aluminum colanders resist rust better than mild steel. Verify listing marks and follow manufacturer limits on bulb wattage and ambient conditions. When unsure, consult a licensed electrician for compliance.
Weatherproofing the Openings
Perforations invite moisture, so position the fixture where wind-driven rain can’t reach it. Add an interior acrylic diffuser or frosted globe to deflect mist while softening glare. Seal the cord entry with a drip loop beneath the canopy so water cannot track into the box. Use silicone washers on hardware that pierces the shade. Stainless fasteners and outdoor-rated paint help prevent staining and peeling over time.
Mounting and Maintenance
Anchor into solid framing or use outdoor-rated masonry anchors for brick and block. Keep wiring within a weatherproof box and tighten gasket compression evenly. Wipe the colander regularly to remove salt, pollen, and grease, which accelerate corrosion. Replace bulbs with cool-running LEDs to limit heat stress. Inspect seasonally for loose locknuts, cracked grommets, or compromised seals. Prompt fixes extend life and keep the pattern crisp night after night.
Conclusion
A colander lamp fixture turns a humble kitchen tool into useful lighting with personality. Safe mounting, correct ratings, and good glare control make the difference between novelty and daily utility. Thoughtful bulb choice and simple diffusers shape patterns without sacrificing comfort. With careful placement and routine checks, your repurposed shade will sparkle for years.
If you liked this project, you will also like viewing these easy DIY projects…