Last Updated on February 15, 2024 by teamobn
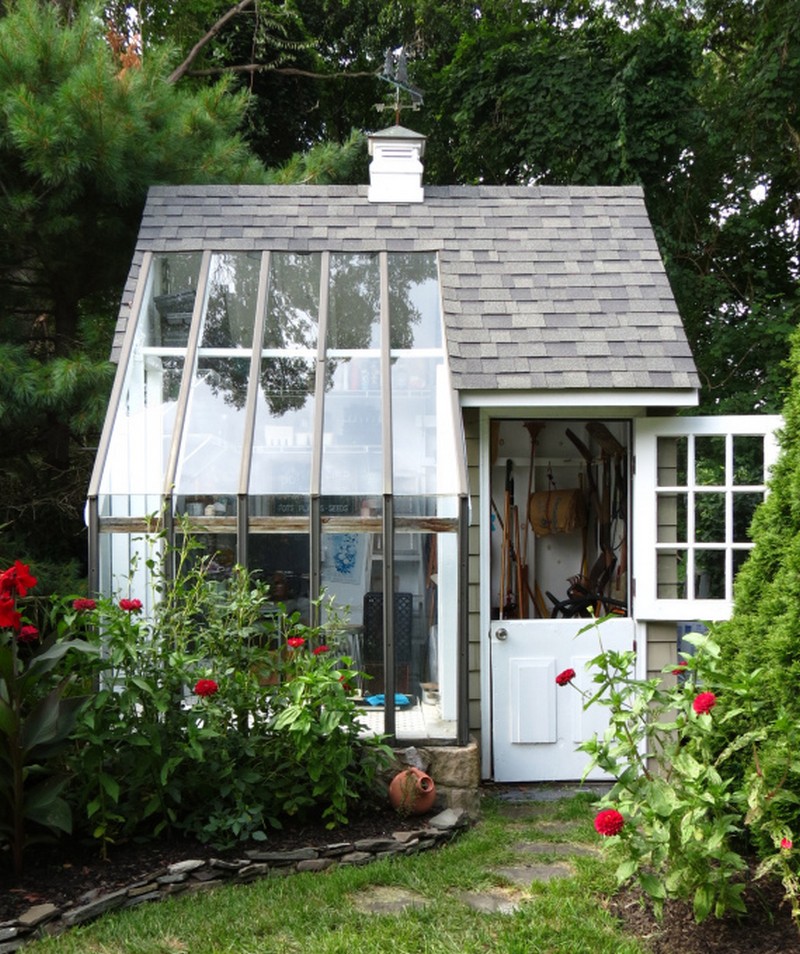
It’s almost too beautiful to be called a potting shed, but that is what this little space is used for. It could also work just as nicely as an artist’s retreat, music room, or reading room.
A potting shed is a small structure used to help a gardener grow flowers, plants, and vegetables. The shed is typically a small, unheated structure with no plumbing, electricity, or internal infrastructure. The structure contains large windows, a door, and enough space to work on gardening chores.
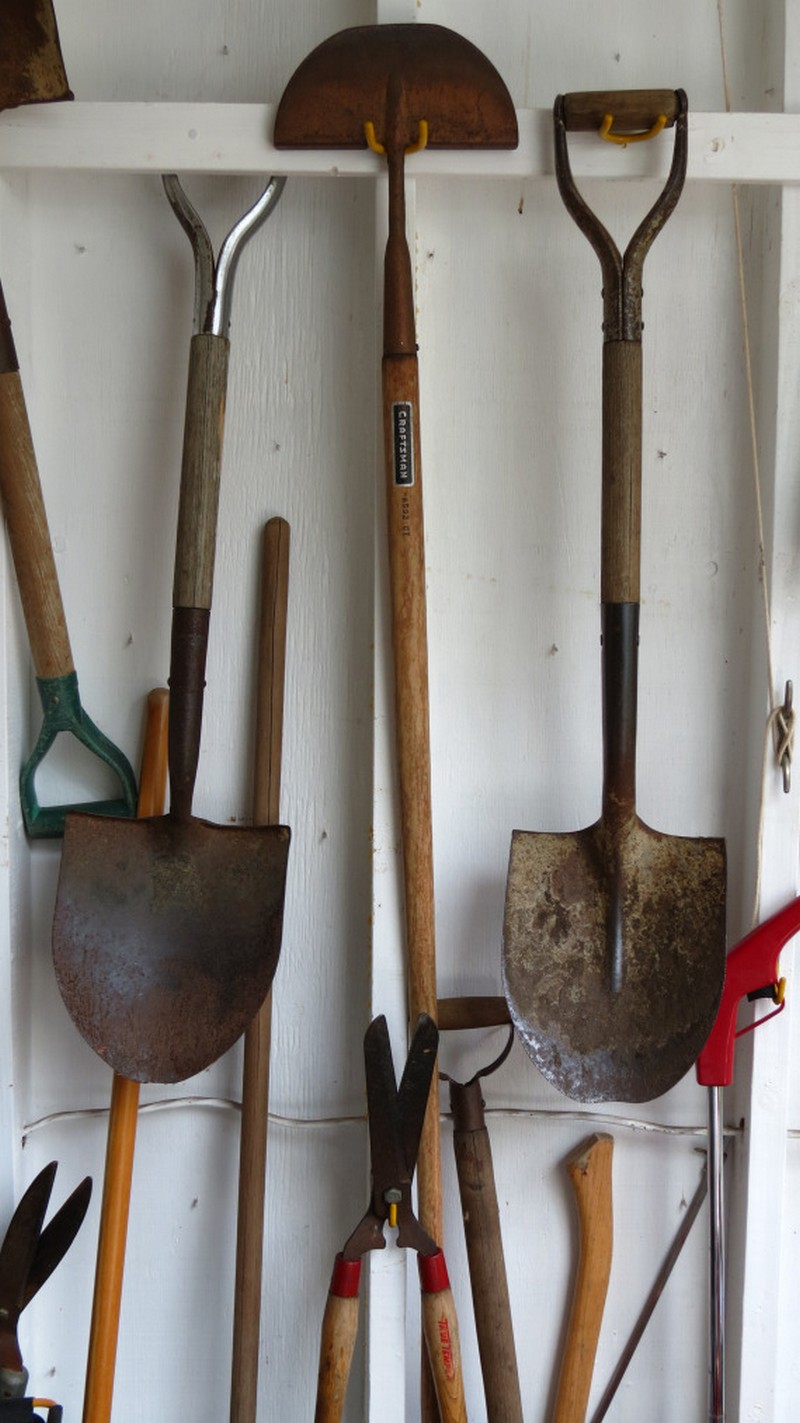
Not only is it a potting shed, but it is also used as a garden tool storage and a “greenhouse” for starting seeds.
This potting shed is a small outdoor shed that is used to organize gardening tools and supplies. The shed is often used to store potting soil, seeds, gardening tools, and other gardening supplies.
Gardeners often use potting sheds to start seedlings for their vegetable and flower gardens. The potting shed does not have to be a permanent structure. There are many do-it-yourself kits that are offered to build a potting shed from scratch, or one can easily be created from a small garden shed or a tool shed.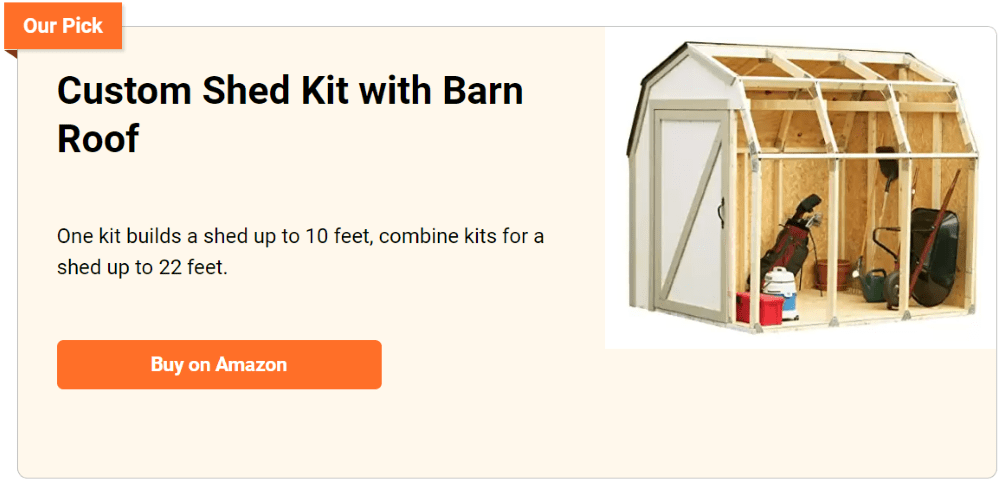
We are not a big fan of the commonly used term “shed” for a garden building. This is because the word “shed” does not literally describe the types of buildings we like to feature in our articles.
Most of the time, “shed” is used to describe a small, low-cost, uninspiring building that is not suitable for indoor use. However, we love to feature well-planned, attractive, and stylish garden buildings, which would not be considered a shed.
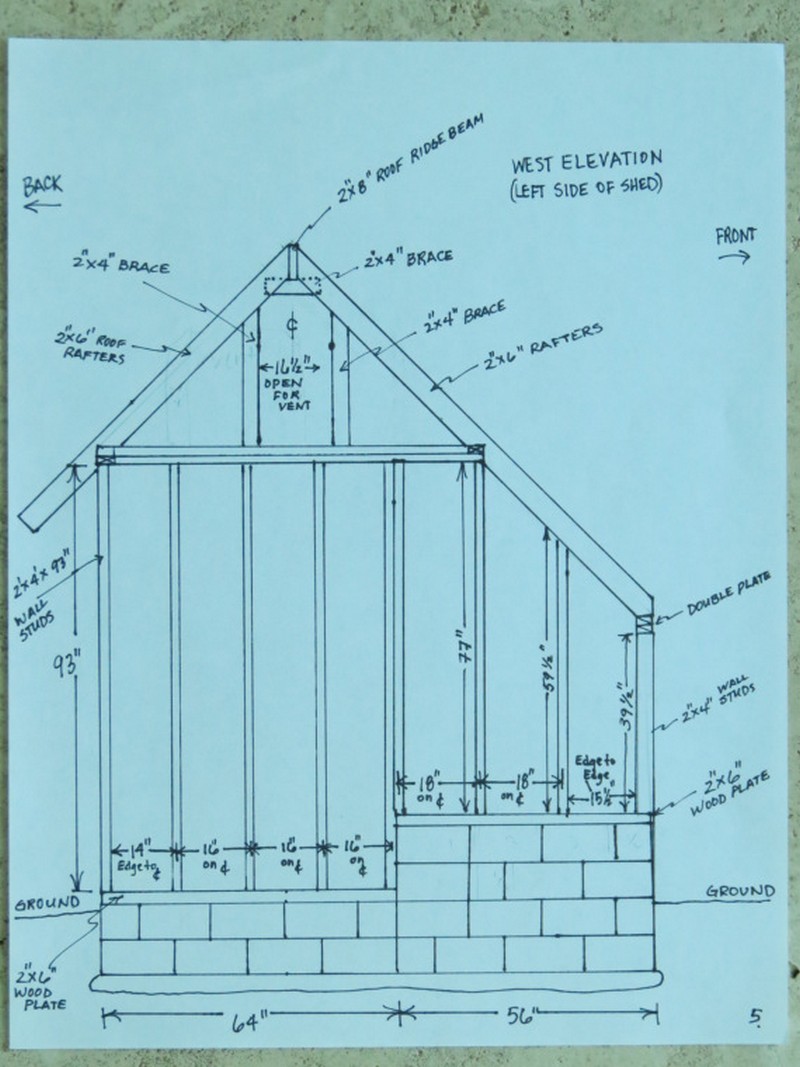
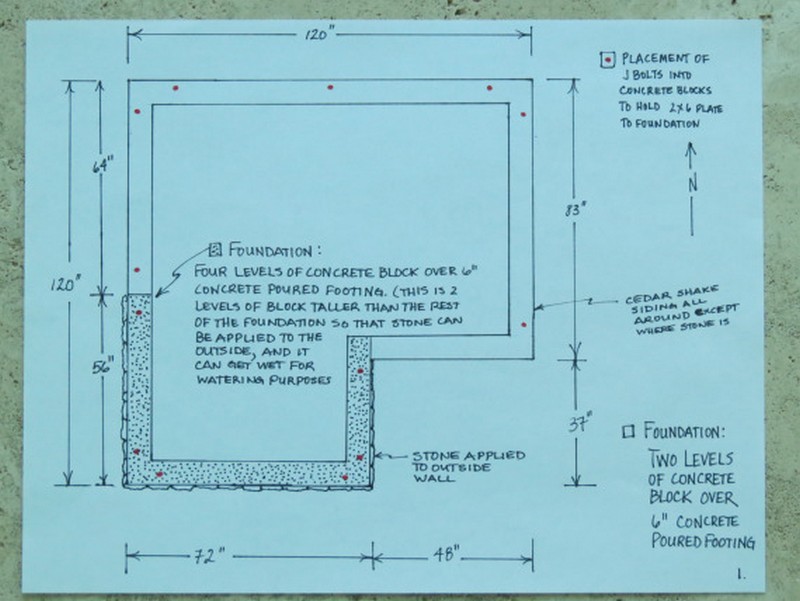
Because of the beautiful thing that it is, people started to ask where they could buy the same shed kit! What they didn’t know was that this 10’x10′ house was originally designed and built by its owners. Fortunately, the kind owner-builders provided plans and further construction details.
This is truly an inspiring building project for all those who are also into gardening. Would you change anything in this garden shed?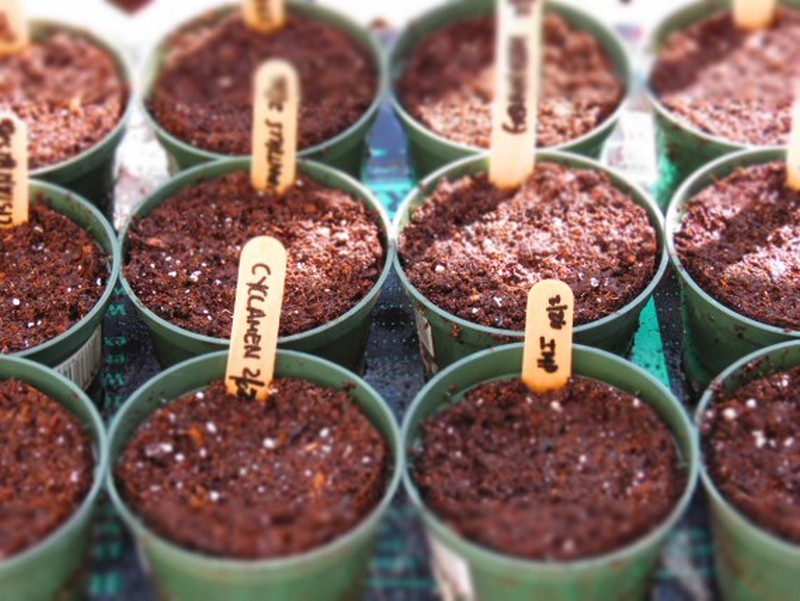
This is a good example of a well-planned potting shed. It has been thought out well and is constructed carefully, but it’s not over-planned.
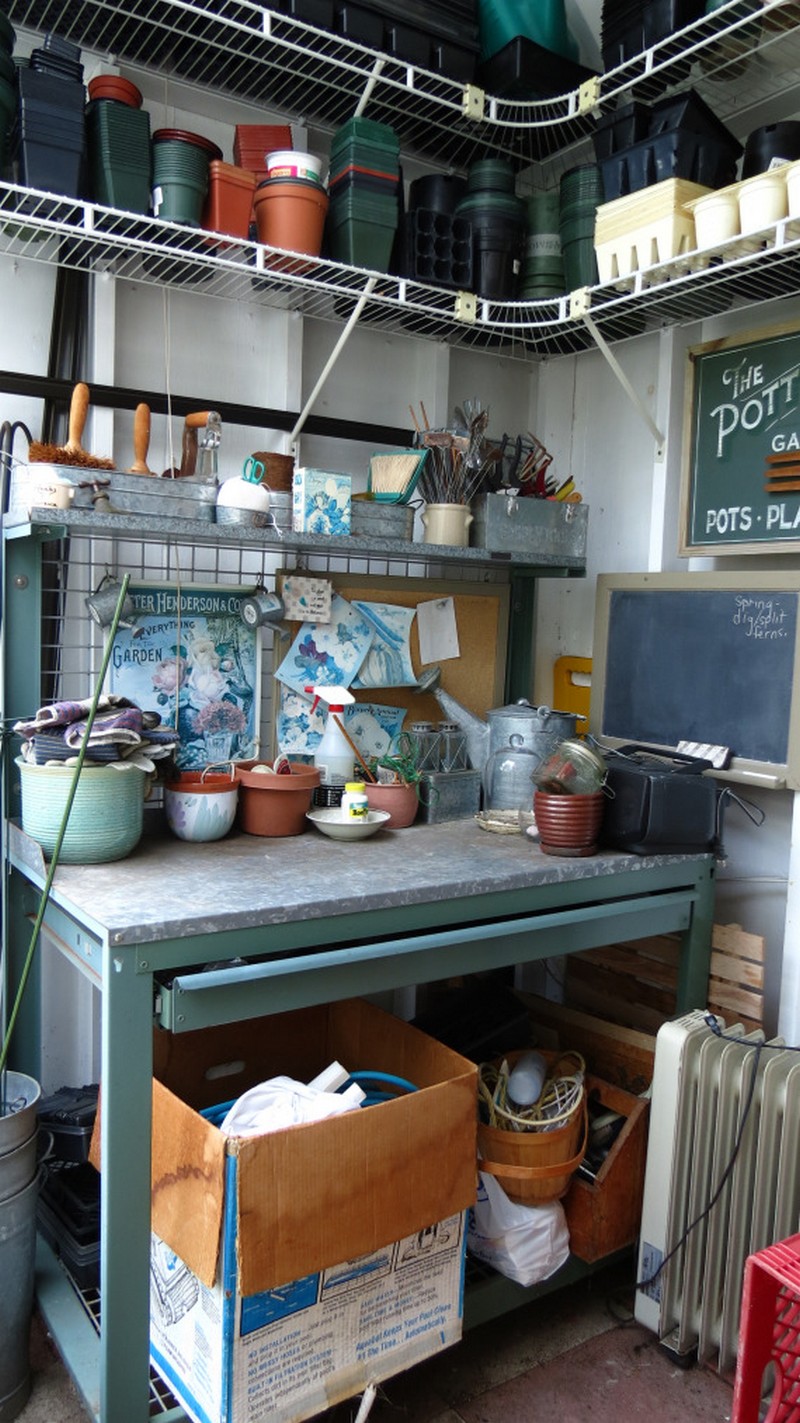
The space appears to be well-used, but not to the point of clutter. The lighting, while not actually on a timer, comes on automatically when it gets dark.
An old shed has become a lovely place to create a little oasis in the yard. A piece of beautiful garden furniture and some pots. This is an example of how to make a nice place for yourself even if you have a small space.
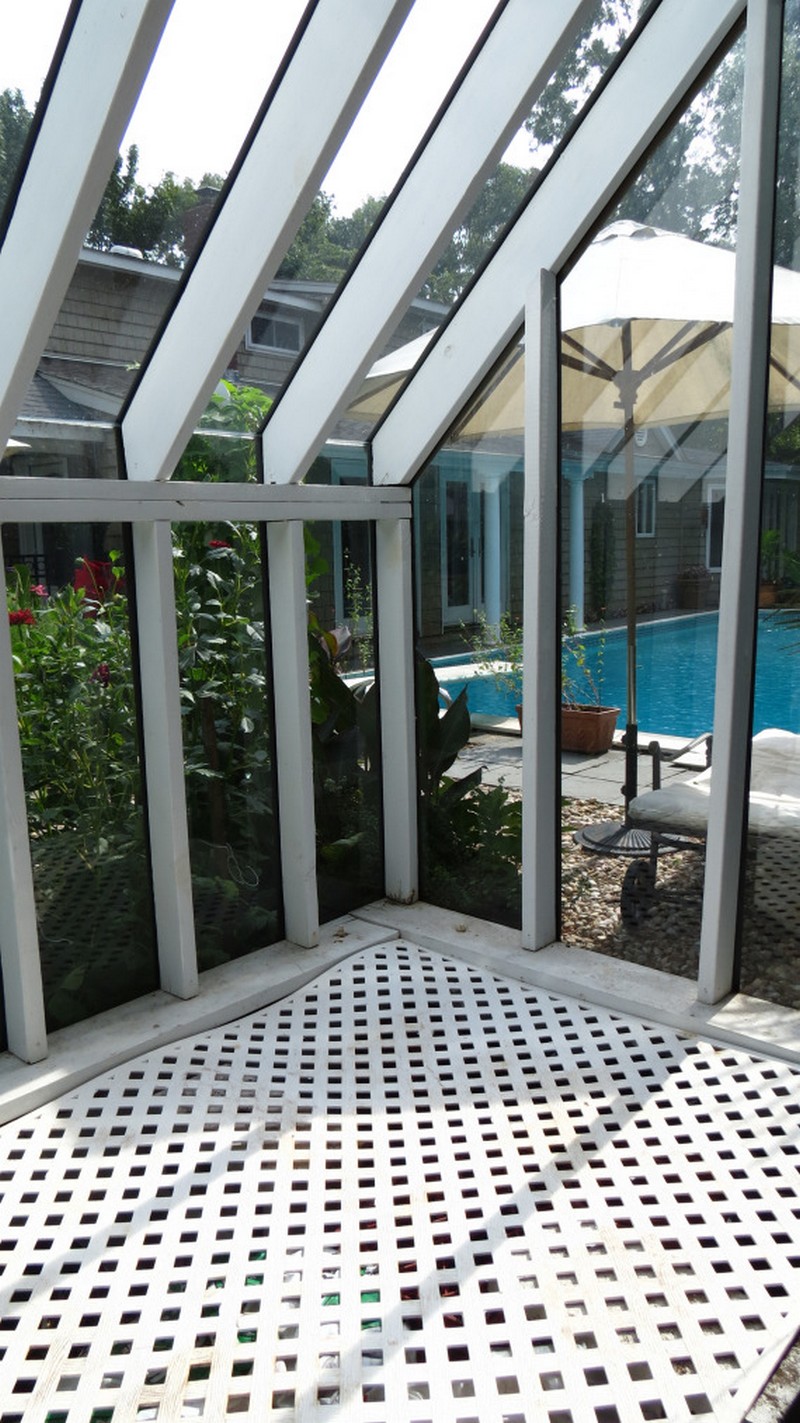
The floor plan of this potting shed is just perfect, it is not too huge or too small. It has good access with both a front and a side entry, it has plenty of windows for light, and the three-season room is a great bonus to this plan.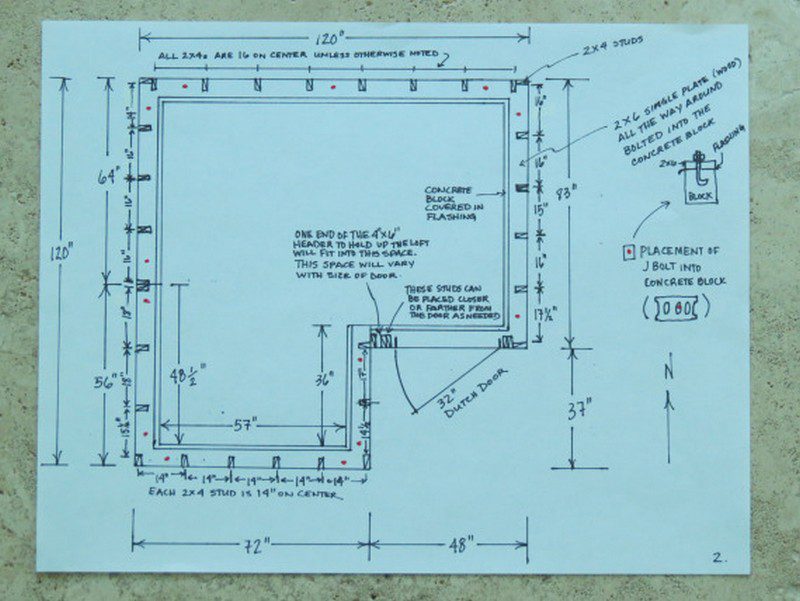
Building a Potting Shed
Materials
- 2×6, 2×4, and 2×8 lumber
- Plywood Sheets
- Decorative Roof Shingles
- Concrete Blocks
- Lattice
- Concrete Mix
- Plexiglass and Lexan
- Shatterproof Glass
- Greenhouse Tracks – for holding the glass
- White Paint
- Deck Screws
- Glass Sealant
- Adhesive
- Door Hinges
- Hooks
Tools
- Table Saw
- Power Drill
- Paintbrush
- Nail Gun
- Shovel
- Trowel
Instructions
Step 1: Plan Your Potting Shed
- Decide on the size and location of your potting shed. Make sure the location gets adequate sunlight and is on level ground.
Step 2: Prepare the Foundation
- Use the shovel to clear and level the area.
- Lay out concrete blocks as the foundation to support the structure. Ensure they are level and stable.
- Mix concrete and pour it into the gaps around the blocks for additional stability.
Step 3: Frame the Shed
- Cut 2×6, 2×4, and 2×8 lumber to size with the table saw for the shed’s frame, including walls and roof trusses.
- Assemble the frame using the power drill and deck screws. Start with the floor frame, the walls, and finally the roof trusses.
Step 4: Install the Roof
- Cover the roof frame with plywood sheets, securing them with the nail gun and deck screws.
- Apply decorative roof shingles over the plywood, using adhesive and nails to secure them.
Step 5: Add Walls and Windows
- Cut plywood sheets to cover the walls. Secure them to the frame with the nail gun.
- For windows, frame out openings in the walls using 2×4 lumber. Install plexiglass or Lexan windows in these frames, securing them with glass sealant and screws. Use greenhouse tracks to hold the glass securely.
Step 6: Install the Door
- Construct or purchase a door that fits your opening. Use door hinges to attach it to the frame.
- Install hooks on the door and walls for hanging tools or plants.
Step 7: Finishing Touches
- Apply white paint to the exterior and interior walls with a paintbrush for a clean, finished look.
- Install a lattice around the base of the shed for aesthetic appeal and to support climbing plants.
- Install shatterproof glass in areas that will receive direct impact to ensure safety.
Step 8: Interior Setup
- Inside, use the remaining lumber to create shelves and a workbench. Secure these structures with screws.
- Organize your gardening tools, pots, and soil on the shelves and hooks.
Click on any image to start the lightbox display. Use your Esc key to close the lightbox. You can also view the images as a slideshow if you prefer 😎

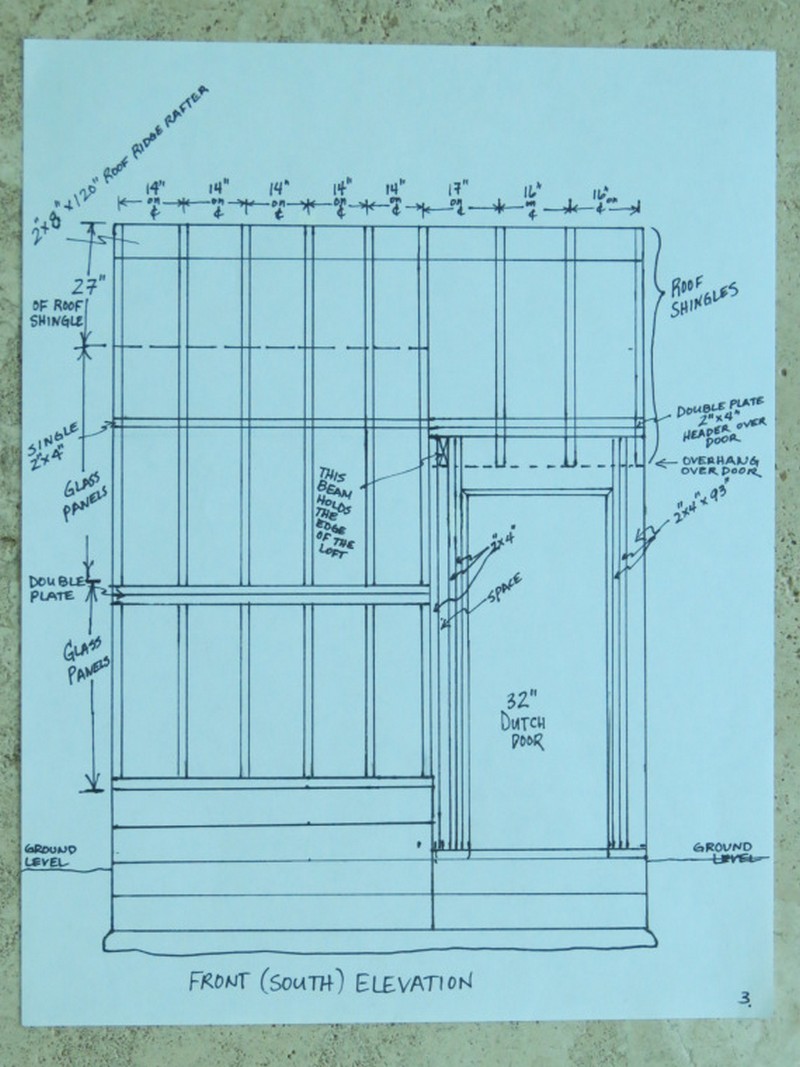
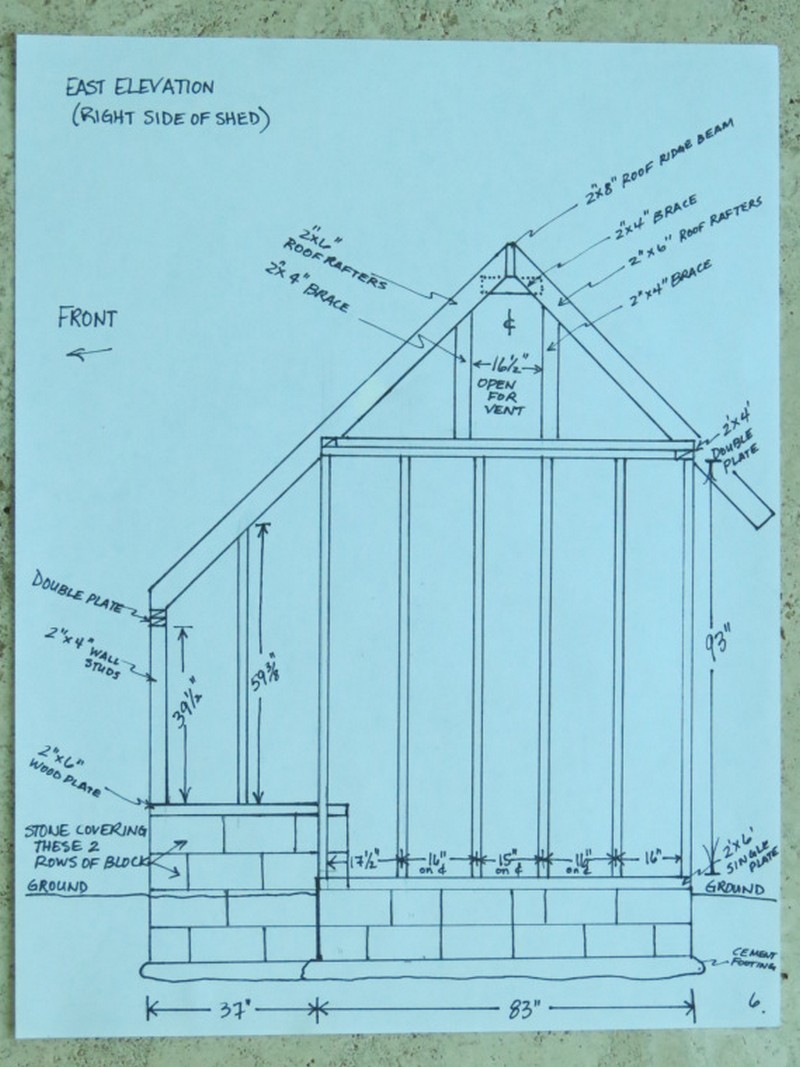
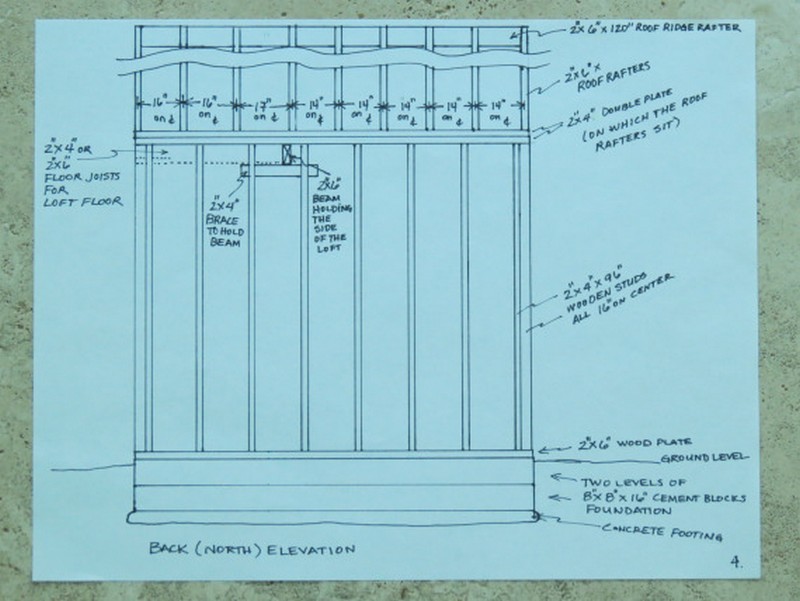

Water and Soil Management
Managing water and soil is crucial in a potting shed. These elements are the backbone of healthy plant growth. In this section, we’ll explore how to effectively handle water and soil within your potting shed, ensuring your gardening efforts are productive and efficient.
Effective Water Management
Effective water management in a potting shed is vital for the health of your plants and the longevity of the shed itself. It goes beyond the basic task of watering plants, encompassing humidity control, water conservation, and protection against water damage.
Drip Irrigation for Consistent Moisture
A drip irrigation system is a highly efficient way to manage water in your potting shed. It delivers water directly to the base of your plants, minimizing evaporation and ensuring that each plant receives a consistent amount of moisture.
This method is particularly beneficial for maintaining an even soil moisture level, which is crucial for the health of root systems. Setting up a timer can automate the watering process, making it easier to maintain optimal soil moisture, even when you’re not around.
Rainwater Collection Systems
Using a rain barrel or a more elaborate rainwater harvesting system can significantly reduce your water usage and provide your plants with natural, untreated water, which is often better for plant health.
Positioning a rain barrel to collect runoff from your shed roof is a simple and effective way to start. This not only conserves water but also reduces your environmental footprint. Ensure your collection system includes a filter to remove debris and a secure lid to prevent mosquitoes from breeding.
Adequate Drainage Solutions
Proper drainage is essential to prevent water from accumulating around or under your potting shed, which can lead to waterlogging of plants and structural damage over time. Incorporating a sloped floor towards a drainage point or installing gutters and downspouts to direct rainwater away from the foundation can protect your shed and garden from excessive moisture. Permeable paving around the shed can also help by allowing water to soak into the ground naturally.
Humidity Control
Controlling the humidity inside your potting shed is crucial, especially in climates prone to high humidity, which can encourage the growth of mold and mildew. Ventilation is key. Consider installing vents or a small, solar-powered fan to improve air circulation.
Opening windows or doors during warmer months can help regulate the shed’s internal environment, keeping humidity levels in check and providing a healthier environment for plants and people.
You can create a more sustainable and efficient potting shed by implementing these strategies for effective water management. This not only benefits your plants by providing them with the ideal growing conditions but also helps in preserving the structure of your shed for years to come.
Soil Mixing and Storage
Soil mixing and storage are key components of maintaining a productive potting shed. The right soil mix can significantly impact plant health, growth, and yield. Therefore, dedicating a specific area in your potting shed for these activities streamlines your gardening tasks and ensures that your plants get the best possible start.
Designating a Soil Mixing Area
Creating a dedicated space for soil mixing within your potting shed increases efficiency and cleanliness. This area can be as simple as a sturdy table or a built-in counter with enough surface area to mix large volumes of soil and amendments.
The surface should be easy to clean and resistant to water and soil stains. A smooth, non-porous material like stainless steel or sealed wood is ideal, as it prevents soil from sticking and makes cleanup a breeze.
Storage Solutions for Soil and Amendments
Proper soil and soil amendments storage is crucial to prevent contamination and preserve their quality. Use bins, tubs, or containers with lids to store different soil types, compost, perlite, vermiculite, and other amendments.
Labeling each container is a good practice to avoid mix-ups and ensure you use the right material for each plant type. Consider using stackable containers to save space, and choose durable and rodent-proof materials to keep your supplies safe and dry.
Organizing Soil Amendments for Easy Access
Organizing your soil amendments efficiently can save you time and effort. Place the most frequently used items at an easily accessible height and closer to your mixing area. Shelving or racks installed above or beside the mixing table can keep these items within reach but out of the way, ensuring a clutter-free workspace. This organization also makes it easier to monitor your inventory and know when it’s time to restock.
Maintaining Quality and Cleanliness
To maintain the quality of your soil and amendments, ensure your storage area is dry and well-ventilated. Moisture can lead to mold growth and compromise the quality of your soil mix.
If possible, incorporate a system to cover your mixing area when not in use, protecting it from dust and pests. Regularly cleaning your storage bins and mixing table will prevent cross-contamination and keep your potting shed tidy and sanitary.
By focusing on the setup and organization of your soil mixing and storage area, you create a functional space that enhances your gardening efficiency. This dedicated area makes creating the perfect soil mix for every plant easier and contributes to a more enjoyable and productive gardening experience in your potting shed.
Maintaining Soil Health
Maintaining soil health is crucial for the success of any gardening endeavor, especially in a potting shed environment where you have direct control over the growing conditions. Healthy soil supports robust plant growth, aids disease resistance, and enhances moisture retention. Here are key practices to ensure your soil remains fertile and productive:
Adding Organic Matter
Incorporating organic matter into your soil is one of the most effective ways to improve its structure, fertility, and ability to hold water and nutrients. Organic materials such as compost, leaf mold, or well-rotted manure can significantly enhance the biological health of your soil, introducing beneficial microorganisms and nutrients that plants need to thrive. Regularly amending your soil with these materials can improve aeration and drainage, making it more conducive to plant growth.
Soil pH Testing
The pH level of your soil has a profound impact on plant health, influencing nutrient availability and absorption. Testing your soil’s pH allows you to adjust it to meet the specific needs of your plants. For example, if your soil is too acidic or too alkaline, you can add lime to raise the pH or sulfur to lower it, respectively. Regular pH testing ensures that your soil remains within the optimal range for your plants, promoting healthier growth.
Proper Soil Storage
Storing your soil in a cool, dry place is essential to prevent mold growth and pests, both of which can compromise soil quality and plant health. Use airtight containers or bins with lids to protect your soil from moisture and pests. Ensuring good ventilation in your storage area also helps keep the soil dry and reduces the risk of fungal diseases.
Soil Rotation
Rotating your soil supplies helps ensure that you use the oldest material first, maintaining the freshness and efficacy of your soil mix. This practice also helps manage nutrient depletion, as different plants have varying nutrient needs. By rotating soil and incorporating fresh amendments, you can maintain a balanced nutrient profile, vital for sustaining plant health.
Composting Organic Waste
Setting up a composting bin in or near your potting shed is an excellent way to recycle organic waste, such as plant trimmings, vegetable scraps, and fallen leaves. Composting reduces waste and produces rich organic matter that can be used to amend your soil. This process returns nutrients to the soil, promoting a healthy, sustainable growing environment.
Integrated Pest Management
Implementing an integrated pest management (IPM) strategy can help maintain soil health by controlling pest populations without relying heavily on chemical pesticides. Practices such as crop rotation, pest-resistant plant varieties, and encouraging beneficial insects can reduce pest impact and preserve the soil ecosystem.
Considering these aspects of soil health lets you create a fertile, vibrant foundation for your plants. Healthy soil leads to healthy plants, making soil maintenance a critical aspect of gardening in a potting shed.
FAQ for Building a DIY Potting Shed
What is a potting shed?
Why build a DIY potting shed?
What materials do I need to build a potting shed?
What are some essential features of a potting shed?
How do I choose the right location for my potting shed?
Can I customize the size of my potting shed?
How do I ensure the potting shed is durable?
How can I make my potting shed eco-friendly?
Conclusion
A DIY potting shed is a rewarding project that enhances your gardening experience. With the right materials, tools, and effort, you can create a space that is functional for your gardening needs and a beautiful addition to your outdoor area. Remember to consider the size, location, and specific features that will make your potting shed perfect for you.
Thanks to Nitty Gritty Dirt Man for this great project. You can get more details about this project here…
For more gardening projects, check out our raised garden bed article next!

