Last Updated on November 13, 2025 by teamobn
Looking for a charming and easy garden project? A DIY clay pot lighthouse is a perfect weekend craft that adds a unique, coastal touch to your patio or flower beds. This step-by-step guide will walk you through the entire process, from gathering simple materials to the final sealing touch, ensuring you create a beautiful and durable decoration.
At a Glance: Project Summary
- Primary Technique: Stacking and gluing pots and saucers to form a lighthouse structure.
- Skill Level: Beginner-Friendly
- Cost: Low (Under $30 typically)
- Time to Complete: 1-2 hours (plus drying time for paint and sealant)
- Main Materials: Clay pots (various sizes), saucers, a glass knob or finial, all-purpose glue, outdoor paint.
It’s great decorative lighting that would really make a statement in your outdoor area. You could also use this as a table centrepiece for when you’re having an outdoor party/dinner.
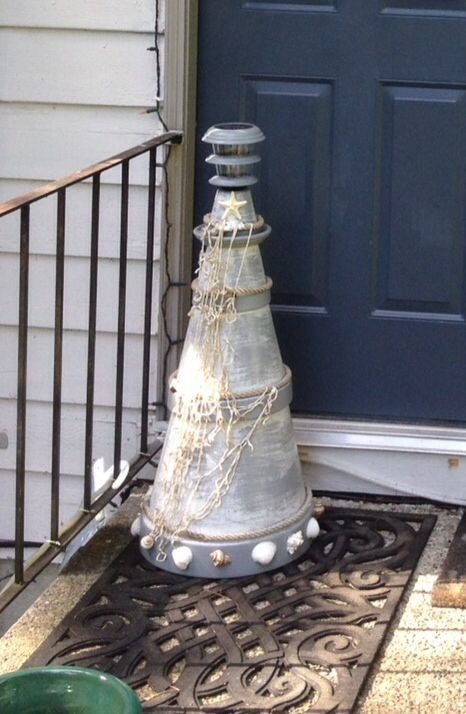
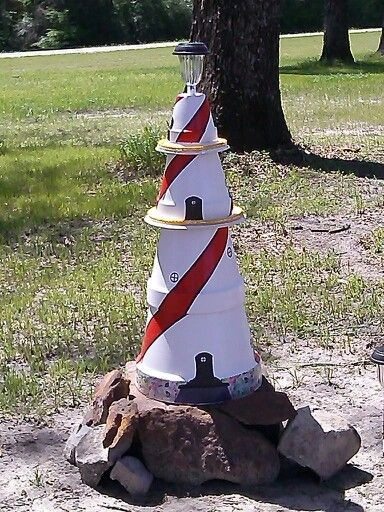
Building a DIY Clay Pot Lighthouse
You can build DIY lighthouses out of foam cones, boxes like oatmeal boxes and cardboard cereal boxes, these can also be from plastics, like plastic cups, plastic bottles and more. In addition, you can use paint to transform certain items into decorative lighthouses, such as wooden candle holders and peppermills. Adding light to unexpected places can be a good way to brighten anything. In this project will we be using clay pots.
Do you need to make a lighthouse made from terracotta pots for your yard? Continue reading our guide.
What materials and tools are needed to build a DIY Clay Pot Lighthouse?
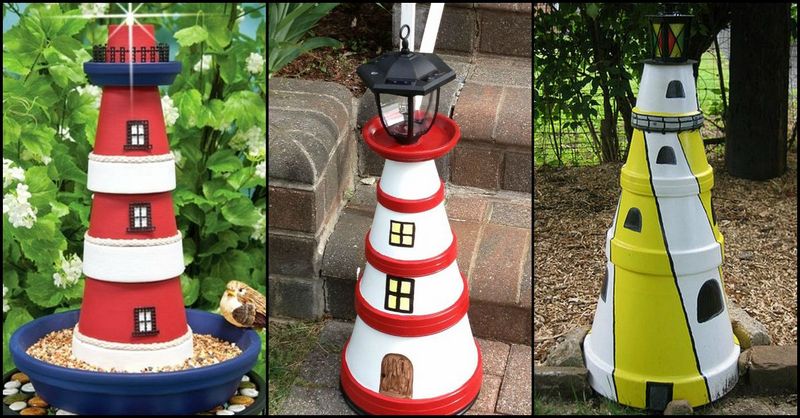
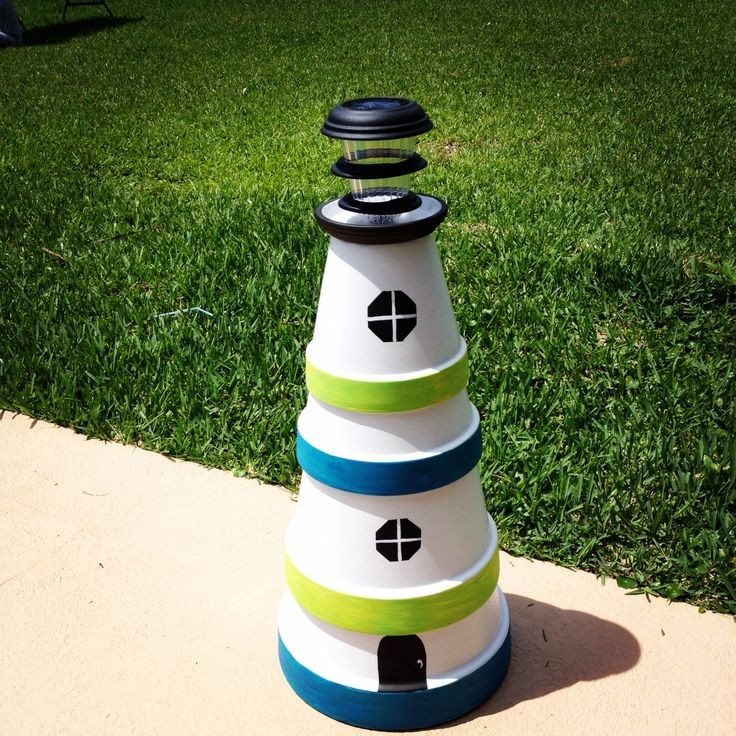
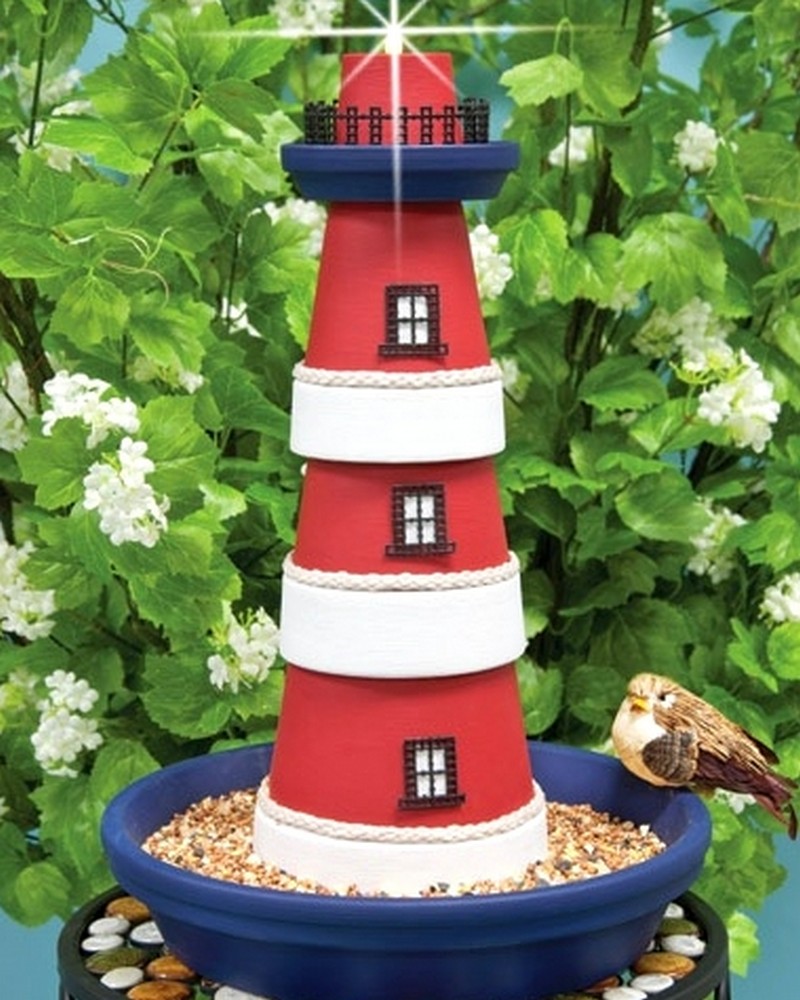
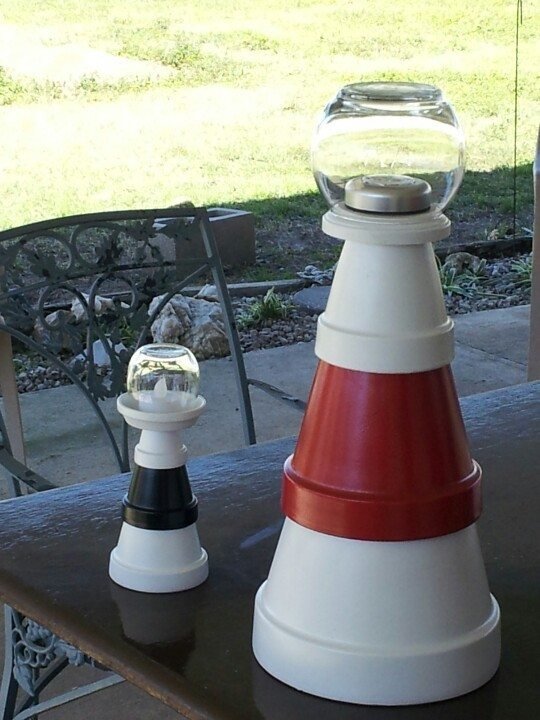
- Clay Pots: One 10-inch pot (base), one 8-inch pot, one 6-inch pot, one 4-inch pot
- Saucers: One 8-inch saucer, one 6-inch saucer, one 4-inch saucer
- Adhesive: A strong, waterproof all-purpose glue (like E6000 or Gorilla Glue)
- Paint: Acrylic craft paint or outdoor-rated spray paint in your chosen colors (classic white and red, or get creative!)
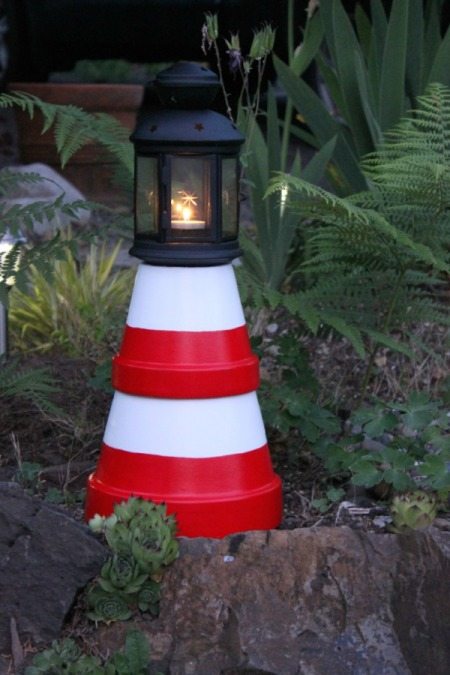
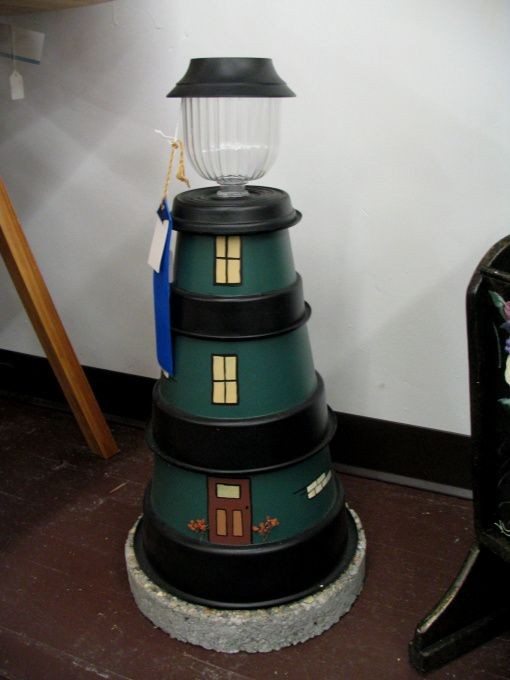
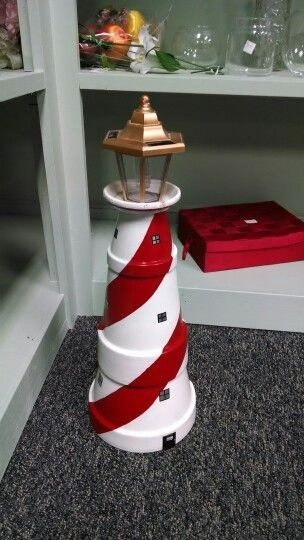
- Top Finial: A glass gem, a small decorative knob, or a wooden bead for the very top.
- Brush: Paintbrushes for detail work.
- Sealant (Crucial): A clear, exterior-grade spray sealant to protect your lighthouse from rain and sun.
How to build a DIY Clay Pot Lighthouse?
Follow these steps in order for the best results:
Step 1: Prepare and Paint the Pieces
- Clean Thoroughly
- Wipe down all clay pots and saucers with a damp cloth to remove any dust or debris from manufacturing. Allow them to air dry completely. Painting on a dirty or damp surface will cause the paint to peel.
- Prime (Optional but Recommended)
- For the most vibrant and long-lasting color, apply a coat of white primer or a base coat of white paint to all pieces. This creates a uniform surface and helps the top colors pop.
- Apply Base Coat
- Paint all pieces with your main color (e.g., white). Use a brush for acrylics or shake your spray paint can well and apply in a well-ventilated area. Hold the spray can 8-10 inches away and use sweeping motions to avoid drips.
- Add Decorative Details
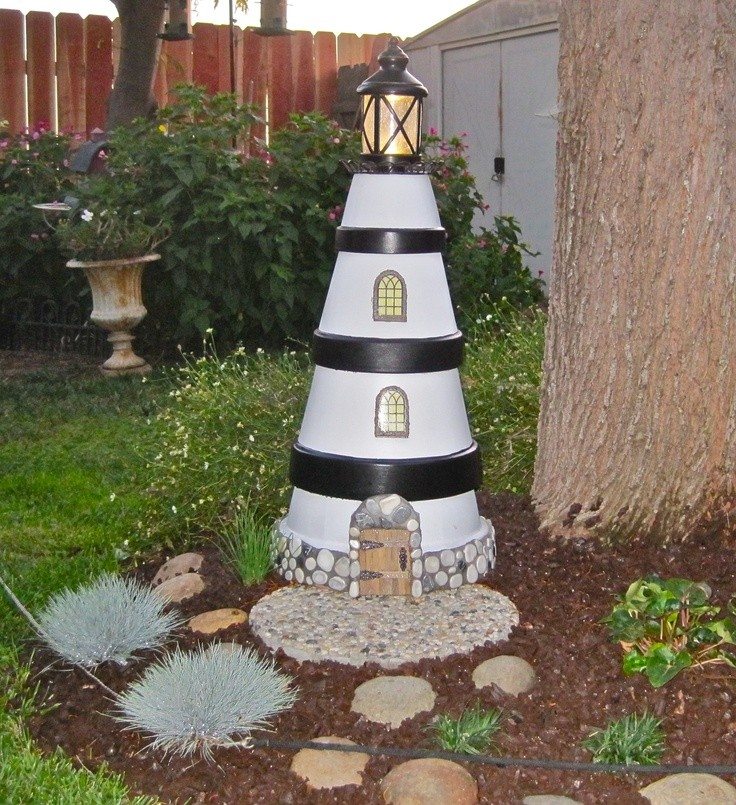
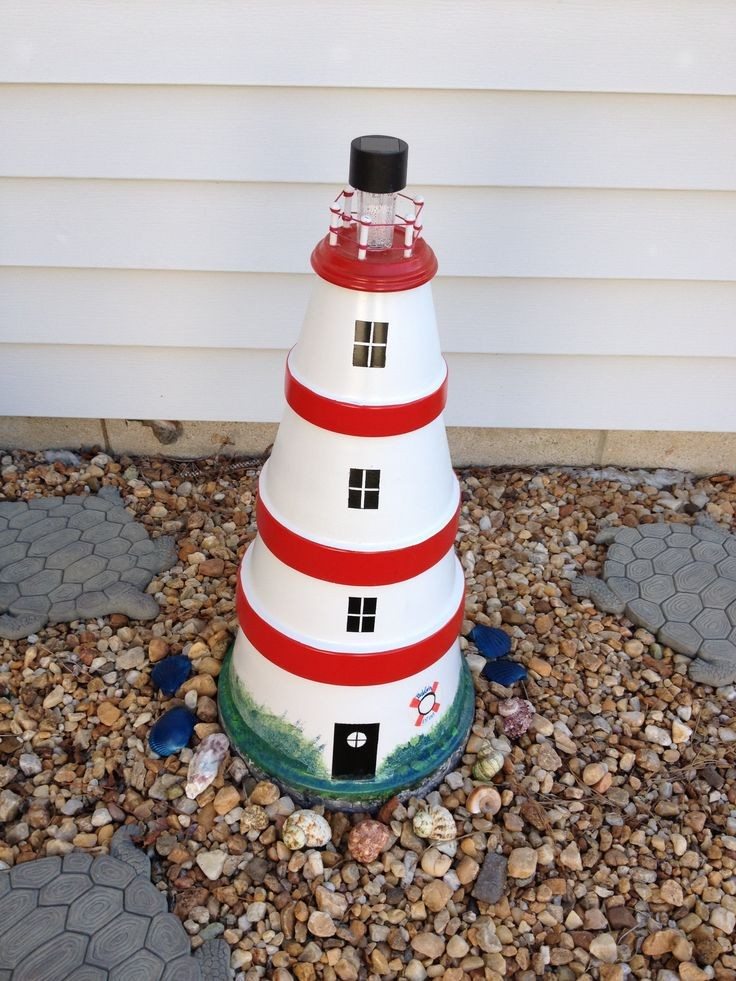
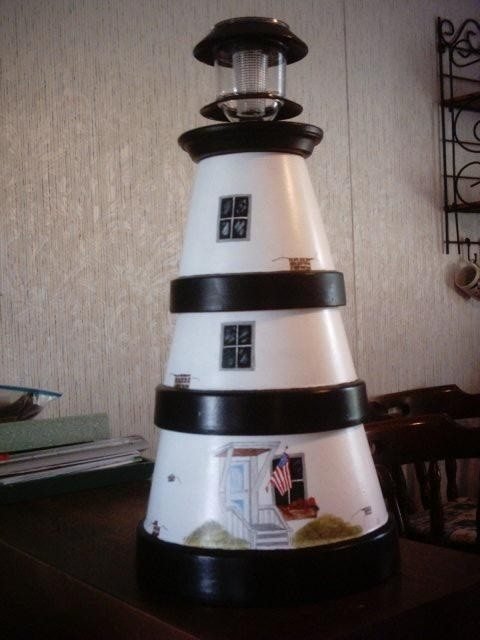
- Once the base coat is dry to the touch, add your accent colors. For the classic lighthouse look, paint red horizontal stripes on the “lantern room” (the top 4-inch saucer). Using painter’s tape can help you get clean, sharp lines.
- The Golden Rule
- Let all painted pieces dry completely according to the paint manufacturer’s instructions. This typically takes 1-2 hours. Rushing this step will lead to smudged paint and fingerprints on your final product.
Step 2: Build the Base Layer
- Position the Foundation
- Take your largest pot (the 10-inch one) and turn it upside down so the open end is flush with the ground. This creates a wide, flat, and stable foundation for the entire structure.
- Apply the Glue
- In the center of the now-upturned base of the 10-inch pot, apply a generous, continuous bead of strong adhesive in a spiral pattern. Ensure the glue is close to the edges to provide maximum contact and support.
Step 3: Stack the Middle Section
This step repeats a simple pattern to build the lighthouse’s height and classic tapered shape.
- Place the 10-in pot upside down as the base.
- Run a bead of construction adhesive around the bottom ring.
- Center the 8-in pot upside down on the base; press to bond.
- Add adhesive and center the 6-in pot on top.
- Align drainage holes front-to-back for a clean lighthouse silhouette.
After this step, you should have a stable, steadily narrowing tower.
Step 4: Create the Lantern Room
This section forms the distinctive top of the lighthouse.
- Form the Walls
- Apply a bead of glue to the center of the last pot (the 4-inch one). Take the 4-inch pot and place it right-side up on this saucer, ensuring it is centered. This pot acts as the glassed-in “lantern room” of the lighthouse.
- Add the Roof
- Apply a final, generous ring of glue to the top rim of the 4-inch pot. Carefully center the smallest (4-inch) saucer on top and press down. This saucer becomes the roof or cap of the lighthouse. Hold it in place for a moment to secure the bond.
Step 5: Add the Finial
This small detail provides a professional finishing touch.
- Place the Final Detail
- Apply a generous dab (or a full glue bead for a knob) to the center of the top saucer (the roof).
- Secure the Finial
- Firmly press your chosen decorative item — a glass gem, a small wooden finial, or a ceramic knob — into the glue. Hold it straight for a minute until the glue sets enough to keep it from sliding. This represents the lighthouse’s light.
Step 6: Seal for Protection
This is a critical step for longevity if your lighthouse will live outdoors.
- Final Drying Time
- Before sealing, you must let the entire assembled structure sit for at least 24 hours in a dry, undisturbed area. This allows all the internal glue bonds to fully cure.
- Prepare the Area
- Move the lighthouse to a well-ventilated area outdoors or a very well-ventilated garage. Place it on a sheet of cardboard or newspaper.
- Apply the Sealant
- Shake the can of clear exterior sealant well. Applying 2-3 light, even coats is far more effective than one heavy coat that can run or drip. Spray from about 12 inches away, using a steady, sweeping motion.
- Wait Between Coats
- Follow the sealant can’s instructions for drying time between coats, typically 15-30 minutes. Allow the final coat to dry completely for at least a few hours before moving your lighthouse to its new home in your garden.
Thanks to Ehow for this great project. You can get step-by-step instructions here…
Benefits of a Clay Pot Lighthouse
A clay pot lighthouse is not just a decorative addition to your garden or outdoor space; it embodies creativity, sustainability, and functionality. These charming structures, crafted from simple clay pots, offer more than meets the eye.
In this section, we uncover the multifaceted benefits of incorporating a clay pot lighthouse into your environment, revealing how they can transform your outdoor living area in both aesthetics and utility.
Enhances Garden Aesthetics
One of the most immediate benefits of a clay pot lighthouse is its ability to enhance the visual appeal of your garden or patio. Its unique design and the opportunity for personalization through paint and decorations allow it to stand out as a focal point.
Whether nestled among flowers or standing proudly on a patio, a clay pot lighthouse adds a touch of whimsy and charm to any space.
Promotes Recycling and Sustainability
When you choose to build a clay pot lighthouse, you’re crafting a charming garden feature and embracing a lifestyle that values recycling and sustainability. It’s about taking those old, perhaps forgotten clay pots that have served their initial purpose and giving them a brand new role.
This approach doesn’t just reduce waste; it sparks a wave of creativity, urging us to see the potential in everyday objects to be repurposed into something beautiful and practical.
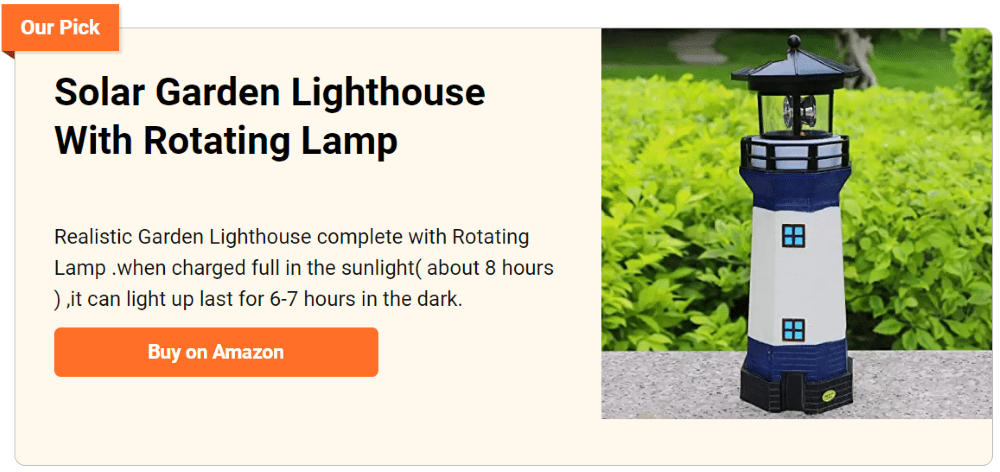
Offers Customizable Lighting Solutions
A clay pot lighthouse isn’t just a static decoration; it offers the flexibility to light up your outdoor space exactly how you see fit. Whether you lean towards solar power’s gentle, eco-friendly glow or the reliable shine of battery-operated lights, the choice is yours.
You can play with the intensity and hue of the light to create the perfect mood for any occasion, from a serene evening alone to a lively backyard party. This adaptability makes the clay pot lighthouse essential for lighting up walkways, adding a warm ambiance to your patio, or serving as the captivating centerpiece at your next outdoor event.
Engages Creative Skills
Building a clay pot lighthouse is a fantastic way to engage your creative skills. From painting to assembling, each step allows for personal expression and innovation. It’s an excellent project for individuals of all ages, encouraging artistic exploration and problem-solving.
Enhances Nighttime Visibility and Safety
In addition to its aesthetic appeal, a clay pot lighthouse improves nighttime visibility and safety in your garden or outdoor area. The light emitted from the lighthouse can illuminate paths, steps, or obstacles, reducing the risk of accidents after dark. It’s a beautiful way to ensure your outdoor spaces are safe and welcoming, even at night.
Incorporating a clay pot lighthouse into your outdoor space offers a range of benefits, from enhancing garden aesthetics to promoting sustainability and safety. This DIY project not only allows for creative expression but also contributes positively to the environment and your home’s ambiance.
Click on any image to start the lightbox display. Use your Esc key to close the lightbox. You can also view the images as a slideshow if you prefer 😎


FAQ: Clay Pot Lighthouse
- What steps are involved in adding an accent color to the lighthouse?
- Begin by selecting a vibrant accent color that complements the main theme of your lighthouse. This will add visual interest and depth. Paint the base of each section of your lighthouse with your chosen accent color.
- How do you incorporate a solar light into the lighthouse design?
- Place a glass votive housing on top of the first saucer over the lighthouse, then add a flameless battery-operated tea light. Finally, cover the holder with the cover top we made earlier.
- How is the light secured to the lighthouse?
- A strong adhesive is applied to affix the light securely, with an overnight setting period to ensure durability.
- Where should I place the finished project?
- Consider placing it in your garden or on your patio to highlight its charm and make it a focal point of your outdoor space.
- What options are available for adding windows to the DIY lighthouse?
- You can be more creative and add some designs to these pots, like a square box type window, by painting it black or any color you desire. For even more versatility, consider using black vinyl. Cut out your desired window shape in the vinyl and apply it directly as a stencil. This method offers the flexibility to paint over the stencil and create a crisp, outlined window.
- What are some potential bases for the lighthouse project?
- You can build DIY lighthouses out of foam cones, boxes like oatmeal boxes, and cardboard cereal boxes. These can also be made from plastics, like plastic cups, plastic bottles, and more. In addition, you can use paint to transform certain items into decorative lighthouses, such as wooden candle holders and peppermills. Adding light to unexpected places can be a good way to brighten anything. In this project, we will be using clay pots.
Conclusion
Crafting a clay pot lighthouse is more than just a DIY project; it’s a step towards blending creativity with eco-conscious living. This versatile addition to your garden or patio enhances the beauty of your outdoor space and offers a sustainable approach to lighting and decoration.
Embracing the journey of constructing a clay pot lighthouse promises an enriching experience that marries aesthetics with functionality, making every evening a little brighter.
If you liked this project, you will also like viewing these clay ideas…