Last Updated on September 29, 2025 by teamobn
There’s nothing more soothing than relaxing with the sounds and smells of nature. There’s nothing more soothing than relaxing with the sounds and smells of nature. Whether it’s the sound of leaves rustling in the wind or the smell of fresh rain, these natural elements can help to create a sense of calm. When we’re feeling stressed, taking a break to connect with nature can be a helpful way to reduce our anxiety and restore our sense of well-being.
Having a garden at home helps us unwind without having to go out, but not everyone has or can have a garden in their backyard. If your yard is small and paved in concrete, it’s a massive job to rip that concrete up, dump it and then get the garden going. Or maybe you’ve got a courtyard that’s paved, that doesn’t get a lot of sun, but you’d like to add some interest to it.
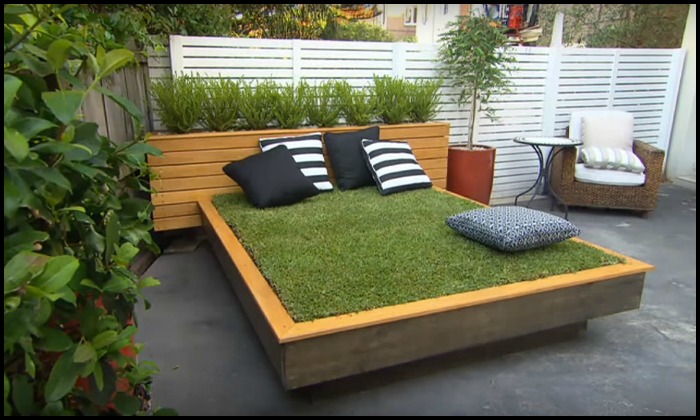
If you’re looking for a way to make your backyard more inviting and relaxing, consider building a daybed with grass. This project is relatively easy to do, and it can make a big difference in how you enjoy your outdoor space.
This daybed project is easy and a lot more practical than actually turning a concrete backyard into a garden. But you still get to enjoy taking a nap or reading a great book on a wonderful lawn!

Worried about maintenance? Use soft leaf buffalo turf – one of the easiest types of grass to grow and look after, even if the area is heavily shaded!
Watch the video tutorial below to learn how easy this grass daybed is to build and maintain. 🙂
Do you need this piece of furniture in your backyard?
You’ll need these materials:
- 2×6 Timber
- Hardwood Timber Cladding
- Charcoal Stain
- GI Fabric
- Soil
- Fertilizer
- Water Crystals
- Soft Leaf Buffalo Turf
- Deck Screws
And these tools:
- Belt Sander
- Paint Roller
- Cordless Drill
- Grass Cutter
Steps:
- Plan the footprint of the grass daybed. Choose a flat spot with good light and hose access, then mark outside dimensions to match your cushions and lounging style.
- Cut the 2×6 timber to length and assemble a rigid rectangle. Pre-drill the ends, drive deck screws with the cordless drill, and check for square by comparing corner diagonals.
- Add evenly spaced 2×6 cross-joists for load support. Screw two 2×6 runners under the frame to lift the grass daybed for airflow and drainage.
- Smooth all exposed timber with the belt sander. Ease sharp corners, round edges that touch legs and cushions, and remove sanding dust so finishes bond well.
- Clad the exterior with hardwood timber cladding. Keep boards flush and straight, pre-drill, then fix with deck screws to clean up the look and stiffen the frame.
- Roll on charcoal stain with the paint roller. Apply thin coats with the grain, let dry, then add a second coat for richer color and better weather resistance.
- Line the interior with GI fabric to hold soil while letting water drain. Bring the fabric up the sides under tension, trap it with 2×6 cleats around the inside perimeter, and trim the excess for a clean edge.
- Mix soil with the recommended fertilizer and water crystals. Aim for a light, crumbly blend that retains moisture without getting boggy, then fill the lined frame, firm lightly, and rake level.
- Lay Soft Leaf Buffalo turf in tight courses. Butt seams, stagger joints, water deeply to settle, and use the grass cutter to trim edges for a crisp grass daybed surface.
- Establish and maintain the turf. Keep it evenly moist for two weeks and avoid heavy use until roots knit, then feed on schedule, spot-repair seams, and trim with the grass cutter to keep the grass daybed lounge-ready.
Contents
Base Preparation and Drainage Under a Grass Daybed
A grass daybed feels luxurious only if the base stays dry, stable, and breathable. Good drainage, a clean GI fabric liner, and a resilient soil blend keep turf healthy, resist sagging, and prevent muddy spots.
Why Drainage Matters For Comfort And Longevity
Drainage protects your grass daybed from waterlogging that suffocates roots and compacts soil. Standing water also invites moss and fungus. Elevate the frame on runners so air moves beneath. Slope the internal base a few millimeters toward one edge, then pierce the GI fabric only at that low side to create discreet weep points. These tiny outlets move excess water away while the fabric still holds the soil body in place.
Choosing And Installing The GI Fabric Layer
GI fabric acts as a soil basket and a filter. Line the frame with one continuous sheet, pulling it taut up the sides to avoid folds that trap water. Trap the fabric with interior cleats or battens to stop slumping once the mix is added. Trim flush for a clean edge, then lightly pre-wet the fabric so soil settles evenly. Your grass daybed gets structure without sacrificing permeability or breathability.
Soil Mix Ratios For Resilience
Aim for a light, open blend that drains yet holds moisture. A reliable starting point is 50 percent screened loam, 30 percent coarse sand, and 20 percent compost. Blend in a slow-release organic fertilizer at label rates to feed roots steadily. The sand prevents compaction. The compost adds biology and water retention. Rake level in thin lifts and tamp gently so the grass daybed surface stays even once watered and walked on.
Water Crystals: How Much And Where
Water crystals buffer moisture swings on a sun-exposed grass daybed. Hydrate them first so they don’t expand later and distort turf seams. Mix the pre-swelled crystals through the top 75 to 100 millimeters where new buffalo roots will colonize. Use a light touch near edges to avoid heave. You’ll extend watering intervals in heat, protect against brief neglect, and reduce stress during the first month of establishment.
Establishing First-Water Routine And Settling
Water in several passes rather than one deluge. Gentle cycles let the profile drink without pushing fines through the GI fabric. After laying Soft Leaf Buffalo turf, heel the surface with a kneeling board to seat roots, then water again until runoff just begins. Check the low corner next morning. If water sits, add a few more weep pinholes at the liner’s low edge to keep the grass daybed responsive after storms.
Grass Daybed Gallery
Click on any image to start lightbox display. Use your Esc key to close the lightbox.![]()


Timber Frame Design And Load Safety For A Grass Daybed
Structure makes comfort possible. A well-built 2×6 frame, tight cladding, and weatherproof stain keep the grass daybed level, safe, and good-looking even as it carries people, soil, and irrigation water.
Sizing The 2×6 Frame For Real Loads
A grass daybed carries dynamic live loads plus the mass of damp soil. Use 2×6 timbers for perimeter rails and size span gaps to under 450 millimeters between supports. Short spans feel solid and stop the turf from dipping.
Pre-drill ends to avoid splits, then drive corrosion-resistant deck screws. Confirm square by measuring diagonals before cladding or lining. A true rectangle keeps seams tight and prevents edge gaps later.
Cross-Joists And Runners For Ventilation
Evenly spaced cross-joists turn the frame into a stable platform that resists deflection. Add two longitudinal runners beneath to lift the grass daybed off paving. That air gap improves drying after rain and discourages mildew on the cladding. Runners also distribute weight more evenly over concrete or decking. You’ll feel the difference the first time two people sit at the edge without a springy or hollow sensation.
Fasteners And Joint Integrity
Moisture, fertilizer, and time attack cheap fixings. Choose exterior-grade deck screws with corrosion protection and a thread that bites cleanly into hardwood cladding and 2×6 softwood. Drive screws flush, not buried, to protect fibers and keep withdrawal strength.
Where rails meet, consider structural screws or steel angle brackets inside the cavity for extra rigidity. Strong joints stop racking forces from opening seams that would telegraph through the grass daybed surface.
Cladding As Structure And Shield
Hardwood timber cladding isn’t only decorative. Boards act like a diaphragm when fixed tightly, reducing racking and protecting the frame from UV and bumps. Orient boards horizontally for a low, lounge-friendly silhouette that complements the green plane of the grass daybed.
Pre-drill near ends to prevent splits. Maintain consistent reveals for crisp lines. The result is a stiffer box that looks intentional next to pavers, planters, or a courtyard wall.
Finishes: Charcoal Stain Protection
Charcoal stain delivers a modern contrast to Soft Leaf Buffalo while sealing end grain against wet-dry cycles. Sand edges to ease corners, dust off, then roll on thin coats with a foam roller, back-brushing to even the color.
Let each coat dry fully before the next. Touch up screw heads and cut ends generously. Routine top-ups help the grass daybed shrug off sprinklers, morning dew, and the odd spilled drink without blotching.
Conclusion
A grass daybed rewards careful planning. Start with a solid 2×6 frame, sound joist spacing, and cladding that stiffens the box. Add a taut GI fabric liner, then fill with a light soil blend enriched with fertilizer and pre-hydrated water crystals. Lay Soft Leaf Buffalo turf in tight seams and water in gentle cycles. The platform stays level, drains well, and feels comfortable under cushions or a throw.
Maintenance is simple once roots knit. Keep the grass daybed evenly moist in the first two weeks, then shift to a regular feed-and-trim routine. Refresh charcoal stain as needed to protect the timber and preserve contrast with the turf. Touch up edges with a grass cutter, repair seams promptly, and monitor drainage after heavy rain. You get a durable, good-looking grass daybed that stays inviting season after season.
We have more educational articles. Check out our article on lawn grasses around the world!