Store-bought vanities rarely strike the right balance of size, storage, and style. It is smarter to build your own that’ll upgrade your bath without overspending. Building your own DIY bathroom vanity lets you form a furniture that fits your style and space. The DIY guide below covers the steps you need to create your own vanity and how to keep it lasting longer.
Contents
Key Takeaways
- A DIY vanity lets you tailor size, storage, and style to your bathroom while keeping costs lower than comparable store-bought options.
- With a modest tool kit and a focused weekend, you can build a sturdy, built-in-looking cabinet by following the clear step-by-step plan.
- Moisture-smart finishing, waterproofing, and careful installation deliver long-lasting performance whether you choose a sleek floating design or a classic furniture-style piece.
Build Your DIY Bathroom Vanity
Build a bathroom vanity that fits your space, storage, and style while staying on budget. This step-by-step plan turns a weekend of work into a custom piece that feels built-in.
Materials
- 3/4 in cabinet-grade plywood for sides, bottom, and dividers
- 1/2 in plywood for drawer boxes, bottoms, and the back panel
- 1×2 poplar or maple for face frame rails and stiles
- 1×3 or 1×4 for a toe kick or base platform
- Edge banding for visible plywood edges
- Waterproof wood glue rated Type II or polyurethane glue
- 1-1/4 in pocket screws and 1-1/4 in wood screws
- 18-gauge brad nails in 1-1/4 in to 1-1/2 in lengths
- Full-extension drawer slides, 18 in to 20 in, soft-close optional
- Concealed cup hinges for doors, inset or overlay as designed
- Knobs or pulls with machine screws
- Leveling feet or composite shims
- Primer and durable enamel paint or clear polyurethane finish
- Sandpaper in 120, 150, 180, and 220 grits
- Silicone caulk and painter’s caulk
- Wood filler and touch-up paint
- Countertop or vanity top with backsplash, as needed
- Sink and faucet with drain assembly, supply lines, and P-trap
Tools
- Tape measure, pencil, and combination square
- Circular saw with a straightedge guide or a track saw
- Table saw or a high-quality circular saw setup for rip cuts
- Miter saw for clean crosscuts
- Pocket-hole jig with face clamp
- Drill and driver with countersink bit set
- 18-gauge brad nailer, cordless or pneumatic
- Bar clamps and spring clamps
- Router with flush-trim bit and small roundover bit
- Random-orbit sander and sanding block
- Sharp chisel and rubber mallet for minor fit adjustments
- Level and stud finder
- Caulk gun
- Safety glasses, hearing protection, and a respirator
- Paint brushes, foam rollers, and a small tray

Step-by-Step Guide
- Verify plumbing rough-ins and outlet clearances, then measure the space and set final cabinet width, depth, and height with a planned countertop overhang.
- Choose sink and countertop types, plan door and drawer layout, and create a labeled cut list with exact dimensions.
- Break down plywood on a stable surface, keep factory edges aligned for accuracy, and apply edge banding to visible edges.
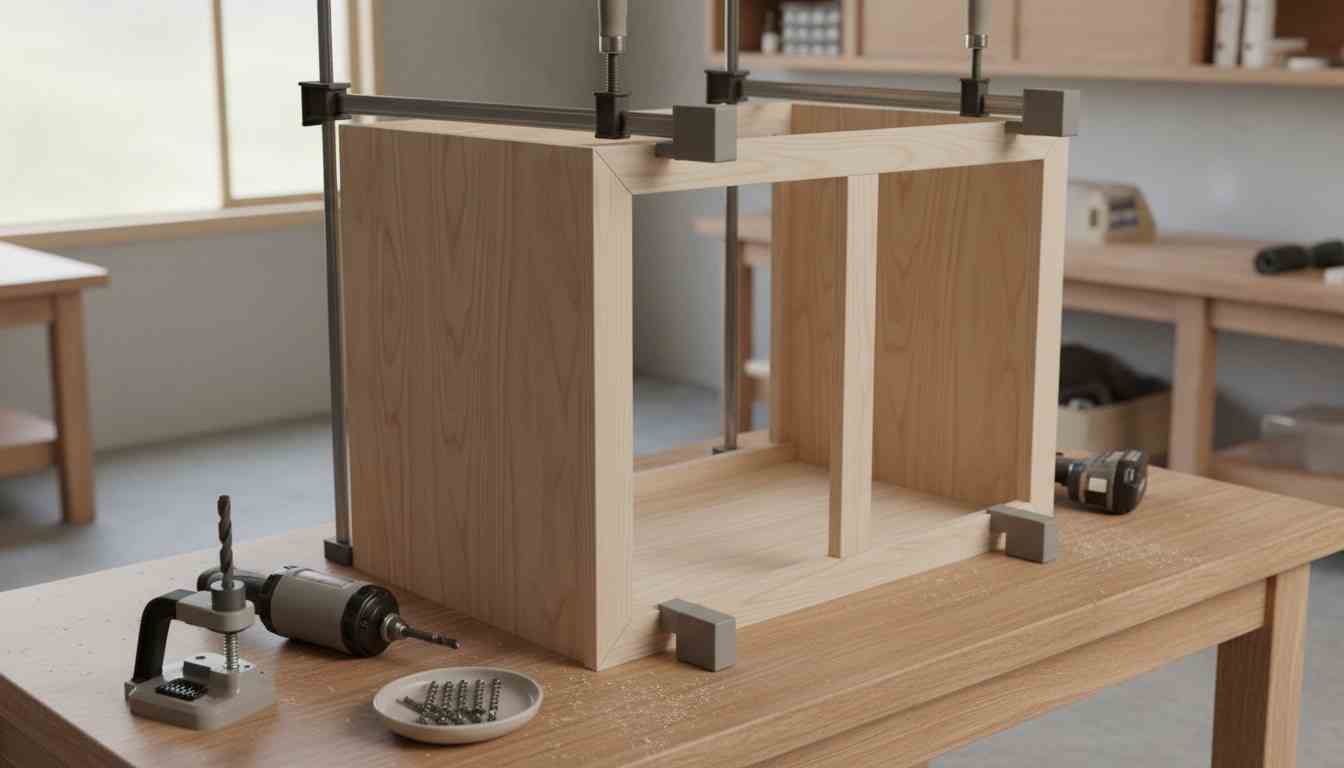
- Drill pocket holes and pre-drill for screws where needed, then dry fit the case and confirm matching diagonals for square.
- Glue and screw the bottom between the sides, add top stretchers, and re-check for square after each connection.
- Build a level toe-kick base or cut toe-kick notches, attach the back panel, and add leveling feet or prepare shims.
- Assemble and sand the 1×2 face frame, then glue, clamp, and pin it to the cabinet with consistent openings.
- Install the center divider and interior rails for drawer bays, ensuring they are plumb, parallel, and flush to the face frame.
- Build square 1/2 in plywood drawer boxes, add bottoms, and test for smooth travel and proper reveals.
- Mount full-extension slides with spacers, attach slide members to boxes, and adjust until motion is smooth and gaps are even.
- Build doors to match your reveals, bore hinge cups, hang doors, and fine-tune hinge adjustments for uniform margins.
- Sand through 120 to 220 grits, ease sharp edges slightly, and remove all dust for a clean finish.
- Prime and paint with durable enamel or apply a waterproof clear finish, then allow a full cure before handling.
- Shim the cabinet level in place, anchor into studs through the back, and confirm doors and drawers operate freely.
- Dry fit the countertop, cut the sink opening, set the top with silicone, install plumbing, caulk perimeters, add hardware, and perform a final leak check.
Finishing and Waterproofing
Bathroom vanities face constant humidity, splashes, and abrasion, so a durable finish is essential. Thoughtful prep, sealed edges, and curing create protection that resists swelling, staining, and peeling for years.
Surface Preparation
Remove dust with a vacuum and a damp microfiber cloth, then let the wood dry before sanding. Sand faces to 150 or 180 grit for paint, and to 180 or 220 for clear finishes. Ease sharp edges slightly so coatings build evenly and resist chipping. Fill nail holes and seams with stainable filler, sand flush, and spot prime knots with dewaxed shellac. Finally, wipe with a water-damp rag, avoid tack cloth residue, and test your sanding sequence on scrap first.
Choose a Finish System
- Waterborne Acrylic Enamel: Use a bonding primer, then waterborne enamel. It levels smoothly, resists yellowing, and cleans easily. Great for high-traffic baths and color flexibility. Pick satin for fewer fingerprints or semi-gloss for extra brightness.
- Waterborne Polyurethane: Clear finish that keeps wood tone natural with low odor and quick recoat. Add extra coats on horizontal surfaces near the sink. Works well over water-based stains when you follow the manufacturer’s timing.
- Oil-Modified Polyurethane: Warm amber tone that flatters oak, walnut, and cherry. Slower dry and stronger odor but excellent flow and toughness. Ventilate well and avoid over white paint unless you want intentional warmth.
- Two-Part Waterborne Conversion Finish: Crosslinked chemistry cures hard with excellent moisture and print resistance. Observe pot life limits and protective gear. Ideal when maximum durability is desired without the yellowing of traditional solvent systems.
- Marine Spar Varnish or Epoxy Plus Poly: Flexible exterior varnish tolerates movement and moisture. For extreme areas, seal cut edges with thin epoxy first, then topcoat with polyurethane to prevent brittleness and enhance long-term protection.
- Hardwax Oil: Silky, repairable feel but less water resistance than film finishes. Acceptable for low-splash powder rooms with diligent upkeep. Plan periodic refresh coats to maintain protection and sheen.
Seal Edges and End Grain
End grain and exposed plywood edges absorb moisture quickly, so seal them before primer. Brush on thin coats of dewaxed shellac or diluted wood glue to size thirsty edges, then sand lightly. Edge band visible plywood to block wicking at the front.
Flood sink cutouts, faucet holes, and the underside of tops with additional coats until they stop absorbing. Seal face frame end grain carefully around the sink bay, where splashes are frequent, to prevent raised fibers and finish dulling.
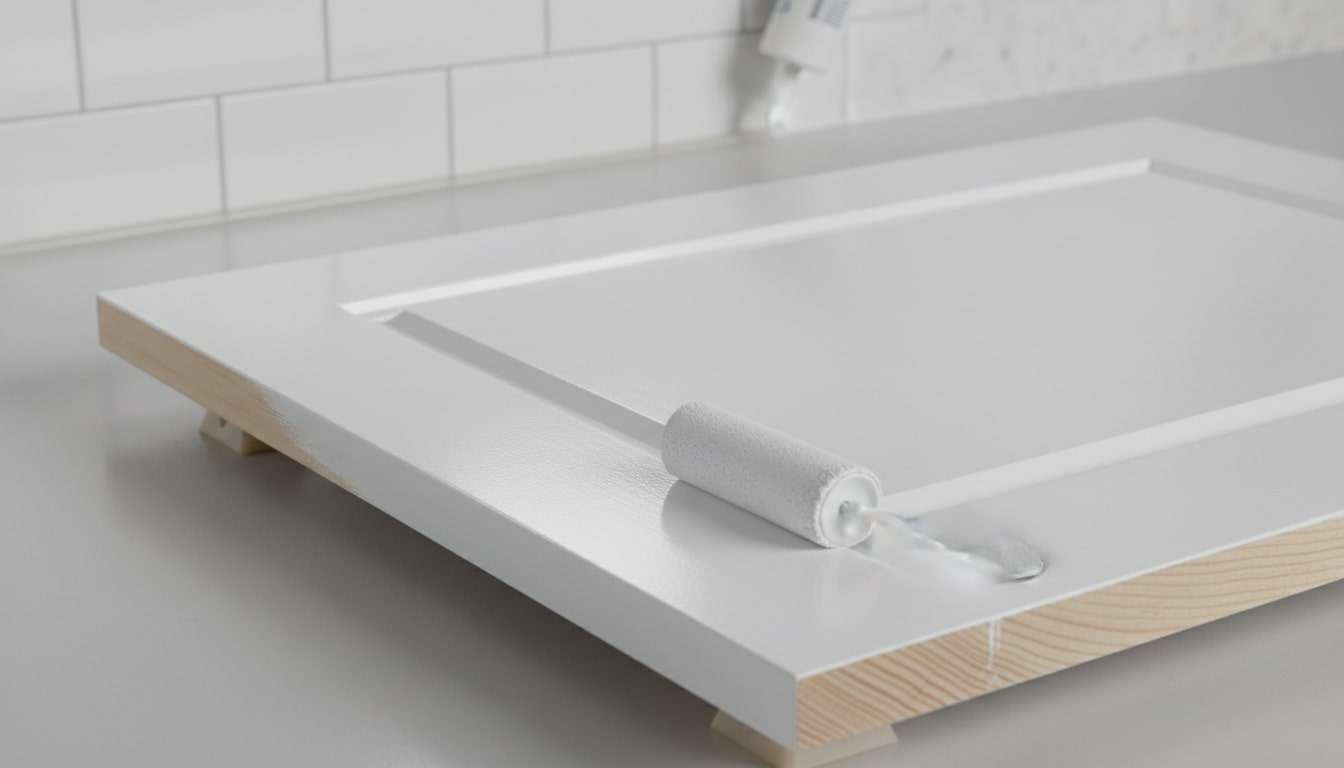
Prime and Paint Application
Start with a bonding primer that adheres to plywood and hardwood, then scuff sand with 220 grit between coats to remove nibs. Roll large panels with a high density foam roller and lightly tip off with a fine brush to level texture.
Apply two or three thin topcoats of waterborne enamel, maintaining a wet edge to avoid lap marks. Remove dust with a tack rag substitute, such as a damp microfiber, and allow recoat times for reliable adhesion and hardness.
Clear Coat Application for Wood
If you plan to show wood grain, test stain and clear coat on scrap to confirm color, clarity, and grain raise. Apply an even stain, wipe off excess along the grain, and allow full dry time. Build thin coats of waterborne polyurethane, adding extra protection on horizontal surfaces near the sink. Scuff sand with 320 between coats to improve adhesion and remove dust nibs. Seal interior faces lightly to balance moisture movement and reduce cupping or door warping over time.
Waterproof High-Risk Areas
High-splash zones deserve extra attention to prevent swelling and finish failure. Saturate the inside of sink and faucet cutouts with additional coats until they refuse to absorb. Brush extra sealant along door bottoms, drawer fronts near the sink, and end grain at the face frame. Apply a thin bead of clear silicone beneath vessel sink bases and around faucet escutcheons to block capillary wicking. Seal the underside edges of the countertop where water can collect, even if they are hidden.
Common Mistakes and Easy Fixes
Mistakes can happen when building your own DIY bathroom vanity. Below are the common ones that may occur during your build and how you can fix it.
Finish Adhesion Problems
- Symptom: Peeling, fisheyes, or rough texture after painting.
- Fix: Remove silicone contamination with a solvent that is safe for wood, then sand to a uniform dull surface. Use a bonding primer and maintain clean, dust-controlled conditions between coats.
Unsealed Edges And Cutouts
- Symptom: Swelling at plywood edges or sink openings.
- Fix: Saturate exposed end grain with dewaxed shellac or penetrating epoxy, then topcoat. Add extra coats around sink and faucet holes until the surface stops absorbing.
Countertop Cutout Errors
- Symptom: Chipped edges or an oversized sink opening.
- Fix: Tape the cut line, use a sharp, fine-tooth blade, and support the cutout fully. If oversized, add a mounting ring or a slightly larger sink trim. Polish chips with a diamond pad where applicable.
Anchoring Only Into Drywall
- Symptom: Vanity shifts over time and caulk seams crack.
- Fix: Locate studs and drive structural screws through the back rail. If studs miss the layout, add a horizontal cleat that spans multiple studs and fasten the vanity to the cleat.
Caulk Lines That Fail Early
- Symptom: Gaps reappear, and edges collect grime.
- Fix: Use 100 percent silicone in wet zones and paintable acrylic only on dry trim. Tool a small, continuous bead and remove tape while wet. Let the silicone cure fully before water exposure.
Overlooking Hardware Interference
- Symptom: Doors, pulls, or drawers collide with plumbing.
- Fix: Dry-fit hardware locations before drilling. Shorten drawer depth in the sink bay or add a U-shaped drawer. Choose low-profile traps and offset valves to increase clearance.
Skipping Cure Time
- Symptom: Imprints, sticking doors, and dulled sheen.
- Fix: Give finishes their full cure window before installation, and use door bumpers to prevent sticking. Space doors and drawers on pyramids so air reaches all sides evenly.
Forgetting Seasonal Movement
- Symptom: Doors warp slightly and reveal a change with humidity.
- Fix: Seal interior and exterior faces to balance moisture. Add adjustable hinges and slides so you can retune gaps. Maintain steady bathroom humidity with a reliable exhaust fan.
Conclusion
A well-built vanity turns a daily routine into a calm, useful moment because storage is where order begins. You now know how to plan, cut, assemble, and protect the cabinet so it stands up to moisture and busy mornings. Durable finishes and thoughtful waterproofing prevent small splashes from becoming costly repairs. When the drawers glide and the top sits level, you will see craftsmanship that adds lasting value to your home.
FAQ: DIY Bathroom Vanity
- What Wood Works Best For A Painted Vanity In A Humid Bathroom?
- For the smoothest painted finish, many builders use moisture-resistant MDF for doors and face frames and pair it with cabinet-grade plywood for the case. Avoid standard particleboard near the floor because swollen edges are difficult to repair. Acclimate materials to the bathroom for a few days and target a moisture content of 6 to 8 per cent before finishing. Prime all faces and edges and seal end grain thoroughly to stabilize the surface.
- Can I Add Power Inside A Drawer For Hair Tools Safely?
- Yes, but use a UL-listed drawer outlet kit that routes through a protected wire chase and connects to a GFCI-protected circuit. Leave a slack loop so the cord does not strain the slides and add a heat-resistant tray for curling irons. Vent the drawer box with small grommeted holes to dissipate warmth and follow the kit’s maximum wattage rating. Confirm placement does not conflict with plumbing or slide hardware.
- How Do I Protect The Floor Area Under A Freestanding Vanity From Leaks?
- Create a small containment zone under the sink bay with a waterproof liner or a peel-and-stick membrane turned up at the edges. Add a leak detector puck and use a waterproof under-sink mat with a raised lip to catch drips. Choose braided stainless supply lines and quarter-turn valves for quick shutoff. Seal penetrations with silicone and inspect connections at season changes when expansion can loosen fittings.
- What Support Do I Need For A Floating Vanity With A Stone Top?
- Install solid blocking between studs and a continuous ledger cleat lagged into at least three studs with structural screws. Use hidden steel brackets rated for the expected load because many stone tops weigh 12 to 18 pounds per square foot. Keep bracket spacing tight and the unsupported depth within the manufacturer’s guidance for your stone type. Verify the wall is plumb and level so shimming does not concentrate stress.
- How Do I Prevent Odors And Mildew Inside The Vanity?
- Seal interior faces with a light clear coat so spills do not soak in and wipe up cleanly. Size your bath fan correctly at 80 to 110 CFM for a typical room and run it for twenty minutes after showers to purge humidity. Add a breathable liner or desiccant pack under the sink and store damp items in vented caddies. Leave a small gap at the back panel or use grommets to improve airflow through the cabinet.