Last Updated on November 12, 2025 by teamobn
Contents
- 1 Building a Gypsy Wagon
- 1.1 What materials and tools are needed to build this Gypsy Wagon Project?
- 1.2 How to build this Gypsy Wagon Project?
- 1.3 Step 3: Build and Through‑Bolt the Subfloor
- 1.3.1 Step 4: Fabricate Box‑Style Walls
- 1.3.2 Step 5: Set Walls and Tie the Structure
- 1.3.3 Step 6: Roof Deck and Purlins
- 1.3.4 Step 7: Fit the Window Unit and Dutch Door
- 1.3.5 Step 8: Structural Bed Platform and Interior Bracing
- 1.3.6 Step 9: First Shakedown Trip and Base Coat
- 1.3.7 Step 10: Interior Finish: Floor, Shelves, Homey Touches
- 1.3.8 Step 11: Exterior Stairs and Full Paint
- 1.3.9 Step 12 Stove, Hearth, and Heat Shielding
- 2 Legal Considerations and Mobility
- 3 Conclusion
Quick Answer
- What it is: A lightweight, towable tiny home (vardo) built on a cargo trailer using wood framing and steel roofing.
- Cost: Typically $3,500–$8,500+, depending on trailer, lumber, insulation, windows, and stove.
- Build time: About 6–10 weekends for a weatherproof shell; more for interior finishes.
- Difficulty: Intermediate DIY; comfortable with carpentry, basic wiring, and trailer safety.
- Legal/safety: Must meet local trailer rules (lighting, brakes, width/weight limits, breakaway switch). Install CO/smoke detectors if using a stove.
Building a Gypsy Wagon
Are you the kind of homeowner who’s always on the go? Then a mobile gypsy wagon is your best option. They’re very unique, affordable, and can be easily relocated whenever you wish to move. And if you’re after great savings, you can also build it yourself.
Could you live in a gypsy wagon?
What materials and tools are needed to build this Gypsy Wagon Project?
You’ll need a balanced mix of reclaimed wood, standard hardware, and a handful of power and hand tools for precision work. The lists below organize everything according to the actual build process — from trailer prep to interior finishing and stove installation.
Base & Frame
- Cargo trailer – 6–8 ft, solid tongue/frame
- Rust converter & primer (1 L each)
- Black enamel or truck‑bed paint (1 qt / 1 L)
- Salvaged plywood – 1″ thick (floor panels)
- Stainless bolts, washers, locknuts – assorted
- Construction adhesive & silicone sealant tubes (2–3)
- Wiring harness + light kit (DOT compliant)
Wall & Roof Build
- Tongue‑and‑groove pine ¾″ (front/back) – approx 40 sq ft
- Pine/Cedar ¼″ (sides) – approx 60 sq ft
- Hardwood battens 1″×2″ – 12–15 pcs
- Oak corner posts – 4
- Oak band boards – 2–3
- Poplar uprights – 8–10 pcs
- Plywood ½″ roof sheathing – 2–3 sheets
- Steel roofing sheets (epoxy coated, light color) – enough for 8×10 roof
- Screws, roofing screws, washers
- Exterior sealant / caulk
- Optional insulation (foam or wool panels)
Doors & Windows
- Dutch door or pine/oak for custom build
- Casement window unit (or salvaged RV window)
- Hinges (6 heavy‑duty), 2 latches, weatherstripping
- Trim boards (oak / cedar) – approx 40 ft linear
- Wood filler & primer
Interior & Finish
- Oak/pine flooring boards – 35–45 sq ft
- Oak stair treads (2–3) + fir risers
- Shelving boards & wall brackets
- Hinges / lift arms for storage lids
- Roman‑shade fabric or covers
- LED or 12 V lights + switches
- Oil primer (1 L) + Exterior paint (3 L)
- Interior finishing oil / varnish (1 L)
Stove & Safety Section
- Compact stove (RV size)
- Slate / firebrick tiles for hearth (approx 4 sq ft)
- Fire‑rated board & 14‑gauge steel flashing
- Wall thimble + stovepipe kit
- High‑temp sealant tube
- Bolts / eye screws for anchoring stove
- CO / smoke detector and mini extinguisher
Hardware & General Supplies
- Mixed wood screws (1″ – 2½″), galvanized or stainless
- Finishing nails / trim nails
- Wood glue / epoxy tubes
- Sandpaper (80, 120, 220 grits)
- Painter’s tape, drop cloths, tarps
- Sealant gun + extra cartridges
- PPE – gloves, respirator, eye / ear protection
Optional Upgrades
- Rigid or wool insulation layer
- Solar power kit / portable generator
- Folding sink or water container
- Decorative trim or scrollwork paint kit
- Retractable awning or shade canopy
- Curtains, cushions, mirror, rugs
What tools are needed for this project?
- Reciprocating saw, Circular saw or table saw
- Drill/driver (with wood and metal bits)
- Angle grinder (cutting and rust removal disks)
- Orbital / finishing sander
- Miter saw
- Nail gun / brad nailer
- Tile saw (for slate or hearth work)
- Masonry drill (for anchoring and thimble installation)
- Paint sprayer (optional for final coats)
- Chisels and wood chiseling set
- Clamps (assorted sizes)
- Combination square and carpenter’s square
- Measuring tape and chalk line
- Level (hand and long)
- Socket / wrench set Sealant / caulk gun
- Hinge jig or hinge router template
- Paint brushes (large and detail)/Rollers and paint trays/Putty knife and scraper
- Hammer and mallet
- Carpenter’s pencils and markers
Quick Pre‑Build Reminders
- Check trailer bearings, tires, and brakes early.
- Arrange workspace – a flat gravel pad or garage floor.
- Keep fasteners sorted in labeled boxes.
- Photograph progress for documentation and shareability.
How to build this Gypsy Wagon Project?
Building a gypsy wagon combines craftsmanship, design discipline, and a willingness to improvise. The process below incorporates the original builder’s photos and insight while tightening the timeline and adding modern clarity. It assumes you have intermediate woodworking skills and access to standard carpentry tools.
Step 1: Plan and Cardboard Mock‑Up
Goal: Confirm proportions, openings, and roof curve before buying materials.
Before buying anything, sketch your ideas and build a small cardboard mock‑up. This simple model lets you visualize the final proportions, door swing, window placement, and roof curvature.
Mark the roof radius, bed height, and hitch clearance precisely.
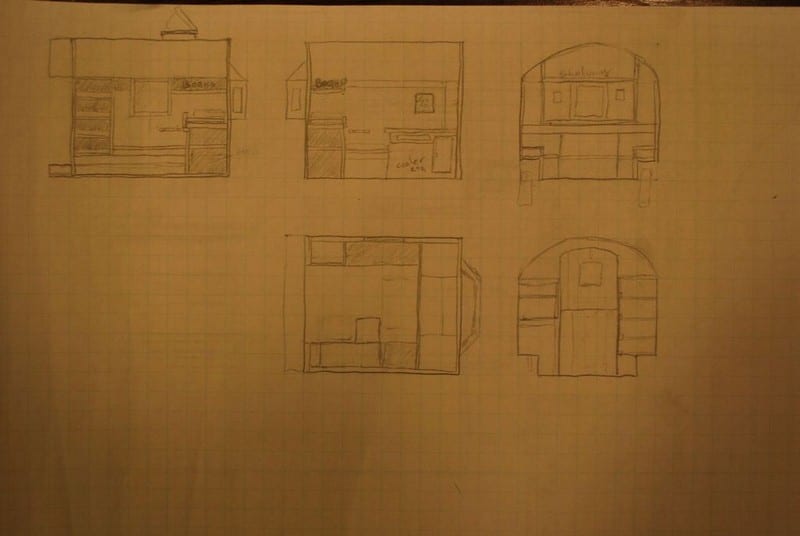
Sketch several layouts to scale on graph paper. Build a small cardboard model: mark door swing, window size/placement, roof radius, bed height. Photograph the mock‑up for reference.
Tip: Photograph or scan your model from different angles; they’ll serve as references later.
Pro tip: Ensure hitch clearance and overall height for garage/route limitations.
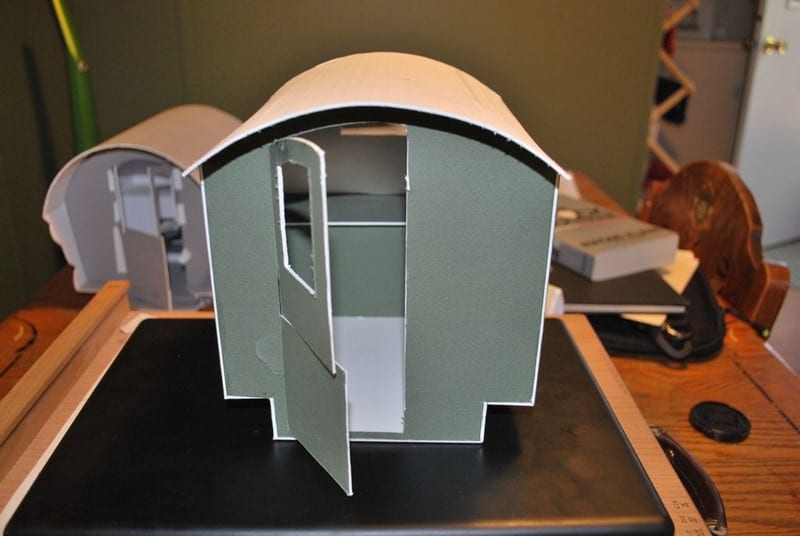
Here is my cardboard mock-up of the final gypsy wagon design.
Step 2: Strip the Cargo Box and Prep the Trailer
Goal: Expose and refurbish the steel frame as a safe foundation.
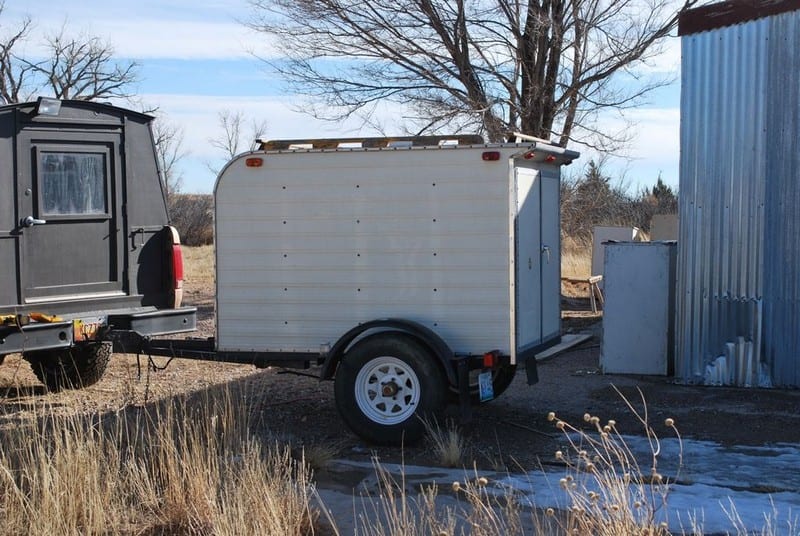
- Cut off the existing cargo box.
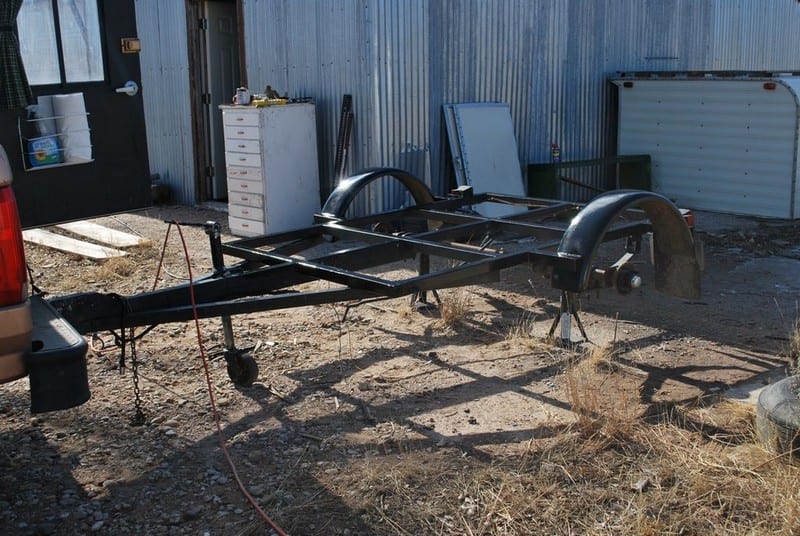
- Remove/replace outdated wiring harness and lights.
- Clean, de‑rust, prime, and paint the frame and tongue.
Safety check: Eye/ear protection and gloves; secure the trailer to prevent movement.
There was a huge sense of relief when I made the first cuts to create the brackets of my gypsy wagon. After years of pondering, waiting, and changing plans, I felt committed. It was like I was starting an avalanche. No turning back now.
I plunged into long evenings and weekends, cutting, fitting, and sawing. The base came together quickly after work one evening.

Step 3: Build and Through‑Bolt the Subfloor
Goal: Create a rigid, moisture‑resistant deck.
- Dry‑fit plywood panels on the painted frame.
- Apply adhesive and set panels.
- Drill through the steel and plywood; through‑bolt with washers and locknuts.
- Seal panel edges against road spray.

Pro tip: Seal or undercoat the plywood underside before installation for longevity.
Finally, the base for my gypsy wagon was set on the newly painted frame and through-bolted for strength and safety.

Step 4: Fabricate Box‑Style Walls
Goal: Strong, traditional wall assemblies (not stick‑framed).
- Panel the front and rear in ¾” Tongue‑and‑groove pine; sides in ¼”.
- Install vertical battens inside and out on the sidewalls at 12″ centers.
- Fit pine corner posts and oak outside corners.
- Add uprights around door/window openings. Install oak band boards along the wall tops.
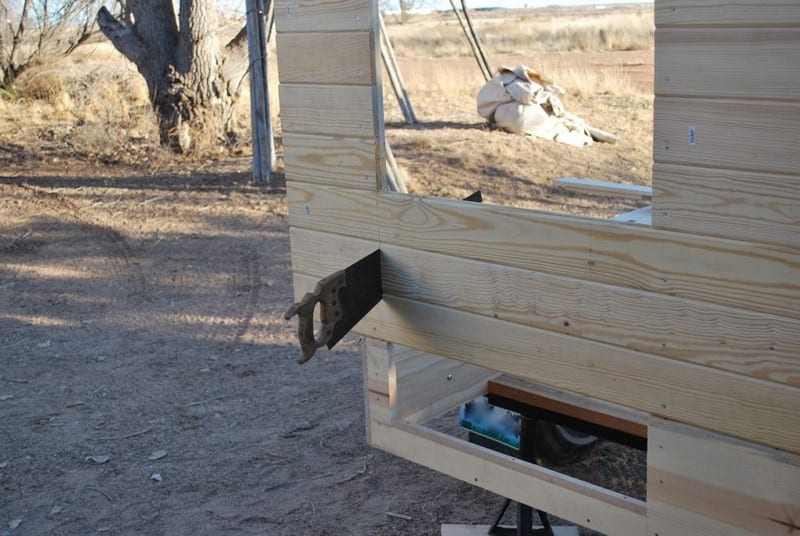
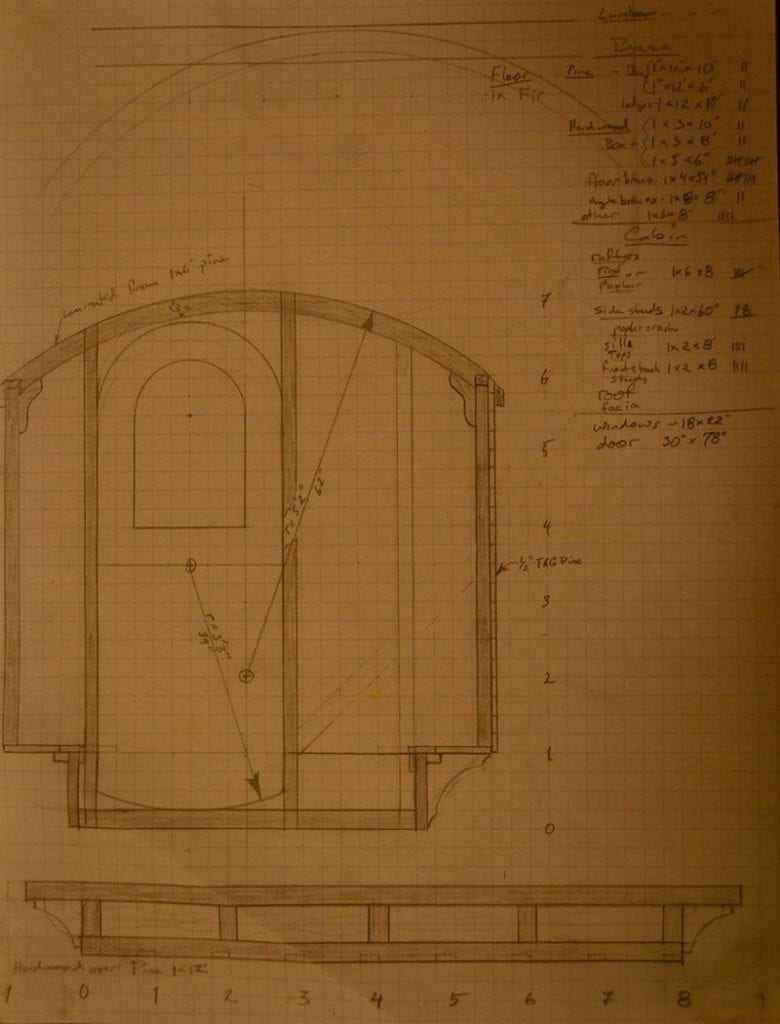
The walls of my gypsy wagon are built like a box, not like modern stick framing. All are tongue and groove pine, the front and rear being 3/4″ thick, the sides 1/4″. This is why the sides have hardwood strengthening battens (1″) run vertically inside and out on 1′ centers.
Corner posts are made from 1 1/4″ pine stock. Outside corners are oak. Upright bracing around the door inside and out from poplar. Upright bracing on front wall is oak. Sub-floor is 1″ salvaged plywood.
Footnote: I have since put a second layer of wood over the outside side-walls. This added some strength (and at least 40 pounds) but was primarily to add insulation for heat transfer. The walls get incredibly hot in the southwestern sun and transferred much of the heat inside.
I didn’t really notice a problem in the cold, as the wagon is quite snug.

Step 5: Set Walls and Tie the Structure
Goal: Assemble a square, solid body on the deck.
- Stand walls on the deck and align square.
- Glue and screw wall bases into the subfloor.
- Recheck plumb/square; adjust with shims as needed.

Safety check: Temporary bracing prevents tip/shift during assembly.

The bed structure of my gypsy wagon ties the walls together and stiffens the entire structure. Without this, I would have to find some other way to strengthen the walls. The roof is plywood, screwed to poplar purlins.
Outer and inner tops of walls are stiffened with oak band boards.
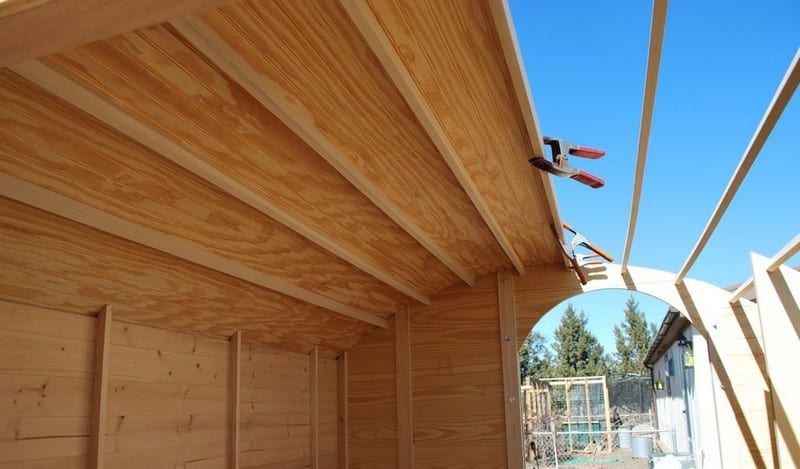
Step 6: Roof Deck and Purlins
Goal: Plywood roof fixed to purlins, ready for final skin.
- Install purlins across wall tops (set curve if desired).
- Cut and fasten plywood deck to the purlins.
Pro tip: Leave a tiny overhang and drip edge for weather protection.

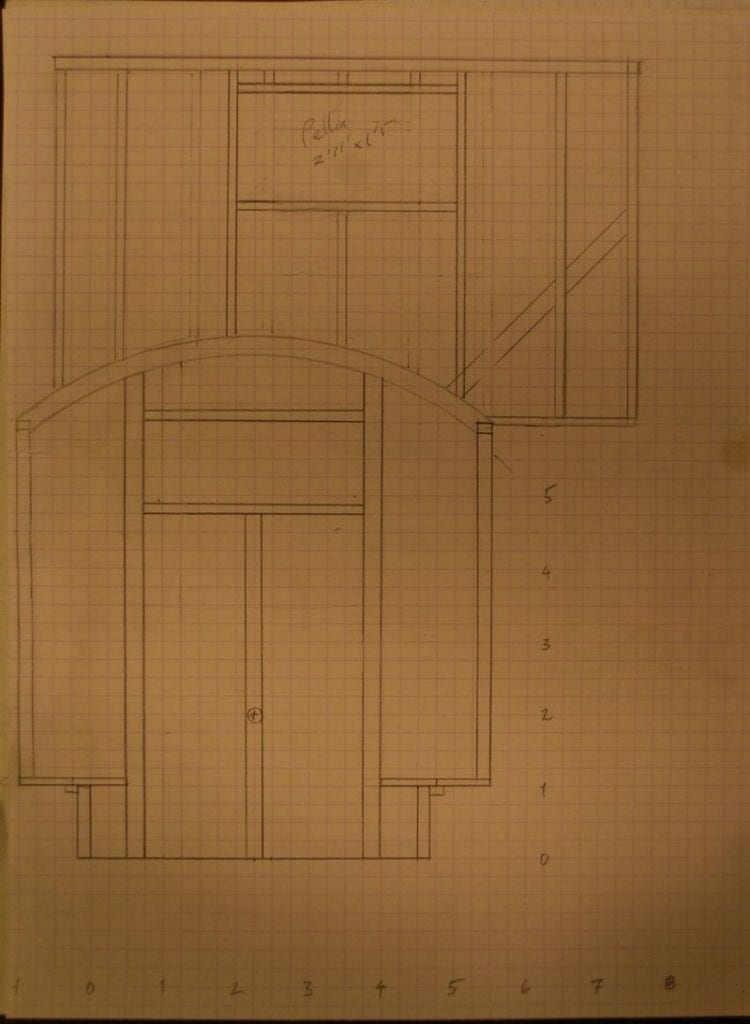
Step 7: Fit the Window Unit and Dutch Door
Goal: Weathertight openings with traditional look and function.
- Install the window as a single pre‑built unit for a tight fit.
- Hang the Dutch door; align the halves and weatherstrip the joint.
- Add a drip cap and seal perimeter joints.

Pro tip: Confirm door clears steps/porch and swings safely while hitched.

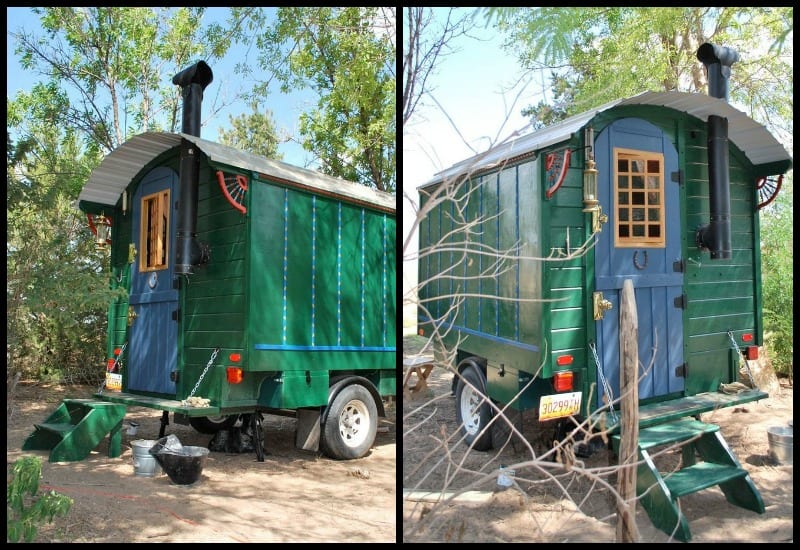
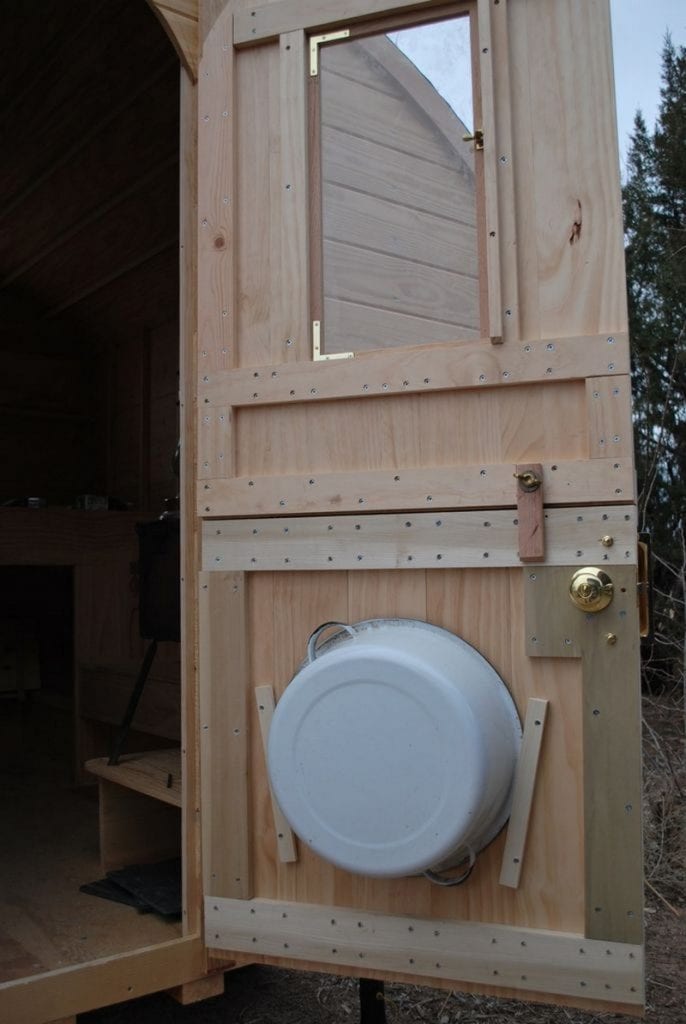
The door is modeled after some sheep wagon styles from the western U.S. It is a “Dutch door” with a functional casement window and a wash pan holder. Not quite finished in the photo below, but nearly there.

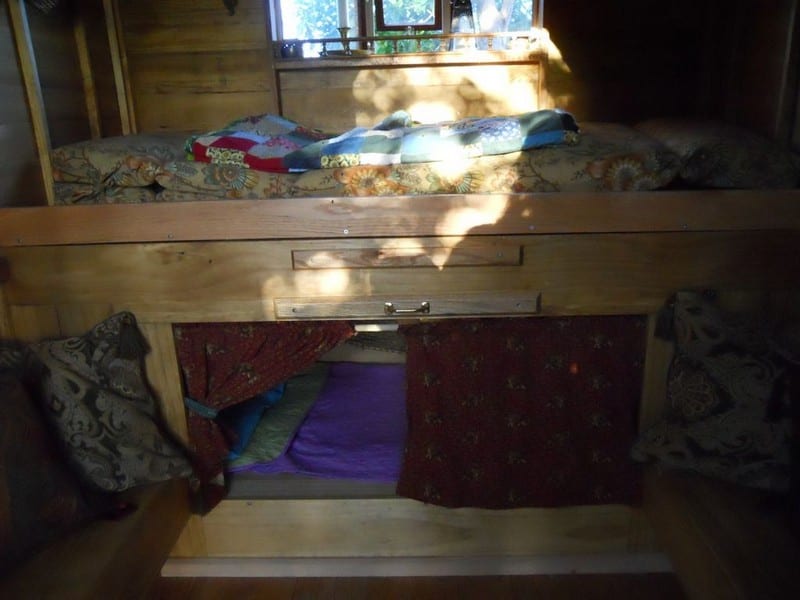
Step 8: Structural Bed Platform and Interior Bracing
Goal: Tie the walls together structurally; add core storage.
- Build the bed frame to span between walls and anchor to uprights.
- Create under‑bed compartments with lift lids or drawers.
Safety check: Keep the weight centered over the axle for towing stability.

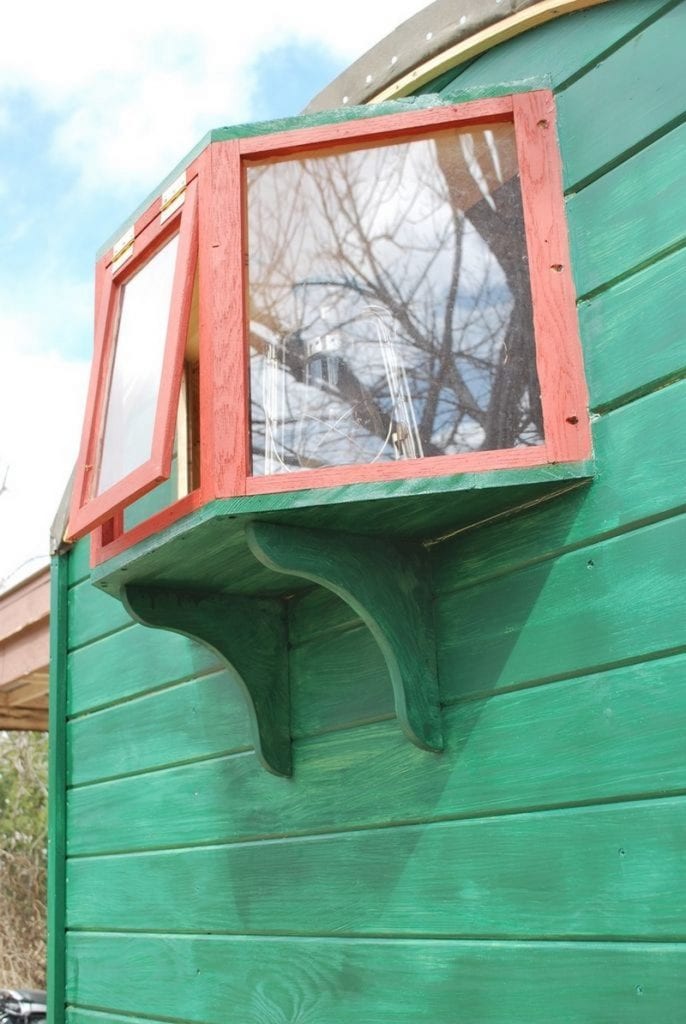
The table of my gypsy wagon is modeled after those in old British wagons. The window was made as a separate unit and then attached whole to the wagon body. It is oak and pine.
Step 9: First Shakedown Trip and Base Coat
Goal: Road‑test structure and fix early issues; start exterior protection.
- Do a 500‑mile test run (desert trip in the original build).
- Identify rattles, loose fasteners, heat issues; tighten and adjust.
- Apply a base coat of oil paint to protect the wood.
We took our gypsy wagon on a 500 mile journey into the desert to test her out and figure out some gypsy wagons interiors layout issues. We got a base coat of oil paint on most of the body by the end of the week.
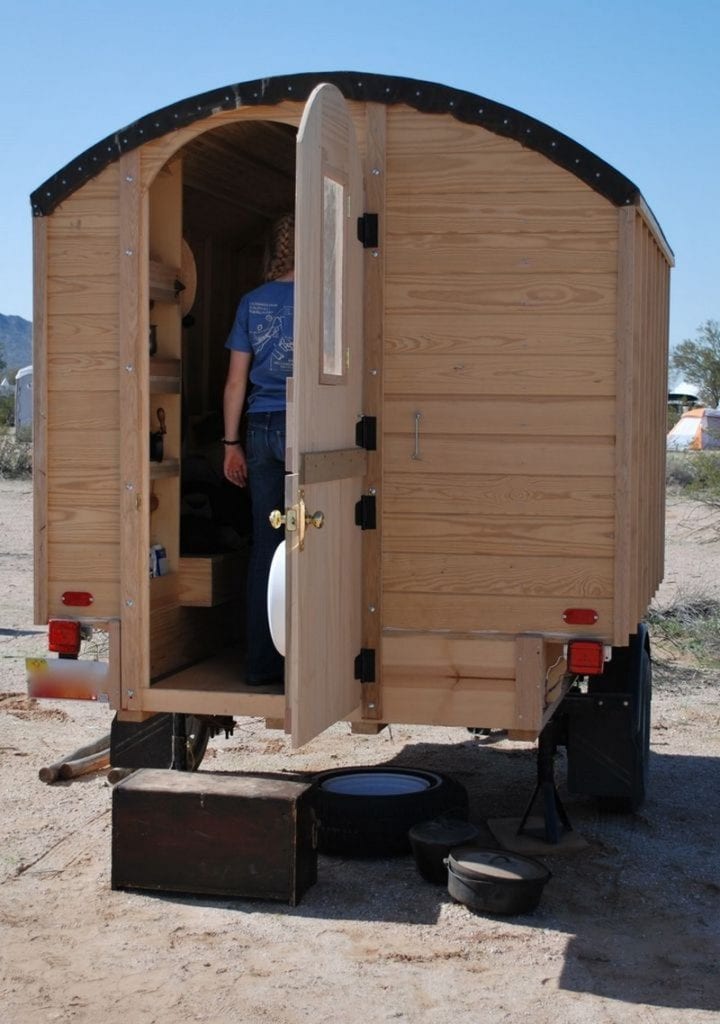
After we returned, we added an oak floor, finished the table, and added a lot of homey touches. There is ample storage under the beds, but I intend to add more outside.
The wagon traveled across New Mexico, Arizona, and southern California through the scorching desert to the beautiful San Diego area for a week. When we got back, she got her full coat of paint, and some more interior work.
The shelves are an enormous amount of space, and can be covered by a roman shade type cover.
Pro tip: Log issues during the drive and address them systematically on return.
Step 10: Interior Finish: Floor, Shelves, Homey Touches
Goal: Make the living space comfortable and functional.
- Install oak flooring.
- Add shelves with optional roman‑shade covers to secure contents in transit.
- Finish surfaces with protective oils/varnish.

Pro tip: Use marine varnish in high‑wear zones for durability.
Stairs were built to match wagon. Oak treads, fir risers. The paint was still proceeding slowly at this point but we had to take some time off to head to the ocean for a second “test” journey.
Roof: Although I didn’t photograph this step, the roof was ultimately covered in a low profile steel that was epoxy coated in the factory. It is a light color to keep some of the radiant heat out and seems to work well. It is screwed through the roof into the purlins.

Step 11: Exterior Stairs and Full Paint
Goal: Safe entry and final weatherproof finish.
- Build stairs to match the wagon; secure to the frame/porch.
- Complete the full exterior paint system after test trips.
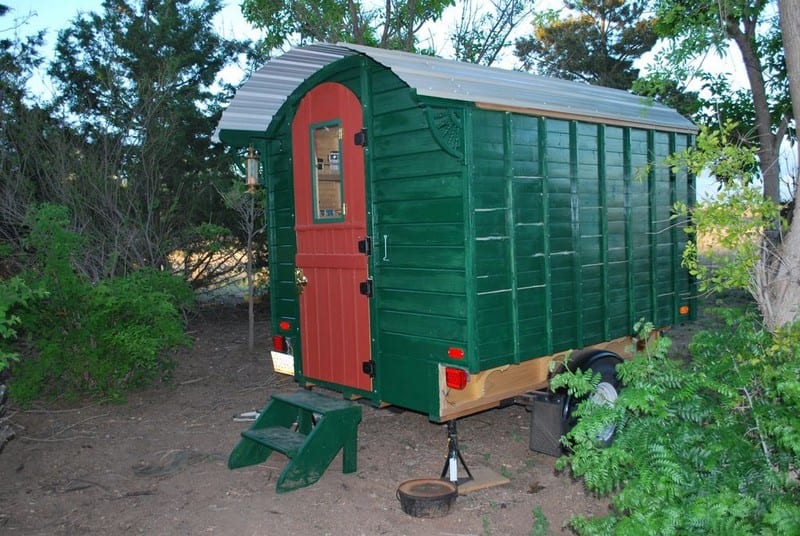
Pro tip: Non‑slip stair treads improve safety in wet conditions.


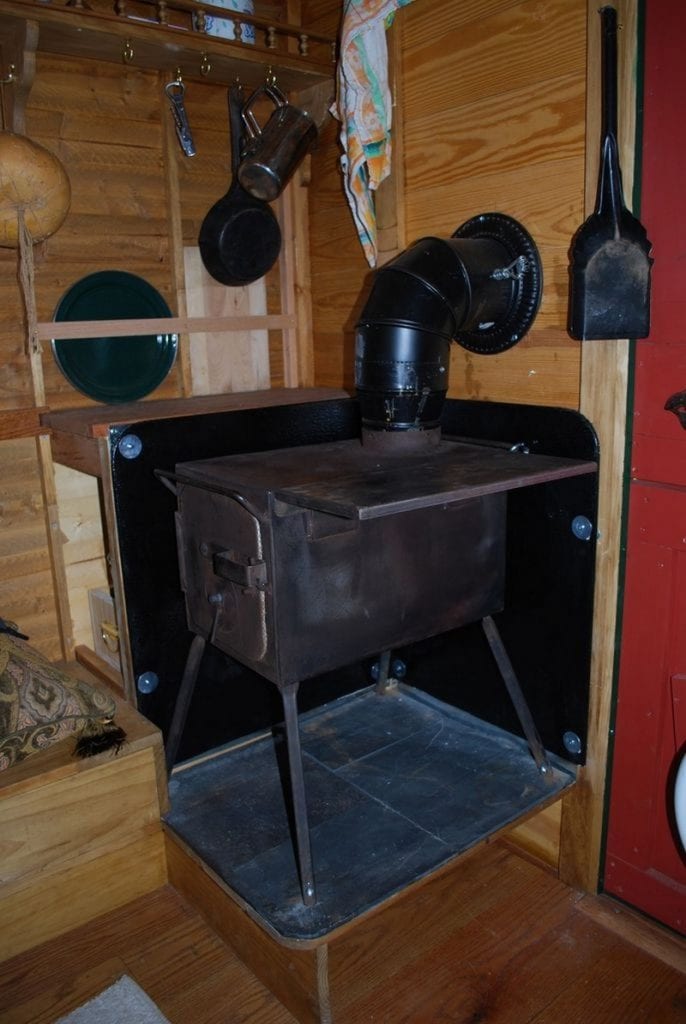
With autumn here I felt it was time to deal with the dreaded stove. I made a hearth area in the corner, tiled the riser with slate, covered the walls with 14 gauge flashing, covered that with fire shield board, inserted a wall thimble, and placed the pipe and stove in the wagon.
In case of rough driving conditions, the stove is screwed to the deck, and two large eye screws attach it to the back wall. It is unlikely to move in anything short of a rollover.
Step 12 Stove, Hearth, and Heat Shielding
Goal: Safe, travel‑secure solid‑fuel heat installation.
- Build a corner hearth with slate tile and a raised riser.
- Shield walls with metal flashing over fire board.
- Install wall thimble and vent the pipe correctly.
- Bolt the stove through the deck and tie back with eye screws.
- Install detectors and mount an extinguisher within reach.
Safety check: Maintain clearances to combustibles per the stove manufacturer.
Only with time will the wagon really take on a personality as it get lived in and things are arranged “just so”. Like a ship or any small living space, a good deal of thought needs to go into every little detail, especially when it comes to storage.
I think it will help me minimize and is now my real “escape pod”, whether its to get to the mountains or beach, or to just someday hit the road.
Thanks to paleotool for this great project!
You can also consider a gypsy wagon kit that has everything you need to build one.
Legal Considerations and Mobility
Embarking on the journey of building and living in a gypsy wagon is an adventure that combines the allure of a nomadic lifestyle with the satisfaction of creating a unique, mobile home. While the prospect of crafting your own gypsy wagon and exploring new horizons is exciting, it’s essential to navigate the legal landscape to ensure your venture is both enjoyable and compliant.
This section delves into the key legal considerations and mobility aspects you must address when bringing your gypsy wagon dream to life.
Legal Considerations
- Zoning Laws and Building Codes: Gypsy wagons, while mobile, can sometimes fall into a grey area between vehicles and permanent dwellings. Before starting your build, research local zoning laws and building codes in your area. Some regions may have specific requirements or restrictions on living in mobile structures or parking them on private property. Understanding these laws can help you design your gypsy wagon to comply with regulations and avoid potential legal issues.
- Registration and Road Legality: As a mobile home, your gypsy wagon must be road-legal if you plan to tow it on public roads. This involves registering the wagon as a recreational vehicle (RV) or a trailer, depending on your local Department of Motor Vehicles (DMV) guidelines. You’ll likely need to ensure that your gypsy wagon meets safety standards, including proper lighting, braking systems, and size dimensions.
- Insurance: Securing insurance for a gypsy wagon can be more complex than for a standard vehicle or home. You may need to look into specialized insurance providers that cater to RVs, tiny homes, or custom-built trailers. Insurance will protect you against road accidents, theft, and damages, offering peace of mind as you travel.
- Permits for Construction: Depending on where you plan to build your gypsy wagon, you may need to obtain specific permits, especially if your build is considered a permanent structure at any point during construction. Check with local authorities to understand the requirements for permits, inspections, and any other regulations that may apply to the construction phase of your gypsy wagon project.
- Utility Connections and Off-Grid Living: If your gypsy wagon design includes connecting to public utilities or adopting off-grid solutions, you must adhere to legal standards and regulations. For off-grid living, investigate the legality of collecting rainwater, installing solar panels, and composting toilets in your intended locales. Each state or municipality may have its rules governing these practices.
- Historical and Environmental Preservation: There may be additional restrictions to consider in areas with strict environmental or historical preservation laws. These could involve limitations on where you can park your gypsy wagon or specific guidelines on waste disposal and ecosystem impact. Always research the environmental and historical guidelines of your intended destinations to ensure compliance.
Mobility
- Towing Vehicle Requirements: The ability to move your gypsy wagon easily depends on having a suitable towing vehicle. Ensure your vehicle is capable of handling the weight and dimensions of your wagon. Consider the wagon’s gross vehicle weight rating (GVWR) and the towing capacity of your vehicle to ensure safe and efficient travel.
- Route Planning: When you’re ready to hit the road, planning your route is crucial. Some roads may have restrictions on trailer sizes or weight limits. Additionally, consider the terrain and weather conditions, as some areas might be challenging or unsafe for towing a gypsy wagon. Using GPS and road-trip planning apps that cater to RVs can help you find the best routes and campsites.
- Parking and Campsites: Finding places to park or camp with your gypsy wagon requires some research. Not all campsites are equipped to accommodate non-traditional RVs or tiny homes on wheels. Look for RV parks, campgrounds, and tiny home communities that welcome gypsy wagons. Always check local regulations regarding overnight parking, especially in urban areas or public lands.
- International Travel: For those considering taking their gypsy wagon on international adventures, it’s crucial to research the import and export laws, as well as the vehicle and trailer regulations of the countries you plan to visit. Customs documentation, vehicle insurance that covers international travel, and knowledge of local driving laws are all essential for a hassle-free journey.
- Seasonal Mobility: The mobility of your gypsy wagon can also be influenced by seasonal changes. Winter conditions may require winterized water systems, insulated pipes, and appropriate tires for your wagon and towing vehicle. Conversely, extreme heat demands proper ventilation, air conditioning, and sun protection for your gypsy wagon to ensure it remains a comfortable living space.
- Community and Legal Advocacy: Joining a community of gypsy wagon, tiny home, or RV enthusiasts can provide valuable insights and support. These communities often share updates on legal changes, advocacy opportunities, and tips for navigating the complexities of mobile living. Engaging in advocacy efforts to change restrictive laws or regulations can also enhance the living experience for the gypsy wagon community.
Navigating the legalities and mobility challenges is a critical step in the journey of owning a gypsy wagon. By addressing these considerations, you can ensure that your adventure on the road is both lawful and enjoyable. With proper planning and compliance, your gypsy wagon can offer a lifetime of memories and discoveries.
Frequently Asked Questions: Gypsy Wagon
- How much will it weigh and what can tow it?
- Small builds can be ~1,500–1,800 lbs; larger, full-featured wagons often reach 3,000–4,300 lbs. Pick a tow vehicle with comfortable headroom vs. max rating, trailer brakes, and proper tongue weight. Verify your local limits.
- What road-legal size and paperwork apply?
- Common guidance: under ~8–8.5 ft wide and below ~12 ft high to avoid special permits. Registration/insurance can require title/certificate of origin, weight slip, and inspection — varies by region. Check your DMV/insurer.
- How do I insulate and control condensation?
- Use continuous insulation (e.g., rigid foam), air seal meticulously, and add controlled ventilation. Builders sometimes add exterior layers for heat control or go 3‑season to save weight.
- Is a wood stove safe in a small vardo?
- Yes, with proper clearances, noncombustible hearth, wall/pipe shields, a listed thimble, and robust anchoring for travel. Small marine/tent stoves are common; add CO/smoke alarms and ventilate.
- What off‑grid power and cooking work best?
- Keep loads light: portable/roof solar for lights, fans, device charging; propane or butane cooktops for simplicity. Ventilate and install detectors. Some builds skip electrical entirely to cut weight/complexity.
Conclusion
Building a gypsy wagon is part craft and part road‑test—sketch, mock‑up, build the shell, then refine the interior after real miles. The traditional box‑style walls, light steel roof, and compact stove create a dependable, cozy micro‑home that tows well and looks timeless.
With legal basics covered (registration, lighting, brakes) and smart weight distribution, you’ll have a roadworthy vardo that’s easy to maintain and a joy to personalize. Ready to start?
A great addition to your gypsy wagon is a portable station. Read our post on the best power stations!