Last Updated on October 30, 2025 by teamobn
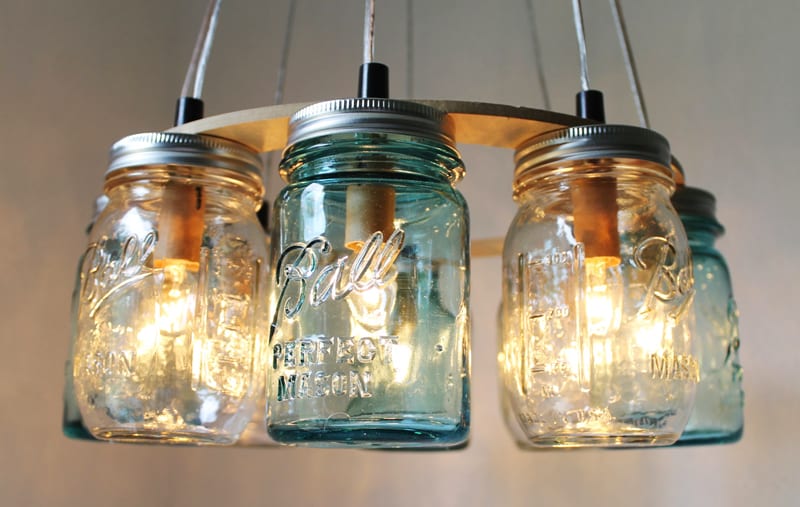
If you need elegant-looking lighting without having to spend big money, here’s one DIY project you might want to try. Indoor or outdoor, these lights are beautiful.
Make stylish mason jar lights using LED bulbs and ventilated lids. Difficulty: Easy. Time: 45–90 minutes. Cost: $15–$40 per light. Indoor use recommended; outdoor use only with weatherproof, UL-listed components. Use low-heat LED bulbs, add multiple ventilation holes in the lid, and never use incandescent/halogen bulbs.
Contents
- 1 At a Glance of the DIY Mason Jar Lights Project
- 1.1 Safety notice (read first)
- 1.2 What are the materials needed to make DIY Mason Jar Lights?
- 1.3 How to make DIY Mason Jar Lights?
- 1.3.1 Step 4: Add ventilation holes around the perimeter
- 1.3.2 Step 6: Trim and smooth the center hole
- 1.3.3 Step 7: Install the socket and strain relief
- 1.3.4 Step 8: Wire the socket (if not pre-wired)
- 1.3.5 Step 10: Test for heat and function
- 1.3.6 Step 11: Mount or hang your light
- 1.3.7 Step 12: Enjoy your new mason jar light!
- 1.4 Troubleshooting & Common Mistakes
- 1.5 Variations & Ideas
- 1.6 Frequently Asked Questions (FAQs)
- 2 Conclusion
At a Glance of the DIY Mason Jar Lights Project
- Project type: Decorative pendant or sconce jar lights (LED only)
- Skill level: Beginner
- Total time: 45–90 minutes (per light)
- Estimated cost: $15–$40 (USD) per light
- Best for: Ambient lighting over kitchen islands, patios, or hallways
- Indoor/Outdoor: Indoor; outdoor only if you use weather-rated parts and sheltered locations
Safety notice (read first)
- Use LED bulbs only (≤7W / ≈450 lumens). Do not use incandescent or halogen bulbs.
- Add ventilation holes in the lid. Target 6–10 holes ≈ 6 mm (1/4″) spaced around the perimeter; deburr sharp edges.
- Keep clearance between bulb and glass: at least 10–15 mm around the bulb; avoid oversized bulbs in small jars.
- Use UL-listed components and strain relief on cords. For hardwired installs, consult a licensed electrician and follow local electrical code.
- For outdoor use, use weather-rated (IP) components, place under cover, and provide a drain/vent path to reduce condensation.
- Unplug power before working. Wear safety glasses and gloves when drilling metal.
What are the materials needed to make DIY Mason Jar Lights?
- 1× Mason jar (pint or quart; wide mouth recommended)
- 1× UL-listed E26 medium-base socket with mounting ring/adapter (pendant or sconce style)
- 1× Metal lid and ring (or a purpose-built jar lid light adapter)
- × LED bulb ≤7W, 2700–3000K warm white; enclosed-rated if ventilation is limited
- A nail or wood screw
- A pen, pencil, or marker
- A hammer
- Scissors
- Pliers
- A flat head screwdriver
How to make DIY Mason Jar Lights?
Step 1: Choose your jar, socket, and bulb size
- Select a mason jar (pint, quart, or half-gallon).
- Choose a UL-listed E26 socket that fits your jar opening. Wide-mouth jars (3.5″ / 89 mm opening) work best.
- Pick an LED bulb ≤7W with dimensions that leave at least 10–15 mm clearance from the glass on all sides. A standard A19 LED (60 mm diameter) fits most quart jars; use smaller bulbs (A15 or G16.5) for pint jars.
Tip: Hold the bulb inside the jar before drilling to confirm clearance.

Step 2: Mark the center hole for the socket
- Place the metal lid flat on your work surface.
- Center the socket base (the threaded collar or mounting ring) on the lid.
- Use a pen, pencil, or marker to trace the inside edge of the socket collar.
- This circle is where you’ll cut.
- Mark a small dot at the exact center for your pilot hole.

Step 3: Drill or punch pilot holes around the traced circle
- Put on safety glasses and gloves.
- Use a center punch or nail and hammer to create a pilot dimple at the center mark.
- Punch 8–12 small pilot holes evenly spaced along the traced circle line.
- Space them about 10–12 mm apart.
Why: These perforations make it easier to cut out the center and reduce the risk of the metal bending or tearing unevenly.

Step 4: Add ventilation holes around the perimeter
- Mark 6–10 evenly spaced points around the outer edge of the lid, about 10–15 mm from the rim.
- Use a drill with a 6 mm (1/4″) bit, or hammer and nail, to punch ventilation holes at each mark.
- Purpose
- Ventilation allows heat to escape and prevents moisture buildup. Aim for a total vent area of at least 170–300 mm² (roughly 6–10 holes at 6 mm each).
- Deburr all holes with a file or deburring tool to remove sharp edges.

Step 5: Cut out the center opening
- Using a hammer and flat-head screwdriver (or tin snips), carefully cut along the perforated circle from pilot hole to pilot hole.
- Work slowly to avoid bending the lid. The cut doesn’t need to be perfectly smooth—the socket collar will cover the edge.
Alternative
Use a step bit or hole saw sized to your socket collar for a cleaner cut (recommended if you have the tools).
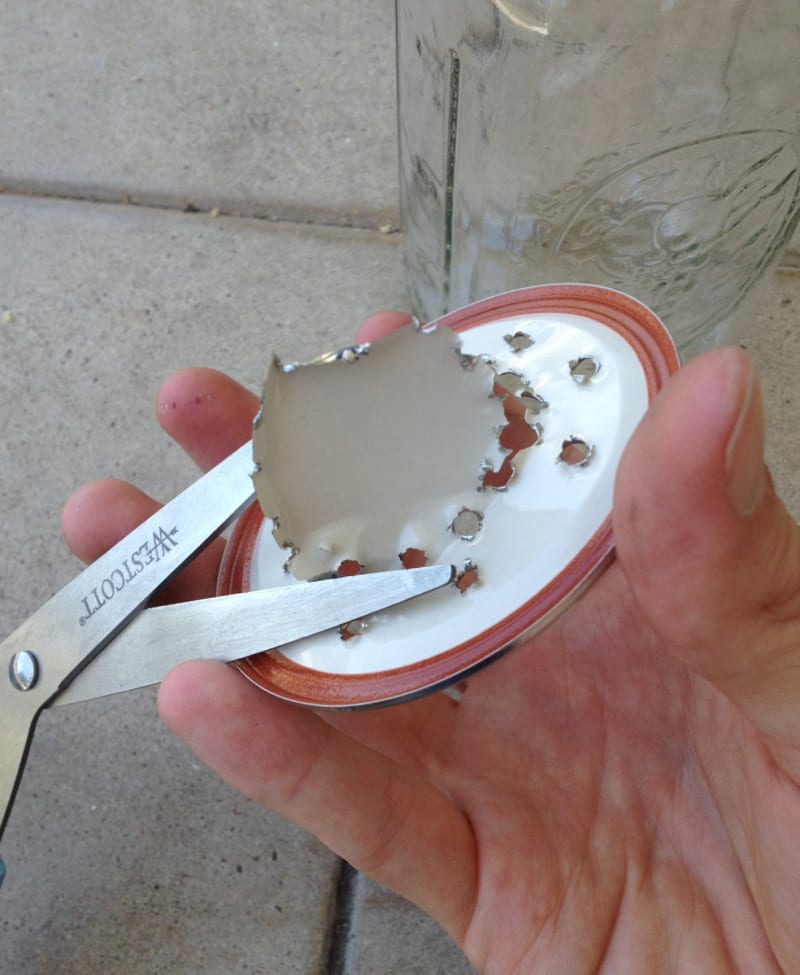
Step 6: Trim and smooth the center hole
- Use scissors or tin snips to trim any remaining tabs or rough edges inside the circle.
- Test-fit the socket. The threaded collar should pass through snugly. The hole should be large enough for the socket body but small enough that the mounting ring or flange holds the lid securely.
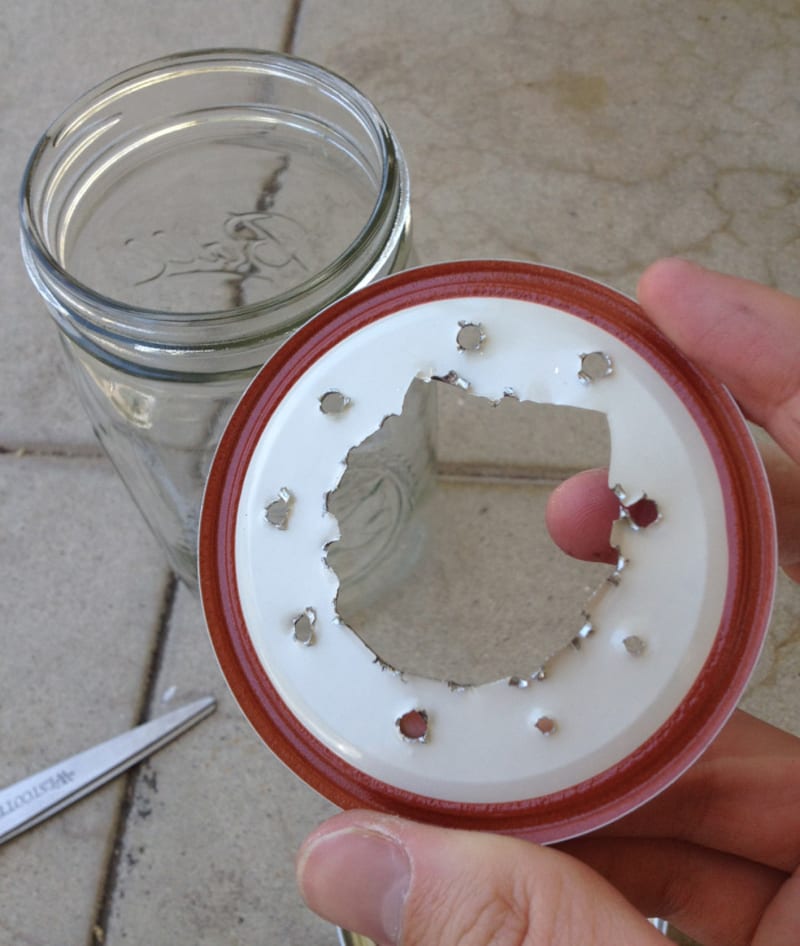
- If the hole is slightly too small, use pliers to gently bend back the metal. If it’s too large, the socket’s mounting ring should still grip the lid when tightened — just ensure it’s stable.
- If it’s not going to be pretty, that’s okay, as long as the hole doesn’t get too big for your socket.
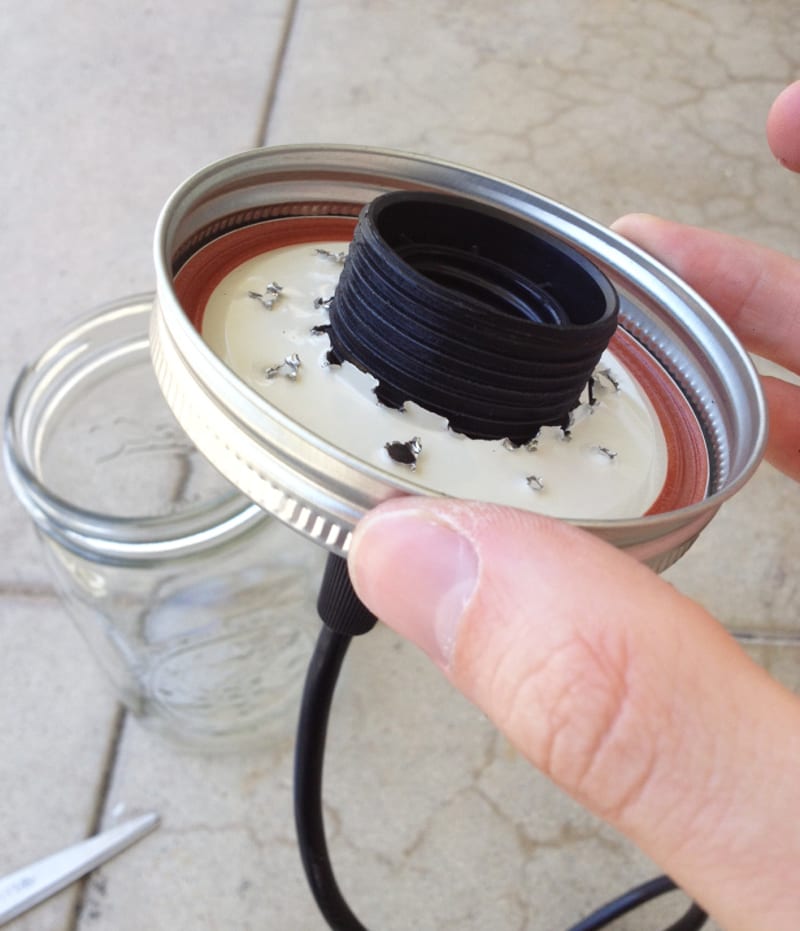
Step 7: Install the socket and strain relief
- Thread the lamp cord (if using a cord kit) through the center hole from the top (outside) of the lid.
- Attach a strain relief bushing or grommet where the cord passes through to protect the wire insulation.
- Position the socket base over the hole so the threaded collar pokes through the bottom of the lid.
- Secure the socket with its mounting ring, locknut, or retaining collar (depending on your socket type). Hand-tighten, then snug with pliers if needed — don’t overtighten and crack the porcelain socket.
Step 8: Wire the socket (if not pre-wired)
- Split the lamp cord about 50 mm and strip 8–10 mm of insulation from each wire.
- Identify neutral (ribbed or white) and hot (smooth or black/colored).
- Connect:
- Neutral (ribbed/white) → silver terminal screw
- Hot (smooth/black) → brass/gold terminal screw
- Wrap each connection clockwise around the screw, tighten securely, and cover with heat-shrink tubing or electrical tape.
- Tuck wires neatly into the socket base.
- Safety check: Gently tug each wire to confirm it’s secure.
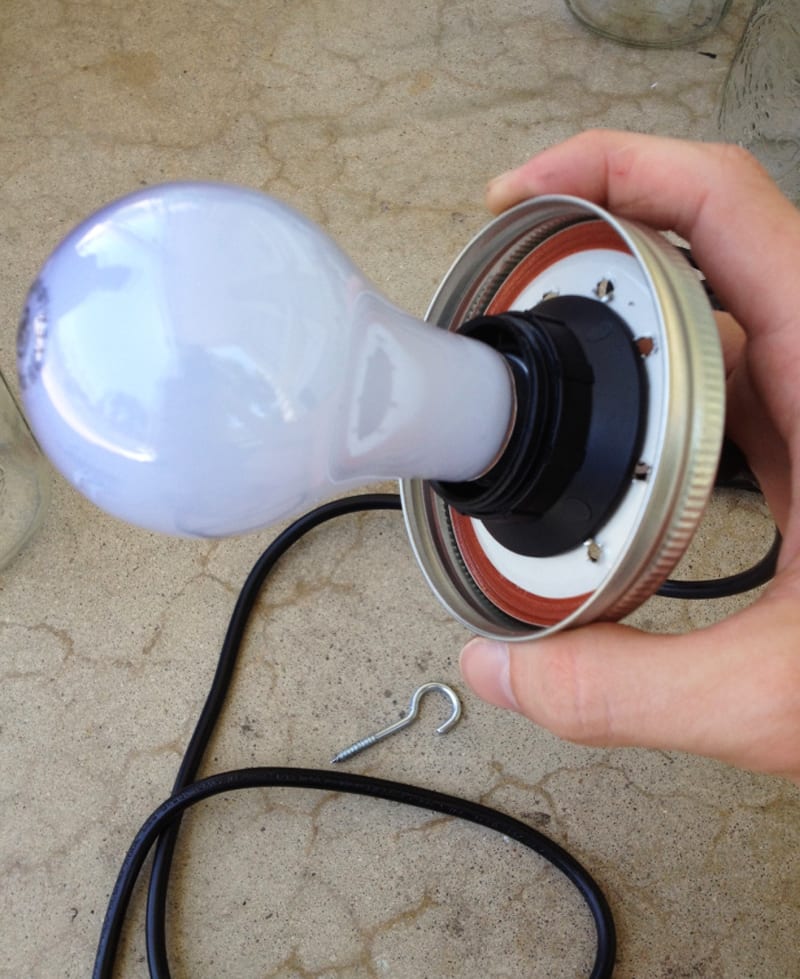
Step 9: Attach the lid ring and test-fit the jar
- Screw the metal ring onto the threaded jar mouth, sandwiching the wired lid in place.
- Tighten the ring hand-tight. The lid should sit flat and stable.
- Insert your LED bulb (≤7W) into the socket and hand-tighten.
Step 10: Test for heat and function
- Plug in the cord (or connect to power if hardwired) and turn on the light.
- Let it run for 15–20 minutes.
- Carefully touch the jar. It should feel warm but not hot. If the glass is too hot to touch comfortably, your bulb wattage is too high or ventilation is insufficient — add more vent holes or use a lower-wattage bulb.
- Safety: Unplug before making any adjustments.
Step 11: Mount or hang your light
- For pendant lights:
- Use a UL-listed cord kit with a ceiling canopy and strain relief.
- Attach the canopy to a ceiling junction box following the kit instructions.
- Adjust cord length as desired; some kits include a cord grip or adjustable height mechanism.
- For sconce lights:
- Mount a UL-listed backplate or fixture base to a wall junction box.
- Secure the jar light to the backplate per manufacturer’s instructions.
- For plug-in/portable lights:
- Simply plug into an outlet. Use a dimmer-compatible plug-in dimmer if you want adjustable brightness.
Step 12: Enjoy your new mason jar light!
Maintenance: Dust the jar monthly. Replace the LED bulb as needed (typically 15,000–25,000 hours). Check that ventilation holes remain clear.
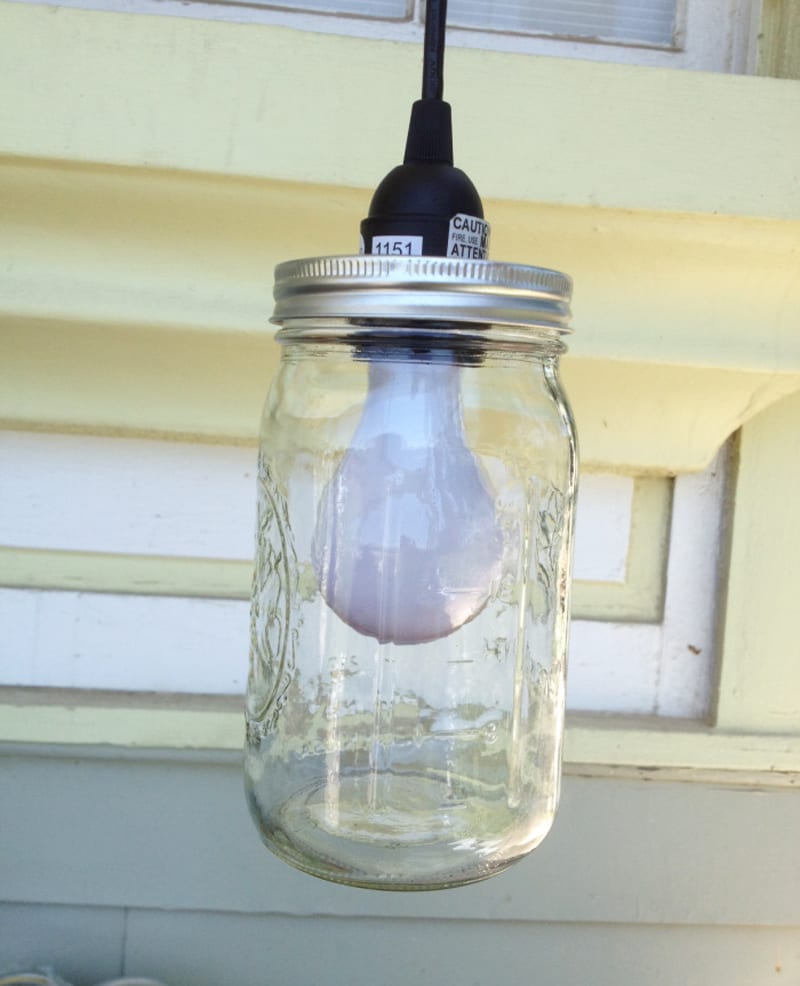
Turn it on and admire your work.
Troubleshooting & Common Mistakes
| Problem | Cause | Fix |
|---|---|---|
| Jar gets very hot | Bulb wattage too high or insufficient ventilation | Use ≤7W LED; add 2–4 more vent holes |
| Condensation inside jar | Moisture trapped; no vent path | Add vent holes; store in dry location; outdoor use requires drain hole at bottom |
| Socket wobbles or falls through | Center hole too large | Use a larger mounting ring/washer, or apply high-temp silicone gasket around socket base |
| Bulb flickers | Loose connection or poor contact | Re-check wire terminals; ensure bulb is fully seated |
| Lid rusts (outdoor use) | Moisture exposure | Use stainless steel or powder-coated lids; apply clear rust-inhibiting spray; replace annually |
Variations & Ideas
- Battery-powered
- Use a battery-operated LED puck light or fairy lights inside the jar—no wiring needed. Great for renters or outdoor events.
- Solar lid lights
- Replace the metal lid with a solar mason jar lid kit (widely available online). Perfect for pathway or garden lighting.
- Colored jars
- Use tinted mason jars (blue, amber, green) or apply glass paint/stain for a custom look.
- Cluster pendants
- Hang 3–5 jars at staggered heights over a kitchen island or dining table for a dramatic effect.
- Sconce pairs
- Mount two jar lights on either side of a mirror, doorway, or headboard.
- Fairy light fill
- Instead of a single bulb, fill the jar with a string of micro LEDs for a softer, whimsical glow.
Frequently Asked Questions (FAQs)
- Are mason jar lights safe?
- Yes, when built correctly. Use LED bulbs ≤7W, add ventilation holes, use UL-listed components, and maintain clearance between the bulb and glass. Never use incandescent or halogen bulbs.
- What type of bulb should I use?
- LED only, ≤7W (approximately 450–800 lumens), 2700–3000K warm white. Choose bulbs rated for “enclosed fixtures” if ventilation is limited.
- How many ventilation holes do I need?
- At least 6–10 holes, each about 6 mm (1/4″) diameter, evenly spaced around the lid perimeter. Total vent area should be 170–300 mm².
- Can I use mason jar lights outdoors?
- Yes, but only with weatherproof, UL-listed cord kits or fixture bases rated for wet or damp locations. Place under a covered porch or eave. Add a small drain hole at the bottom of the jar to prevent water accumulation.
- Why is my jar fogging up inside?
- Condensation forms when warm air inside meets cool glass and has no escape. Add more ventilation holes or a small drain hole at the jar bottom. For outdoor use, ensure the jar is sheltered and vented.
- What size jar works best?
- Quart (32 oz) wide-mouth jars are ideal for standard A19 LED bulbs. Pint (16 oz) jars work well with smaller A15 or G16.5 bulbs. Half-gallon jars suit larger statement pendants.
- Do I need an electrician?
- For plug-in pendant or sconce kits, no — most are DIY-friendly. For hardwired ceiling or wall installations, consult a licensed electrician to ensure code compliance and safe junction box connections.
- Can I use a dimmer?
- Yes, if your LED bulb is labeled “dimmable.” Use a compatible LED dimmer switch or plug-in dimmer module.
- How long do the bulbs last?
- Quality LED bulbs last 15,000–25,000 hours (10–20 years at 3 hours/day).
- Where can I buy the parts?
- Hardware stores (Home Depot, Lowe’s, Ace), craft stores (Michaels, Hobby Lobby), and online (Amazon, Etsy, specialty lighting suppliers).
Conclusion
Transforming simple mason jars into elegant, functional lighting is a rewarding project that adds a touch of personalized charm to any space. By following these detailed steps and prioritizing safety with LED bulbs and proper ventilation, you can create beautiful, energy-efficient lights that enhance your home, indoors or out.
Don’t let your creativity be bottled up — gather your materials, illuminate your ideas, and start your unique mason jar light creations or you can try this upcycled light bulb vase project — another creative way to transform everyday materials into stylish home décor.
Source: in.gredients