Last Updated on June 26, 2025 by teamobn
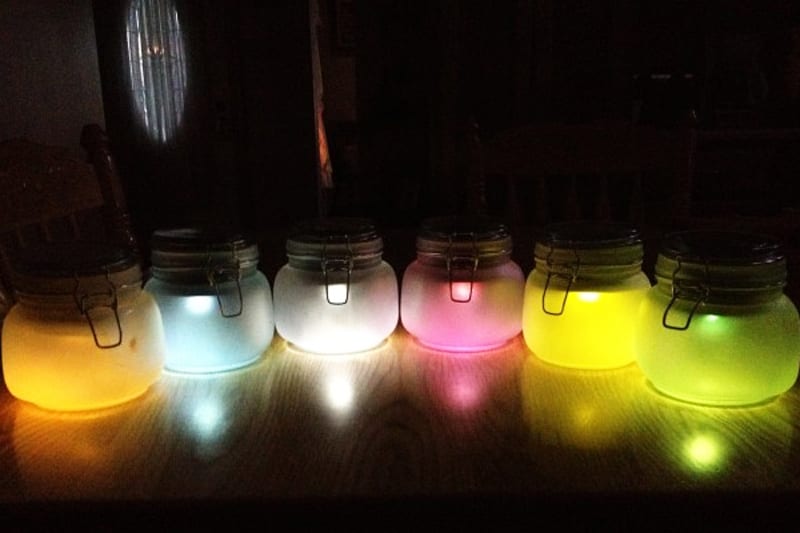
These DIY solar light mason jars are definitely cute come night time. Admit it, seeing them in these photos makes you smile already! Now why not make a few for yourself? 🙂

Materials:
- Solar lights; the silver-topped ones show through the jar a little less
- Clamp style jar with a glass lid
- Glass frosting spray – you can find this is the paint section
- AA 2300mAh rechargeable; NiMh Energizer battery holds more power
- Stained glass or window paint
- Newspaper
- 2-4 popsicle sticks or toothpicks
- Loctite Repair Extreme Adhesive
- Phillips screw driver
Steps:
- Spread the newspaper on your work area. It would be ideal for you to do this outdoors.
- Clean the jar by wiping it with clean dry cloth. Turn the jar upside down on top of the popsicle sticks.
- Frost the jar for a glowing effect. Make sure you keep the lid away or covered while spraying. Hold the spray paint about six inches far and apply evenly. You will barely see what is happening with the glass while you are spraying; don’t stay too long and wait until you really see the paint because you will only have to coat it lightly. It’s easier to do a second coating, than try to repair drip marks. Let it dry completely.
- Unscrew the solar lights from their plastic bulb. Replace the battery with your new battery.
- Lay the jar lid upside down on a flat surface. Use adhesive to stick the light, making sure that you placed it correctly so that it can receive the sunlight through the glass lid. Set it aside overnight to dry completely.
- For the colour of your lights, simply paint the tiny bulbs with the stained glass paints using a toothpick.
- Close the jar, clamping it. Leave it where sunlight can reach it, and see it glow in the dark!
Contents
Advanced battery and solar-cell upgrades for longer night-time glow
Power output starts with the cell and ends at the diode. Fine-tune both and your diy solar light mason jar will shine past dawn without fading.
Efficient mono-crystalline cells for higher output
Swap the stock amorphous panel for a mono-crystalline disc trimmed to the lid’s shape. Mono cells deliver up to thirty percent more charge during short winter days. Solder leads with flux core wire and cover joints with heat-shrink tubing.
Keep the panel flush against clear glass so photons meet silicon head-on. Aim the jar where noon sun hits strongest because panel tilt now matters. Even small gains at midday add extra hours of glow after dark.
High-capacity NiMH versus LiFePO4 replacements
Factory AA cells often store less than 600 mAh. Slide in a 2300 mAh low-self-discharge NiMH and runtime triples without changing circuitry. Want four times the life? Use a 14500 LiFePO4 and a step-down board set to 3 volts.
LiFePO4 handles deep cycles better and shrugs off heat trapped inside the jar at noon. Check polarity before closing the lid and write install dates on masking tape to log lifespan.
Boost converters and voltage regulators
LED strings dim when battery voltage sinks under 1.2 volts. A two-dollar boost converter keeps output steady until cells are almost flat. Mount the board on a foam pad under the lid to stop vibration.
Trim potentiometers with a plastic screwdriver while watching current draw with a USB multimeter. The jar now delivers a constant lumen level that looks more professional than the slow fade most garden lights show.
Maintaining and cycling rechargeable batteries
Even premium cells lose punch if they stay half-charged. Place jars in direct sun once a month during rainy seasons to top them off fully. Wipe dust from the lid with a damp cloth so the panel breathes light.
Every six months discharge one test battery in a flashlight and check capacity with an analyzer. Replace when rated storage drops below eighty percent. Proper cycling reduces landfill waste and keeps your night path bright.
Weatherproof sealing techniques that protect jars in rainy climates
Rain sneaks in through threads, wire holes, and micro cracks. Stop moisture and your diy solar light mason jar survives monsoons without fogging the lens.
Silicone gasket rings under the lid
Rubber rings in clamp jars age fast under UV rays. Swap them for food-grade silicone that stays flexible for years. Lightly coat the ring with petroleum-free grease so it seals tight yet releases for battery swaps. Hand-tighten the clamp until you feel uniform resistance. Over-clamping warps the glass and invites leaks.
Marine-grade epoxy for light tray attachment
Standard craft glue softens in humidity. Mix a two-part marine epoxy and press the solar tray onto the glass lid. Work in small batches because pot life is short. Use a cotton swab to wipe overflow before it cures. After twenty-four hours the bond resists thermal expansion that happens when the sun heats the lid in midsummer.
Breathable venting to prevent condensation
Jars closed too tight trap warm air that condenses on cool nights. Drill a two-millimeter hole on the lid’s side and plug it with a Gore-Tex patch cut from an old jacket. The membrane lets vapor escape but blocks raindrops. Foggy glass disappears and light output climbs.
UV-resistant clear coats to stop clouding
Frosting spray looks charming but can yellow in tropical UV. Finish with an acrylic clear coat labeled UV-stable to lock pigments in place. Hold the can ten centimeters away and pass quickly to avoid runs. Rotate the jar slowly so coverage stays even. Let it cure in shade for forty-eight hours before outdoor use.
String and chandelier builds using multiple mason jars in clusters
Single jars charm a windowsill. Clustered jars become statement lighting that rivals store-bought patio chandeliers yet keeps the diy solar light mason jar spirit alive.
Choosing balanced hanging hardware
Weight multiplies fast when you add five jars. Screw eye bolts through a birch round or reclaimed pallet slat. Space holes evenly to balance load. Thread stainless steel cables through ferrules and crimp with pliers.
Test by hanging the assembly indoors and pulling twice the expected weight. A balanced frame prevents sway that could crack glass in wind.
Running parallel wiring for uniform charge
Each jar needs its own panel yet the chandelier should light as one. Run slim silicone leads from every lid to a bus bar made from copper tape.
Panels wire in parallel so voltage stays at cell level while capacity adds up. Solder joints quickly to avoid overheating lid plastics. Insulate with liquid electrical tape for a tidy finish.
Designing tiered layouts for patios
Arrange jars in staggered tiers to spread light over dining tables. Short cables on outer jars and longer ones in the center create a cone shape that looks polished. Use a swivel hook so the whole chandelier can rotate gently in breeze without twisting wires. Measure drop length so the lowest jar sits above head height. Safety comes first at family gatherings.
Creative diffuser effects with colored inserts
Plain frosting works but layered film inserts elevate mood. Cut translucent vinyl in geometric patterns and press them inside the jar.
Light shines through two textures and creates soft shadows on decking. Swap colors by season: amber for fall, cool blue for summer. Because inserts hang loose they never trap moisture like paint layers can.
These upgrades, seals, and creative builds turn a simple diy solar light mason jar into a durable, high-performance feature that glows long, survives storms, and dazzles guests with custom style.

Troubleshooting dim lights, moisture fogging, and flickering LEDs
Even well-built DIY solar light mason jar projects can lose brightness or show condensation after months outdoors. Quick tests and targeted fixes get the glow back fast without a full rebuild.
Diagnosing persistently dim output
Start at the top. Wipe dust off the solar lid with a microfiber cloth so panels see full sun again. Check battery age next. If it’s older than two years or shows corrosion on the terminals, swap in a fresh low-self-discharge NiMH or LiFePO4 cell.
Inspect internal wiring for cold solder joints that restrict current flow. Tug each lead gently; a loose joint often feels springy.
Measure open-circuit panel voltage at noon with a multimeter. Anything under 1.8 V for a single-AA setup signals a failing cell that needs replacement. Reassemble and leave the jar in direct sun for one full charge cycle before retesting brightness.
Clearing moisture fogging inside the glass
Condensation dulls light and breeds corrosion. Twist off the lid and dry the jar with a hair dryer set on low. Remove the battery so heat doesn’t damage it.
Replace the original rubber seal with a food-grade silicone ring lightly greased with petroleum-free lubricant. Drill a tiny side vent in the lid and cover it with a Gore-Tex sticker patch to let vapor escape while blocking rain.
If frosting spray has peeled, wash the jar in warm soapy water, rinse, and reapply a fresh coat plus a UV-stable clear sealant. Let everything cure for forty-eight hours indoors before heading back outside.
Fixing intermittent or flickering LEDs
Flicker usually means inconsistent voltage. Pop the lid and reseat the battery to confirm solid contact on both ends. Clean terminals with a cotton swab dipped in isopropyl alcohol.
If the LED still blinks, test battery output under load using a small flashlight bulb; voltage sag below 1 V points to a worn-out cell. When a boost converter is installed, adjust the trim pot a quarter-turn clockwise while watching the light.
Sudden cut-outs can stem from thermal expansion loosening solder joints on the LED board, reflow each joint with a fine-tip iron and fresh solder, then secure the board with silicone adhesive to dampen vibrations.
Preventive maintenance for lasting performance
Schedule a quarterly checkup. Wash lids, tighten clamps, and clear spider webs that shade the panel. Store jars indoors during extreme storms to avoid shock damage.
Keep a log of battery install dates and panel swaps so you can predict service life instead of reacting to failures. Staying proactive turns troubleshooting into a quick routine and keeps your garden path lit every night.
Conclusion
A DIY solar light mason jar turns simple household items into sustainable garden art. Upgraded cells, tight seals, and smart wiring ensure bright, dependable glow every night. Regular cleaning and battery checks prevent dimming or flicker before they spoil the mood. Creative finishes let every jar match holidays, patio themes, or kids’ craft sessions. Build, maintain, and enjoy the warm ambiance while knowing you saved energy and landfill space.
We have more creative lighting projects. Check out our drum set chandelier project next!


