A good gaming chair can make your whole setup feel better, but the high-end ones get expensive fast. Building a DIY gaming chair gives you a lot more control. You can dial in the comfort, pick the features you actually want, and match the look of your room without blowing your budget. With a few basic tools, some planning, and the right materials, you can build a sturdy, ergonomic seat that fits your body and the way you play. This guide walks you through designing it, putting it together, and customizing the details so it looks sharp and feels great for long sessions.
Contents
Key Takeaways
- A DIY gaming chair helps you skip the brand premium and spend your money on the parts that matter, like better foam, stronger hardware, and fabric that holds up.
- Since you’re building it yourself, you can dial in the ergonomics, setting the seat depth, backrest height, and lumbar support so it actually fits your body.
- You’re not stuck with the same “racing chair” look either. You can pick any upholstery you like and add extras like RGB lighting or custom armrests if you want them.
- Reusing parts from an old office chair keeps usable materials out of the trash and can give you a sturdier base for a chair that feels more personal and lasts longer.
Building a DIY Gaming Chair
A DIY gaming chair lets you combine comfort, style, and savings into one project. With the right tools, materials, and a simple plan, you can build a custom throne for long gaming sessions.
Materials Needed
- Sturdy base (old office chair base or metal chair base with casters)
- Seat board (plywood or similar, at least 18–20 mm thick)
- Backrest board (plywood or similar, curved or straight)
- High‑density foam for seat (5–10 cm thick)
- Medium‑density foam for backrest and armrests
- Upholstery fabric, faux leather, or gaming‑style fabric
- Upholstery batting (optional, for smoother finish)
- Wood screws and metal brackets
- Gas lift cylinder (if reusing an office chair base)
- Chair mechanism (tilt/recline plate, if adjustable)
- Armrests (reused or DIY wood/metal armrests)
- Adjustable lumbar pillow and neck pillow (optional)
- Casters/wheels (if not included with base)
- Contact adhesive or spray glue (for foam)
- Staple gun staples and upholstery thread (if sewing covers)
- Sandpaper or sanding block
- Wood filler (optional, for smoothing edges)
Tools Needed
- Measuring tape and pencil
- Hand saw or circular saw (for cutting wood)
- Power drill and drill bits
- Screwdriver or drill driver bits
- Staple gun (manual or pneumatic)
- Utility knife or electric knife (for cutting foam)
- Scissors (for fabric)
- Square or straightedge (for accurate cuts)
- Safety gear: safety glasses, dust mask, work gloves
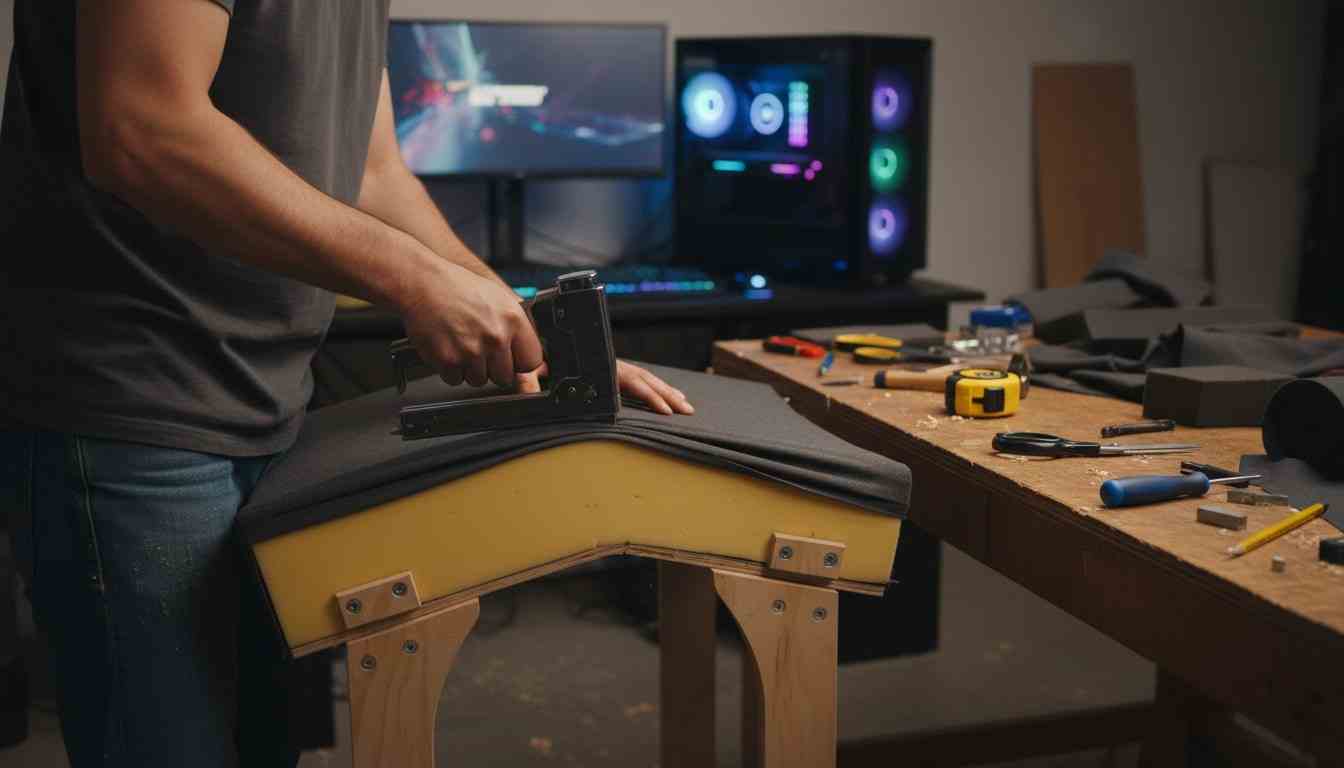
Step‑by‑Step Guide to Building a DIY Gaming Chair
- Plan Your Design and Measurements
- Decide on the overall style (racing‑style, office‑style, or minimalist).
- Sit at your desk and measure ideal seat height, backrest height, and armrest height.
- Sketch a simple side view of your DIY gaming chair including seat, backrest, and armrests.
- Prepare the Chair Base
- If reusing an old office chair, remove the old seat and backrest by unscrewing them.
- Inspect the base, casters, and gas lift to ensure they are stable and not damaged.
- Clean the base thoroughly and tighten any loose bolts.
- Cut the Seat Board
- Mark your seat dimensions on the plywood (typical: 45–50 cm wide, 45–50 cm deep).
- Use a saw to cut the board and round the front corners for comfort.
- Sand all edges and corners until smooth to prevent fabric tearing.
- Cut the Backrest Board
- Mark your backrest dimensions (typical: 50–60 cm tall, 45–50 cm wide).
- If you want a more ergonomic shape, draw a slight curve or tapered top.
- Cut the shape with a saw and sand all edges smoothly.
- Attach Seat and Backrest Together
- Position the backrest on the rear edge of the seat at a slight recline (about 100–110° angle).
- Use metal brackets underneath and at the back to firmly connect seat and backrest.
- Pre‑drill holes and secure with wood screws, checking for wobble as you tighten.
- Mount the Seat Assembly to the Base
- Position the chair mechanism (tilt/recline plate) at the center underside of the seat.
- Mark and drill pilot holes, then screw the mechanism to the seat board.
- Insert the gas lift into the base, then slide the mechanism onto the gas lift.
- Sit gently to ensure everything locks and feels stable.
- Add Foam to the Seat
- Cut high‑density foam to match the seat size using a utility or electric knife.
- Round the front edge of the foam slightly for better leg comfort.
- Apply contact adhesive to the seat board and foam, let it tack, then press together firmly.
- Add Foam to the Backrest
- Cut medium‑density foam to fit the backrest board, slightly larger if you want rounded sides.
- Consider gluing an extra foam pad or wedge at the lower back area for lumbar support.
- Glue the foam to the backrest using contact adhesive and press evenly.
- Shape and Smooth with Batting (Optional but Recommended)
- Wrap the seat and backrest foam with a layer of upholstery batting.
- Pull the batting snug and staple it to the back of the boards, trimming excess.
- This softens edges and helps achieve a professional‑looking finish.
- Upholster the Seat
- Place your fabric face down, then set the seat foam‑side down on top.
- Cut fabric with enough excess to wrap under the seat (8–10 cm per side).
- Starting at the center of each side, pull the fabric tight and staple underneath.
- Work toward the corners, folding them neatly and avoiding wrinkles.
- Upholster the Backrest
- Place the backrest foam‑side down on the fabric, leaving enough fabric to wrap around.
- Pull the fabric evenly and staple it on the back side of the board.
- Make small, neat folds at curves or corners and keep tension consistent for a smooth look.
- Build and Install Armrests
- If reusing armrests, clean and repaint if needed, then attach them to the seat or backrest frame following the original mounting pattern.
- For DIY wooden armrests, cut two identical pieces, sand them, and optionally pad and upholster them.
- Use metal brackets and screws to mount armrests at a height where your elbows rest at roughly 90° when seated.
- Add Lumbar and Neck Support
- Attach an adjustable lumbar pillow with straps around the backrest or screw in anchor points to hook it.
- Install or strap on a headrest pillow at the top of the backrest.
- Sit in the chair and adjust both until your lower back and neck feel naturally supported.
- Fine‑Tune Ergonomics
- Adjust seat height so your feet rest flat on the floor and knees are near 90°.
- Ensure your eyes are level with the top third of your monitor without slouching.
- Adjust armrests so your shoulders are relaxed and your forearms are parallel to the floor.
- Style and Finish Your DIY Gaming Chair
- Add color accents with contrasting fabric panels or stitching.
- Attach patches, logos, or decals to make it feel like a true gaming chair.
- Optionally, route and attach LED strips (battery‑powered or USB) along the back or underside for RGB flair.
- Safety Check and Final Test
- Inspect all screws, brackets, and joints and tighten anything loose.
- Gently rock, tilt, and spin to check for creaks or wobble, reinforcing weak points with extra brackets if needed.
- Use the chair for short sessions first, making minor adjustments until it feels perfectly dialed in.

Why Build a DIY Gaming Chair?
Building your own gaming chair is a solid mix of comfort, savings, and control. You’re not stuck paying for a logo or settling for a chair that kind of fits. You end up with a seat that matches your body, your space, and the way you actually game.
Significant cost savings
A big reason people start a DIY gaming chair project is the price difference. Quality ergonomic chairs can run into the hundreds, and sometimes more, mostly because you’re paying for branding and marketing on top of materials. If you buy your own foam and fabric, or reuse a strong base from a thrifted office chair, you can get a sturdy, comfortable chair for a lot less than retail.
Tailored ergonomic support
Most store-bought chairs are built for an “average” person, which is why they can feel off if you’re taller, shorter, or deal with back pain. When you build your own chair, you can set the seat depth, backrest height, and lumbar support exactly where you need them. That kind of fit matters, especially during long sessions, because it helps reduce pressure points and keeps you from constantly shifting around.
Creative style and customization
A lot of gaming chairs lean hard into the same racing-seat look, and it doesn’t work in every room. Going DIY means you pick the upholstery, so you can keep it clean and minimal, go with breathable mesh, or use a patterned fabric that matches your setup. You can also add practical upgrades like simple cable routing, armrests shaped the way you like, or even RGB lighting if that’s your thing.
Sustainability and upcycling
DIY is also an easy win if you like building without creating more waste. Plenty of office chairs get tossed just because the fabric is ripped or the padding is flat, even though the base and gas lift still work fine. Reusing those parts and replacing the foam and upholstery keeps a big item out of the trash and gives you a chair that can end up better than what you’d buy new.
Troubleshooting common issues
Even a solid DIY gaming chair can pick up a few quirks over time. Catching them early and doing quick fixes the right way keeps the chair stable, quiet, and comfortable for the long haul.
Fixing a wobbly or unstable chair
Wobble almost always comes down to loose hardware or a frame that’s not sitting square. Flip the chair over and check every screw, bolt, and bracket on the base, seat, and backrest. Tighten anything that shifts, and add washers if holes have started to widen or the hardware doesn’t clamp down well anymore.
If the wobble feels like it’s coming from the wheels, make sure each caster is fully pushed into its socket and doesn’t have a cracked stem or bent frame. For wooden builds, look for small cracks, loose joints, or boards that have warped. Reinforce weak spots with corner braces or extra brackets, then test the chair carefully before you go back to daily use.
Reducing squeaks and annoying noises
Squeaks usually happen when metal parts rub together or when a pivot point dries out. The fastest way to fix it is to find the exact spot first. Gently rock, rotate, and recline the chair while listening near the base, tilt mechanism, armrests, and backrest mounts.
Once you’ve located the noise, use a small amount of silicone spray or light machine oil on the moving joints and bolts, and on the tilt mechanism if that’s where it’s coming from. Keep lubricant off fabric and foam.
If your chair has wood parts, squeaks can come from boards rubbing or flexing, so tightening screws and adding felt pads or thin rubber spacers between contact points can help a lot. If it still squeaks, take that section apart, wipe off dust or rust, then put it back together and lubricate again.
Dealing with wrinkled or loose upholstery
Loose fabric makes a good build look unfinished, but it’s usually an easy fix. Start by checking the underside of the seat and backrest for staples or fasteners that have pulled loose. If you find a problem area, remove a few staples, pull the fabric tight again, then re-staple starting at the center and working outward so the tension stays even.
With vinyl or faux leather, a hair dryer on low heat can help smooth small wrinkles. Keep it moving and don’t hold heat in one spot. If the wrinkles won’t go away, you may need to re-stretch that whole panel, trim excess fabric, and fasten it again for a cleaner finish.

Repairing wear and improving long-term durability
After months of use, foam can flatten, fabric can fray, and high-stress parts can loosen up. If the seat feels tired, add a fresh layer of high-density foam on top or replace the cushion completely. Cut it to fit and glue it down so it doesn’t shift.
Small fabric tears are often fixable with a patch on the inside using strong fabric glue, or stitching if you can reach the area cleanly. Armrests take a beating, so removable covers are a simple upgrade that saves you work later.
Make it a habit to check bolts every so often, wipe the chair down, and deal with small issues early. That’s the difference between a chair that lasts a year and one that stays solid for several.
Conclusion
Building a DIY gaming chair is one of those projects that feels worth it when you finally sit down in it. You get to save money, make it look the way you want, and fine-tune the comfort instead of settling for whatever a brand decided was “standard.” When you control the frame, padding, and upholstery, the chair ends up fitting your body and your setup better. If you plan it carefully and build it safely, it can hold its own against plenty of store-bought chairs. The nice part is you’re not locked into one final version either. You can tweak the support, swap fabrics, and add upgrades over time as you learn what you like.
FAQ: DIY gaming chairs
- Is building a DIY gaming chair cheaper than buying one?
- Most of the time, yes. The savings are biggest if you reuse an office chair base or salvage parts that are still solid. Instead of paying for branding, you can spend your money where it actually matters, like good foam, strong hardware, and fabric that won’t peel or tear after a few months. The end result is usually more comfortable for the price because it’s built around you.
- Do I need advanced woodworking or metalworking skills?
- You don’t need to be a pro to build a decent chair. Many designs stick to basic cuts, simple framing, and straightforward upholstery work. A drill, saw, staple gun, and a few brackets can go a long way. If you’re not confident with structural work, starting with a reused office chair base is a smart move since it handles the heavy-duty parts for you.
- How long does it take to build a DIY gaming chair?
- A simpler build using a recycled base can be done over a weekend, usually around 8–12 hours total if you spread it out between planning, cutting, assembly, and upholstery. More custom builds take longer, especially if you’re adding shaped armrests, a recline setup, or a cleaner “finished” look. Moving slow and checking your work as you go tends to save time in the end.
- Can a DIY gaming chair be as comfortable as a store-bought one?
- Yes, and it can be more comfortable if you build it with ergonomics in mind. Comfort comes down to support, foam quality, and how well the chair matches your body, not the logo on the headrest. If you get the seat depth right, shape the backrest properly, and place lumbar support where you actually need it, you can beat a lot of off-the-shelf chairs. High-density foam and solid adjustability are usually the biggest comfort wins.
- How do I make sure my DIY gaming chair is safe and durable?
- Start with strong materials and don’t cheap out on brackets, bolts, and screws. Pre-drill holes so wood doesn’t split, and tighten everything down properly. When you test it, do it in stages, sit gently at first, rock it a bit, then check for wobble, cracks, or hardware that’s backing out. Reinforce high-stress areas like joints, mounts, and the base connection points. After that, a quick check every so often, especially on bolts and moving parts, keeps small problems from turning into failures.


