Building your own queen bed frame is a rewarding weekend project that saves money and lets you customize style, height, and storage. With common tools and readily available lumber, you can create a rock-solid foundation that fits a standard queen mattress perfectly.
This guide walks through planning, materials, cut lists, joinery, and assembly steps so you can choose a clean platform or a classic rail-and-slat queen bed frame. You’ll also get pro finishing tips, cost and time estimates, and techniques to keep your build square, quiet, and long-lasting.
Contents
Key Takeaways
- With common tools and affordable lumber, you can build a sturdy queen bed frame in a weekend and tailor height, style, and storage.
- The guide covers planning, cut lists, joinery, and assembly for either a platform or rail-and-slat design, with squareness checks and center support for longevity.
- Pro finishing, anti-squeak, and upgrade ideas, drawers, floating plinth, upholstered headboard, lighting, deliver a durable, quiet, professional result with clear cost and time estimates.
Building a Queen Bed Frame
Build a durable queen bed frame with common tools, affordable lumber, and precise steps. This guide covers cuts, joinery, assembly, and squareness checks so your frame is sturdy and long-lasting.
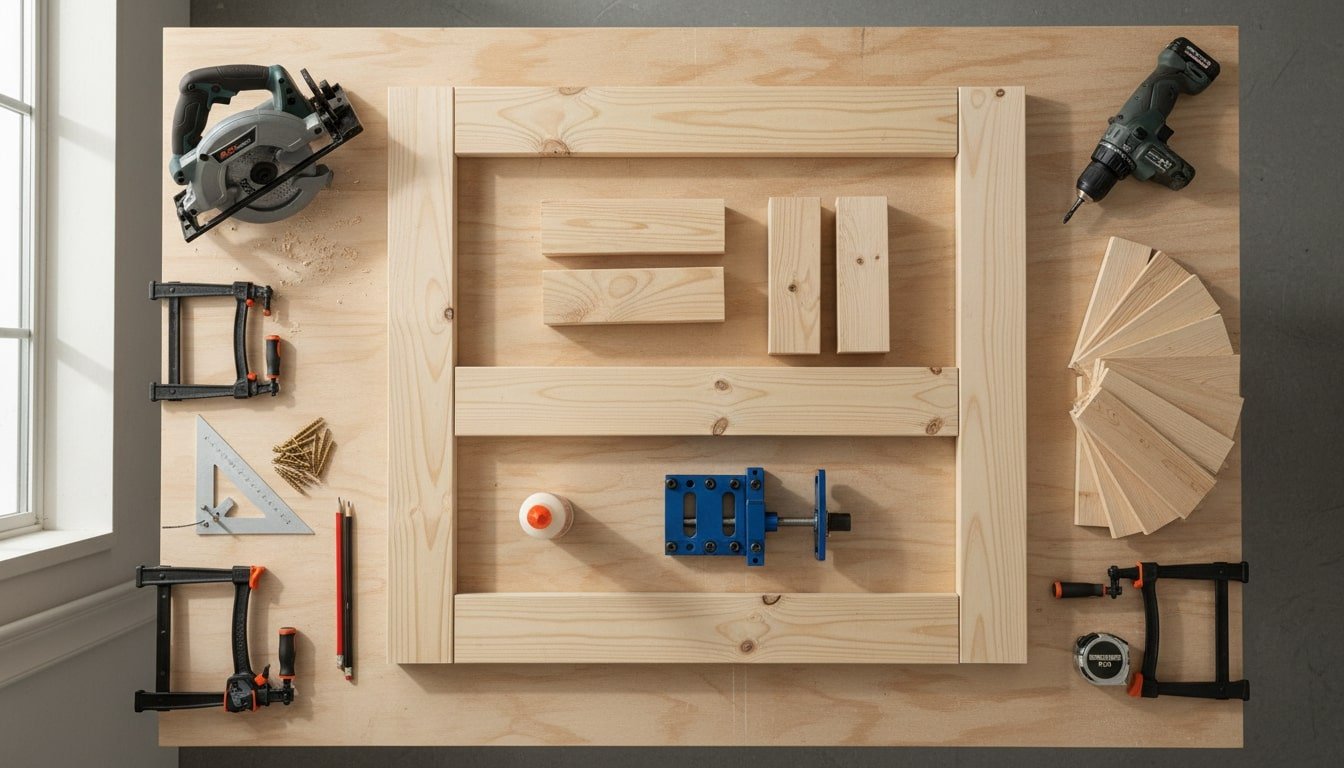
Materials
- 2×6 lumber for frame rails (sides: two @ 80″ for flush, 82″ for 1″ overhang, head/foot rails: two @ 60″ if they fit between side rails, adjust for joinery/hardware)
- 4×4 posts for legs (four pieces, 10″–14″ tall, adjust to desired mattress height)
- 1×3 or 1×4 slats (12–16 pieces cut to interior frame width, typically ~60″)
- Two 1×3 cleats/ledgers for slats (length to match side rails minus hardware clearance)
- Center support beam: 1×4 or 2×4 @ ~80″, plus 2 adjustable center feet
- Bed rail brackets (4 sets) or 3/8″ bolts with threaded inserts/knockdown hardware
- Wood screws: 1-1/4″–1-5/8″ for slats, 2–2-1/2″ for cleats
- Pocket-hole screws (2-1/2″) and wood glue (if using pocket joinery)
- Felt pads for legs, anti-squeak tape or cork (optional)
- Finish: stain and polyurethane, or paint + primer
- Optional: 3/4″ plywood deck (two panels to total ~60″×80″) if not using slats
Tools
- Miter saw or circular saw with a straightedge guide
- Drill/driver, countersink bit, and pocket-hole jig (optional)
- Tape measure, pencil, speed square, combination square
- Level and clamps (4+ medium or large)
- Random-orbit sander (120/180/220 grit) and sanding block
- Safety glasses, hearing protection, and dust mask
- Wrench set (for bolts/feet) and stud finder (for headboard wall-mount, optional)
Step-by-Step Guide
- Plan dimensions and height
- Measure your mattress (standard queen: 60″×80″).
- Decide if the queen bed frame should be flush or have a 1″ reveal.
- Choose a target top-of-mattress height (commonly 24″ ± 2″).
- Cut rails and legs
- Cut two side rails to 80″ (flush) or 82″ (overhang).
- Decide joint orientation: if head/foot rails fit between side rails, cut each to 60″.
- Cut four 4×4 legs to 10″–14″ height.
- Pre-sand components
- Break sharp edges and sand all faces to 180–220 grit.
- It’s easier to get a clean finish on parts before assembly.
- Install cleats on side rails
- Mark a line 3/4″ down from the top inside edge of each side rail (for 3/4″-thick slats flush with rail top).
- Glue and screw 1×3 cleats along this line, keeping them back ~1–2″ from each end for bracket clearance.
- Prepare center support
- Cut a 1×4 or 2×4 beam to ~80″.
- Add two adjustable feet spaced roughly at the 1/3 and 2/3 points.
- Set feet so they’ll end up about 1/16″ proud of slat height to prevent sag.
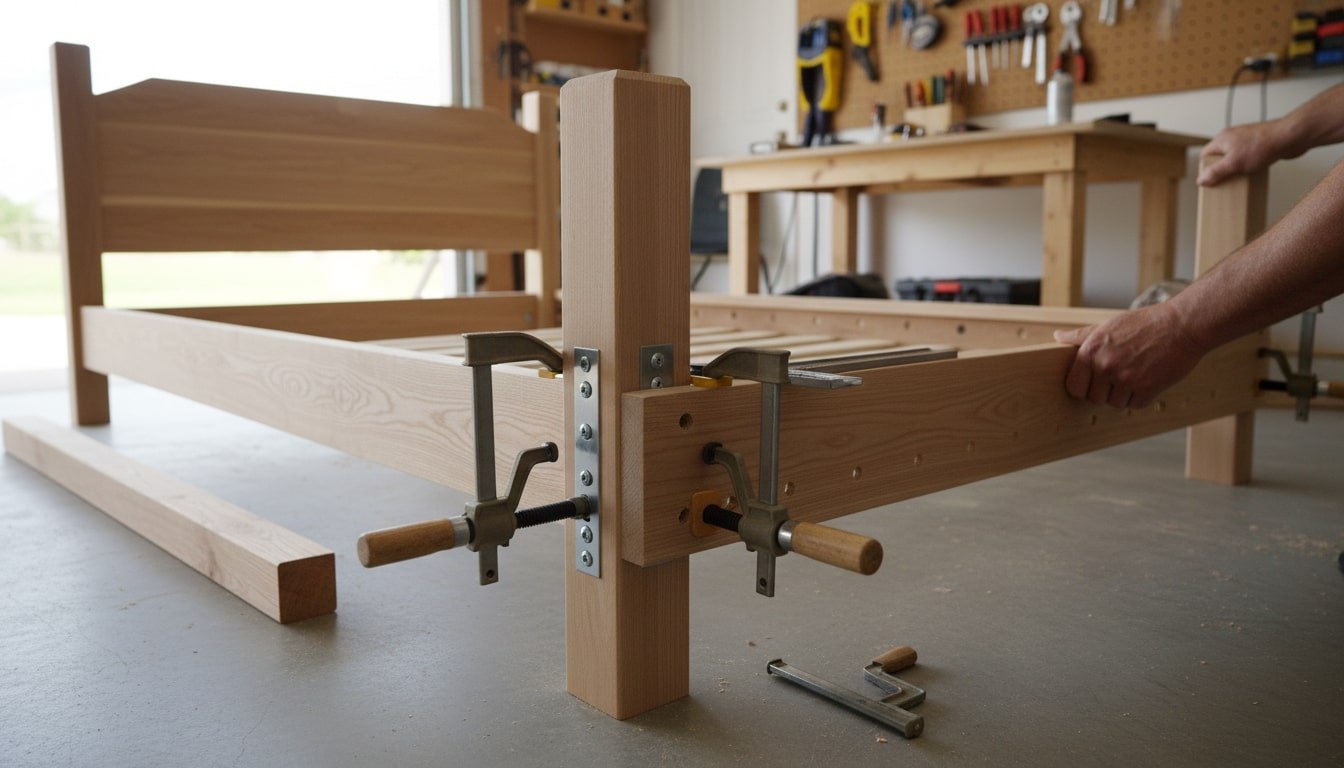
- Mount bed rail hardware
- Install bed rail brackets on each leg at the target rail height.
- Mount the mating brackets on the rail ends, ensuring the top edges of all rails align.
- Alternatively, lay out bolt locations or pocket holes for a knockdown connection.
- Dry fit the frame
- Assemble legs and rails without glue.
- Check for racking: measure diagonals, adjust until both match.
- Confirm interior width matches your slat length.
- Secure the center beam
- Support the beam at each end with small cleats, joist hangers, or pocket-screwed blocks on the head/foot rails.
- Install and level the adjustable feet so the beam just kisses the floor.
- Cut and install slats or deck
- Rip/cut 1×3 or 1×4 slats to the interior width (typically ~60″).
- Space slats 2″–3″ apart for foam/hybrid mattresses (up to 4″ for innerspring).
- Predrill and screw slats to the cleats.
- For a plywood deck, cut panels, add ventilation holes, and screw to cleats.
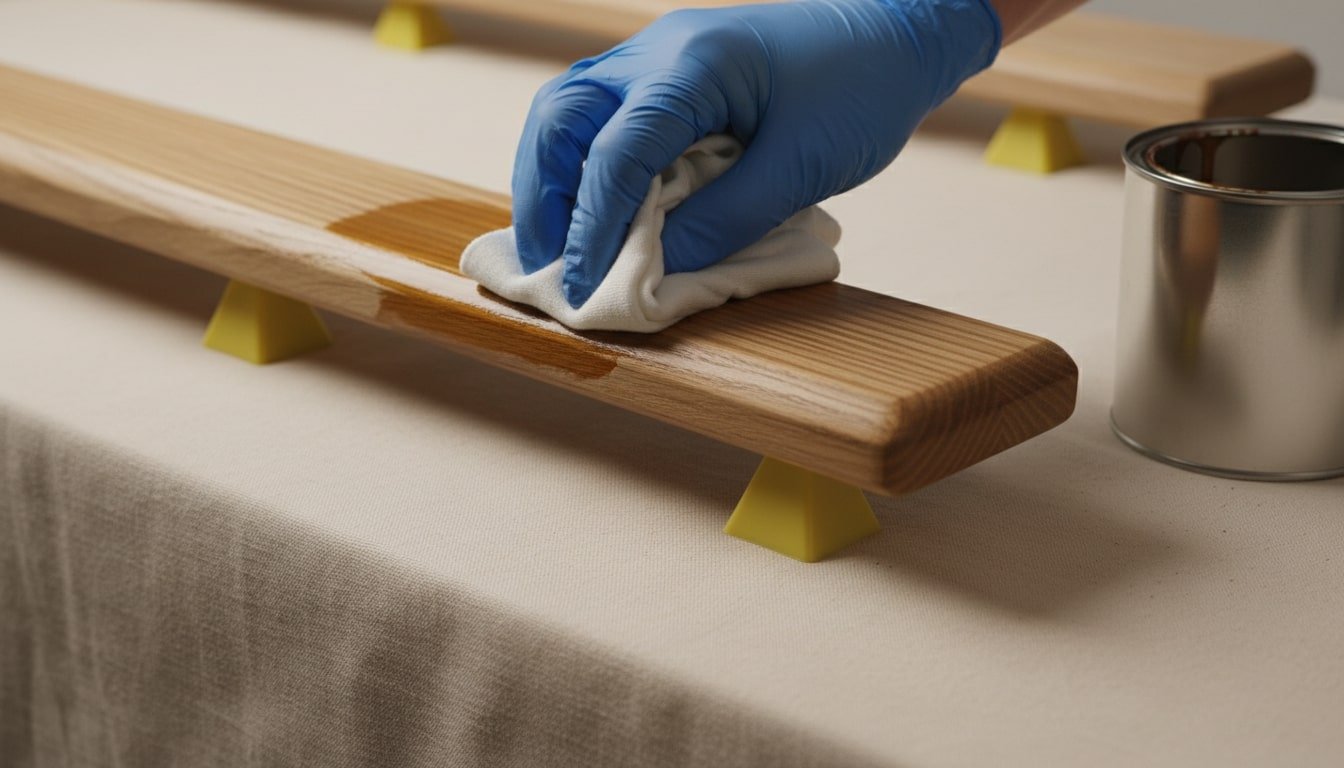
- Disassemble for finishing (recommended)
- Label parts, then apply stain/paint and topcoat per product directions.
- Allow full cure before reassembly to minimize sticking and squeaks.
- Final assembly and leveling
- Reassemble the queen bed frame, add felt pads to legs, and re-check diagonals and level.
- Adjust center feet until the frame is rock-solid.
- Squeak prevention and load test
- Add cork/anti-squeak tape at known rub points if needed.
- Place the mattress, sit at multiple spots, and listen.
- Tighten hardware as necessary.
Variations and Upgrades
Take your queen bed frame beyond the basics with smart variations and upgrades. Enhance storage, style, and comfort while keeping the structure sturdy, quiet, and easy to move or maintain.
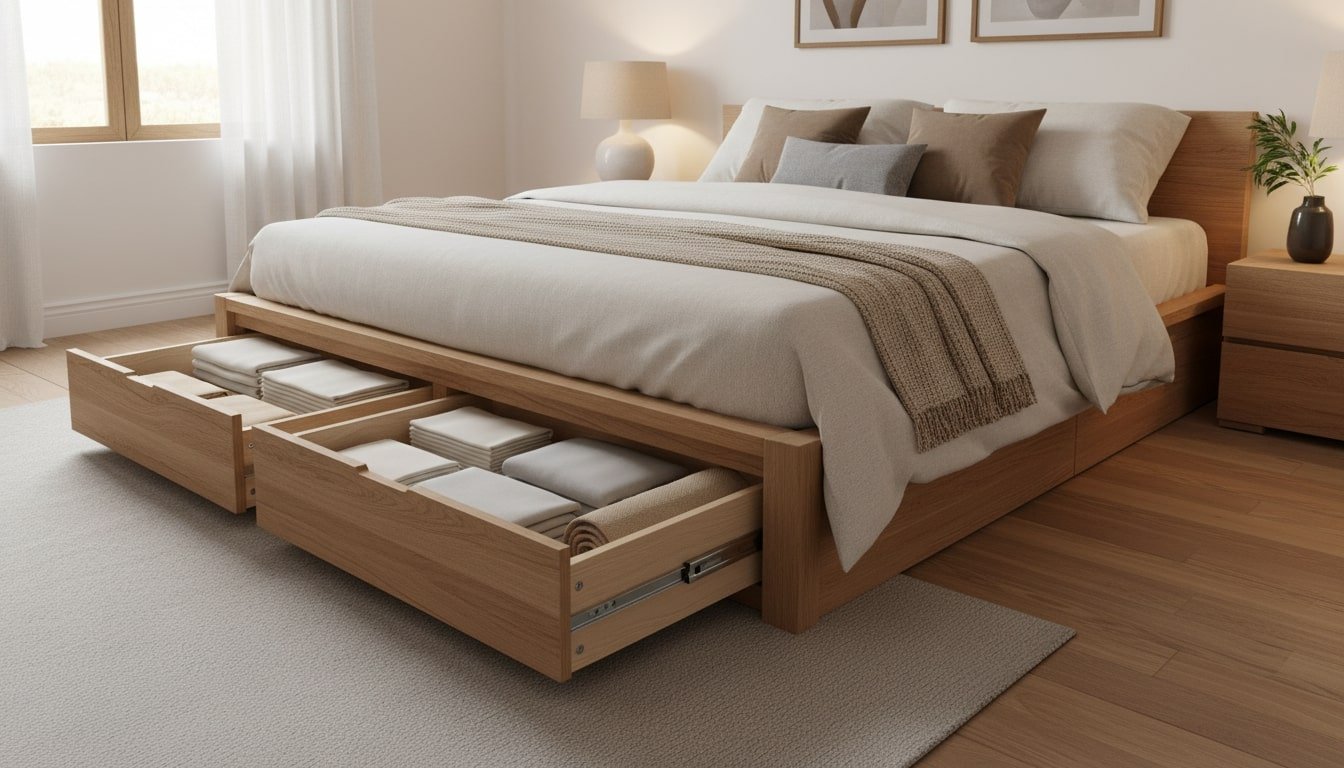
Storage Drawers With Full-Extension Slides
Add under-bed storage to your queen bed frame by building a plinth base with left and right drawer bays. Use full-extension, 18–22 inch side-mount or soft-close undermount slides for maximum reach.
Size each opening to fit common bins or linens: 10–12 inch tall faces, 22–24 inch depth, and at least 1/2 inch total side clearance per drawer. Keep 3/4 inch clearance below slats and the center beam so slides don’t foul.
Construct a stout carcass from 3/4 inch plywood, then build 1/2 inch drawer boxes with hardwood fronts. Add a continuous toe-kick to hide casters and protect toes. Install stop blocks, felt pads, and rear bumpers to prevent rattle. Make each bay a bolt-on module so the frame breaks down easily for moves.
Floating Platform Look With Recessed Plinth
Create a floating platform effect by setting a structural plinth 3–4 inches in from the perimeter of the queen bed frame. The visible skirt or platform overhangs, hiding the base and making the bed appear to hover.
Build the plinth as a rigid torsion box or 3/4 inch plywood ladder with crossmembers 8–12 inches on center. Anchor legs or leveling feet under the plinth, not the skirt. Add a perimeter apron or deck that cantilevers no more than 4–5 inches to limit deflection.
For drama, recess low-profile LED strips inside the apron with an aluminum channel and diffuser. Use a matte finish and eased edges to keep the modern look clean, and add hidden corner brackets for knockdown transport.
Upholstered Headboard or Integrated Lighting
Boost comfort and style by pairing your queen bed frame with a DIY upholstered headboard or built-in lighting. Soft textiles add acoustic dampening and hotel-level coziness without compromising the frame’s structure.
Build a headboard from 1/2–3/4 inch plywood, 1–2 inch foam, and high-loft batting under durable fabric. Staple from the back, pulling evenly for smooth corners. Mount with a French cleat to the wall or bolt to the legs using threaded inserts for a rattle-free, removable connection.
For lighting, integrate low-heat LED sconces or strip channels behind the headboard edge for a glow. Include a touch-dimmer and cord management routed through a hollow standoff. If hardwiring, follow local code and consult a licensed electrician.
Finishing the Queen Bed Frame
Finishing your queen bed frame seals the wood, enhances color, and protects against daily wear. With careful prep, smart product choices, and curing, your build looks professional and stays quiet.
Surface Prep, Edge Breaks, and Dust Control
Great finishes start with perfect prep. Work methodically so your queen bed frame is smooth, clean, and ready to accept stain, paint, or clear coats without surprise scratches or blotches.
- Inspect and mark flaws
- Use raking light to spot tear-out, burn marks, mill lines, and dried glue. Circle defects with a pencil so nothing is missed.
- Scrape glue squeeze-out after it gels (rubbery, ~15–45 minutes) with a sharp chisel; wet wiping can drive glue into pores and cause finish “holidays.”
- Fill and level
- Fill nail holes or small defects with color-matched wood filler. Let it fully cure, then sand it flush (start 150-grit, refine 180).
- For larger chips, glue in a matching wood patch oriented with the grain.
- Sanding sequence (grits explained)
- If parts are rough or have planer/saw marks: start at 80-grit → 120-grit → 150-grit.
- If parts are fairly clean from the mill: start at 120-grit → 150-grit.
- Final smoothing: 180-grit for oil-based finishes; 220-grit for water-based finishes.
- Ease the edges (edge breaks)
- Target a small 1/16″ roundover (about 1.5 mm) to resist chipping and feel comfortable.
- Method 1: Router with a 1/16″ roundover bit and bearing—light passes, then a hand-sand at 180–220-grit.
- Method 2: Fold 180–220-grit paper and take 2–3 light strokes along every exposed edge and corner. You should just barely lose the knife-sharp feel.
- Avoid heavy roundovers where joinery needs full bearing surface (e.g., rail-to-leg interfaces).
- Dust removal and grain-raising
- Vacuum thoroughly with a brush attachment, then blow out pores using clean, oil-free compressed air.
- For water-based finishes: “water-pop” to raise the grain. Wipe the surface lightly with a damp (not wet) microfiber, let dry until uniformly dull (30–60 minutes), then scuff-sand with fresh 220-grit to remove fuzz.
- For oil-based finishes: skip water-pop; wipe with mineral spirits to preview color and reveal hidden scratches, then let fully flash off.
- Prevent blotching on softwoods
- On pine, fir, alder, or maple, brush or wipe on a pre-stain conditioner (follow the brand’s timing).
- Dewaxed shellac (thinned 1–2 lb cut) can also serve as a universal sealer before stain.
- Masking and staging
- Mask hardware mortises, screw threads, and slide rails with painter’s tape so finishes don’t foul fits.
- Finish parts disassembled, supported on painter’s pyramids or screw “standoffs” in scrap blocks for full-edge access.
- Keep the finishing area clean: turn off dusty tools, run an air purifier if you have one, and let airborne dust settle before coating.
Stain, Paint, or Clear Finish Workflows and Compatible Topcoats
Choose a finish system and stick to compatible products. Oil-based stains and polys amber warmly, water-based systems dry fast and stay clear, hardwax oils feel natural. Always read recoat windows. Test on scrap from your queen bed frame offcuts to confirm color, adhesion, and sheen. Maintain thin, even coats and good ventilation for predictable results. Avoid mixing brands without compatibility.
- Stain workflows
- Oil-based wiping stain → wipe on, allow to penetrate 5–15 minutes, wipe off, dry 8–24 hours → seal with dewaxed shellac (optional) → topcoat with oil-based polyurethane (satin/semi).
- Water-based dye or gel stain → apply evenly, wipe back, dry fully → seal with waterborne sanding sealer → topcoat with waterborne polyurethane or polycrylic (two to three thin coats).
- Paint workflows
- Sand to 220 → high-adhesion bonding primer (waterborne) → scuff-sand 320 → waterborne alkyd enamel or cabinet-grade acrylic in thin coats → optional clear waterborne topcoat for durability on rails and legs.
- Clear finish workflows
- Oil-based polyurethane/varnish: warm tone, high durability, three thin coats with 320 scuff between.
- Waterborne polyurethane: clear, fast, low odor, three to four skinny coats.
- Hardwax oil: natural feel, easy spot repair, two coats burnished in, periodic maintenance.
Cure Times, Reassembly, and Floor Protection
Dry-to-touch is not fully cured. Oil-based polys often need 24–48 hours before light handling, but may take 7–30 days to reach full hardness. Waterborne polys can be handled in 2–4 hours and typically cure in 5–10 days. Hardwax oils can be used lightly after 24–36 hours and reach full cure within a week. Avoid trapping moisture or placing mattress weight too soon.
When the finish is hard on the thumbnail, reassemble the queen bed frame. Wax bolt threads and any wood-on-wood contact points to prevent squeaks. Add felt pads to legs, use a breathable rug or sliders during placement, and level the center feet until the slats stop flexing. After a week, re-tighten hardware, then move to a quarterly check to keep everything solid and silent.
Conclusion
You now have a clear, step-by-step path to build a sturdy, stylish queen bed frame tailored to your space and mattress. With careful planning, accurate cuts, and smart joinery, the result will be quiet, rigid, and easy to move. Finish thoughtfully and allow a full cure so the frame looks great and lasts. With these techniques, your DIY queen bed frame becomes a long-term centerpiece of the bedroom.
FAQs
- How much weight can a DIY queen bed frame hold?
- A well-built queen bed frame using 2×6 side rails, a 2×6 center beam with two to three adjustable feet, and 1×4 slats at 2–3 inch spacing can comfortably handle a combined load of 600–900 lb combined load. For higher capacity, upgrade the center beam to laminated 2×6 or 2×8, use structural screws (not drywall screws), and add a third center foot. Ultimately, capacity depends on materials, fasteners, and workmanship. When in doubt, overbuild and load-test gently before regular use.
- Can I build a queen bed frame to fit an adjustable base?
- Omit slats and create a perimeter “skirt” or rail system that leaves 1/2–3/4 inch clearance around the adjustable base (60×80 inch nominal). Support the base on a flat subframe or cleats and include pass-throughs for power cords and cable management, avoid blocking motors, articulation, or IR/Bluetooth receivers. Add non-slip pads and a small retainer strip at the foot if the base lacks one. Verify the final height so the adjustable base’s mattress retainer clears the footboard or rail.
- Which wood species should I choose, and do I need to acclimate it?
- Budget-friendly SPF or poplar is easy to machine and finish. Oak, ash, or maple provides higher dent resistance and crisp edges for a premium queen bed frame. Birch or maple plywood excels for torsion boxes, plinths, and drawer modules. Acclimate lumber to your home for 3–5 days at 35–55% RH, target 6–8% moisture content for interior pieces. Quarter-sawn boards move less across the seasons and are ideal for long rails and legs.
- What finishes are low-odor and bedroom-safe, and when can I sleep on it?
- Waterborne polyurethane and waterborne alkyds are typically low-VOC (often under 100 g/L) and cure fast with minimal odor, making them great bedroom choices. Hardwax oils are low-odor and feel natural, following brand-specific ventilation and cure guidance. As a rule, allow 24–48 hours before light assembly and 5–10 days before full bedding and heavy use. Keep the room ventilated and the mattress off the frame until odors dissipate. Always verify manufacturer cure times for safe re-occupancy, kids, and pets.
- How do I keep a queen bed frame quiet on hardwood or uneven floors?
- Fit felt pads or rubber feet under legs and install adjustable levelers so all support points share the load equally. Wax bolt threads and wood-to-wood contact faces, use lock washers or nylon-insert nuts on through-bolts to resist loosening. Add thin EVA foam tape atop cleats to decouple slats and quell micro-movements. If your floor is significantly out of level, consider a plinth base with multiple concealed feet to spread load and eliminate rocking.