Last Updated on December 9, 2025 by teamobn
When you think of versatile project materials, flower pots usually are not the first thing that comes to mind. We see them as a way to add color and life to a space, filled with flowers and plants on a windowsill or patio.
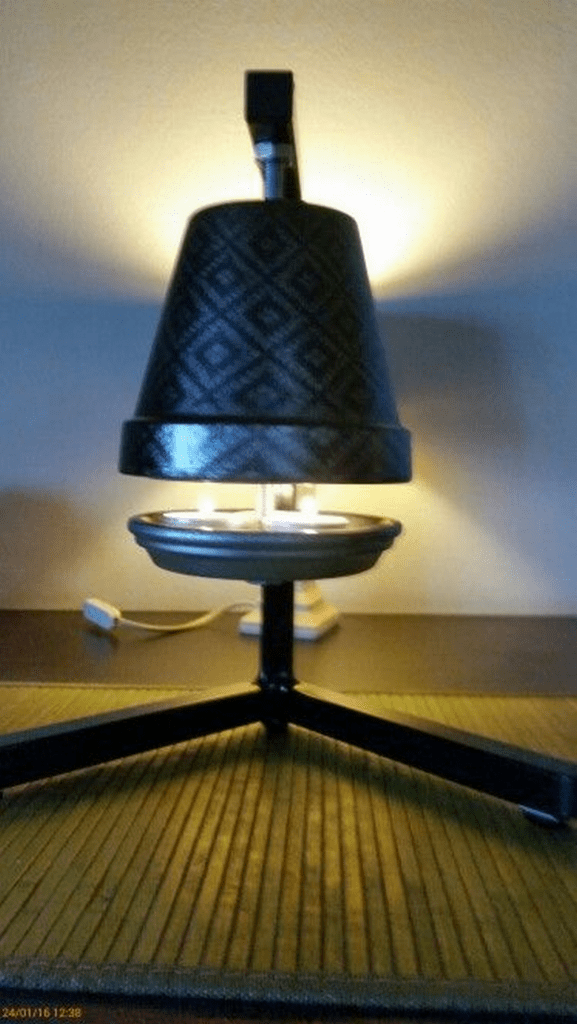
To Ben Galt, they are also a simple way to make a small heater.
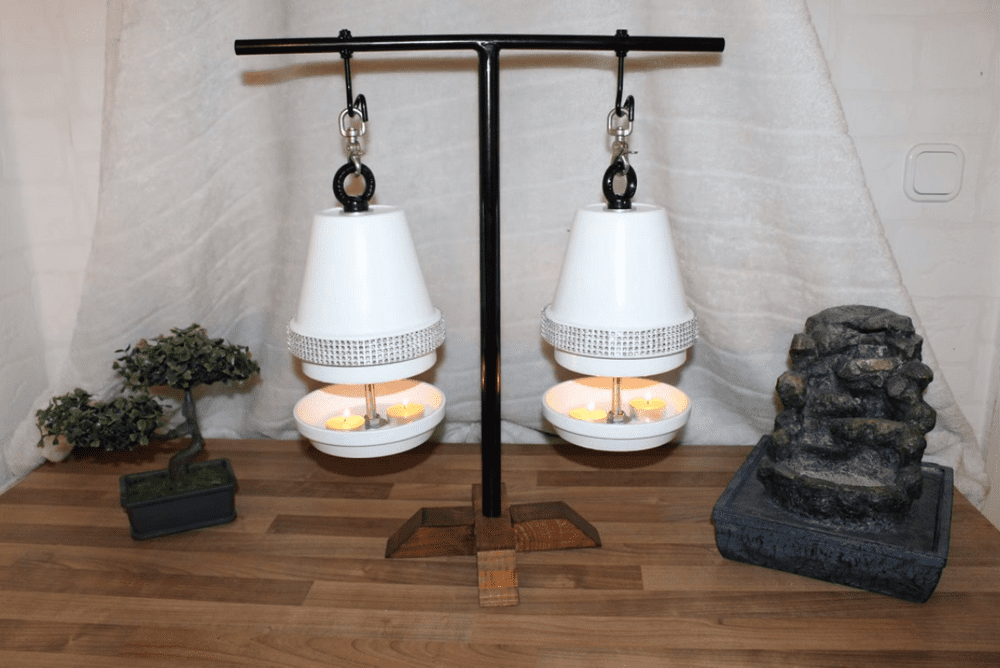
A flower pot heater is a compact device that uses tea light candles and terracotta pots to create gentle radiant heat. It is popular as a low cost DIY project that adds a little extra warmth and a cozy glow to a small area, such as a desk, side table, or reading corner.
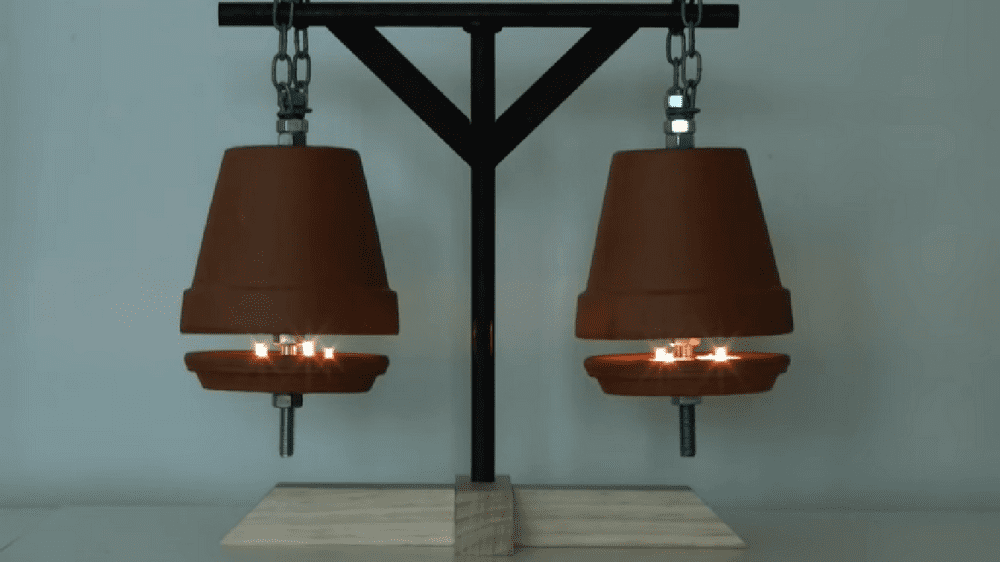
In this version, based on Galt’s design, the pots hang from a stand instead of sitting directly on a table. This helps protect your furniture from heat, makes it easier to adjust the candle height, and improves safety when used with care.
Terracotta is a good material for this project because it absorbs heat from the candles and then slowly releases it into the surrounding air. The result is a small heater that can be both functional and decorative when used correctly and in a well ventilated room.
Important: A flower pot heater is only meant for gentle local warmth. It is not a safe replacement for central heating or a main source of heat in an emergency. Always use it with care, good ventilation, and never leave it burning unattended.
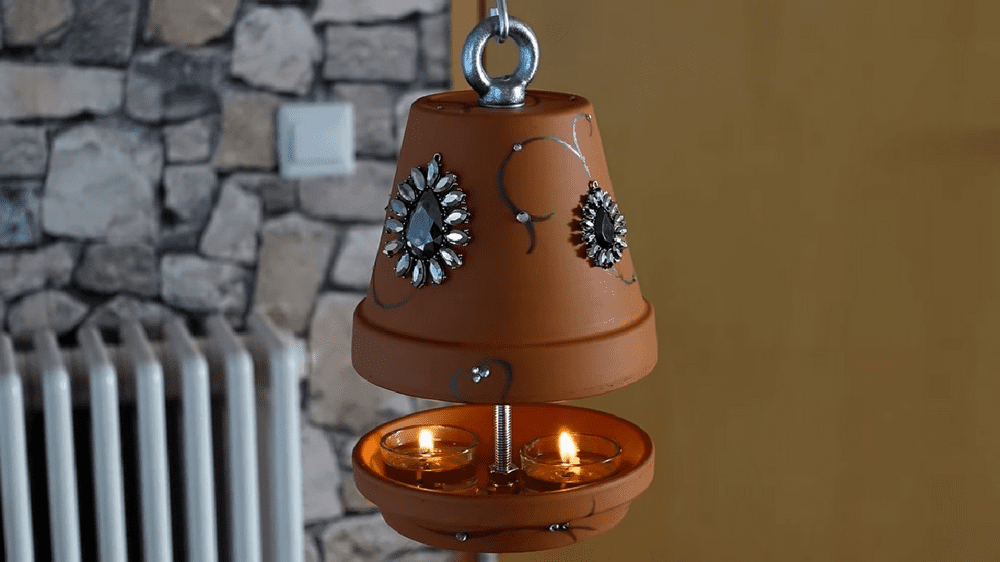
These flower pot heaters are functional and decorative in nature.
Contents
- 1 Flower Pot Heater At A Glance
- 2 Would You Like To Have One Of These Pot Heaters For The Winter?
- 3 Building a Flower Pot Heater
- 3.1 What Materials Are Needed to Build a Flower Pot Heater
- 3.2 What Tools Are Needed for This Project
- 3.3 How to Build a Flower Pot Heater: Step-by-Step Instructions
- 3.4 Safety Guidelines And Precautions
- 3.5 Placement Of The Flower Pot Heater
- 3.6 Monitoring The Flower Pot Heater
- 3.7 Using Suitable Candles
- 3.8 Adequate Ventilation For The Flower Pot Heater
- 3.9 Handling And Maintenance
- 3.10 Emergency Preparedness
- 3.11 Flower Pot Heater FAQ
- 4 Conclusion
Flower Pot Heater At A Glance
- Main use: Gentle, local warmth and decoration
- Fuel: Standard unscented tea light candles
- Main material: Terracotta flower pots and base
- Build time: Around 1 to 2 hours for most DIYers
- Skill level: Beginner-friendly with basic hand tools
- Best location: Well-ventilated indoor space away from flammable items
- Important: Not a primary or emergency heat source
Would You Like To Have One Of These Pot Heaters For The Winter?
You may have seen other flower pot heater ideas that rest directly on a table or shelf. These can work, but if they run for a long time, the base may get very hot and can scorch or damage the surface underneath.
This design avoids that problem by suspending the heater from a stand instead of letting the hot base sit on your furniture. You can adjust the height of the candles, spin the base to make it easier to place and light them, and limit heat loss by moving the base closer to the pots.
It also looks attractive, which means you are more likely to keep it on display and actually use it.
Would you like to have one of these pot heaters for the winter?
Building a Flower Pot Heater
This design creates a small heater tower using a threaded rod, nuts, washers, and terracotta pots. The assembly hangs from a simple stand, so the hot base does not rest directly on a table or countertop.
What Materials Are Needed to Build a Flower Pot Heater
- 6″ terracotta pot with its base
- 5″ terracotta pot
- 11 link chain (it doesn’t matter how many links there are as long as it’s an odd number)
- 14 1/2 ” nuts
- 11 1/2″ washer
- 1/2″ threaded rod (a 24-inch rod would be good, as you’ll just be using 11-inch each side)
- Tea lights
You will use around 11 inches of threaded rod on each side, so a 24 inch rod is usually enough.
What Tools Are Needed for This Project
- Tape measure
- Hack saw
- Sharpie
- File
How to Build a Flower Pot Heater: Step-by-Step Instructions
Step 1: Prepare The Threaded Rod
- Use the tape measure to find the midpoint of the 24 inch threaded rod. Mark this point with your marker.
- With the hacksaw, cut the rod into two 12 inch pieces.
- If the cut ends are rough or sharp, use the file to smooth them so they are safe to handle and will not damage the pots.
Step 2: Assemble The Base
- Take one of the 12 inch threaded rod pieces and slide a washer onto one end.
- Follow the washer with a nut. Tighten the nut to secure the washer in place. This will form a stop under the base.
- Insert the rod up through the drainage hole in the center of the 6 inch terracotta pot base. The washer and nut should sit under the base, on the bottom side.
- Add another washer and nut above the base and tighten gently so the base feels secure but not stressed.
Step 3: Build The Heater Structure
- Above the base, alternate sliding on a washer and a nut. Tighten each nut as you go so the stack of washers stays stable. This creates air gaps that help control how the heat moves up the rod.
- After adding several nuts and washers to raise the support, slide the 5 inch terracotta pot upside down onto the rod.
- Adjust the nuts and washers so the pot is centered over the base. You want space underneath the pot so warm air from the candles can collect and heat the terracotta before it slowly radiates out.
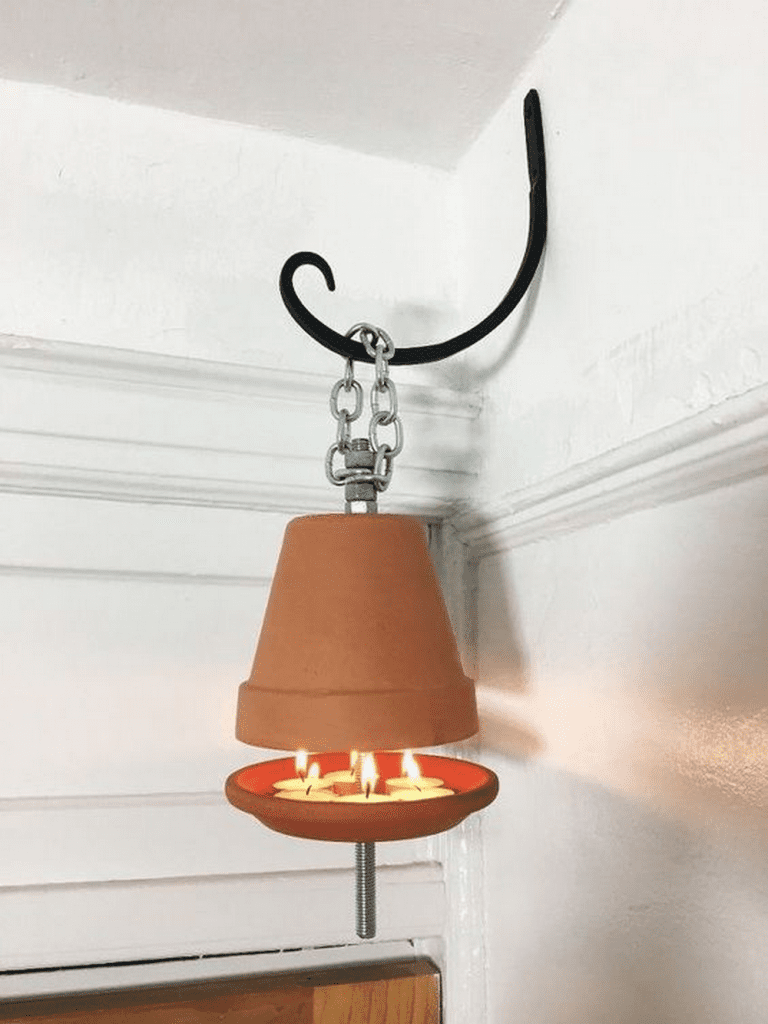
Step 4: Attach The Chain
- At the top of the threaded rod, add a washer and nut to act as a support point.
- Hook one end of the 11 link chain over the rod and hold it just above the top nut.
- Slide another washer down over the chain and secure it with a nut so the chain is clamped between two washers. Tighten firmly.
- The chain will be used to hang the heater from a stand or ceiling hook. You can choose which link you hang from to adjust the height.
Step 5: Install The Tea Lights
- Place unscented tea lights inside the terracotta base. Most bases can hold several tea lights, depending on their size.
- Set them in a neat group under the center of the pot so the heat rises evenly.
- Start with a small number, such as three or four, and only add more after you see how much heat the setup produces.
Step 6: Hang The Heater
- Choose a suitable and safe location to hang your flower pot heater. It should be away from curtains, paper, fabric, and other flammable materials, and out of the path of pets and children.
- Use a strong hook or bracket that can safely support the weight of the pots and stand. Follow the weight rating of any hardware you use.
- Hang the heater by one of the links in the chain and check that it sits level and does not swing easily. You can try different links if you want to change the height above the table or floor.
Step 7: Test Your Heater
- Light the tea lights carefully and observe the heater. In a few minutes, the terracotta pots should begin to feel warm as they absorb and then radiate heat.
- Stay nearby for the first full burn and watch for any problems, such as unstable movement or surfaces that get too hot.
- Make small adjustments to the number of candles, the gap between the base and the pot, or the hanging height until you are happy with the balance of warmth and safety.
Click on any image to start the lightbox display. Use your Esc key to close the lightbox.


Looking for a way to add a bit of extra warmth to your home this winter? A flower pot heater is a simple and charming project that most people can build with basic tools. You can also watch the video that inspired this design for a visual walk through, then use our written steps and safety notes as a quick reference.
Safety Guidelines And Precautions
In the colder months, a flower pot heater can be a clever and attractive way to add a little extra warmth to your home. However, like any project that involves open flame and heat, you must follow safety precautions very carefully.
Use the following basic safety guidelines whenever you use a flower pot heater.
Placement Of The Flower Pot Heater
Always use your flower pot heater over a heat resistant, non flammable surface. Avoid wooden tables and any surface that can burn, melt, or be damaged by heat.
Make sure the heater is stable and cannot be knocked over easily. Keep it away from edges where a bump might make it fall.
There should be no flammable items near the heater, such as paper, curtains, bedding, clothing, or soft furnishings. Keep a clear space around it on all sides and above.
Monitoring The Flower Pot Heater
Never leave a flower pot heater burning unattended. Stay in the room while it is running so you can spot any problems quickly.
Always blow out all candles before you go to sleep, leave the room for a long time, or leave the house. A few extra seconds to put out the flames is worth the peace of mind.
Check the heater from time to time while it is in use. Feel the area around it to make sure nearby surfaces are not getting too hot.
Using Suitable Candles
Choose candles that fit your heater and are safe for indoor use. Unscented tea lights that sit flat in the base are the best choice.
Avoid tall candles that may tip, drip, or burn unevenly. Also avoid heavily scented candles. They can produce more soot and may release chemicals you do not want in a small space.
Make sure the tea lights are still in good shape. If the metal cups are bent or damaged, replace them before use.
Adequate Ventilation For The Flower Pot Heater
Good ventilation is essential any time you burn candles indoors. Candles use oxygen and produce carbon dioxide and other gases.
Use the heater only in a room that has some fresh air flow. You can open a window slightly or keep a door ajar to allow air to move.
Never use a flower pot heater in a closed, air tight room. This is unsafe for both fire and air quality.
Handling And Maintenance
Terracotta can stay hot for a long time after the candles are blown out. Always treat the pots with care, especially while the heater is running or just after you have turned it off.
Use gloves or a thick cloth if you need to touch or move the heater. Do not try to move the heater while the candles are still burning unless you have no other choice.
Check the pots and hardware regularly. Look for cracks in the terracotta or loose nuts and washers. Damage can weaken the structure and make it unsafe. Replace any parts that show wear or breakage.
Emergency Preparedness
Keep a small fire extinguisher or fire blanket nearby when you use your flower pot heater. Read the instructions on the extinguisher so you know how it works before you need it.
Make sure everyone in the household understands that the heater is not a toy. Explain the rules for using it, including never touching hot parts and not playing with the candles.
If anything goes wrong, act quickly. Put out the candles, turn off any other flames in the area, and deal with the problem before starting again.
Following these safety guidelines will help you enjoy the warmth and atmosphere of a flower pot heater without taking unnecessary risks. Correct placement, careful monitoring, and regular maintenance are the keys to safe use.
Flower Pot Heater FAQ
- Is a flower pot heater safe to use indoors?
- A flower pot heater can be used indoors only with great care. It must be kept away from flammable materials, watched at all times, and used in a well ventilated room. It should never be treated as completely safe or left burning unattended.
- How much heat does a flower pot heater produce?
- A flower pot heater produces gentle local warmth. It can make a nearby area feel more comfortable, but it does not have enough output to heat a whole room or house. Think of it as a small comfort, not as a full heating system.
- How long can I run a flower pot heater?
- Most tea lights burn for about three to four hours. You should still check the heater often while it is running. Let the pots cool fully between long sessions so they are not under constant heat stress.
- Can I use a flower pot heater during a power outage?
- You can use a flower pot heater during a power outage for a bit of light and a small amount of warmth. However, it should not be your main heat source in cold weather. Always have a safe, approved backup heating plan for emergencies.
- What rooms are best for a flower pot heater?
- Use a flower pot heater in a room with some fresh air flow and enough space around it, such as a living room or dining area with a window or door. Avoid small, closed rooms, children’s bedrooms, or spaces with a lot of fabric and clutter.
Conclusion
During cold weather, a flower pot heater can be a low cost way to add gentle warmth and a cozy glow to a small area. The design is straightforward, the materials are easy to find, and the project is suitable for most people with basic DIY skills.
Used carefully, it serves as both a small heat source and an attractive decorative piece. The limited fuel use and simple parts also make it appealing for anyone who wants to reduce energy use where possible.
If you enjoy this project, you might like to explore other creative heater ideas as well. Take a look at our combined patio heater and pizza oven project for another way to stay warm and cook outdoors at the same time.
We have more amazing heater ideas. Check out our patio heater and pizza oven project!