Last Updated on June 16, 2025 by teamobn
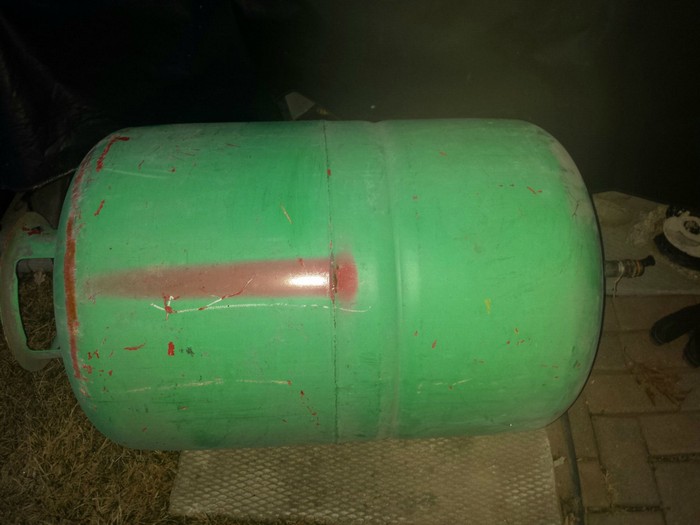
If you have access to old propane tanks, you can easily create your own DIY pizza oven. This is a great project for anyone who loves to cook outdoors, and it’s sure to impress your friends and family. Plus, it’s a fun and relatively easy project that you can complete at a weekend.
We’ve featured a propane tank turned pizza oven project before, but this one is a simpler and easier project to do. It involves minimal modification, which is great, especially for first-time steel/metal DIY-ers. This is a great option for those who are looking to do a little bit of steel or metal work but don’t want to commit to a large project.
The whole process of this propane tank pizza oven is much simpler and quicker than other methods, such as welding, and can be done with just a few tools. Plus, it’s much more economical than other methods, making it a great option for those on a budget.
The propane tank pizza oven is the perfect size for portability and space-saving. It is easy to carry or move around, making it a great option for those who want to enjoy pizza without taking up a lot of space. With its easy-to-use features and compact design, the propane tank pizza oven is a great choice for anyone looking for a convenient and affordable way to enjoy delicious pizza.
Have you ever wanted to have a pizza night in your own backyard? Well, now you can with this easy and affordable upcycling project. All you need is an old propane tank and a few other supplies that you can find at your local hardware store. Head over to the tutorial linked below and you’ll be on your way to making your very own backyard propane tank pizza oven. So what are you waiting for? Get started today!
Remember: When choosing materials to build a cooking surface with, it is important to select materials that will not contaminate your food. Galvanized steel and regular paint can both leach harmful chemicals into food, so it is best to avoid using them.
Instead, opt for materials that are food-safe and will not pose a risk to your health. When in doubt, always consult with someone who is knowledgeable about the subject, or research and validate from various sources. This will help ensure that you are making the best decision possible.
You’ll need these materials:
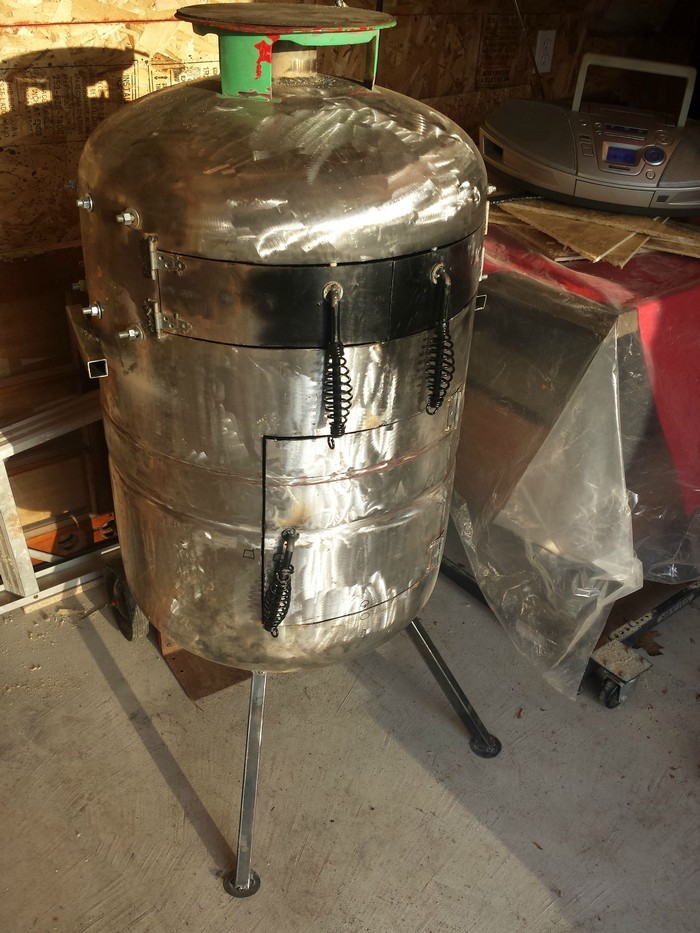
- Old Propane Tank
- Hinges
- Scrap Steel (for legs)
- 3″ Steel Pipe
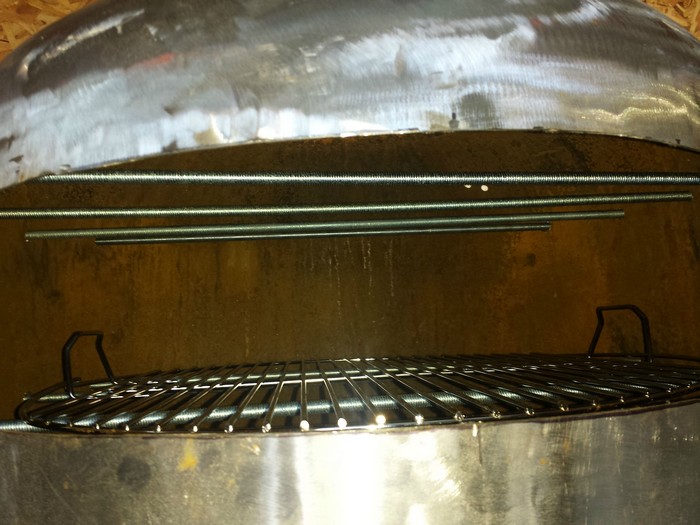
- Steel Rods (not galvanized)
- Welding Hammers
- High-Temperature Grill Paint
And these tools:
- Angle Grinder
- Welder
- Cordless Drill
Steps to make a propane tank pizza oven:
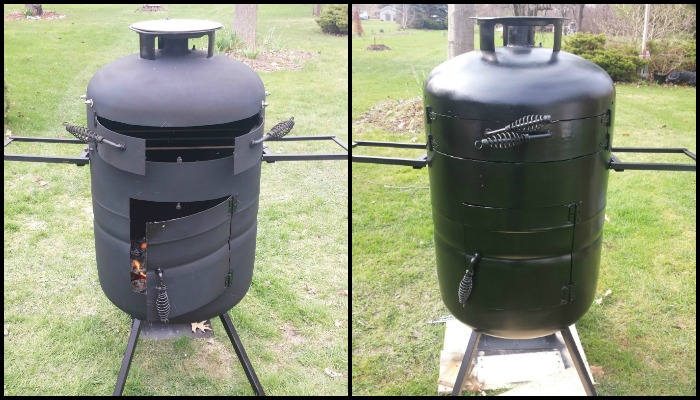
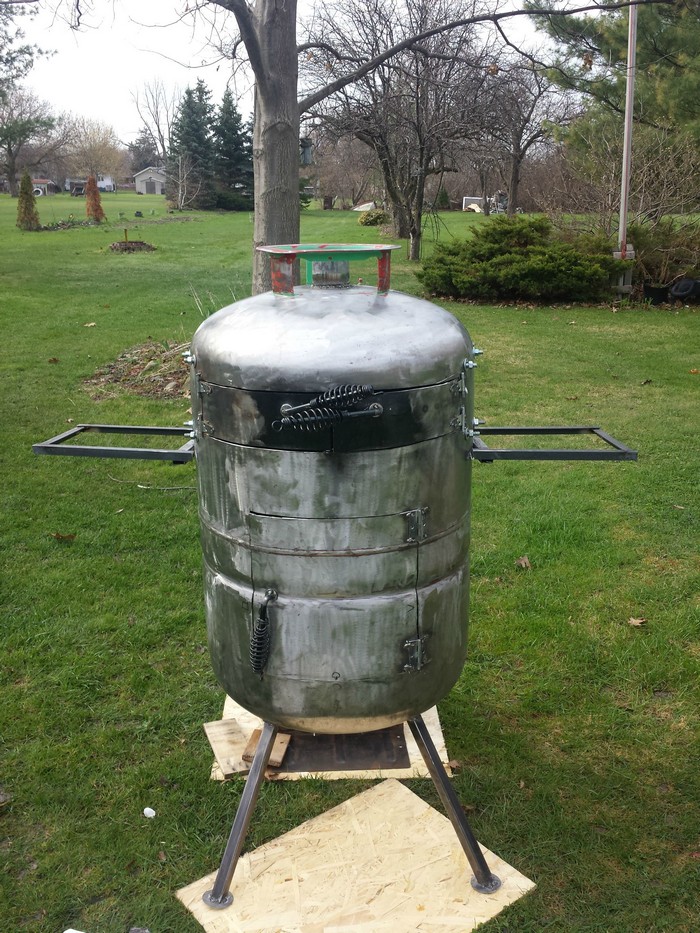
- Ensure the propane tank is empty and purged of any residue. Put on safety goggles and gloves.
- Use the angle grinder to strip all paint off the tank. Move in a steady circular motion until bare metal shows.
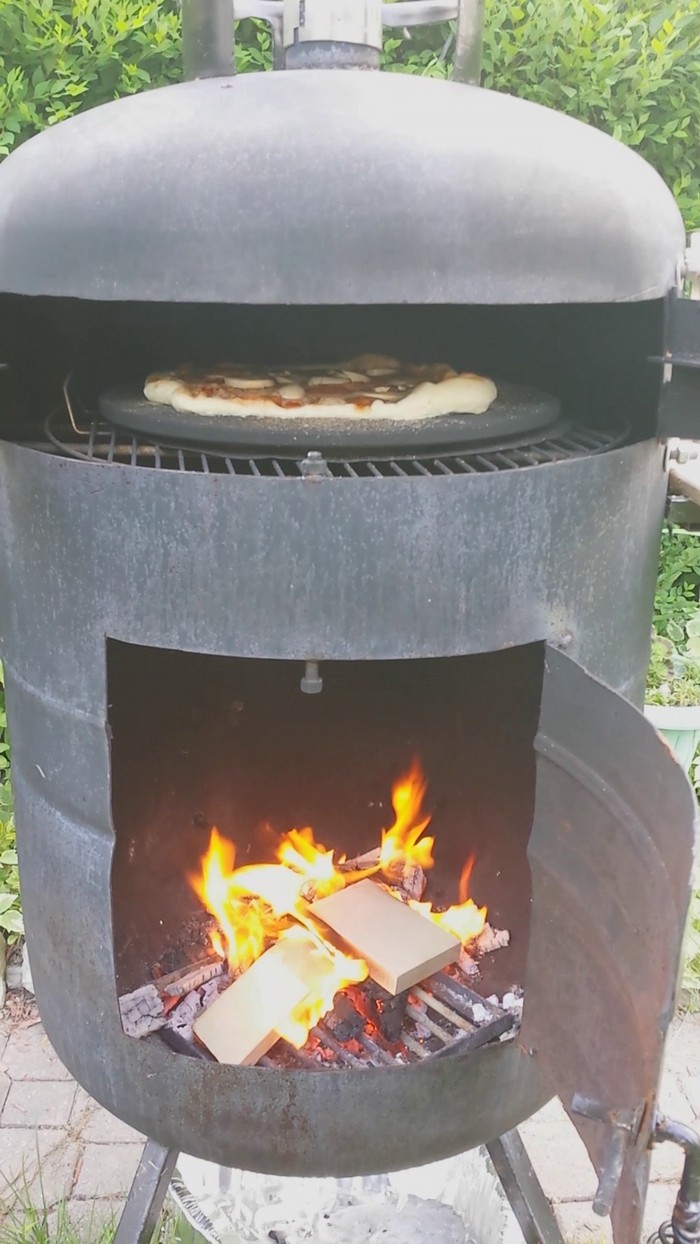
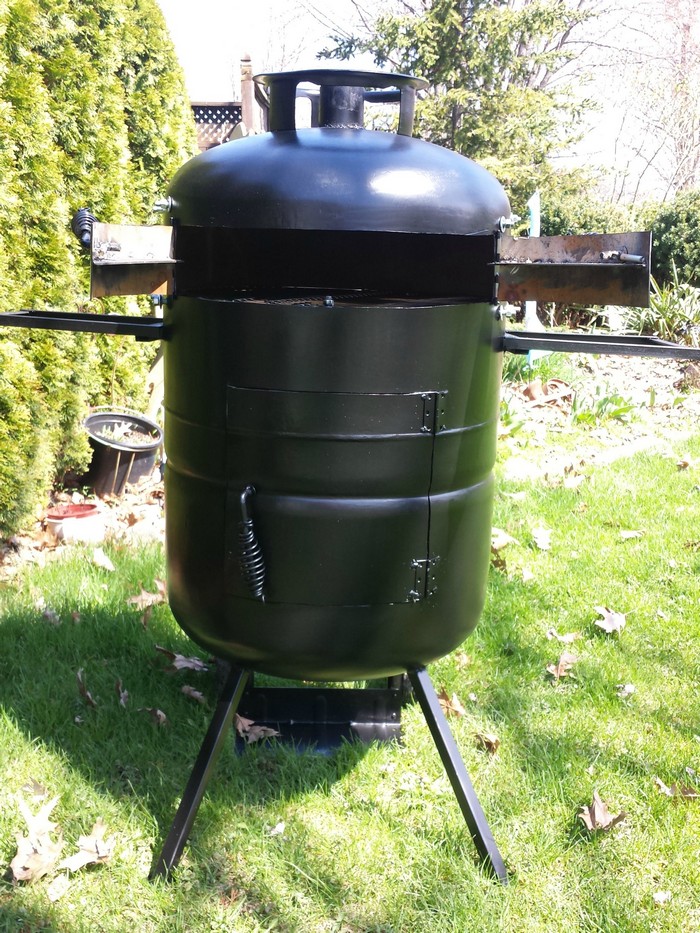
- Lay the tank on its side and mark two door openings with a center punch. One must fit your pizza stone. The other must let you add firewood.
- Cut along your outlines with the angle grinder. Smooth each edge with a file.
- Drill hinge-mounting holes on each door edge using the cordless drill.
- Attach doors with hinges. Reinforce each hinge with a short steel rod.
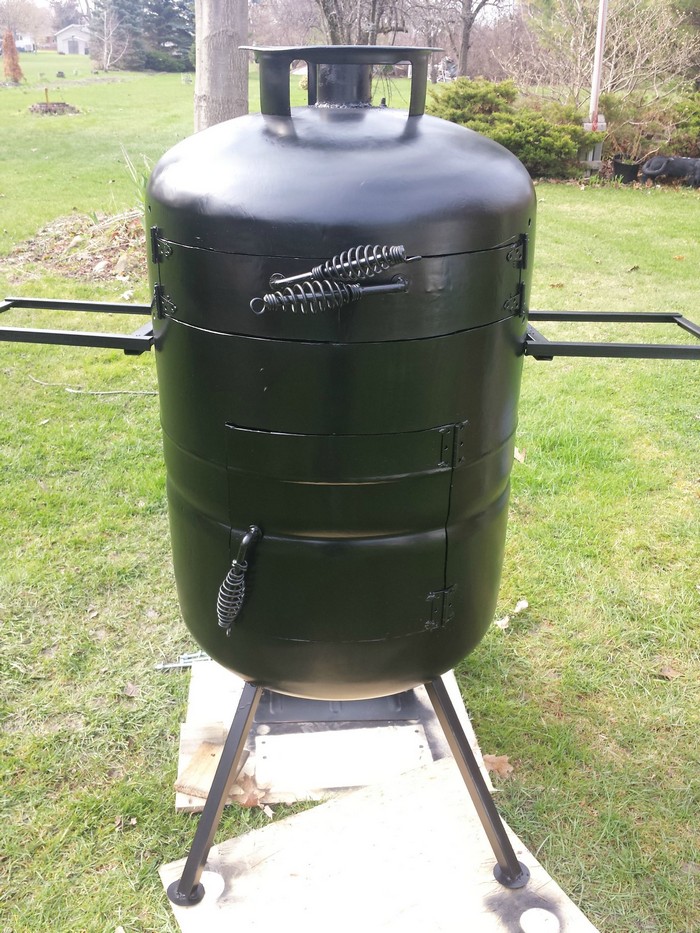
- Mark a round exhaust hole on top of the tank. Cut it out with the angle grinder.
- Insert the 3″ steel pipe into the exhaust hole. Weld it firmly in place. Use welding hammers to clear slag and seal the joint.
- Measure and mark three leg positions under the tank. Weld scrap steel pieces to serve as legs. Check that the oven sits level.
- Inside the oven chamber, weld steel rods horizontally at the right height to support your pizza stone.
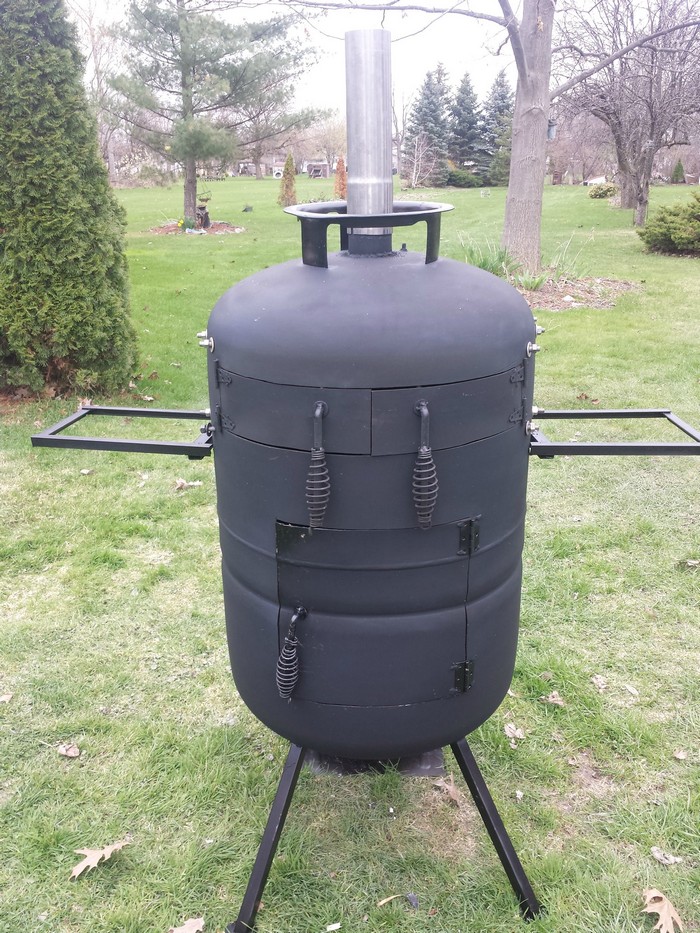
- Clean the entire oven with a wire brush. Apply high-temperature grill paint in thin, even coats.
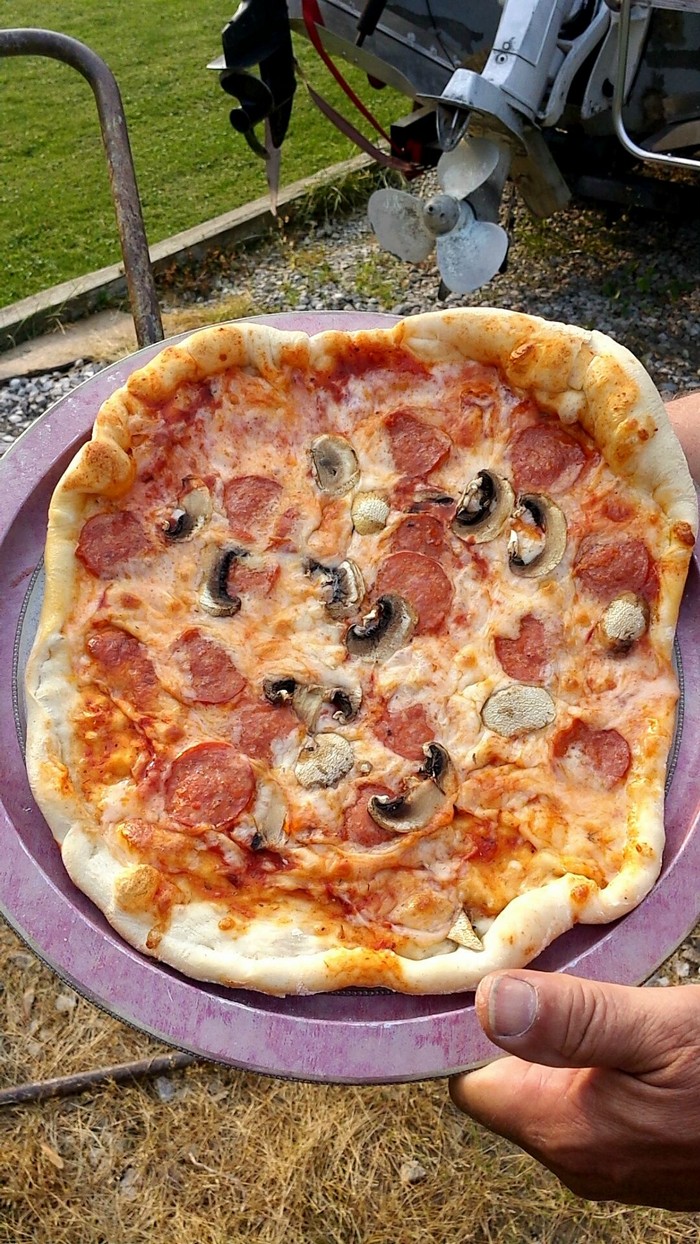
- Let the paint cure fully per the manufacturer’s instructions. Preheat your oven and start baking.
Contents
Safety Considerations for Propane Pizza Ovens
A propane pizza oven demands careful safety measures to protect you, your guests, and your equipment. Small oversights can lead to serious accidents or equipment damage.
Inspecting and Preparing the Propane Tank
Before you begin, inspect your propane tank carefully. Check the tank body for dents, rust, or corrosion. Look closely at seams and welds for cracks or pitting. If you spot damage, do not use the tank. Refer to the tank’s certification stamp for expiry dates. Make sure valves and connectors are clean and free of debris. Replace any worn or faulty parts at a certified service center. A well maintained tank cuts the risk of leaks, fires, and serious accidents while cooking.
Proper Equipment and Protective Gear
Handling hot metal and open flames demands the right gear. Wear heat resistant gloves and sturdy work boots. A face shield or safety goggles will shield you from sparks and flying debris.
When you weld or assemble your oven, wear long sleeves and flame-resistant clothing. Avoid loose or synthetic fabrics that can catch fire. Keep a fire extinguisher rated for gas fires within arm’s reach. Good gear keeps you safe when sparks or flare-ups occur.
Safe Placement and Stable Surface
Choose a flat, non-flammable surface for your oven. Concrete pavers or a fire-resistant mat work well. Keep the oven at least two feet away from structures and combustible items. Position it away from overhanging branches and low roofs.
You’re less likely to start a fire when you allow ample clearance. Ensure the legs are level and the oven cannot wobble. A stable base prevents tipping and lets you slide pizzas in and out without sudden shifts.
Leak Detection and Valve Checks
Leaks can be deadly if left undetected. Apply a soapy water solution around all connections and valves. Watch for bubbles to form if gas is escaping under pressure. Never test for leaks with an open flame.
Tighten or replace parts that fail this test. Inspect the flexible hose for cracks or bulges. Check regulator pressure readings for consistency. A steady reading plus no bubbles means your system is sealed and safe for cooking.
Emergency Shutdown Procedures
Even with precautions, you should know how to shut off gas fast. Locate and practice turning the tank valve before firing up the oven. Keep a crescent wrench nearby in case you need to isolate the tank quickly.
If you smell gas, shut off the valve immediately and let the odor dissipate. Do not relight igniters until you’re sure the smell is gone. Call a professional if the odor persists. A clear shutdown plan eases panic during emergencies.
Insulating Your Oven for Better Heat Retention
Effective insulation improves heat retention and cooking consistency in propane pizza ovens. A well insulated oven heats faster, cooks more evenly, and uses less fuel during each bake.
Choosing Insulation Materials
Selecting the right insulation is key for performance. Ceramic fiber blanket, mineral wool, and high-temperature ceramic board are top options. Ceramic fiber blankets wrap the oven chamber and handle 2300°F.
Mineral wool boards resist compression under weight. Ceramic boards line floors for a firm cooking surface. Compare R-values and max temperature ratings before you buy. Avoid fiberglass or foam that can off-gas at high heat. Use materials labeled safe for kilns or ovens for durability.
Applying Ceramic Fiber Blanket
Wrapping your oven in ceramic fiber blanket is simple and effective. Cut the blanket to fit around the dome and walls. Leave a small gap at seams for thermal expansion. Secure it with stainless steel wire mesh or metal straps.
Tuck edges neatly to avoid gaps that let heat escape. The fiber layer traps hot air close to the walls and reduces fuel use. Follow manufacturer guidelines on maximum thickness for safety. Seal any loose ends with high-temp tape if needed.
Creating a Double-Wall Chamber
Building a double wall helps trap heat between layers. Construct an inner dome of steel or refractory bricks. Build an outer shell from scrap steel or metal. Leave a uniform gap for insulation between the two walls.
Fill the cavity with loose ceramic fiber or refractory mix. This thermal barrier slows heat loss and protects the outer shell from extreme temperatures. Use sheet metal rivets or welds to hold both layers together. A double wall yields a more stable cooking environment.
Sealing Gaps and Joints
Even small gaps can let heat escape quickly. Inspect seams around doors, exhaust pipe, and wall joints. Use high-temperature fire clay or gasket tape to seal cracks. Press clay firmly into gaps before it cures.
Apply gasket tape around the door frame for a snug fit. Replace seals if you notice wear or cracks. A tight seal keeps more heat inside and improves cooking consistency. Check seals before each pizza night for best results.
Evaluating Thermal Performance
After insulation, test your oven’s heat retention. Light a small fire and monitor how fast temperature rises. Use an infrared thermometer for quick surface readings. Note how long it takes to reach cooking temperature.
Let the fire burn out and measure how long the oven holds heat above 500°F. A well insulated oven maintains heat for hours and uses less propane. Track fuel usage over multiple tests and adjust insulation as needed.
Propane Pizza Oven Gallery
Click on any image to start the lightbox display. Use your Esc key to close the lightbox.![]()
Ventilation and Draft Control
Proper ventilation and draft control ensure efficient combustion and stable heat management in propane pizza ovens. Balancing airflow prevents smoke buildup, optimizes flame, and delivers consistent cooking results.
Designing the Exhaust Chimney
Your chimney must remove smoke and hot gases effectively. Aim for a diameter matching your exhaust pipe to keep flow smooth. Too small a chimney causes back pressure and smoke spills. Install the chimney at the top center of the dome. Use 3″ steel pipe with a rain cap to keep moisture out.
Extend it at least 12 inches above the oven body. Weld the base securely and seal with high-temp silicone. A well designed chimney boosts oven performance.
Adjusting Air Intake Vents
Control fresh air with adjustable intake vents low on the oven body. Drill three equally spaced holes and fit sliding vent plates. Open vents fully to start your fire and close slightly once you reach temperature.
Partially closing vents reduces fuel burn and keeps heat steady. Fine tune vent positions to maintain a steady blue flame. You’re adjusting oxygen flow to match your heat needs. Simple vent control lets you shift from roaring blaze to gentle bake.
Monitoring Draft During Cooking
Keep an eye on flame behavior and exhaust flow while cooking. A strong, blue flame signals good combustion. Yellow or orange flames can mean low oxygen or dirty burners. Watch smoke color too, light grey is normal at startup.
Thick, dark smoke later on suggests poor draft or blocked vents. Use a heat gun to spot cold spots near the dome. Adjust vents or add small wood sticks to improve airflow. Consistent draft equals predictable cooking results.
Preventing Backflow and Smoke
Backflow happens when wind or cool air blocks the chimney and pushes smoke back. To stop it, fit a chimney cap with a rotating cowl or draft inducer. These spin with wind and force exhaust upward.
Position your oven away from walls or overhangs that cause turbulence. Keep nearby vegetation trimmed to reduce drafts. You can also add a spark arrestor to catch flying embers. These tweaks ensure smoke exits your oven the right way.
Enhancing Airflow with Adjustable Dampers
Adding dampers gives you fine control over heat and oxygen flow. Install a slide damper in the exhaust pipe for quick adjustments. Slide it closed slightly to raise internal temperature fast. Open it wider to cool the chamber more quickly.
Use a thermometer to gauge the effect of each change. Label damper positions for easy reference during cooking. Dampers help you switch from high heat pizza to low heat baking seamlessly.
Conclusion
Building a propane pizza oven is a rewarding project. You’ll turn an old tank into a functional outdoor oven. Good insulation and draft control keep heat steady. Safe construction lets you cook worry free. Now you’re ready for delicious pizza nights with friends.
We have different kinds of pizza ovens. Check out our exercise ball pizza oven guide next!