Last Updated on December 8, 2025 by teamobn
When you work with wood, it is always nice to find good pieces of lumber that you can save for later projects. But a growing pile of boards on the floor quickly turns into a mess.
A simple DIY lumber rack solves that problem. It keeps your wood off the ground, organized by size, and easy to reach. This guide shares several lumber rack ideas for small workshops and garages. You will also learn how to store lumber to prevent warping and damage, and how to choose the best lumber rack style for your space.
Contents
Quick Answer:
In a small workshop, the best lumber racks are usually wall‑mounted racks, vertical storage, or a compact rolling lumber cart. Wall‑mounted racks save floor space and keep boards off damp concrete. Vertical racks work well for long boards in narrow spots. A rolling cart is ideal if you want to move lumber between tools and keep everything within easy reach.
If your garage or workshop is full of random piles of boards, this page will help you clean it up and work more safely.

Why You Need a Lumber Rack in Your Workshop
A disorganized lumber pile is more than an eyesore. It can be a real safety hazard. Loose boards on the floor create trip hazards that can lead to serious falls and injuries.
Stacked lumber can roll, slide, or tip over if it is not supported properly. You also waste time digging through messy piles to find the right size board.
A good lumber rack:
- Keeps wood off the ground and out of damp areas
- Lets you sort boards by length, thickness, or species
- Makes it easy to see what you have at a glance
- Reduces warping and other damage
- Helps you move lumber around the shop without hurting your back
Before you start building anything, it’s helpful to consider your space. If you have a small workshop, you may want to look at wall-mounted racks or rolling lumber carts. If you have high ceilings, a vertical or ceiling-mounted rack might work best.
We tested these lumber rack ideas in real single car garages and small backyard workshops, so they are practical solutions, not just clever drawings.
DIY Lumber Rack Ideas for Small Workshops
A rolling rack is just one way to store wood. Here are more smart lumber rack ideas, and when they work best.
Click on any image to start the lightbox display. Use your Esc key to close the lightbox. ![]()
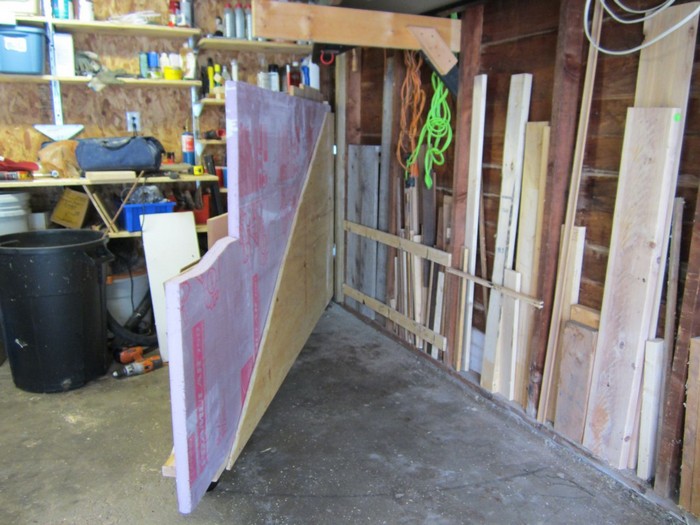
Swing-Out Plywood Storage
Swing-out plywood storage uses panels or frames that pivot from a wall or post. Each panel holds sheet goods or boards and can be swung out of the way when not needed.
- Best for: Storing plywood and sheet goods in a narrow space
- Pros: Uses wall space efficiently and keeps sheets upright and easy to reach
- Watch out for: Heavy sheets put a lot of strain on hinges and supports, so hardware must be strong and well-anchored
You can build this system using strong hinges, 2 x 4 frames, and solid wall anchors.

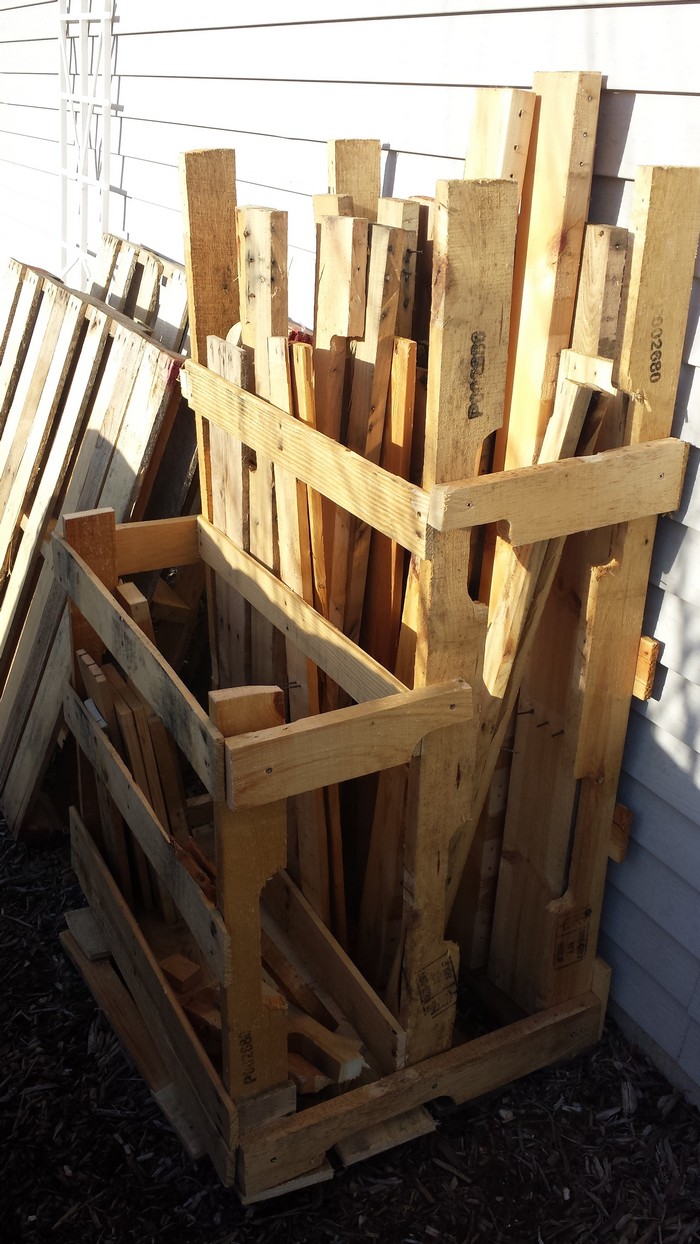
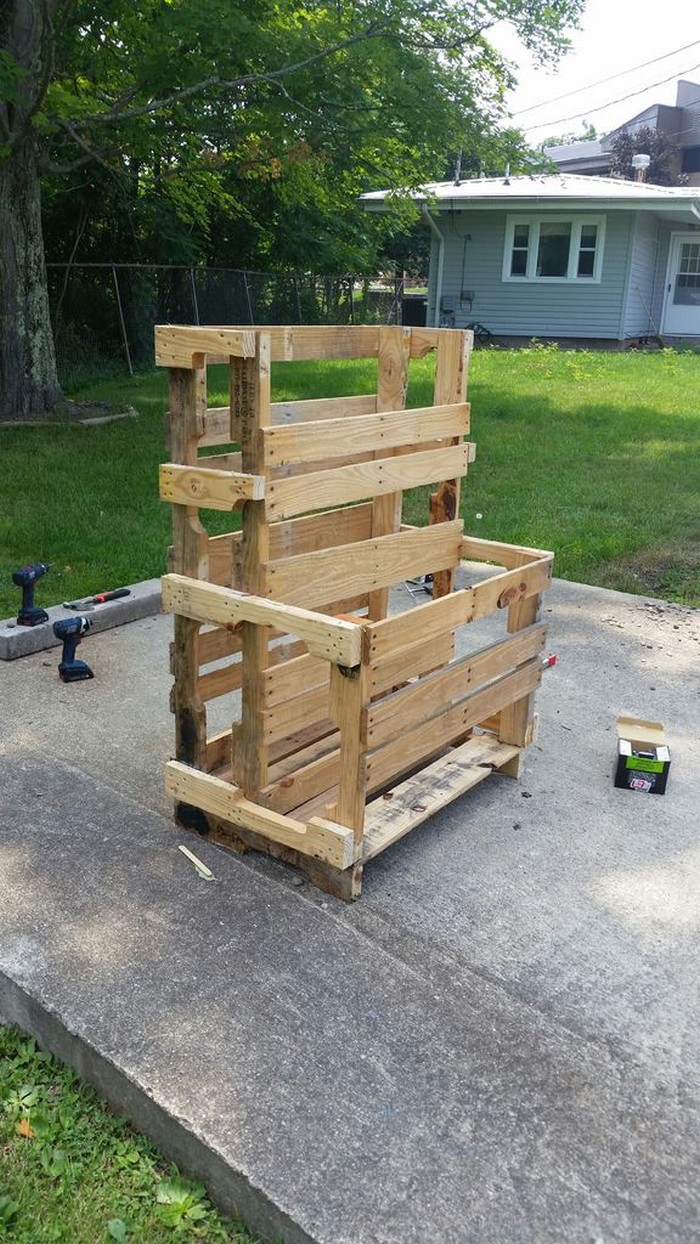
DIY Pallet Wood Storage
Old pallets can become a simple and cheap lumber rack. By standing pallets upright or screwing several together, you can create slots that hold boards and offcuts.
- Best for: Budget-friendly storage and scrap wood
- Pros: Easy to build from recycled materials, customizable, can be set on casters
- Watch out for: Some pallets are rough and may contain nails or staples, so take care when handling
Adding wheels to the bottom turns a pallet rack into a basic rolling storage cart.

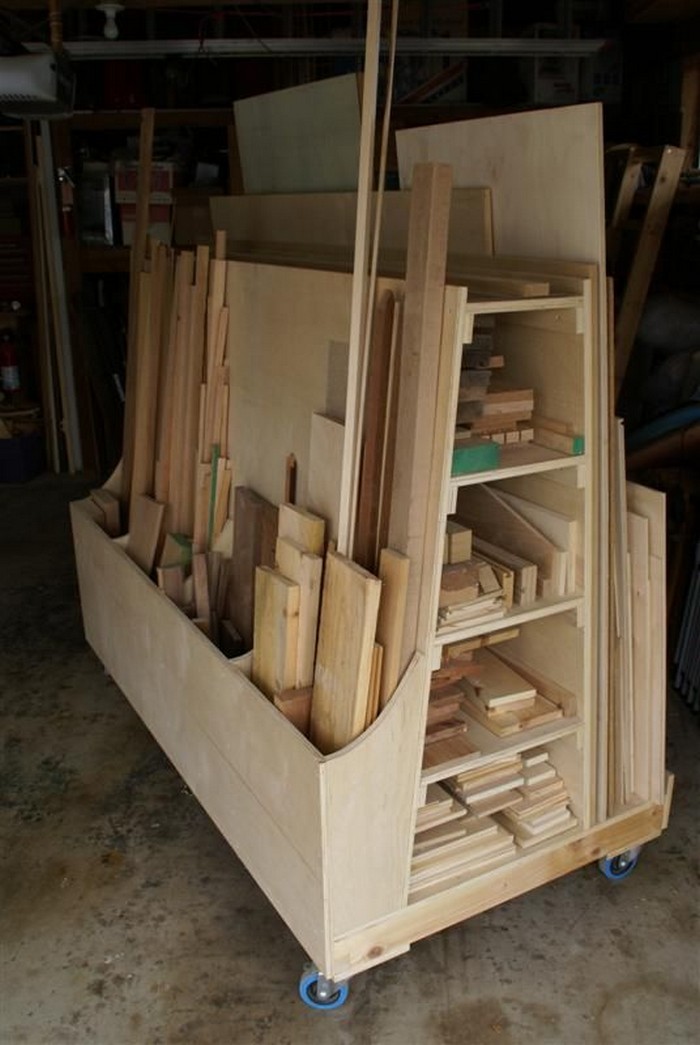
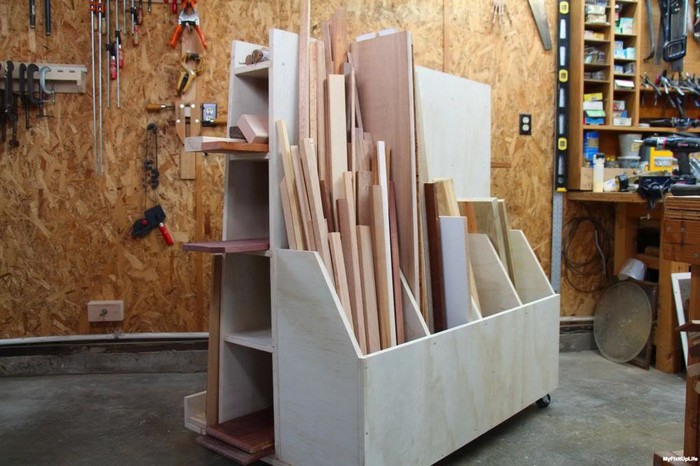
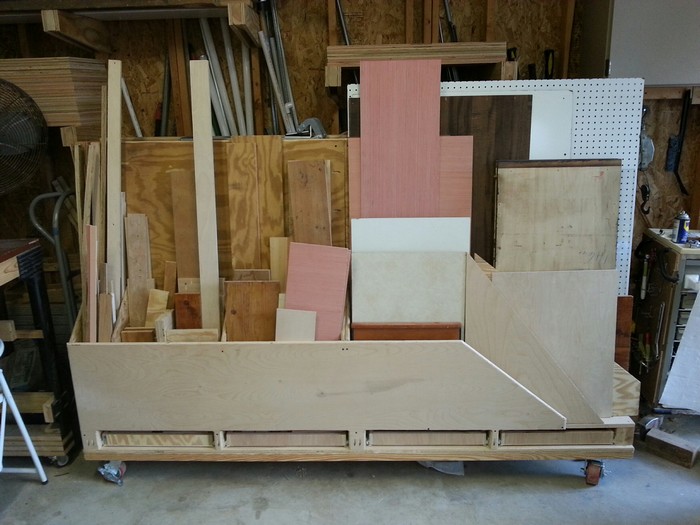
Lumber Storage Cart
A lumber storage cart is very similar to the rolling rack described earlier. Many designs have angled shelves and a vertical section for long boards.
- Best for: Medium and large workshops where you regularly move wood between tools
- Pros: Mobile, can hold long boards and offcuts, easy to reorganize
- Watch out for: Takes up floor space and requires heavy-duty casters to support the load
Think about your doorway widths before building so the cart can move freely.
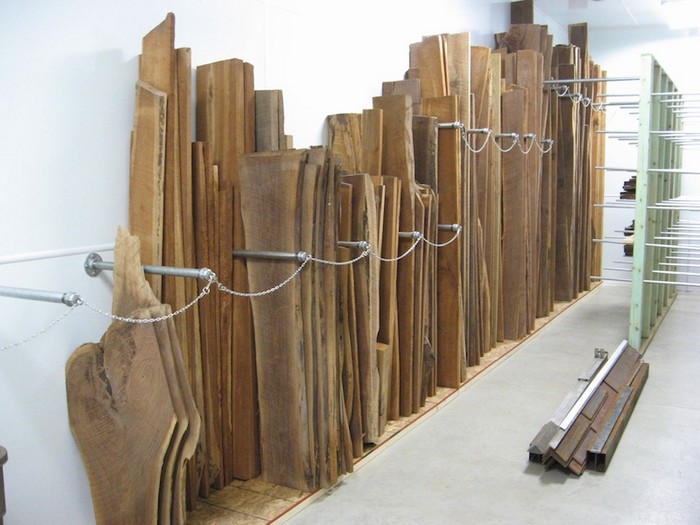
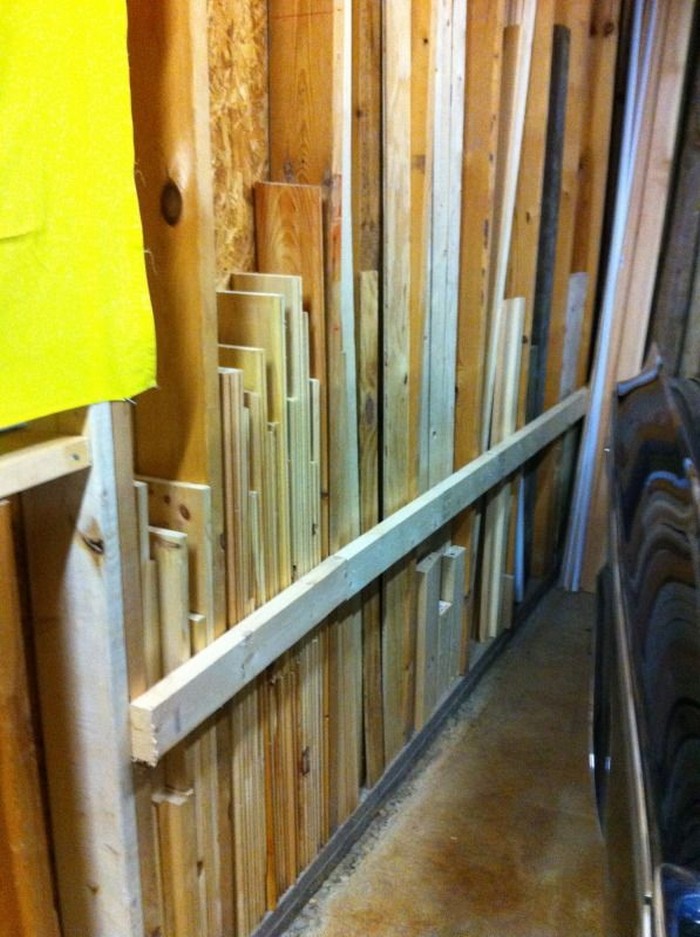
Vertical Lumber Storage
Vertical storage keeps boards standing upright instead of lying flat. You can build a simple frame that holds the bottom ends of boards and supports them as they lean against the wall.
- Best for: Long boards in narrow shops and garages
- Pros: Uses wasted wall space, easy to see and grab individual boards
- Watch out for: Boards can tip if not supported correctly, so keep them at a slight angle against a strong backing
Chains or horizontal bars can help keep the tops of the boards from falling forward.
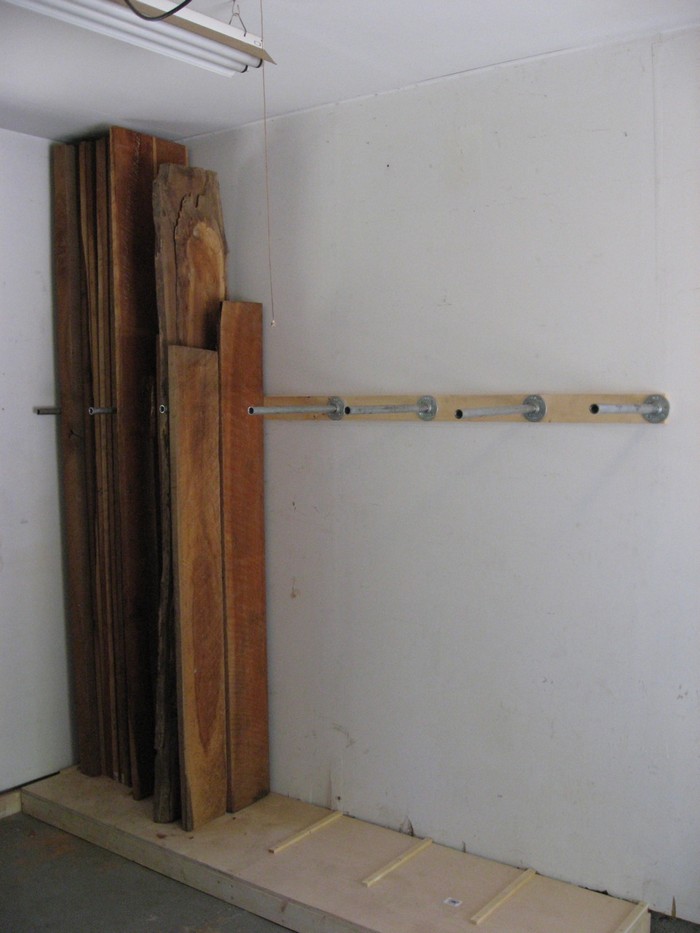
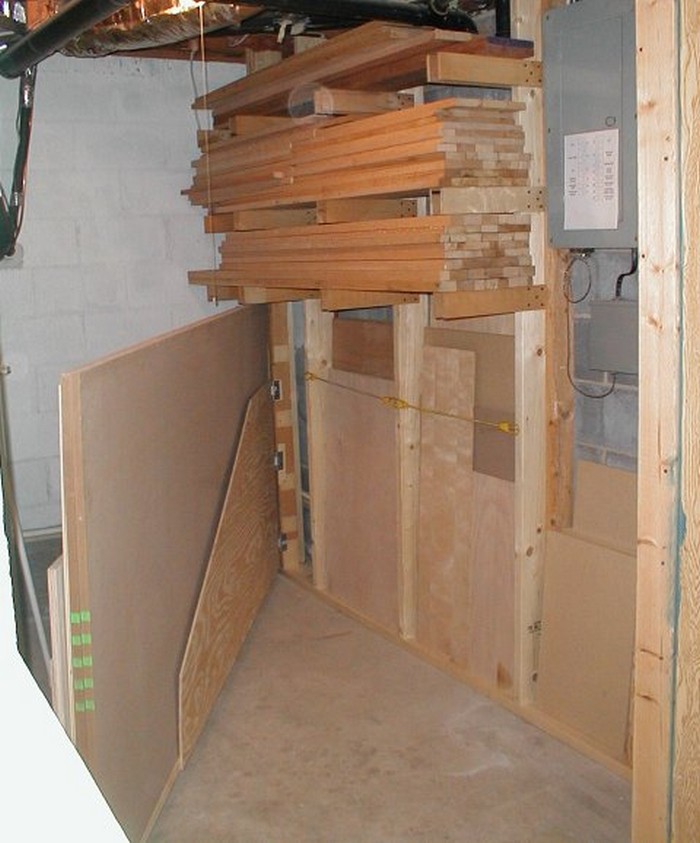
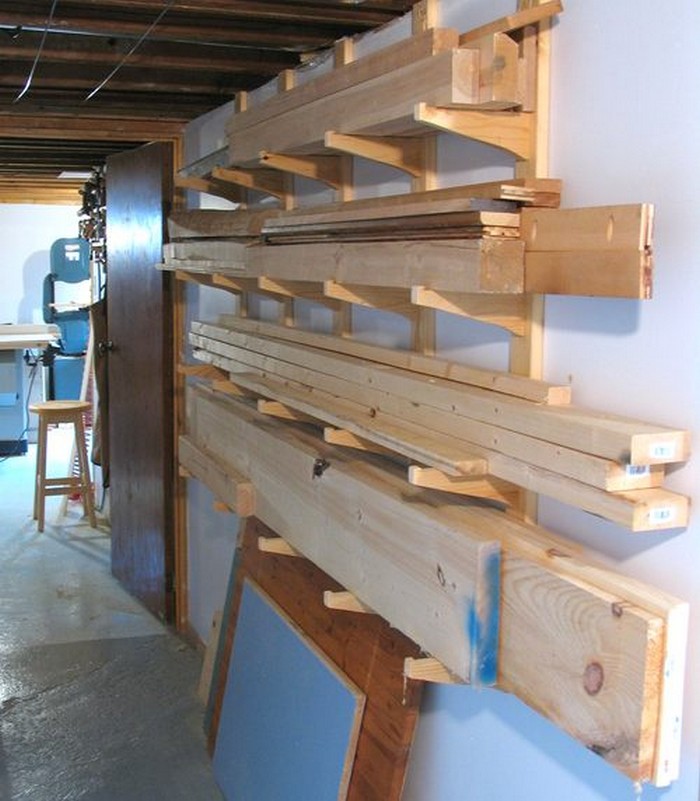
Wall-Mounted Lumber Storage
Wall-mounted racks hold wood on horizontal arms attached to the wall. You can buy metal systems or build your own from 2 x 4 lumber.
- Best for: Small shops that need to free up floor space
- Pros: Keeps lumber off the floor, away from moisture and dirt, and makes use of vertical space
- Watch out for: All weight transfers to the wall, so you must fasten racks directly into studs or masonry
Wall-mounted racks work well for shorter boards, trim pieces, and lighter materials.
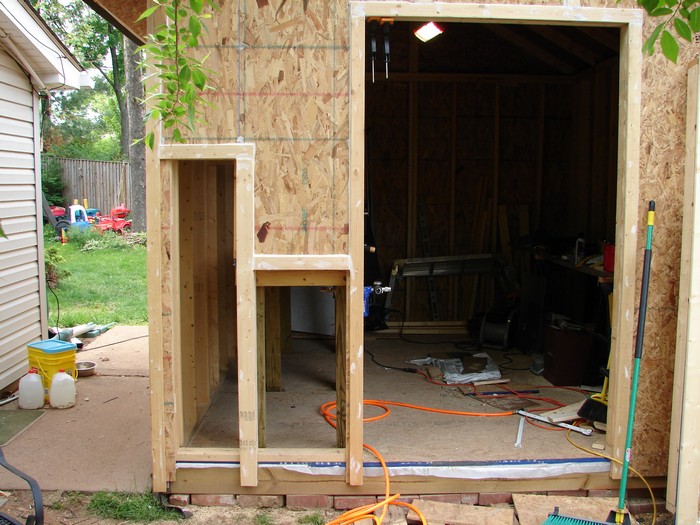
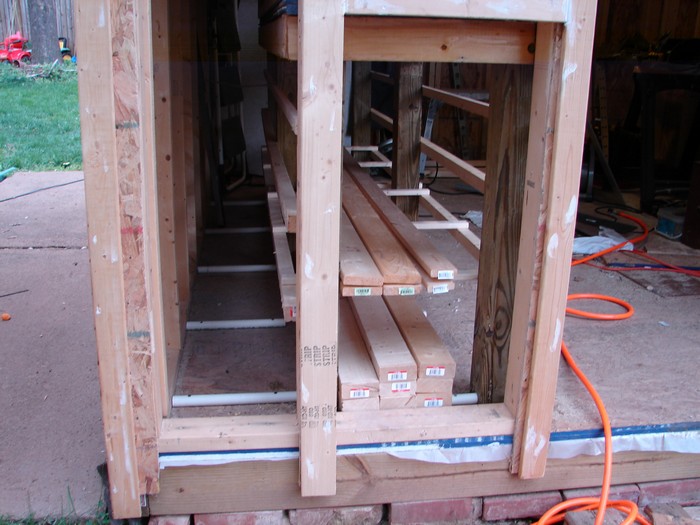
Built-in Lumber Storage
Built-in storage becomes part of your workbench or wall framing. For example, you can add slots for boards under a workbench or between wall studs.
- Best for: Permanent workshops where you control the layout
- Pros: Very efficient use of space, looks clean and tidy, often very strong
- Watch out for: Harder to move or change later, so plan carefully before building
Built-in racks are ideal if you are also organizing tools like rakes, shovels, or long clamps, because you can design storage for everything in one area.

If you’re also wrangling rakes, shovels, and trimmers, don’t miss these yard tool storage and organization tips to keep everything accessible once your lumber is sorted.
Lumber Rack Ideas Compared
| Type | Best For | Space Needed | Mobility | Pros | Cons |
|---|---|---|---|---|---|
| Rolling lumber cart | Small to medium workshops that need flexible storage | Uses floor space. Needs clear paths to roll. | High. Can roll to different work areas. | Easy to move. Can carry many boards and offcuts. Reduces trips across the shop. | Takes up floor space. Needs strong casters. Can be heavy when fully loaded. |
| Wall mounted rack | Small garages and narrow workshops with limited floor space | Uses wall space. Very little floor space. | None once installed. Fixed in place. | Keeps lumber off the floor. Protects from moisture. Uses vertical space well. | Must be anchored to studs or masonry. Harder to change later. Limited by wall strength. |
| Vertical lumber storage | Long boards in tight spaces and corners | Small footprint on the floor near a wall. | Low. Usually fixed in one spot. | Great for long boards. Easy to see individual pieces. Uses narrow spaces. | Boards can tip if not supported. Needs strong backing and restraints. |
| Ceiling mounted rack | Garages with high ceilings and busy walls and floors | Uses ceiling joists. No extra floor space. | None. Fixed in place. | Keeps long boards completely out of the way. Frees up both floor and wall space. | Harder to reach. Often requires a step ladder. Must be attached very securely. |
| Pallet based storage | Budget setups and beginners with extra pallets | Small to moderate floor area. | Medium if you add wheels. Low if fixed. | Very low cost. Easy to build from recycled materials. Good for scrap wood. | Can be rough and uneven. May hide nails or staples. Not ideal for heavy, long boards unless reinforced. |
| Freestanding rack | Larger shops or open garage areas | Needs a clear floor area that matches rack size. | Medium. Can be moved but not as easy as a cart. | Does not need wall attachment. Flexible placement. Can hold many types of lumber. | Takes floor space. Must be designed carefully so it does not tip or rack out of square. |
| Built in storage | Permanent workshops where you control layout | Blends into walls, benches, or corners. | None. Fixed permanently. | Very strong and efficient. Can be made to fit your exact tools and space. Looks clean and tidy. | Hard to move or change later. Needs more planning. Not ideal for renters. |
Types of Lumber Racks and When to Use Them
Choosing the right type of rack depends on your space, the amount of wood you store, and how often you use it. Here is a summary of common types and their main uses.
Wall-Mounted Lumber Racks
Wall-mounted racks are great when floor space is limited. Metal brackets or strong wooden arms hold boards against the wall.
- Ideal for: Small garages, narrow shops, and lightweight boards
- Strength tip: Fasten each bracket into at least two wall studs, and follow weight ratings for brackets and screws
Vertical Lumber Storage
Vertical racks hold boards upright and are useful for long pieces.
- Ideal for: Tight spaces and corners where a rolling cart will not fit
- Safety tip: Store boards at a slight angle and add restraints so they cannot tip over
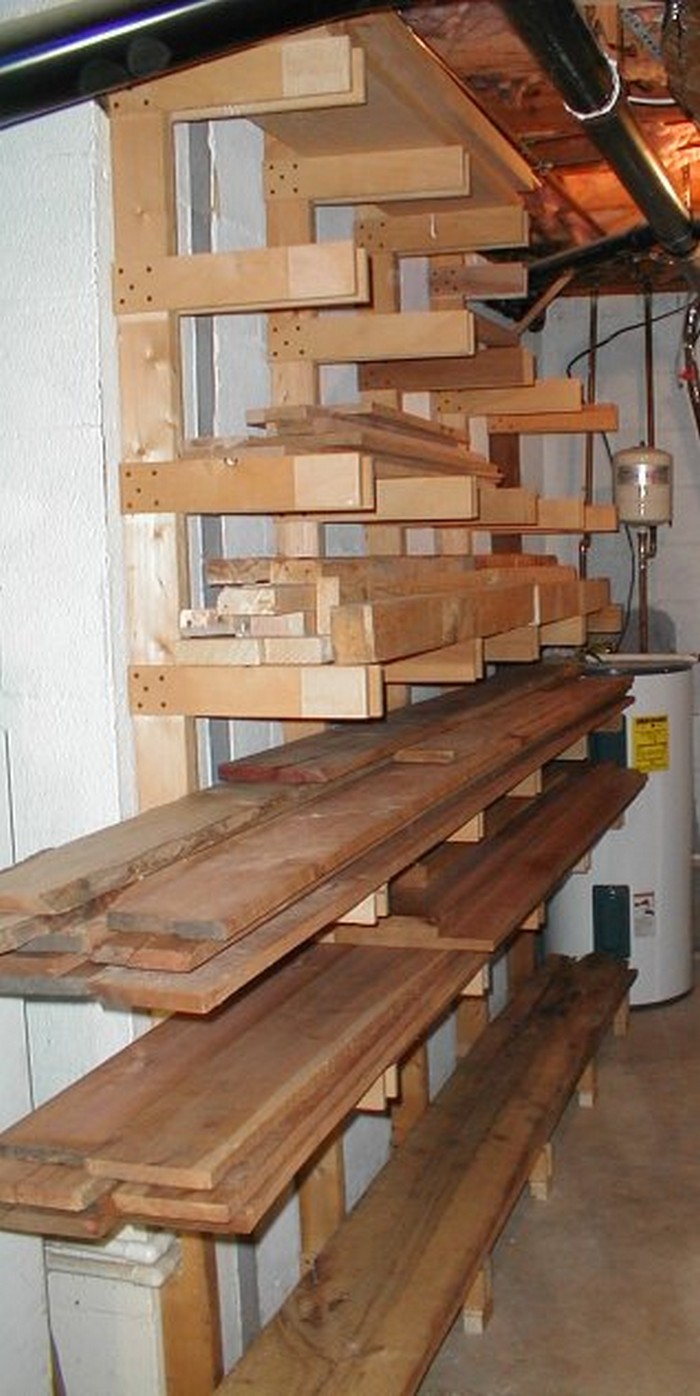
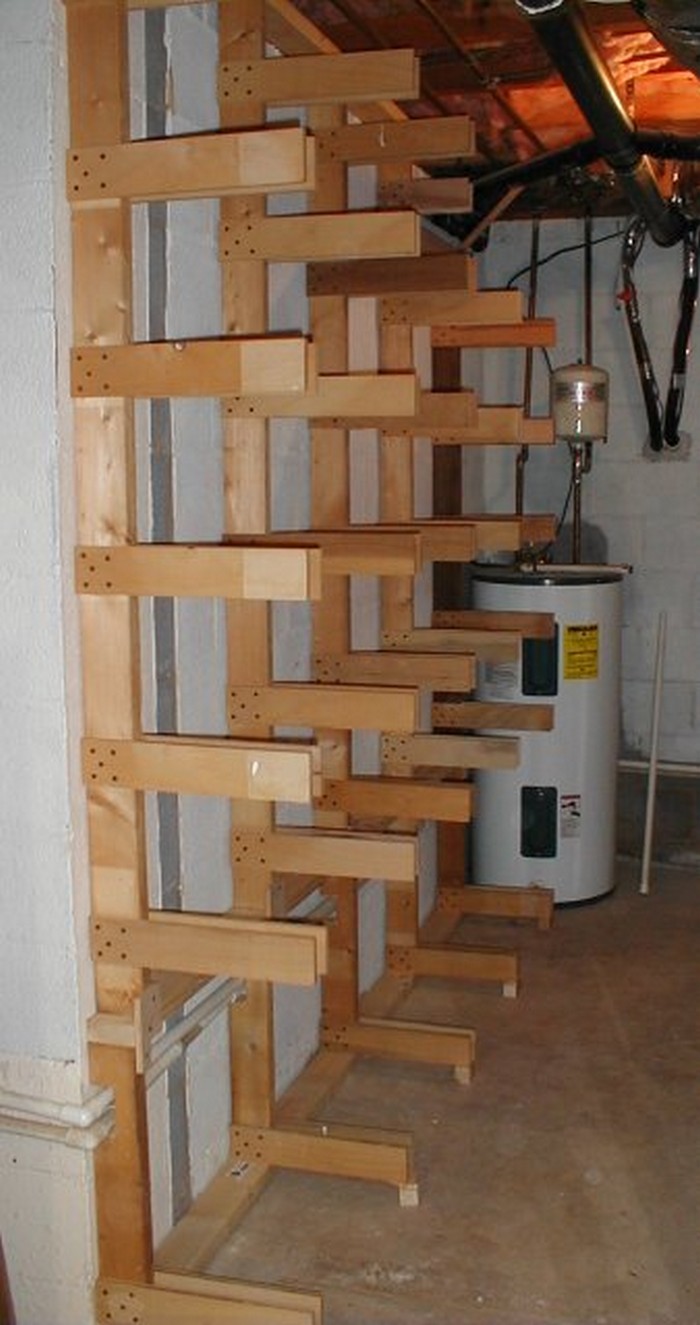
Freestanding Lumber Racks
Freestanding racks do not need to attach to a wall. They have legs or posts that support horizontal shelves.
- Ideal for: Large shops and open spaces
- Benefit: Easy to move to a different area if you rearrange your workshop
Rolling Lumber Carts
Rolling carts combine storage and mobility.
- Ideal for: Workflows where you move materials between different tools or stations
- Benefit: Reduces the number of trips across the shop and lets you bring all needed lumber to your workbench
Ceiling-Mounted Lumber Racks
Ceiling-mounted racks hang from the ceiling joists and hold long boards overhead.
- Ideal for: Garages with high ceilings and little wall space
- Watch out for: You may need a step ladder to reach boards, and you must fasten brackets securely to structural members
Plywood and Sheet Goods Racks
These racks are shaped to hold large sheets safely.
- Vertical sheet racks keep panels on edge with supports at the bottom and back.
- Angled racks hold sheets on a sloped surface so they do not warp or slide.
These are useful for anyone who often works with plywood, MDF, or large panels.
Combination Storage Systems
Some systems mix several styles in one unit. For example, a rolling cart might have:
- Upright slots for long boards
- Flat shelves for shorter pieces
- A tilted area for sheet goods
Combination systems are good for woodworkers who work with many different sizes and types of lumber.
How to Store Lumber to Prevent Warping and Damage
Good storage is about more than just saving space. If lumber is stored poorly, it can warp, crack, or mold. Here are best practices that keep your wood in good condition.
Keep Lumber Off the Ground
Concrete floors can hold moisture for a long time. When lumber sits directly on the concrete, it absorbs that moisture and starts to warp or grow mold.
- Use a rack, pallets, or scrap boards under your lumber.
- Aim for at least a few centimeters of space between wood and floor.
Support Boards Properly
If long boards only touch supports at the ends, they can sag over time. This bending can become permanent.
- For horizontal storage, add support every 16 to 24 inches along the length of the board.
- Make sure the supports are level and line up with each other on all tiers of the rack.
Vertical storage also needs support. Boards should lean at a small angle against a strong surface so they do not bow or fall.
Control Temperature and Humidity
Wood expands and contracts as the moisture in the air changes. Big swings in humidity or temperature can cause boards to twist, cup, or crack.
- Try to keep humidity around 40 to 60 percent if possible.
- In damp areas, use a dehumidifier. In very dry climates, a humidifier can help.
Even basic steps, such as keeping lumber away from wet doors and open windows during storms, will help.
Allow Airflow Around Boards
If air cannot move around lumber, moisture can get trapped. That encourages mold growth and uneven drying.
- Avoid packing boards too tightly. Leave small spaces between pieces.
- If stacking several layers, place thin strips of wood called stickers between each layer so air can circulate.
Let Lumber Acclimate Before Use
If you bring lumber from a store or outdoor shed into your workshop, give it time to adjust.
- Let boards sit in your workshop for at least 24 to 48 hours before cutting or joining them.
- For fine furniture or tight joinery, more time is even better.
This helps reduce sudden movement that can ruin careful work.
Protect Lumber From Direct Sunlight
Sunlight can dry one side of a board faster than the other. That uneven drying often leads to twisting or cupping.
- Store lumber in a shaded area.
- Use curtains, blinds, or a simple cover if your rack sits near a window.
If you cover wood, use a breathable material so air can still move.
Organize Lumber by Size and Type
Good organization also prevents damage.
- Keep heavy boards on the bottom shelves.
- Group similar thicknesses together so they share the same supports.
- Store hardwood and softwood in separate stacks if possible, because they may react differently to moisture.
Neat stacks are easier to inspect, measure, and move without accidents.
FAQs About Storing Lumber and Lumber Racks
- Is it better to store lumber vertically or horizontally?
- Both methods can work. Horizontal storage on well spaced supports is usually best for keeping boards flat and straight. Vertical storage saves floor space and works well for long boards, as long as they lean at a slight angle against a strong support and cannot tip.
- How do I keep stored lumber from warping?
- Keep lumber off damp floors, support it every 16 to 24 inches, and allow air to move around each board. Try to keep humidity between 40 and 60 percent, avoid direct sunlight, and let boards adjust to your workshop conditions before you use them.
- What is the best lumber rack for a small garage?
- Wall-mounted racks and vertical storage are often the best choices for small garages because they free up floor space for tools and cars. A compact rolling lumber cart can also work well if you have room for it to move.
- Can I build a lumber rack from 2 x 4s?
- Yes. Many strong DIY racks use simple 2 x 4 construction. Just be sure to use good-quality lumber, strong screws, and enough braces. If you build a wall-mounted rack, always fasten it directly into studs or solid masonry.
- How much weight can a lumber rack hold?
- That depends on the materials, design, and fasteners. Metal racks usually list a weight rating. For DIY wooden racks, use conservative estimates, add extra supports, and put the heaviest boards on the lowest levels. If you are unsure, build for more strength than you think you need.
Conclusion
A well-planned lumber rack keeps your workshop safer, cleaner, and more efficient. Whether you choose a rolling lumber cart, a wall-mounted system, or a built-in rack, good storage keeps your boards straight and ready to use.
By keeping lumber off the floor, supporting it properly, and controlling moisture and airflow, you can prevent warping and damage. With the ideas and tips in this guide, you can choose or build the right lumber rack for your space and get more value from every board you buy.