Last Updated on November 28, 2025 by teamobn
If you want a simple and affordable way to turn laundry baskets into a dresser, here’s a step-by-step DIY guide. This project uses everyday materials and basic tools — perfect if you’re looking to save space or upcycle existing baskets.
Contents
- 1 Quick Overview
- 2 DIY Laundry Basket Dresser Guide
- 3 Benefits of a Laundry Basket Dresser in Small Spaces
- 4 Organizing Tips for Large Families
- 5 Customizing Your Laundry Basket Dresser
- 6 Conclusion
Quick Overview
- What you’ll make: A laundry-basket dresser (a compact wardrobe/organizer built from baskets)
- Who it’s good for: small-space homes, budget-conscious DIYers, upcycling lovers
- What you need: baskets, wood/plank (or frame), basic hardware, tools (see Materials & Tools below)
- Time estimate: about [insert realistic time, e.g. 2–4 hours]
- Skill level: beginner–intermediate
Laundry rooms are one of the messiest rooms in the house. They are often cluttered with dirty clothes, laundry soap, and other cleaning stocks. This can make it difficult to keep the room clean and organized. You need to think of one good storage solution that will make your laundry room neat and organized. And, are not satisfied with how your current laundry area looks?
Laundry is a never-ending chore. As the kids grow, so do the number of clothes that have to be washed on a regular basis. Laundry rooms tend to be chaotic, with hampers and laundry supplies scattered throughout. While it could be worse, finding what is needed for laundry can be a major pain, as it is estimated that the average person spends minutes a day looking for supplies.
If you’ve been having a laundry nightmare, then it’s time to make a change. Your laundry room needs a makeover, and we’re here to help.
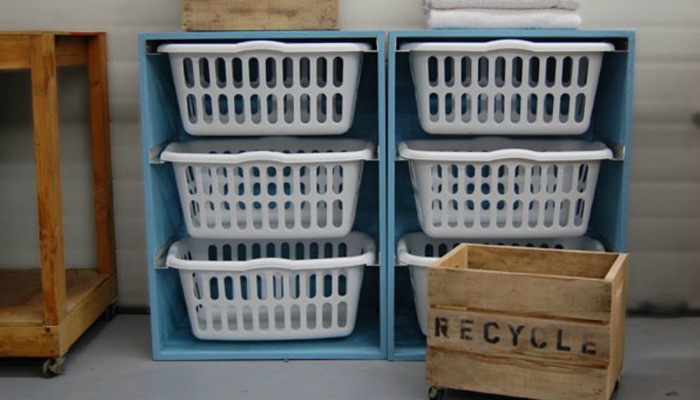
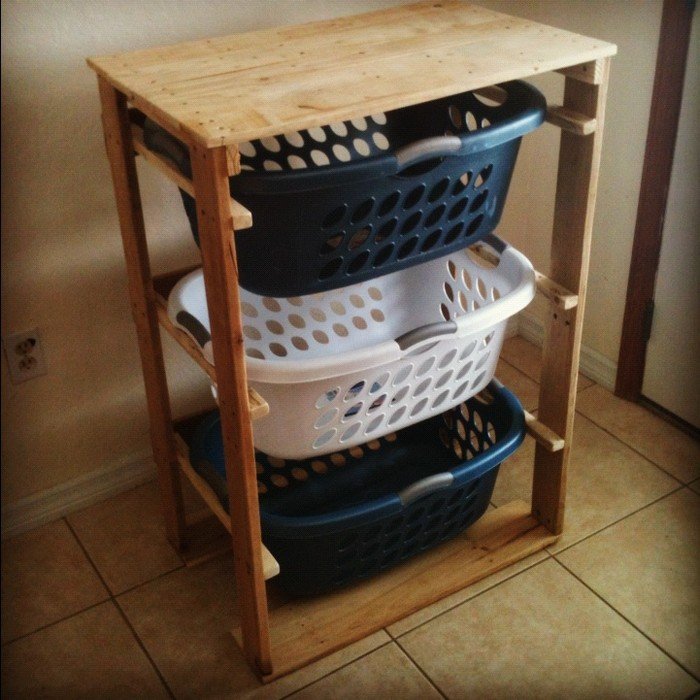
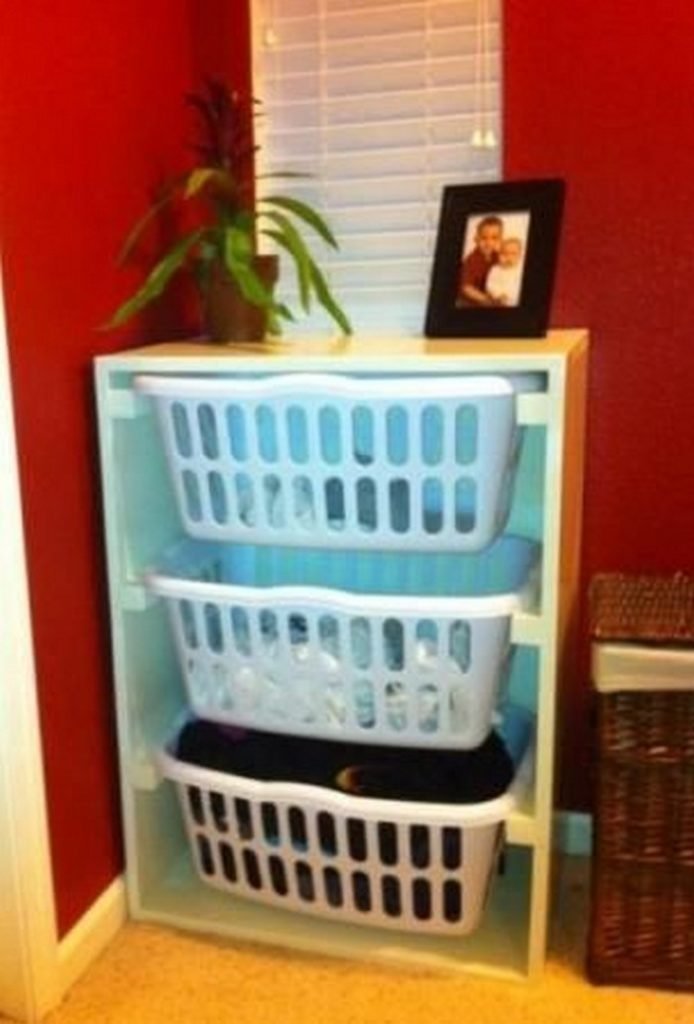
This easy-to-build laundry basket dresser is a great way to use up spare lumber or pallets. With just a few simple cuts and some basic assembly, you can construct this handy storage unit in no time. Perfect for storing laundry baskets, towels, or other household items.
This is the perfect solution for small spaces or for anyone who wants an easy way to store and organize their dirty (or newly cleaned) clothes. You can put it in the laundry room (obviously), the bathroom, the bedroom, or even have it retrofitted in your closet! It’s easy to assemble and made of durable materials, so you can be sure it will last for years to come.
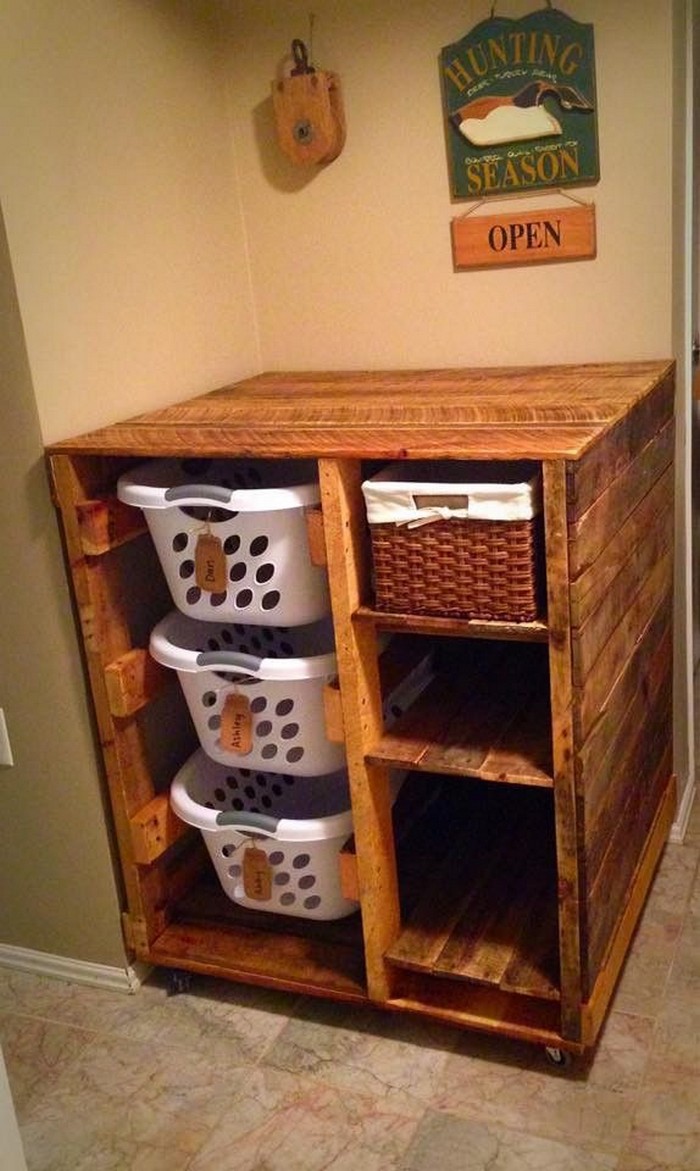
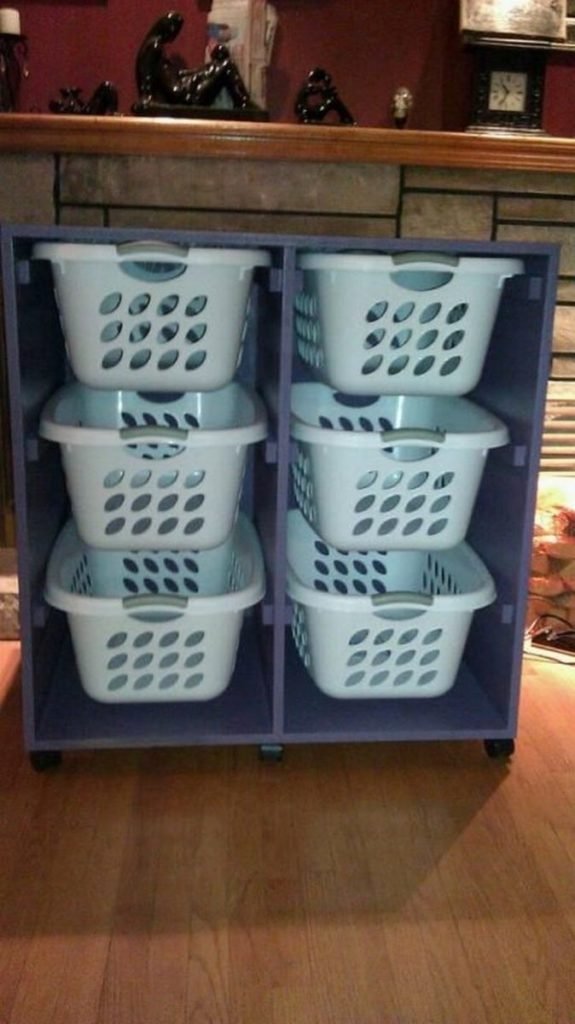
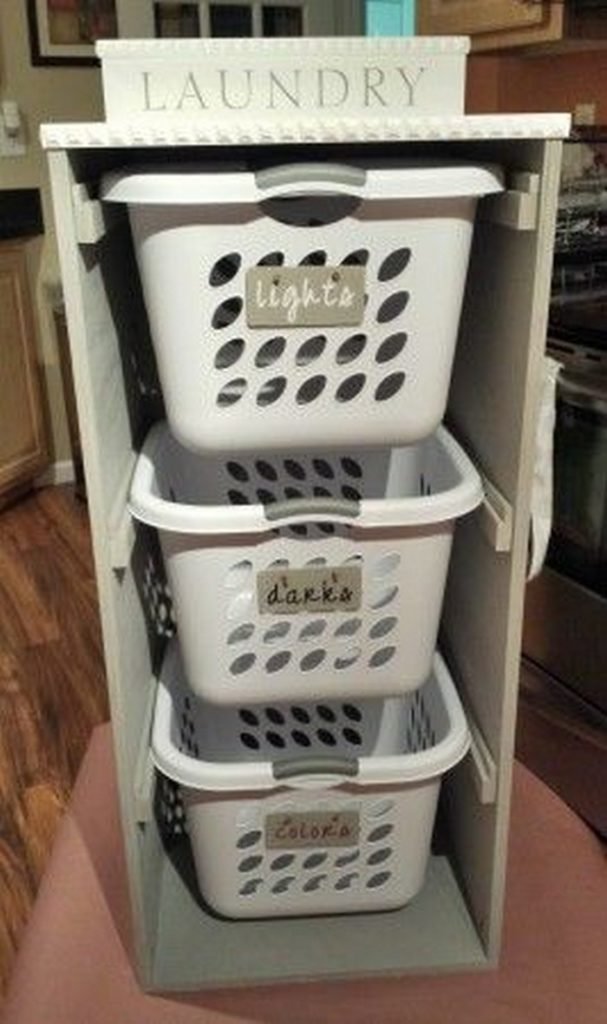
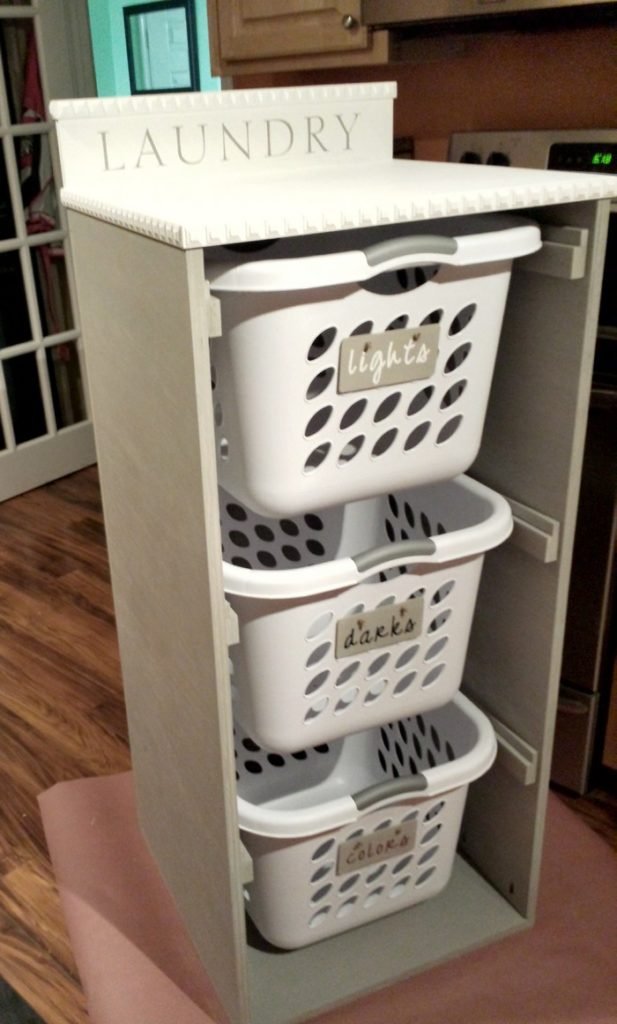
You can even label the laundry baskets to sort out whom or what items you store in them. This can help you maintain organization and keep track of what goes where. Plus, it’ll save you time in the long run! This is especially useful if you have a lot of different items that need to be stored in different baskets.
You can label each basket in the laundry basket dresser with specific contents, such as “whites,” “darks,” or “delicates.” This will help you save time when doing laundry, as you won’t have to sort through all of the baskets to find the items you need.
Whichever way you categorize the baskets and wherever you plan to put the dresser, this simple DIY storage idea will definitely keep all your laundry more organized! It will make doing the laundry easier, too!
DIY Laundry Basket Dresser Guide
What Materials Are Needed to Build a DIY Laundry Basket Dresser
- 3/4″ Plywood
- 1/4″ Plywood
- 1 1/2″ x 1 1/2″ Metal Angle
- 2″ Wood Screws or 1 1/4″ Pocket Hole Screws
- 3/4″ Wood Screws
- 1 1/4″ Wood Screws
- Wood Glue
- Wood Filler
- Finishing Supplies
What Tools Are Needed for This Build
- Measuring Tape
- Square
- Pencil
- Safety Glasses
- Hearing Protection
- Drill
- Circular Saw
- Random Orbital Sander
- Level
- Countersink Drill Bit
How to Build a DIY Laundry Basket Dresser: A Step-by-Step Guide
Step 1: Plan Your Dresser
- Start by measuring your laundry baskets. A common basket size is around 15–18 inches wide and 10–12 inches tall, so plan for at least 1 inch of clearance on each side for easy sliding.
- Measure the area where the dresser will sit. This gives you the maximum height, width, and depth you can work with.
- Sketch a simple front view and side view. Mark how many baskets you want (two, three, or more) and note the spacing between shelves.
- A typical three-basket dresser typically measures approximately 30–34 inches in height, 16–18 inches in depth, and 22–26 inches in width. Adjust your measurements to match your baskets and available space.
Step 2: Cut the Plywood
Put on safety glasses and hearing protection. Use your measuring tape, square, and pencil to mark straight cut lines on the 3/4-inch plywood.
- You’ll need:
– Two side pieces (height of your dresser x full depth)
– One top and one bottom piece (full width x depth)
– Shelf pieces (full width x about 12–16 inches, depending on basket size) - Double-check your measurements. Accuracy here makes the assembly much easier.
- Use the circular saw to cut along your marked lines. Work slowly and keep the saw guide against the square for clean, straight cuts.
Step 3: Assemble the Frame
- Lay the bottom piece flat and apply a thin bead of wood glue along its two side edges.
- Position the side panels upright on the glued edges.
- Secure them using 2-inch wood screws or 1 1/4-inch pocket hole screws, depending on your joinery method.
- Use your square to check each corner. The frame should form perfect 90-degree angles before moving on.
- Add the top piece with glue and screws, creating a simple open box frame.
Step 4: Add the Shelves
- Lay the bottom piece flat and apply a thin bead of wood glue along its two side edges.
- Position the side panels upright on the glued edges.
- Secure them using 2-inch wood screws or 1 1/4-inch pocket hole screws, depending on your joinery method.
- Use your square to check each corner. The frame should form perfect 90-degree angles before moving on.
- Add the top piece with glue and screws, creating a simple open box frame.
Step 5: Install the Back Panel
- Measure the full height and width of the frame you’ve assembled.
- Cut the 1/4-inch plywood to match these dimensions.
- Place the panel onto the back of the dresser and secure it using 3/4-inch wood screws around the perimeter.
- Attaching the back panel locks the frame in place and prevents any side-to-side wobble.
Step 6: Add Metal Angles for Support
- Install the 1 1/2 x 1 1/2-inch metal angles underneath each shelf.
- Position one angle near the front and another near the back for best support, especially if you expect the baskets to carry heavy loads.
- Secure each angle using 1 1/4-inch wood screws.
- This reinforcement helps the shelves resist sagging over time.
Step 7: Sand and Finish
- Use the random orbital sander to smooth all surfaces. Start with medium-grit sandpaper and finish with fine-grit for a polished feel.
- Fill any screw holes or small gaps with wood filler and allow it to dry completely.
- Sand the filled spots again until smooth and flush with the wood surface.
- Apply your chosen finish — paint, stain, or a clear sealant.
- Let the dresser dry thoroughly before adding baskets.
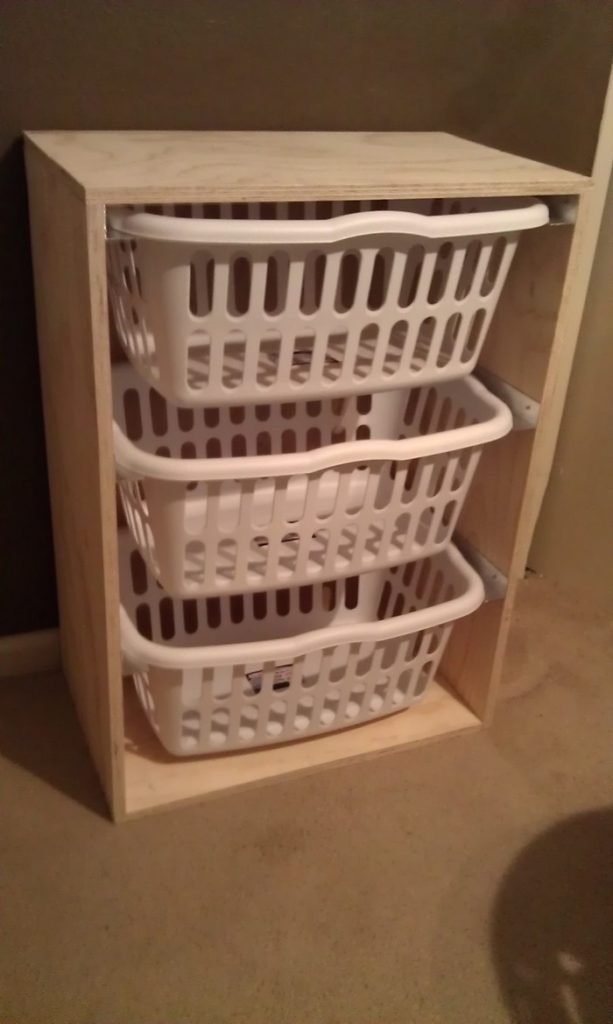
Step 8: Final Touches
- If you want the baskets to slide more easily, add small knobs or handles to the front rail area or even directly onto the baskets.
- Slide your baskets into each shelf space. They should fit comfortably with just a little wiggle room.
- Move the dresser into place and load it with laundry or storage items.
Benefits of a Laundry Basket Dresser in Small Spaces
Laundry basket dressers are a smart solution for anyone struggling with limited space. They offer a neat and efficient way to organize your laundry, transforming cluttered areas into well-ordered spaces. Here’s why they’re perfect for small spaces.
Maximizes Floor Space
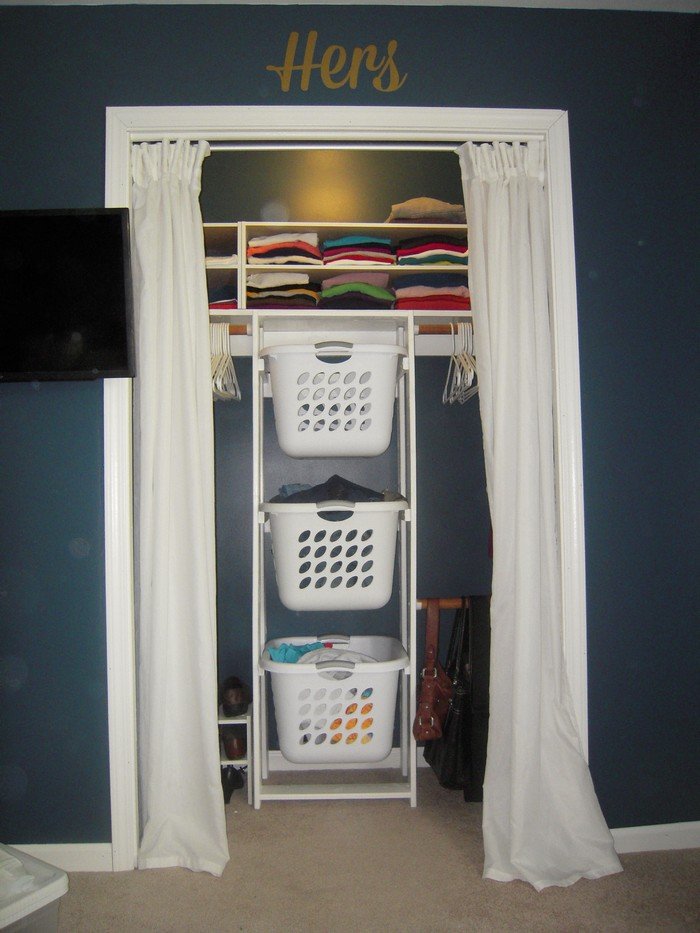
In small living spaces, every square foot is valuable. A laundry basket dresser smartly utilizes vertical space, often overlooked in home organization. Stacking laundry baskets upwards it allows more floor area to be available for other uses.
This vertical storage method is especially beneficial in cramped apartments or tiny homes, where managing space effectively is key to maintaining a clutter-free environment. It’s a practical solution that offers significant relief in tight quarters, ensuring your laundry does not encroach upon your valuable living space.
Enhances Organization
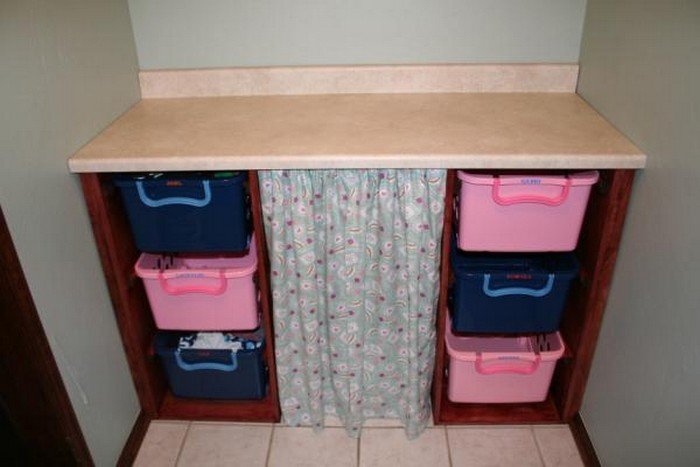
The genius of a laundry basket dresser lies in its simple yet effective organization system. Sorting becomes a breeze by assigning different baskets for various laundry categories—such as lights, darks, delicates, or even each family member’s clothing.
This setup makes it easy to keep track of your laundry tasks, eliminating the all-too-common issue of clothes piling up in corners or on furniture. It streamlines the laundry process, from washing to folding, ensuring that managing your laundry no longer feels daunting. The clear categorization also speeds up laundry day, as everything is already sorted and ready to go.
Improves Aesthetics
Beyond its practical benefits, a laundry basket dresser also serves an aesthetic purpose. It can be designed to match the decor of your laundry area or any room, from minimalist and modern to rustic or vintage styles. By neatly concealing laundry within its structure, it helps maintain the cleanliness and order of your space, contributing to a more pleasant and visually appealing environment.
This makes your home look tidier and turns the laundry area into a space you enjoy using. A well-chosen laundry basket dresser becomes more than just a storage solution—it enhances your home’s overall look and feel.
A laundry basket dresser is not just a practical storage solution; it’s a game-changer for small spaces. It helps you reclaim your floor, simplifies your laundry routine, and keeps your home looking its best.
Click on any image to start the lightbox display. Use your Esc key to close the lightbox. ![]()


Organizing Tips for Large Families
Managing laundry for a large family can feel like a never-ending cycle. With clothes piling up daily, keeping everything organized is key to maintaining sanity and efficiency. Here are some practical tips to help large families manage their laundry chaos.
Assign Baskets to Family Members
Give each family member their laundry basket within the dresser. Label each basket with a name to avoid mix-ups. This encourages everyone to be responsible for their laundry, simplifying sorting and washing.
Use Color-Coded System
Implement a color-coded system for towels, bed linens, and clothes that require special care. Assign a specific color for each category. This method makes it easy to see what needs washing and helps prevent items from being misplaced.
Set a Laundry Schedule
With many people in the house, having a laundry schedule is helpful. Designate days for washing different types of laundry or assign days for each family member. This ensures laundry doesn’t pile up and keeps the process running smoothly.
Involve Everyone in Laundry Tasks
Make laundry a shared responsibility. Assign age-appropriate laundry tasks to each family member, such as sorting their clothes, folding, or putting laundry away. This distributes the workload and teaches responsibility.
Pre-Sort Laundry Hampers
Use pre-sorting laundry hampers with multiple compartments in bedrooms or bathrooms. This way, everyone can sort their clothes by color or fabric type as they change. It saves time on laundry day and keeps everything organized.
Use a Hanging System for Immediate Needs
Install a hanging system, like rods or hooks, in the laundry room for items that must be air-dried or immediately hung up. This keeps clothes from wrinkling and makes finding school uniforms or work outfits easy.
Keep Supplies Organized
Store laundry detergents, fabric softeners, and other supplies in labeled containers or shelves. Keeping these items organized and within reach makes the laundry process faster and less hassle.
Create an “Urgent Wash” Bin
Have a separate bin for items that need urgent washing, like sports uniforms or work clothes needed for the next day. This ensures that important items are washed quickly and not lost in the shuffle.
These strategies can transform laundry from a daunting task into a manageable part of family life. With a little organization, the laundry room can become a place of efficiency and order, even in the busiest of homes.
Customizing Your Laundry Basket Dresser
Creating a laundry basket dresser that perfectly fits your space and style can make laundry day more enjoyable. Customizing your dresser allows you to match your home’s decor and meet your specific storage needs. Here are some ideas to inspire your customization project.
Choose Your Style
Choosing the right style for your laundry basket dresser is crucial for blending seamlessly with your home’s decor. Start by identifying the design theme of your home or the specific room where the dresser will be placed. If your home features a modern aesthetic, consider a sleek, clean-lined dresser with a high-gloss finish or bold, geometric patterns. Opt for hardware with a chrome or stainless steel finish to complement the modern look.
For homes with a rustic charm, a laundry basket dresser made of reclaimed wood with a distressed finish can add to the warmth and authenticity of your space. Choose hardware with an antique or vintage design, such as brass or wrought iron, to enhance the rustic feel.
If you lean towards a minimalist design, focus on a dresser with simple, uncluttered lines and a monochromatic color palette. A matte or satin finish can add sophistication without overwhelming the minimalist vibe. Opt for hardware that is subtle and blends with the overall design, such as simple knobs or handles in a matching or complementary color.
Customizing the finish and color is also a great way to express your style. Painting your laundry basket dresser in a hue that matches your room’s color scheme can create a cohesive look. Alternatively, staining the wood can highlight its natural beauty and add warmth to the space. Consider the lighting in your room as well, as it can significantly affect how the color and finish appear.
Add Functional Labels
Adding functional labels to each basket in your laundry basket dresser is a small but impactful way to boost the efficiency and organization of your laundry process. Labels serve as a clear guide for where items should go, making it easier for every family member to participate in keeping the laundry sorted.
Chalkboard labels are a fantastic choice for families whose laundry needs might change over time. They allow you to easily update the labels based on the current sorting system or as different family members take on different laundry responsibilities.
You can write directly on these labels with chalk or use a chalk pen for a more refined look. This flexibility is perfect for adjusting categories, such as switching from “whites” and “colors” to more specific labels like “work clothes” and “gym wear” as needed.
Vinyl stickers, on the other hand, offer durability and a clean, professional appearance. They are moisture-resistant, an essential feature in the laundry room environment.
Vinyl labels can be custom-made to fit the style of your laundry basket dresser, with various fonts and colors to choose from. This option is ideal for permanent categories unlikely to change, providing a long-lasting solution to your organizing needs.
Regardless of the type of label you choose, the key is to ensure that each label is clearly visible and accurately represents the contents of the basket. This simple addition not only aids in sorting but also streamlines the laundry process, making it quicker and more intuitive for everyone involved. Labels can also be a fun way to add a personal touch to your laundry room, reflecting your home’s style while keeping everything in its right place.
Incorporate Decorative Elements
Incorporating decorative elements into your laundry basket dresser enhances its functionality and elevates its aesthetic appeal, making it a unique piece in your home. Adding fabric liners to the baskets can introduce a vibrant pop of color or a subtle hint of texture, depending on your room’s decor and color scheme.
These liners beautify the baskets, protect the clothes from snagging on rough edges, and make cleaning the baskets easier. Choose fabrics that complement your home’s style—floral prints can add a touch of romance, while geometric patterns offer a modern vibe.
Decorative knobs or pulls on the dresser drawers are another excellent way to infuse personality into your laundry basket dresser. The market offers various hardware options, from vintage-inspired designs to sleek, contemporary shapes.
Selecting knobs or pulls that reflect your style can transform the dresser from a purely functional piece to a standout feature in your laundry room or area. For instance, crystal knobs can add a touch of elegance, while rustic, iron pulls might better suit a farmhouse-style home.
These decorative touches make your laundry basket dresser unique and create an enjoyable and personalized laundry experience. Customizing your dresser with these elements encourages a more organized and pleasant laundry routine, turning a mundane task into an opportunity to enjoy a beautifully curated space.
Make It Mobile
Making your laundry basket dresser mobile by adding casters at the bottom transforms it into a versatile piece of furniture, perfect for homes where flexibility and space optimization are key. The mobility of the dresser allows for effortless relocation, whether navigating through tight spaces, adjusting the layout of your room, or simply needing to move it aside for a thorough cleaning session.
This feature is particularly beneficial in multi-purpose areas where the laundry room may also serve as a space for storage, crafts, or even a home office. With casters, your dresser can be easily rolled out of the way to accommodate other activities or make space for guests.
Moreover, casters make accessing hard-to-reach areas behind or underneath the dresser convenient, ensuring no space goes uncleaned. This is crucial for maintaining a hygienic environment in spaces where cleanliness is paramount, like laundry areas.
When selecting casters, opt for models with locking mechanisms to provide stability when the dresser is used. This safety feature ensures the dresser stays in place during loading or unloading, providing a secure and stable storage solution.
Incorporating casters into your laundry basket dresser’s design enhances its functionality and adds a modern, practical touch to your home. This simple upgrade makes laundry smoother and more efficient, proving that even the most utilitarian pieces can offer flexibility and style in your living space.
Frequently Asked Questions: Laundry Basket Dresser Questions
- What’s the actual benefit of this compared to just using baskets on the floor?
- Total organization! You can pre-sort darks, colors, and whites directly into the baskets as you go. Once clothes are clean and folded, the baskets become the transport system to get everything put away. It keeps your laundry area tidy and your workflow efficient.
- I’m not an expert builder. Can I really do this?
- Absolutely. This is a fantastic project for builders with intermediate skills. The structure is essentially a simple box, and getting your lumber pre-cut at the store does most of the hard work for you. Take your time, measure twice, and you’ll be proud of the result.
- Can I modify the design?
- Please do! That’s the beauty of DIY. If you don’t have space for a 3×3 unit, build a 2×2. If you want to add doors to the front or casters to the bottom for mobility, go for it! This plan is a solid foundation for your own custom creation.
Conclusion
Building a laundry basket dresser is a rewarding project that brings organization and style to any home. Following these straightforward steps, you can create a customized piece that meets your laundry needs. This dresser not only maximizes space but also enhances the aesthetics of your laundry area.
Do you need more ways to maximize your laundry room space? Check out our wall-mounted drying rack next!