Last Updated on November 14, 2025 by teamobn
Now here’s a must-have for anyone raising chickens in cold climates: a simple DIY heated chicken waterer that keeps your flock’s water from freezing all winter.
Contents
- 1 Project Overview
- 2 What Is a Cinder Block Heated Chicken Waterer?
- 3 Essential Safety Tips for Your DIY Heater
- 4 How Effective Is This in Winter? (Performance & Limitations)
- 5 Other Heated Chicken Waterer Ideas
- 6 Winter Poultry Care Essentials
- 7 Emergency Preparedness for Poultry Coops
- 8 Feathered Comfort on a Budget
- 9 FAQ: DIY Chicken Water Heater
Project Overview
To make a budget-friendly heated chicken waterer, place a light bulb inside a cinder block, cover it with a concrete stepping stone, and set your metal waterer on top. The bulb gently warms the block, which in turn keeps the water above freezing without overheating the coop. This setup uses inexpensive, commonly available materials and can be built in under an hour.
Key benefits of this DIY chicken water heater:
- Keeps water from freezing in typical winter conditions
- Costs far less than commercial heated bases
- Uses easy-to-find materials and basic tools
- Elevates the waterer to keep it cleaner and reduce debris
In this guide, you’ll learn exactly how to build a cinder block heated chicken waterer, how to use it safely, and what to watch for in very cold weather. You’ll also see a few alternative heated waterer ideas and winter poultry care tips.
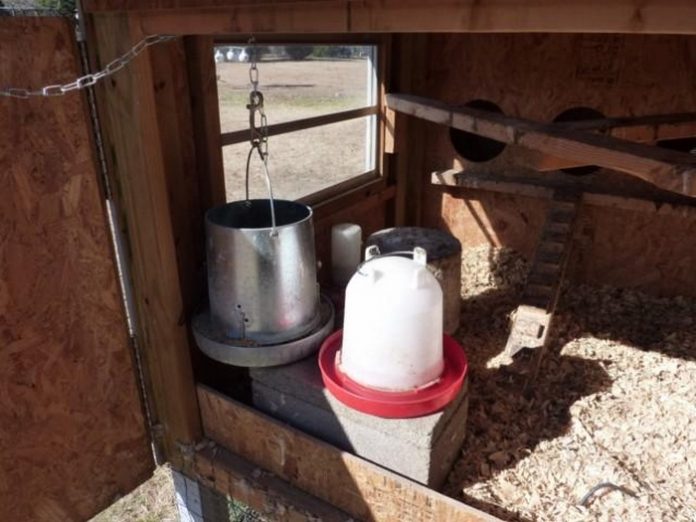
This DIY project is one example, using a cinder block and a matching concrete stepping stone.
What Is a Cinder Block Heated Chicken Waterer?
A cinder block heated chicken waterer is a DIY base that uses a standard light bulb inside a concrete block to gently warm your flock’s waterer from below. The heat from the bulb warms the block, which then transfers steady, low-level warmth to the metal waterer on top.
This design is popular because it is:
- Cheap – often under the cost of a commercial heater
- Simple – minimal wiring and basic tools
- Effective – helps keep water thawed in most winter conditions

Used with a metal waterer in a draft‑protected coop, this setup can help keep water unfrozen in many cold-weather climates.
Ready to dive into this innovative project and ensure your flock stays warm and refreshed, no matter the weather? Gather the essential materials and tools to get started.
What materials are needed to build a Cinder Block Heated Chicken Waterer?
- 1 Cinder Block: The core of the heater, it absorbs and radiates heat.
- 1 Concrete Stepping Stone: Acts as a safe, flat heating surface for the waterer.
- 1 Ceramic Light Socket: Essential for safety, as it can handle the heat from the bulb.
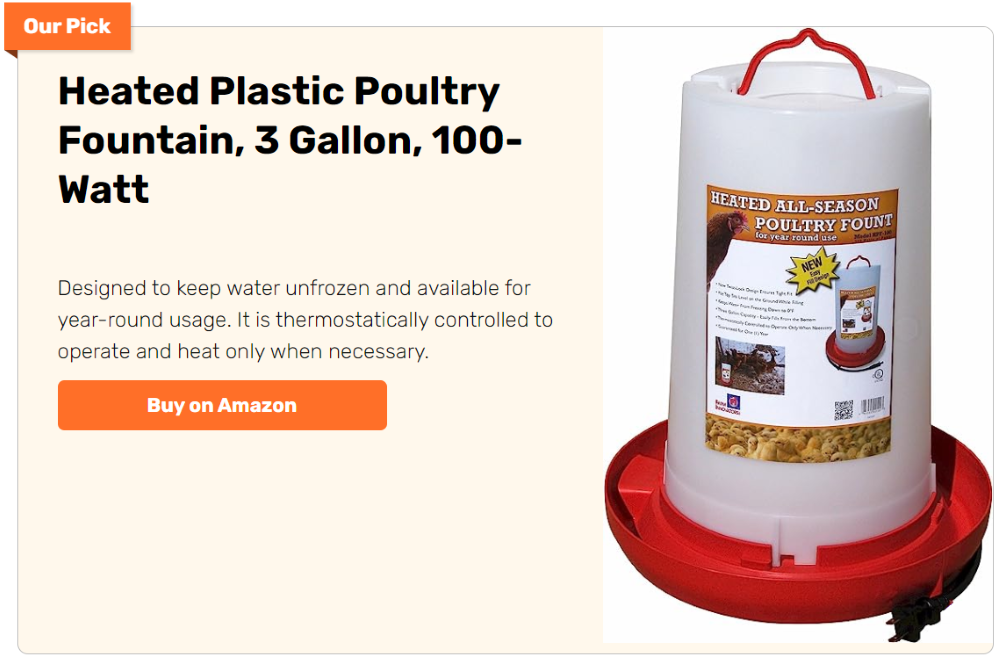
- 1 40W-100W Incandescent Bulb or Reptile Heat Bulb: Provides the heat. Start with a lower wattage.
- Aluminum Bracket & Screws: To securely mount the socket inside the block.
- Outdoor-Rated Power Cord/Extension Cord: For safe electrical operation.
What tools are needed to build a Cinder Block Heated Chicken Waterer?
- Cordless Drill
- Masonry Drill Bit
- Safety Goggles
- Dust Mask
- Screwdriver
Click on any image to start the lightbox display. Use your Esc key to close the lightbox.![]()

How to build a Cinder Block Heated Chicken Waterer?
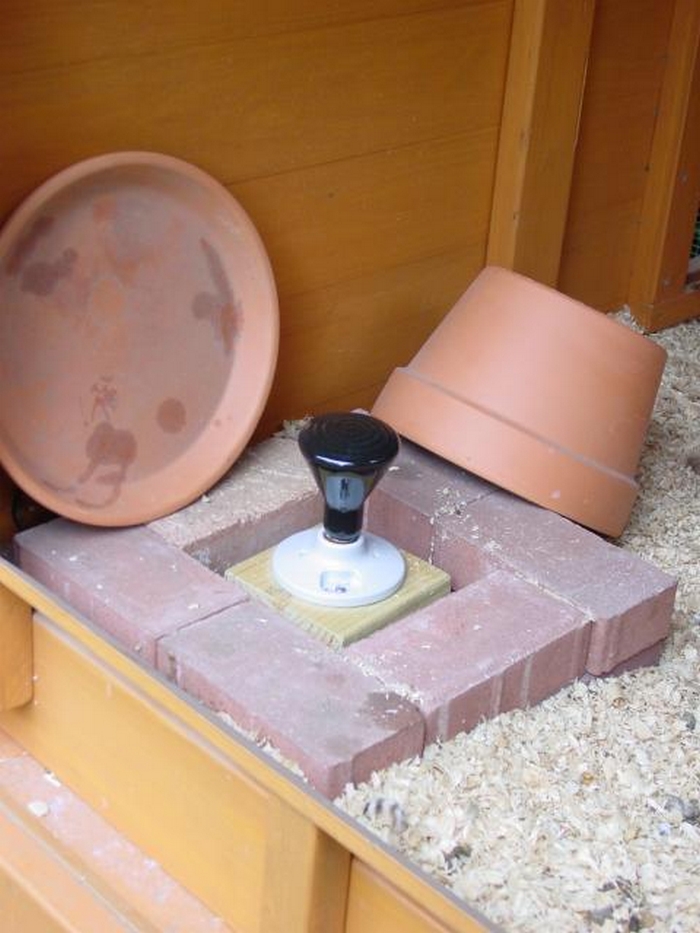
- Drill the Power Cord Hole.
- Put on your safety goggles and dust mask. Drill a hole through the side of the cinder block large enough to feed your power cord through.
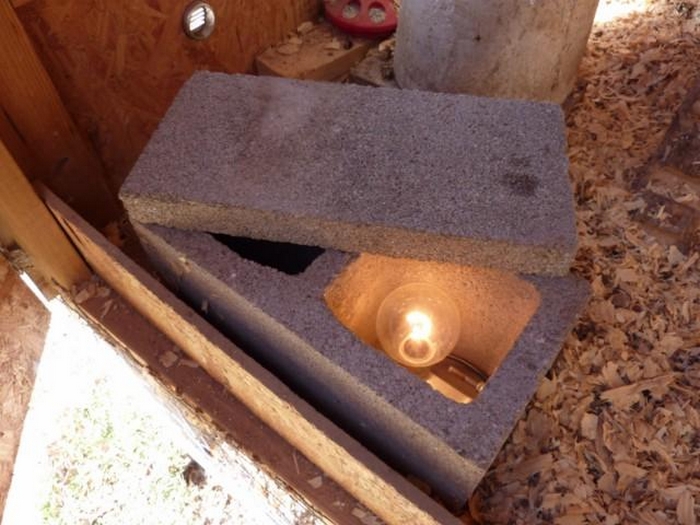
- Mount the Light Socket.
- Attach the ceramic light socket to the aluminum bracket using screws. Then, position the bracket inside the hollow of the cinder block and secure it in place.
- Wire the Socket and Insert the Bulb.
- Feed the end of your power cord through the hole you drilled. Wire it to the light socket following all safety guidelines, ensuring connections are tight and secure. Screw in your chosen bulb.
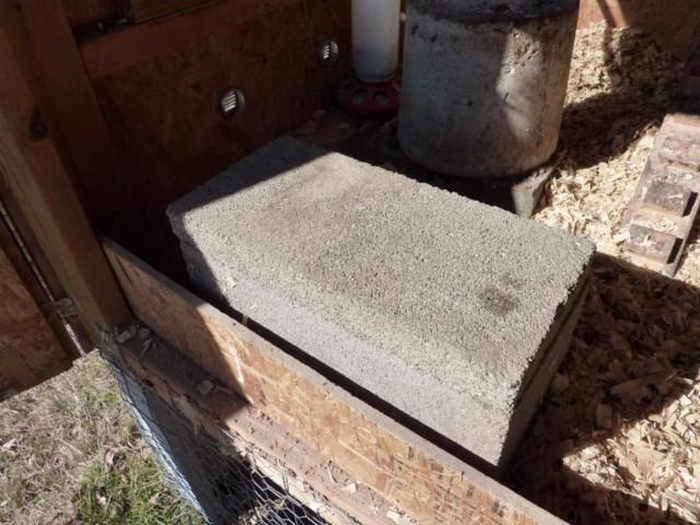
- Cover the Block and Place the Waterer.
- Place the concrete stepping stone on top of the cinder block. This creates a stable, heated platform. Set your metal chicken waterer directly on the stone.
- Final Safety Check and Test.
- Plug the cord into a GFCI-protected outdoor outlet. Check that the cinder block becomes warm to the touch but not dangerously hot. Ensure all cords are away from the chickens and any flammable bedding.
Essential Safety Tips for Your DIY Heater
- Electrical Safety is Paramount
- Always plug the unit into a GFCI (Ground Fault Circuit Interrupter) outlet to prevent shock hazards.
- Use a Ceramic Socket
- Plastic sockets can melt and are a fire risk.
- Check Wattage
- Do not use a bulb with a higher wattage than your socket is rated for. A 40-60W bulb is often sufficient.
- Cord Management
- Use an outdoor-rated extension cord and keep it off the ground and away from moisture and curious beaks.
- Regular Inspection
- Check the setup daily for any signs of damage, overheating, or moisture.
How Effective Is This in Winter? (Performance & Limitations)
This DIY heater is surprisingly effective for its cost and simplicity.
- Temperature Range:
- In a reasonably insulated and draft-free coop, it can prevent freezing in temperatures down to -10°C (14°F). In more severe cold, a higher-wattage bulb or additional insulation around the coop may be needed.
- Pros: Very low cost, simple to build, uses readily available materials.
- Cons: Not as powerful as commercial heated bases in extreme cold, requires a metal waterer (plastic can warp), and relies on a constant power source.
This uncomplicated arrangement provides a straightforward and efficient means to maintain your chickens’ water at a comfortable temperature, particularly during chilly winter seasons.
Special thanks to mareed2k at Backyard Chickens for sharing indispensable ideas on how to make an inexpensive heated chicken waterer!
Other Heated Chicken Waterer Ideas
While the cinder block method is our focus, here are a few other popular DIY approaches:
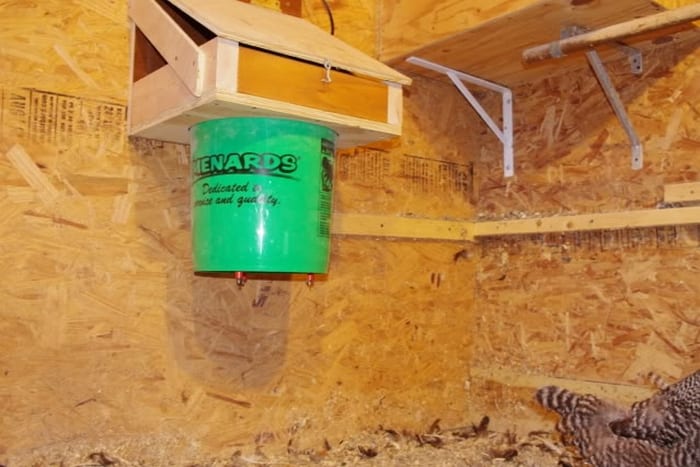
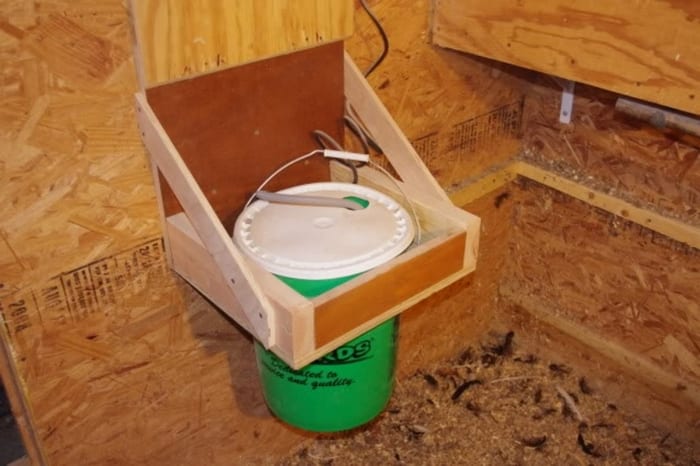
Hanging Bucket With Nipples
This water heater for chickens is a clever and practical solution for providing your feathered friends with access to unfrozen water during the cold winter months. This innovative system typically involves suspending a large bucket, equipped with specialized poultry water nipples, within your chicken coop or run.
The nipples are designed to release water when pecked by the chickens, ensuring a continuous supply of clean, unfrozen water.
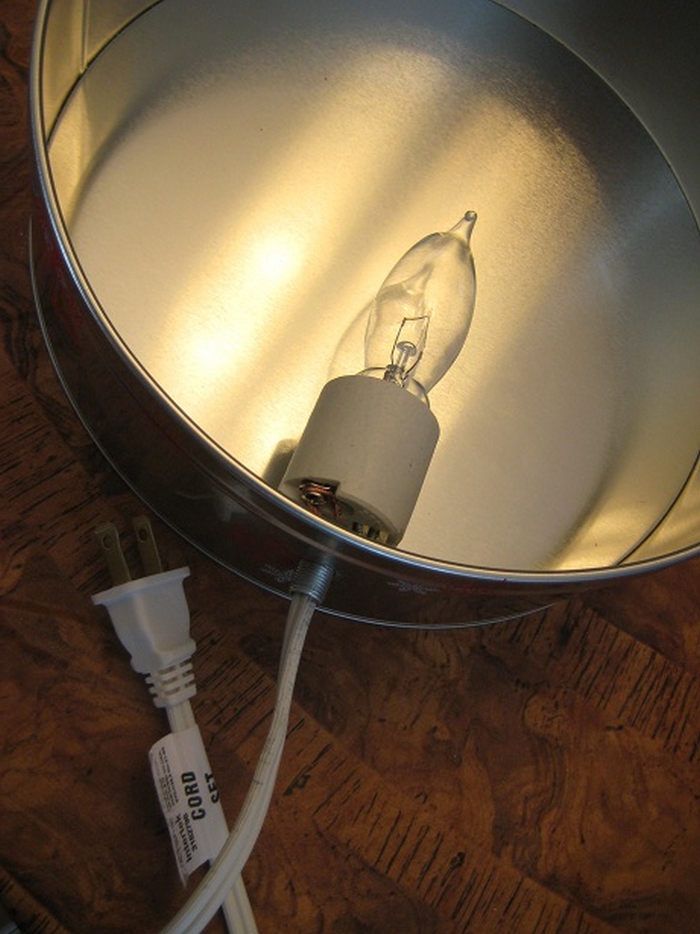
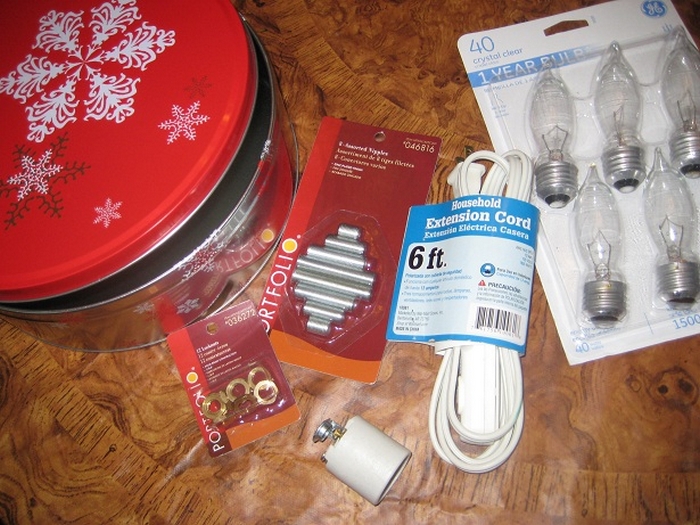
Cookie Tin Heater
This is a simple yet ingenious DIY heated chicken waterer solution that utilizes a cookie tin or a similar metal container to provide warmth in small spaces.
This cost-effective and resourceful heating device can be especially handy in environments like chicken coops, workshops, or even small outdoor sheds where a localized heat source is needed.

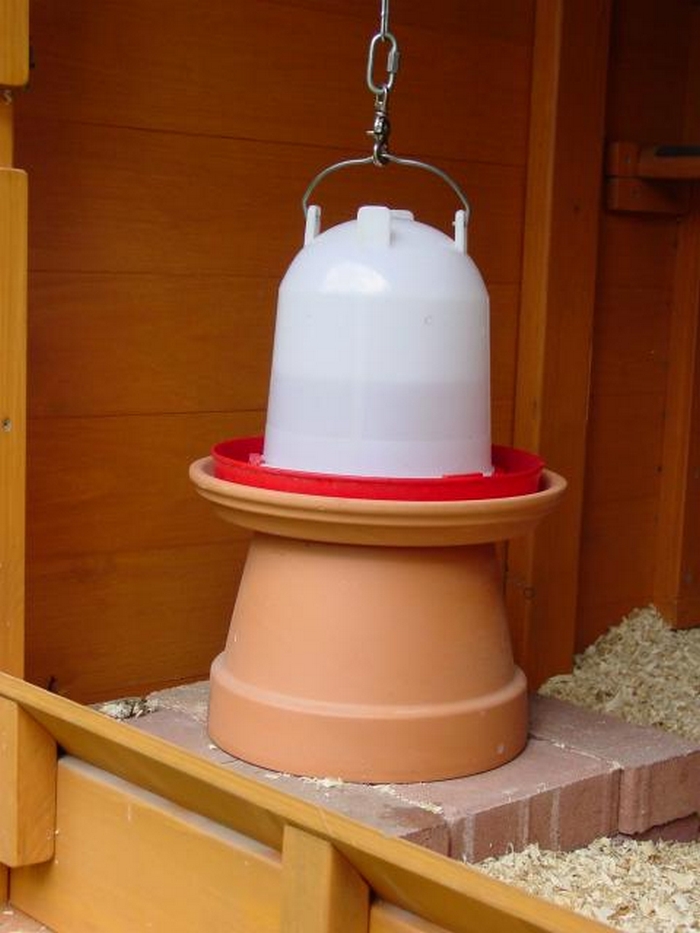
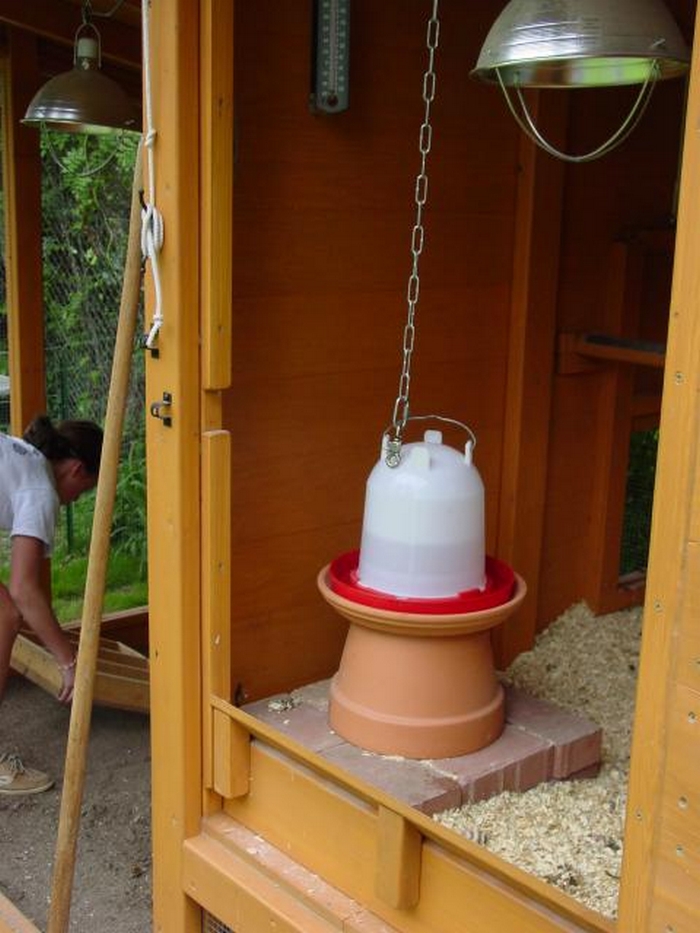
Terra Cotta Pot Heater
It is a unique and cost-effective heated chicken waterer solution that takes advantage of the natural heat-retaining capabilities of terra cotta clay pots.
This ingenious DIY heating system is perfect for places like a chicken coop, greenhouse, or outdoor hangout spot where you need that heat to go directly where you want it.
Winter Poultry Care Essentials
Keeping water liquid is just one part of winter chicken care. Also ensure your flock has:
- Dry Bedding: Deep litter method can generate a small amount of heat.
- A Draft-Free Coop: Seal major wind tunnels while maintaining ventilation.
- Extra Calories: Chickens burn more energy to stay warm; consider offering scratch grains in the evening.
Emergency Preparedness for Poultry Coops
The unpredictable nature of winter weather necessitates a proactive approach to emergency preparedness in poultry coops. Ensuring the well-being of your chickens during extreme cold, snowstorms, or power outages involves strategic planning and the implementation of backup systems. Maintaining access to unfrozen water through heated chicken waterers is paramount among the various measures to be considered.
This guide outlines key considerations and steps to prepare your poultry coop for emergencies, focusing on the critical role of heated chicken waterers.
Backup Power for Heated Chicken Waterers
Traditional heating methods for chicken waterers may fail in a power outage, putting your flock at risk of dehydration. Investing in battery-operated or solar-powered heated chicken waterers can provide a fail-safe to ensure continuous access to liquid water.
Alternatively, having a generator on standby to power your existing heated waterers can safeguard against prolonged electricity failures, keeping your chickens hydrated and healthy.
Insulated Water Storage
To complement your heated chicken waterer, consider insulating water storage containers to slow the freezing process. This measure can buy valuable time during short-term power outages or sudden outdoor temperatures drop.
Insulated containers, combined with heated waterers, can ensure that your flock has access to water, a fundamental aspect of their survival and well-being in emergencies.
Enhanced Insulation
Beyond water, the overall warmth of the coop is crucial during extreme cold. Additional insulation can help retain the heat generated by the chickens and any supplemental heating sources, including the ambient warmth that heated chicken waterers provide.
Materials such as foam board, extra straw, or fiberglass insulation can be added to walls and ceilings to prevent heat loss.
Emergency Ventilation
Even in an emergency, proper ventilation remains critical to prevent moisture buildup and ensure a healthy environment for your flock. Portable, battery-operated fans or passive air vents can help maintain air circulation if standard ventilation systems are compromised.
Ensure these solutions do not directly expose chickens to cold drafts, particularly near the water area to avoid freezing, despite the presence of heated chicken waterers.
Stockpile Essentials
Stockpiling feed and water is wise in anticipation of winter storms or disruptions. While heated chicken waterers efficiently prevent water from freezing, storing water in insulated containers ensures that your chickens will remain hydrated should you encounter difficulties in maintaining your water heating system.
Similarly, a sufficient feed reserve will keep your chickens nourished if access to supplies becomes limited.
Manual Water Warming Methods
In cases where heated chicken waterers and backups may fail, knowing how to manually warm water becomes invaluable. Keeping a supply of kettles, pots, or any safe container for heating water on a wood stove or over a fire can provide an emergency water warming solution.
Regularly replacing the water in your chicken waterers with manually warmed water will prevent freezing and maintain hydration levels until standard heating methods can be restored.
Pre-Winter Check-Up
Before the onset of severe weather, conducting a thorough inspection and maintenance check on your heated chicken waterers and emergency equipment is essential. Verify that all devices are in working order, batteries are fully charged (if applicable), and there are no leaks or damages to water storage containers.
This proactive approach ensures that your systems are reliable when your chickens need them the most.
Training and Drills
Familiarize yourself and any caretakers with the emergency preparedness plan, including how to operate backup power sources, manually warm water, and fortify the coop. Conducting drills or walkthroughs can help identify gaps in your plan and ensure a swift, effective response in emergency scenarios.
Emergency preparedness for poultry coops is a comprehensive strategy that extends beyond just maintaining warmth. It encompasses ensuring continuous access to unfrozen water through reliable heated chicken waterers, fortifying the coop against extreme weather, and having contingency plans for feed and water.
Feathered Comfort on a Budget
Elevate your poultry care game with a brilliant cinder block heated chicken waterer! In just six easy steps, you can provide your feathered friends warmth and hydration while keeping your budget in check.
Leave your frozen water worries behind and relish the presence of snug and robust chickens right in your own backyard. Immerse yourself in this cost-effective, feather-friendly endeavour, guaranteeing your flock’s happiness and hydration throughout the winter.
With a dash of creativity and a few cinder blocks, your poultry haven is just a short journey away. Read our post on the 10 unique chicken feeders for more ways to boost your egg production!
FAQ: DIY Chicken Water Heater
- How can an aquarium bubbler prevent the water from freezing?
- A continual motion aquarium bubbler protects water from freezing by eliminating surface stagnation. Agitating the water keeps it warmer and prevents ice from forming. Aeration boosts oxygen levels, improving aquatic life.
- What is the purpose of the thermo cube in a DIY heated chicken waterer setup?
- Thermo Cubes in DIY heated chicken waterers run the heater and bubbler only when temperatures dip below 35°F, saving electricity. This automated activation saves power and prevents water freezing. It cuts electricity as temperatures climb, keeping your chickens’ system cost-effective and sustainable.
- How do you maintain a DIY heated chicken waterer throughout the year?
- Seasonal maintenance keeps your DIY heated chicken waterer running smoothly and clean for your chicks. Disassemble and clean the system with hot water and apple cider vinegar in spring, storing the heater and bubbler safely and keeping the Thermo Cube plugged in if protected. Reassemble, clean, and test the heater and bubbler in autumn to confirm everything works before freezing conditions. This regimen keeps the waterer working and birds watered year-round.
- What are some potential drawbacks of using a DIY heated chicken waterer?
- DIY heated chicken waterers are useful yet difficult. Extreme cold might freeze the waterer, necessitating indoor thawing and cleaning. Maintaining the waterer is important since hens might pollute it with droppings. Not waterproofed and powered, DIY systems may be unsafe and less durable than professional ones. It needs regular maintenance and prudence in winter to work.
- How can you address the issue of chickens sitting on top of the waterer?
- You may use various methods to keep hens off your waterer. Dome-shaped caps or wire guards make waterers less sturdy and chicken-unfriendly. The waterer may be raised to neck level or placed in less favorable spots to discourage perching. Spiky strips or faux owls repel them more. Combining these approaches keeps your waterer clean and your flock’s water sanitary.
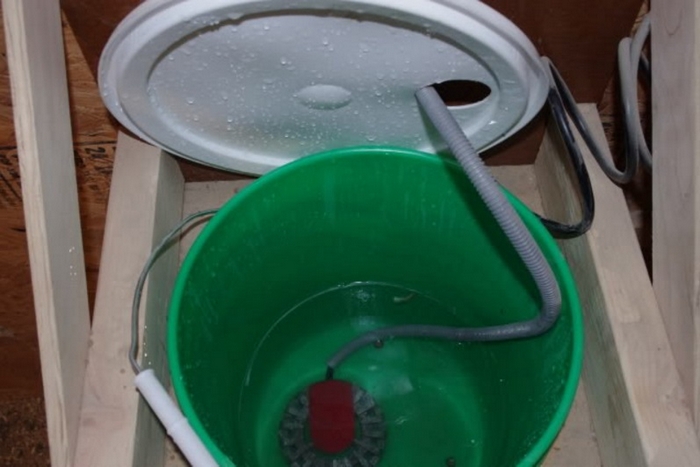
- How do you ensure the bubbler and heater stay submerged in the water?
- Keeping the bubbler and heater submerged in your bucket requires suction cups. Anchor each gadget to the bottom using suction cups to keep them in place. Regularly monitor the water level to cover the bubbler and heater for optimal functioning and constant conditions.
- How should the horizontal chicken watering nipples be positioned on the bucket?
- Lower horizontal chicken watering nipples on a bucket so all hens, including smaller ones, may reach them. To keep the bubbler and heater immersed and prevent freezing, raise the nipples to retain adequate water at the bucket’s base. Balancing height lets hens drink comfortably while saving water for the system.


