Last Updated on November 5, 2025 by teamobn
Contents
- 1 At a Glance
- 2 Why a Cigar Box Guitar?
- 3 Building a Cigar Box Guitar
- 4 How to Build a Cigar Box Guitar?
- 4.1 Shaping the Neck
- 4.2 Body Cut-Out (Neck Pass-Through in the Box)
- 4.3 Neck Cut-Out (Lid Recess So the Box Can Close)
- 4.4 Tailpiece (Hinge Method)
- 4.5 Machine Heads (tuners)
- 4.6 Sound Holes
- 4.7 Quick Checks Before Assembly
- 4.8 Final Assembly
- 4.9 Stringing and Tuning (Clear, concise, and more precise)
- 4.9.1 Step 14: Place the Nut and Bridge (Rough Position)
- 4.9.2 Step 15: String The Guitar
- 4.9.3 Step 16: Initial Tension and Action Check (Before Full Tuning)
- 4.9.4 Step 17: Tune to Pitch
- 4.9.5 Step 18: Set Intonation (Quick Method)
- 4.9.6 Step 19: Final Action and Feel
- 4.9.7 Step 20: Playability Markers
- 4.9.8 Troubleshooting Quick Guide
- 4.10 Safety and Accuracy Tips:
- 4.11 FAQ: Cigar Box Guitar (3‑String, Strike‑Through)
- 5 Final Thoughts
At a Glance
- What you’ll build: 3‑string strike‑through cigar box guitar (neck passes through box)
- Time: 2–4 hours (first build); 1.5–2 hours (experienced)
- Estimated cost: $35–$70 (box $5–$10; tuners $12–$30; wood $10–$20; misc $5–$10)
- Difficulty: Beginner–Intermediate
- Tools: Saw, drill + bits, screwdrivers, sandpaper, file; optional chisels
- Supplies: Cigar box; 100cm hardwood (neck); hinge (tailpiece); threaded rod (nut + bridge); 3 strings
- Tuning: Open G (G–D–g) is the most common; also D–A–d or g–b–d
- Safety: Wear eye protection; clamp workpieces; pre‑drill hardwood; measure twice, cut once
Why a Cigar Box Guitar?
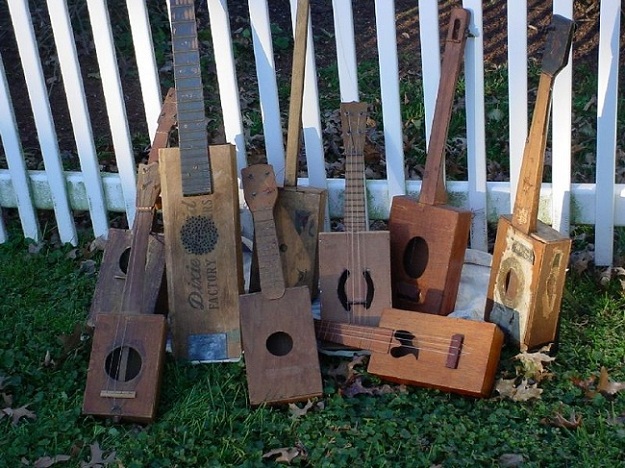
Before we start into the actual construction of a Cigar Box Guitar, I should probably explain what a CBG actually is. Like the name suggests, a CBG is a small, playable guitar with a body constructed from a cigar box.
Cigar Box Guitars have a long and colourful history dating back to the mid 19th century. Thanks to the readily available and inexpensive materials, cigar box guitars, fiddles and banjos were instrumental in the formation of the blues as most of original performers were poverty stricken African Americans without enough money to buy “real” instruments.
Over the last few years thanks to the emergent DIY culture, Cigar box guitars have had a revival. Unlike a normal six string guitar, CBGs are easy to make, easy to learn and can be put together for very little money.
They’re an ideal project to make with the kids, and they also make great presents for anyone even slightly musically inclined. This guide covers a simple strike‑through design with minimal parts.
Still not convinced? Hop over to YouTube and take a listen to some of the people who have constructed their own guitars. If that doesn’t convince you, nothing will.
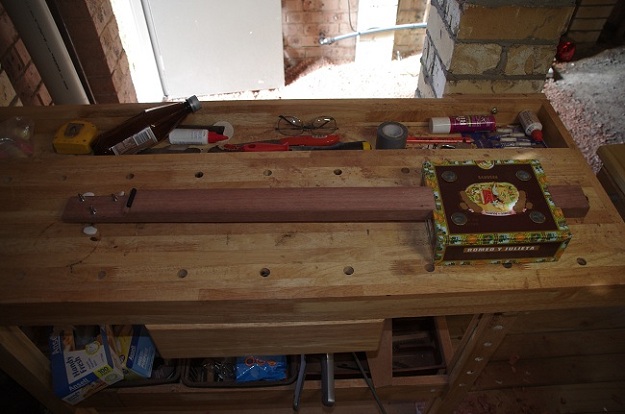
Building a Cigar Box Guitar
This particular style of cigar box guitar is referred to as a strike-through design, meaning that the neck goes all the way through the body. Strike-through guitars are the easiest to build and also require the fewest components.
What Are the Materials Needed to Build a Cigar Box Guitar?
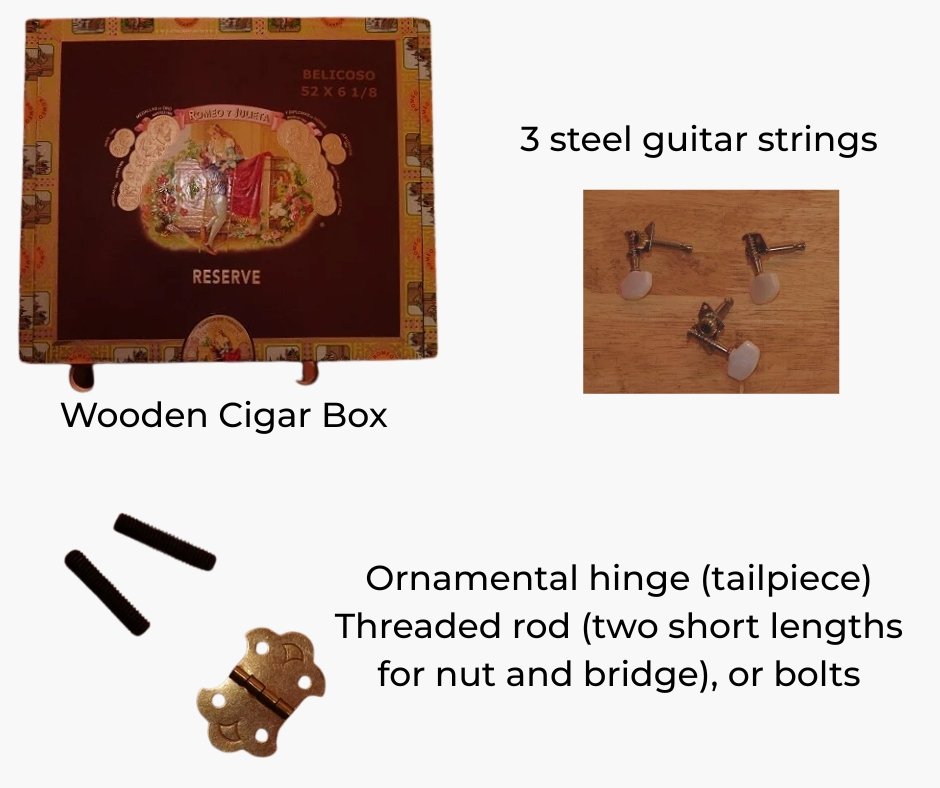
- Cigar box (wood or laminated cardboard both work)
- Hardwood neck blank, 100cm long (approx. 2–2.5cm thick x 4–5cm wide; e.g., jarrah, maple, oak)
- Ornamental hinge (tailpiece)
- Threaded rod (two short lengths for nut and bridge), or bolts
- 3 steel guitar strings (for Open G: use strings 3, 4, and 5 from a medium set)
- Optional: grommets/bushings for sound holes
- Optional: stain/varnish or wax polish for finishing
Estimated cost: $35–$70
What Are the Tools Needed to Build a Cigar Box Guitar?
- Coping/keyhole saw
- Drill and bits (1/16″–3/32″ for string holes; up to 1/2″ for sound holes)
- Screwdrivers (to match your screws)
- Sandpaper (coarse to fine)
- Wood/rat‑tail file
Recommended:
- Sharp chisels
- Bit gauge
- Clamps
How to Build a Cigar Box Guitar?
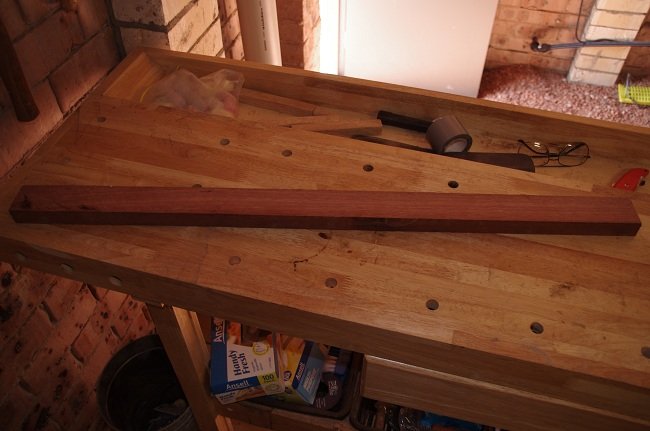
Shaping the Neck
The neck is the backbone of your CBG. It holds your strings, passes through the box, and sets the tone and feel of the finished instrument.
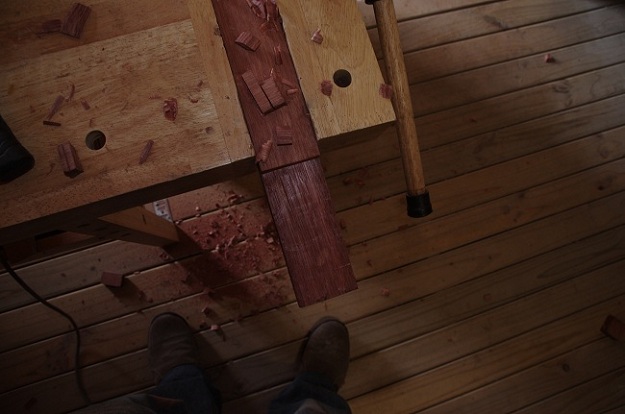
Step 1: Cut and Shape the Neck
- Cut the neck to 85–90cm (classic is 34″ ≈ 86cm). Keep offcuts for gauges and spacers.
- Thin the headstock area to ~1.25–1.5cm so tuners clear. For 3‑string, headstock length ~11–12cm.
- Mark cut lines first; use relief cuts + chisel on hard woods; smooth with file and sandpaper.
Step 2: Thin the Headstock
- Mark a headstock length of 11–12 cm (for a 3‑string).
- Thin the headstock to 12.5–15 mm so tuners can fit and turn freely.
- If cutting is difficult (dense, dry hardwood), make closely spaced saw kerfs down to depth, then remove waste with a sharp chisel.
- Smooth with a rasp/file and sandpaper.
Tip: Mark your cut lines clearly before sawing.

Step 3: Cut the Headstock Step (If Not Using a Scarf Joint)
- After marking the headstock recess, saw along the lines to remove the step.
- Clean up the cut with a chisel/rasp and sand smooth so the hardware sits flat.
Note: A straight headstock with a thin step is fine for most 3‑string CBGs.
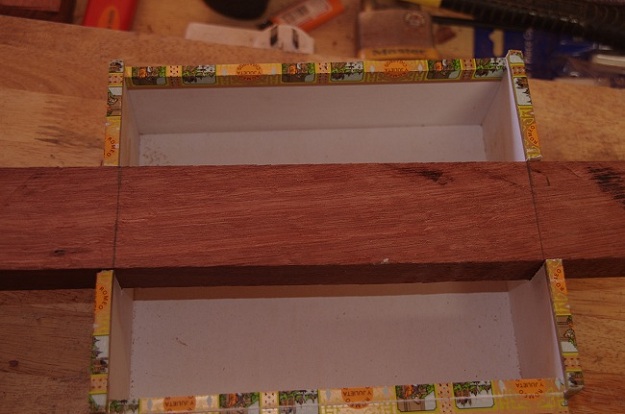
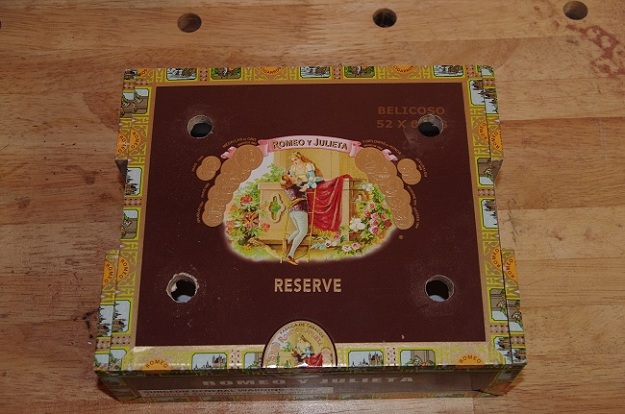
Body Cut-Out (Neck Pass-Through in the Box)
Step 4: Mark the Box
- Find and mark the center of the two box sides where the neck will pass through.
- Use a neck offcut: mark its center, align with the box center marks, and trace the neck profile on both sides.
Tip: Always verify the artwork orientation and which side the neck exits so the lid hinges from the top and the art is upright.

Step 5: Cut the Box Openings
- Cut slightly inside your lines; test fit the neck.
- Enlarge carefully with a file for a snug fit.
- The neck should sit flush with the top edge of the box.

Note: This build relies on friction and string tension — accuracy matters.

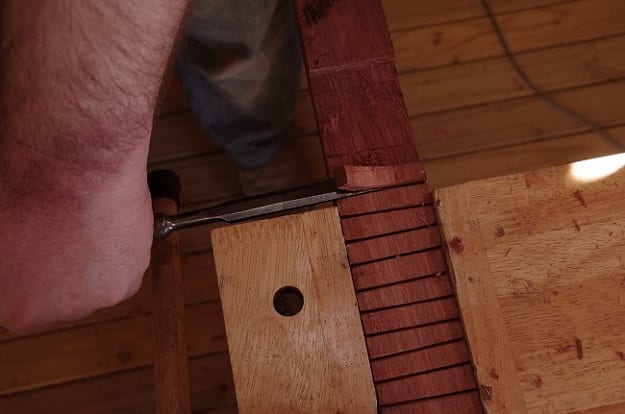
Neck Cut-Out (Lid Recess So the Box Can Close)
Step 6: Position the Neck and Mark the Lid Recess
- Measure lid thickness (use a cut-off from the box as a depth gauge) and mark the recess depth on both sides of the neck.
- Dry-fit the neck through the box. Aim for the tail to sit about 5 cm from the box end for good bridge/tail spacing.
- Mark the inside edges of the box on the neck.
With most boxes, you can use a cut-off from where you made the cigar box guitar body cuts as a depth measure for those cuts.

Step 7: Cut the Lid Recess in the Neck
- Go slowly and keep the fit tight for strength.
- Use guide saw kerfs to the marked depth; remove waste with a chisel.
- File/rasp and sand until the lid sits snug and flush when closed.
Tailpiece (Hinge Method)
Step 8: Prepare the Hinge Tailpiece
- Drill three string holes in a small brass hinge using a 1/16″ or 3/32″ bit—large enough for strings, but small enough to catch the brass ball-ends.
- If you lack a small bit, a fine nail can be used carefully to start holes.
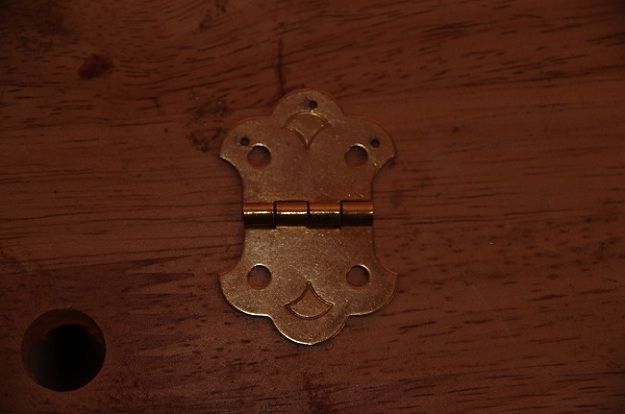
Step 9: Mount the Tailpiece
- Screw the hinge to the rear face of the neck at the tail so it wraps around the end.
- Pre‑drill all screw holes to prevent splitting.

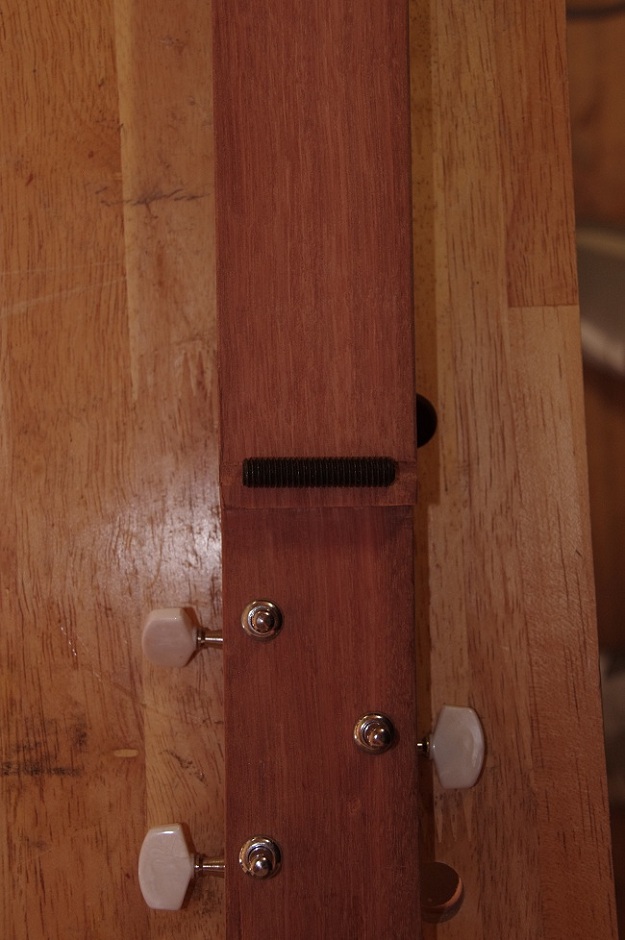
Machine Heads (tuners)
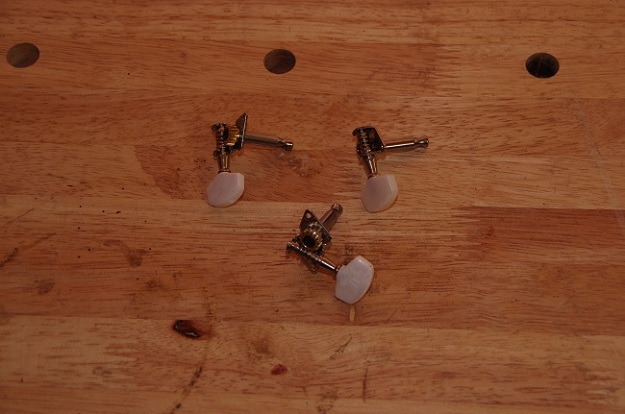
Step 10: Plan Tuner Orientation and Layout
- Determine tuning direction:
- Open/external gears should face the body so all tuners turn the same way.
- Planetary tuners generally all turn the same direction.

- Mark drill points:
- Two tuners on one side: evenly spaced, ~25–30 mm from each headstock end and ~10 mm from the edge.
- One tuner on the opposite side: centered along the length, ~10 mm from the edge.
- Double-check spacing so strings won’t crowd.

Step 11: Drill Tuner Holes
- If bushings require countersinks, wrap electrical tape on your bit to set the depth.
- Drill pilot holes, then to the final diameter per your tuners.
- Pre‑drill tiny holes for tuner screws; they’re small and need a pilot.

Step 12: Cut the Nut Groove
- File a shallow groove for a threaded-rod or bolt nut 3–5 mm from the headstock step.
- A round file is ideal; a dowel or pencil wrapped in coarse sandpaper also works.
Sound Holes
There’s one final task before you can put your cigar box guitar together – you need to make some sound holes.
Step 13: Add Sound Holes
- Drill or cut 1 to 4 sound holes (number and placement are flexible).
- Options: simple round holes, F‑holes, or add grommets/bushings to protect edges and enhance looks.
Quick Checks Before Assembly
- The neck top is flush with the box top.
- Headstock is thinned enough for tuners and washers/bushings.
- Neck pass-through is snug; lid closes fully with the recess.
- Tailpiece is secure; string path is straight from tail through nut to bridge.
- Box art is oriented correctly; lid hinges at the top.

Final Assembly
Fit all components loosely first — neck through box, hinge tailpiece, tuners, nut, and bridge. Confirm straight string alignment and full lid closure. Only then tighten screws and begin stringing.
Stringing and Tuning (Clear, concise, and more precise)
Step 14: Place the Nut and Bridge (Rough Position)
- Nut: Seat the threaded rod/bolt in the nut groove 3–5 mm from the headstock step. Ensure it’s centered and stable.
- Bridge: Start with the bridge about 70 mm from the tail edge of the box on medium-size boxes. You’ll fine‑tune this during intonation.
Tip: Use a small strip of thin rubber, felt, or heat‑shrink on the bridge rod if it rattles on the lid.

Step 15: String The Guitar
- Feed each string through the hinge tailpiece holes from back to front.
- Route over the bridge, straight down the neck, over the nut, and into the tuner posts.
- Lock the strings:
- Pull taut, leave 5–7 cm slack.
- Bend at 90° and feed through the tuner hole.
- Wrap neat, downward coils as you wind.
Tip: Wind from the inside of the headstock outwards so strings don’t rub against each other.
Step 16: Initial Tension and Action Check (Before Full Tuning)
- Bring each string to a gentle, low tension in order: low → middle → high.
- Check action:
- Slide/lap style: higher action is OK (bridge/nut can stay as-is).
- Fretting style: if too high at the nut, deepen the nut groove slightly with a round file. If too high overall, try a thinner bridge rod or shim under the neck within the box to adjust height.
- Ensure strings track straight over nut and bridge (no sideways pull).
Tip: If a string buzzes at the nut, raise that slot slightly (shim the nut) or file a fresher slot with a gentler ramp towards the tuners.

Step 17: Tune to Pitch
- Common tunings:
- Open G (G–D–g) — most common
- Open D (D–A–d)
- g–b–d (higher, bright)
- Tune from low to high string to distribute tension evenly.
- Stretch strings gently (pull up at 12th fret area) and retune 2–3 times to stabilize.
Tip: If the bridge slides while tuning, lightly mark its current spot with low‑tack tape on the lid so you can compare before/after intonation tweaks.
Step 18: Set Intonation (Quick Method)
- Fretless reference method (works for slide and fretless builds):
- Tune the open middle string (D in G–D–g) to pitch.
- Lightly touch at the 12th “fret” position (midpoint of scale) to make a harmonic; compare to the fretted note at the same position (press directly over where the 12th fret would be, or use your slide).
- If the fretted note is sharp, move the bridge slightly back (away from the nut). If flat, move it forward.
- Retune the open string and recheck. Repeat for the other two strings.
- Mark the final bridge position with a faint pencil line inside the box art border so you can return to it later.
Tip:
- For simple builds, perfect intonation isn’t critical; prioritize a pleasing chord sound up the neck where you’ll actually play. See this beginner’s tuning and setup guide.
- Hint: On a 34″ (~864 mm) scale, the 12th position is ~432 mm from the nut.
Step 19: Final Action and Feel
- Slide players: Ensure no fretted buzz; slightly higher bridge is fine.
- Fretting players: Aim for an even feel along the neck. If high near the nut, deepen nut slots a touch; if high everywhere, try a lower bridge rod. If still high, reduce the lid recess shim or deepen the neck recess (last resort).
- Check for rattles:
- Tighten loose tuner screws and bushing nuts.
- Confirm hinge screws are snug.
- Add a small felt piece under the tailpiece if the hinge plate vibrates on the wood.
Tip: A tiny drop of graphite (pencil lead) in nut slots helps tuning stability.
Step 20: Playability Markers
- Quickly mark the 5th, 7th, and 12th positions with a pencil or a fine paint dot on the neck edge. These are common slide targets.
- Optional: Add stick‑on dots or burn marks for durability.
Troubleshooting Quick Guide
- String buzz (open): Nut slot too low or rod not fully seated — shim nut slightly or recut slot cleanly.
- Buzz (along neck): Action too low — raise the bridge a little or check for rattling hardware.
- Dead/muted tone: Bridge/nut not bearing cleanly — rotate rod, ensure single line of contact on the string.
- Tuning drift: More initial stretch needed; lubricate nut slots; ensure neat tuner wraps (2–4 wraps per post).

Safety and Accuracy Tips:
- Cut conservatively; it’s easier to remove material than add it.
- Use depth stops/tape on drill bits.
- Pre‑drill all screw holes.
- Test fit frequently; file/rasp slowly for tight fits.
FAQ: Cigar Box Guitar (3‑String, Strike‑Through)
- What wood is best for the neck?
- Straight‑grained hardwoods like maple, oak, jarrah, or ash. Avoid softwoods (they dent) and warped stock (causes tuning and action issues).
- Do I need power tools to build this?
- No. A hand saw, hand drill, files/rasps, sandpaper, and clamps are enough. Power tools speed things up but aren’t required.
- What string gauges should I use?
- Open G (G–D–g): approx .042–.032–.024
- Open D (D–A–d): approx .038–.028–.020
- Higher tuning (g–b–d): go a bit lighter to reduce tension. Use strings 5–4–3 from a standard 6‑string set as a simple rule.
- How high should the action be?
- Slide/lap style: medium‑high is fine.
- Fretting style: lower action by slightly deepening nut slots and/or using a thinner bridge rod. Aim for clean notes without buzz; adjust by ear and feel.
- Where should I place the bridge?
- Start about 70 mm from the tail edge on a medium box, then fine‑tune with intonation: if fretted 12th is sharp, move the bridge back; if flat, move it forward. Mark the final spot lightly with pencil.
- Do I need frets?
- No. Many CBGs are fretless and played with a slide. If you want frets, add stick‑on markers or a pre‑slotted fretboard later. At minimum, mark 5th, 7th, and 12th positions.
- Why are my strings buzzing or not staying in tune?
- Common causes: nut slots too low or rough (shim or recut and add graphite), bridge rod not making a clean contact edge (rotate or replace), loose hardware (tighten tuners/hinge screws), or strings not properly stretched (stretch and retune 2–3 times).
Final Thoughts
You’re done. With the bridge set, action dialed, and strings stable, your 3‑string CBG is ready to sing. Explore Open G for gritty blues riffs, try Open D for slide ballads, and mark your favorite positions as you go. No two cigar box guitars sound the same — that’s the magic you just built.
Previously published in Australian Guitar magazine #93!
We have more fun instrument ideas. Check out our drum set chandelier!