Last Updated on December 19, 2025 by teamobn
A duct tape wallet is one of those rare projects that is cheap, useful, and fun all at the same time. With just a roll of duct tape, a few basic tools, and less than an hour, you can create a slim, durable wallet that easily holds your cards and cash.
Unlike a store‑bought leather wallet, a duct tape wallet:
- Costs very little to make
- Is tough enough for everyday use
- Can be customized in endless ways with colors and patterns
- Is easy to replace or remake if it wears out
This guide walks you through the process step by step. You don’t need any crafting experience. If you can measure, cut, and fold, you can do this.
It’s a perfect weekend project for:
- Teens who want to make their own accessories
- Parents looking for a simple craft to do with kids
- Anyone who wants a low‑profile wallet that doesn’t attract attention
- People who enjoy DIY projects and like to say, “I made this myself”
Contents
- 1 At a Glance: What You’ll Make
- 2 Why Make a Duct Tape Wallet?
- 3 Crafting a Duct Tape Wallet
- 3.1 Materials and Tools You’ll Need
- 3.2 Step‑by‑Step: How to Make a Duct Tape Wallet
- 3.2.1 Step 1: Cut the Duct Tape Strips
- 3.2.2 Step 2: Make the Wallet Body From Duct Tape “Fabric”
- 3.2.3 Step 3: Trim the Sheet to Wallet Size
- 3.2.4 Step 4: Fold the Wallet Body Into Shape
- 3.2.5 Step 5: Create Card Pockets
- 3.2.6 Step 6: Seal the Sides of the Wallet
- 3.2.7 Step 7: Add an Optional ID Window
- 3.2.8 Step 8: Add Final Touches and Decorations
- 4 Durability and Simple Maintenance Tips
- 5 Conclusion
At a Glance: What You’ll Make
Before we dive into the details, here’s a quick overview.
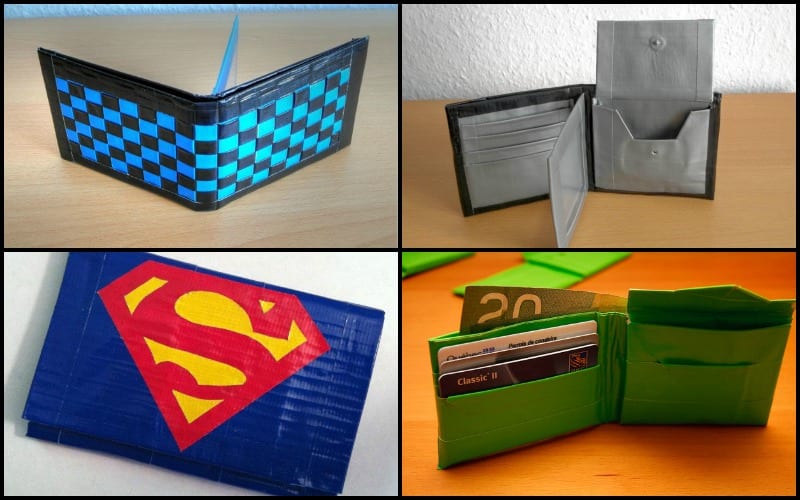
What you’re making: A classic bi‑fold wallet made entirely from duct tape. It has:
- Space for paper bills
- Card slots for IDs, credit/debit cards, and loyalty cards
- Optional clear ID window
- Room for extra features like a coin pocket or key loop if you want to get fancy
Time needed: Around 30 to 60 minutes, depending on your experience and how detailed you get with decoration.
Skill level: Beginner-friendly. If you can follow directions and take your time, you can build this wallet.
Basic process
- Cut strips of duct tape.
- Turn them into a flat sheet of “duct tape fabric.”
- Trim the sheet into a rectangle for the wallet body.
- Fold the sheet to form the wallet shape.
- Build and attach card pockets.
- Seal the sides.
- Add an optional ID window.
- Decorate and finish.
Once you understand the basics, you can easily adjust the size, shape, and features to match how you like to carry your money and cards.
Why Make a Duct Tape Wallet?
There are a lot of DIY projects online, so why choose this one?
Real‑World Use, Not Just a Cute Craft
Here’s a real situation where a duct tape wallet shines.
My friends and I run a small clothing business. Most weekends we’re at a crowded street market, walking through tight aisles and dealing with lots of people. There’s a lot of bumping and rushing, and unfortunately, that also makes it a good place for pickpockets.
For a long time, I used cheap wallets I didn’t care about. If someone stole it, it wasn’t a big loss. But those wallets were bulky and obvious in my pocket. They also didn’t last long; the stitching came apart, or the fake leather peeled.
A duct tape wallet solved several problems at once:
- It’s slim. It disappears into a front pocket, making it harder for anyone to spot or grab.
- It’s light. You don’t feel weighed down, even if you’re walking around for hours.
- It’s cheap and easy to replace. If it gets lost, damaged, or stolen, you can make another one in under an hour.
- It’s customizable. You can make it bright and bold or simple and plain, depending on how much attention you want.
Great for Kids, Teens, and Beginners
Duct tape wallets are also fantastic projects for:
- Teens who want to make something practical that they can actually use
- Scouts, youth groups, or school clubs that need a low‑cost activity
- Families looking for a simple craft that doesn’t require expensive tools
Because duct tape comes in so many colors and patterns, everyone can end up with a design that feels personal, from neon stripes to subtle gray.
Crafting a Duct Tape Wallet
Materials and Tools You’ll Need
You don’t need a workshop to make this wallet. Most of the tools are simple and easy to find.
Main Material
- Duct tape
- This is the star of the project. You can use classic silver duct tape or choose from many colors and patterns. For your first wallet, a single roll is enough. Once you get comfortable, mixing colors becomes fun.
Tips for choosing duct tape:
- Pick a brand that feels strong and sticky, not thin or flimsy.
- Solid colors often give a cleaner look for your first try.
- Patterned tape can be great for the outside, but start simple if you’re new.
Tools
- Scissors or craft knife
- You’ll use these to cut straight lines in the tape. A sharp pair of scissors or a sharp craft knife makes the job easier and safer.
- Ruler
- A ruler helps you measure accurate lengths for your tape strips and keeps your wallet size consistent. A metal ruler is especially helpful if you’re using a craft knife.
- Cutting board or thick cardboard
- This protects your table or work surface while you cut. A kitchen cutting board, a self‑healing mat, or even a piece of thick cardboard will work.
Optional materials
- Clear plastic for an ID window
- A small piece of clear plastic, such as a cut‑out from a zip‑lock bag or clear product packaging, makes a great ID window.
- Elastic band
- If you want to add a money band or extra security strap, a simple elastic band can be taped into place.
- Marker or pen
- Helpful for marking cutting lines and checking measurements—just be careful not to mark the parts of the wallet you want to keep clean.
Gather everything before you start. Having a clear space with all your tools ready will make the project smoother and more enjoyable.
Step‑by‑Step: How to Make a Duct Tape Wallet
Step 1: Cut the Duct Tape Strips
Start by cutting 8 to 10 strips of duct tape, each about 9 inches long.
Why 9 inches?
- It’s long enough to hold paper bills and room for folding, but not so long that it’s hard to control.
Tips as you cut:
- Stick one end of the tape to the edge of your cutting board or table, pull it out to about 9 inches, and cut.
- Try to keep each strip roughly the same length, but don’t stress about getting them perfect. You’ll trim the edges later.
If your tape has a pattern (like stripes or pictures), pay attention to the direction so your design doesn’t end up upside‑down.
Step 2: Make the Wallet Body From Duct Tape “Fabric”
Now you’ll turn your separate strips into a solid sheet.
- Place four strips sticky‑side up on your cutting board.
- Line them up horizontally.
- Overlap the edges by a few millimeters so there are no gaps between strips.
- Make sure the sticky surface is all facing up.
- Carefully place another four strips sticky‑side down on top of the first layer.
- Line them up so they fully cover the sticky part of the bottom strips.
- Smooth as you go to push out any air bubbles.
You should now have a single sheet of duct tape with no exposed sticky parts. It should feel like a piece of flexible, slightly stiff fabric.
If some sticky pieces are still exposed at the edges, don’t worry, we’ll trim those off in the next step.
Step 3: Trim the Sheet to Wallet Size
Use your ruler and cutting tool to turn your duct tape sheet into a clean rectangle.
- Aim for a size around 8 inches wide by 7 inches tall.
- The 8‑inch side will become the width of the wallet, and the 7-inch side will fold in half to make a wallet about 3.5 inches tall.
Steps:
- Line up your ruler along one edge of the sheet.
- Trim a straight line to remove uneven ends or extra tape.
- Measure and cut the opposite side so the sheet is about 8 inches wide.
- Do the same for the top and bottom to reach about 7 inches tall.
You now have a neat rectangle that will become the main body of the wallet.
This is a good time to double‑check:
- Hold a bank card against the sheet.
- Imagine folding the sheet in half.
- Make sure the card will fit inside with a bit of space at the top.
If it seems too tight, adjust slightly, add a bit of height or width.
Step 4: Fold the Wallet Body Into Shape
Fold the 7‑inch height of your rectangle in half so the 8‑inch sides meet. Press along the fold to create a sharp crease.
When folded, your wallet should now be about:
- 3.5 inches tall
- 4 inches wide when closed (8 inches wide when open)
Check how it feels in your hand:
- Does it feel like a comfortable size?
- Does it look like a normal wallet?
If the edges are uneven, trim them again while the wallet is folded. This helps both layers match exactly.
Step 5: Create Card Pockets
Now it’s time to add the card slots that will hold your IDs, debit/credit cards, and loyalty cards.
- Cut several strips of duct tape about 4 inches long.
- For each strip, fold it in half lengthwise so the sticky sides are pressed together.
- This creates a stiff little panel with no sticky parts.
These panels are the basic pieces for your card pockets.
To turn them into pockets:
- Place one panel on the inside of one half of the wallet, near the bottom.
- Make sure the top edge of the panel is open; that’s where the card will slide in.
- Use small pieces of tape along the left, right, and bottom edges to hold the panel in place, leaving the top edge freely open.
Layer more pockets above the first:
- Overlap each pocket slightly so you can still see the top of each card.
- Two or three pockets on each side work well.
Try sliding a card into each pocket to check the fit. Adjust the position if needed:
- If the card goes in too deep, move the pocket down.
- If it barely fits, raise the pocket so more of the card shows.
Repeat on the other side of the wallet if you want more card storage.
Step 6: Seal the Sides of the Wallet
Right now, the wallet is open at the sides and could let cards slip out. To fix that, you’ll seal the edges.
- Keep the wallet folded as if it were in your pocket.
- Cut two strips of tape long enough to cover the left and right sides from top to bottom.
For each side:
- Place the strip so half of its width sticks to the front of the wallet and half to the back.
- Wrap it around the edge and press firmly to seal.
Things to check:
- Make sure you don’t accidentally seal the top openings of your card pockets.
- Run your fingers along the edges and corners to press them down.
- If you feel any exposed sticky bits, cover them with small scraps of tape.
When you’re done, your wallet should feel smooth at the edges and hold together as a single piece.
Step 7: Add an Optional ID Window
If you carry an ID that you need to show often, like a student card, work ID, or transit pass, an ID window is helpful.
To add one:
- Cut a small rectangle of clear plastic slightly larger than your ID.
- Decide where you want the window, usually on the inside left or right side.
- Place the plastic where you want it.
- Use thin strips of duct tape to frame the plastic and attach it on three sides, leaving the top or one side open so you can slide your ID in and out.
Tips:
- Try to keep tape off the center area of the plastic so the ID can be read easily.
- Don’t make the opening too loose, or the card might slide out.
Test it by putting your ID inside and closing the wallet.
Step 8: Add Final Touches and Decorations
You now have a fully working duct tape wallet. The last step is to customize it so it feels like yours.
Ideas for decorating:
- Color blocking: Cover the outside with big sections of different colors.
- Stripes: Add horizontal or vertical stripes using narrow strips of another color.
- Initials or icons: Cut out your initials or simple shapes (like stars or lightning bolts) from a contrasting color and tape them on.
- Themed designs: Use team colors, school colors, or colors that match your favorite hobby.
Press all the decorative pieces firmly to make sure they stick well. Fold and unfold the wallet a few times to check that nothing peels or catches when you put it in your pocket.
Durability and Simple Maintenance Tips
A well‑made duct tape wallet is tougher than many people expect. Duct tape is built to handle rough use, and that strength helps your wallet survive daily life.
How Durable Is a Duct Tape Wallet?
Under normal conditions, a duct tape wallet:
- Handles being carried in a pocket or bag every day
- Resists light rain or splashes of water
- Bends without tearing if it’s not overfilled
However, there are a few things that can shorten its life:
- Extreme heat: High temperatures (like leaving it on a hot car dashboard) can soften the adhesive, making edges sticky or causing layers to slide.
- Heavy overstuffing: Packing in too many cards and receipts stretches the tape and pulls at seams.
- Constant moisture: While duct tape is water‑resistant, being soaked or washed repeatedly can slowly break down the adhesive.
Think of a duct tape wallet as a tough, everyday wallet that does best with normal, reasonable use.
How to Clean Your Duct Tape Wallet
Over time, your wallet may pick up fingerprints, dirt, or small stains. Cleaning is simple:
- Wipe the surface with a damp cloth to remove dust and light dirt.
- For tougher spots, use a small amount of rubbing alcohol on a cloth and rub gently.
- Let the wallet air‑dry completely before putting anything back inside.
Avoid harsh chemicals or rough scrubbing, which can scratch or dull the surface.
Fixing and Reinforcing Worn Areas
One of the biggest advantages of a duct tape wallet is how easy it is to repair.
If you notice:
- A corner starting to lift
- A fold that looks thin or cracked
- An edge that feels sticky
You can:
- Trim any loose or frayed pieces.
- Press a new strip of tape over the problem area, wrapping it around the edge if needed.
- Add an extra strip along the main fold to reinforce it.
With occasional small repairs like these, your wallet can last significantly longer.
Safety Notes
This is a simple, low‑risk project, but it still involves sharp tools and sticky materials.
- Always cut away from your body when using a craft knife.
- Use a cutting board or thick cardboard to protect surfaces and keep the blade from slipping.
- Keep fingers clear of the blade’s path and cut slowly rather than rushing.
- If kids are doing this project, an adult should handle the cutting or at least supervise closely.
- Avoid leaving pieces of tape lying around where they can stick to hair, clothing, or pets.
Paying attention at this stage means you can focus on the creative part without worrying about accidents.
Conclusion
Making a duct tape wallet is a great way to see how versatile and creative simple materials can be. They offer a durable, customizable solution for anyone looking to express their style while ensuring practicality. As you explore various designs and functionalities, your duct tape wallet can truly become a reflection of your personal taste and needs.
Want another DIY wallet idea? Here’s a tutorial for kids’ wallet…
FAQs About Duct Tape Wallets
- How long does it take to make a duct tape wallet?
- Most people can make their first duct tape wallet in 30 to 60 minutes. As you get used to the steps and the feel of the tape, you’ll likely become faster and more precise.
- Is a duct tape wallet really durable enough for daily use?
- Yes, if you treat it reasonably. A duct tape wallet can handle daily carrying, being opened and closed many times, and living in a pocket or bag. Just avoid constant overstuffing and extreme heat.
- Can kids and teens make this on their own?
- Teens can usually handle this project on their own. Younger kids can help with measuring and placing the tape, but an adult or older teen should manage the cutting and any tricky parts. It’s a great project to do together.
- What size should I make my duct tape wallet?
- A good standard size is about 3.5 inches tall and 4 inches wide when folded. This fits most bank cards and IDs with a little room at the top so you can grab them easily. Once you’re comfortable with the design, you can experiment with larger or smaller versions.
- Can I add a zipper or more advanced features?
- Yes. Some people like to attach a small zipper pouch inside the wallet for coins or keys. You can tape the zipper pouch in place just like any other pocket. As long as you attach it securely and keep the overall shape comfortable, you can be as creative as you like.
- What if my wallet starts to peel or fall apart?
- One of the best things about a duct tape wallet is how easy it is to repair. If an edge peels, trim it and cover it with a fresh strip. If a fold weakens, reinforce it with another layer. You can often get a lot more life out of the wallet with just a few minutes of repairs.