Last Updated on October 29, 2025 by teamobn
Dining al fresco is only half the fun when it comes to entertaining in the summer. Backyard kitchens also make all the preparation easier and more pleasant. Convenience aside, an outdoor cooking area can also dramatically improve the look of your backyard or patio space. Whether you’re designing your own backyard kitchen or simply want inspiration for a planned kitchen renovation, this project might be just exactly what you need.
You know the scene… you’re the host, everyone’s having fun and you’re stuck in the kitchen getting the drinks and food! If you’re lucky, a friend brings you a drink and a smile while everyone else is outside having a great time! Option # 1 would be to bring everyone into the kitchen, but that’s hardly practical. Option #2 is to take the kitchen to the party. Yes – problem solved!
This DIY backyard kitchen is sure to make gatherings a lot more fun for everyone! And it’s made entirely from upcycled materials including the ubiquitous (yet very humble) pallet!
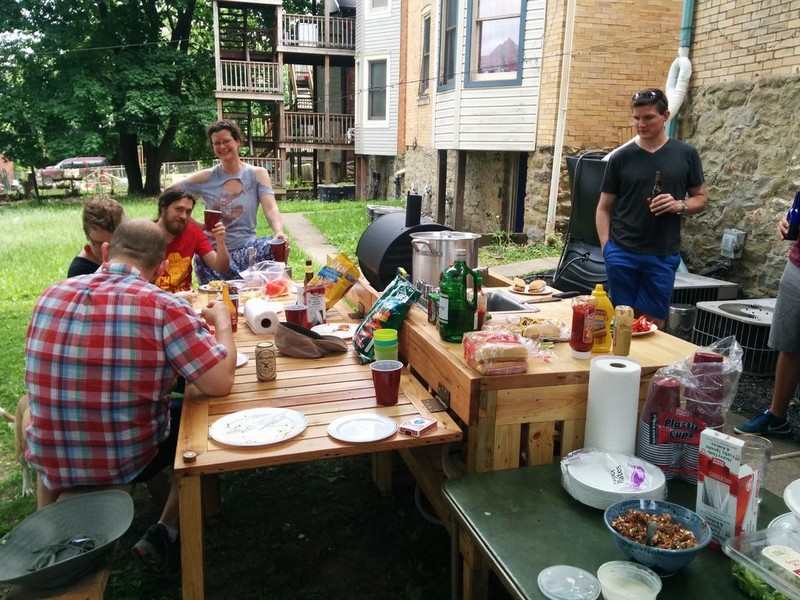
This backyard kitchen brings everyone closer together — literally and figuratively 😉 It’s a kitchen that allows you to cook while you talk with your family and friends, face-to-face! This setup also makes it more convenient for your guests. Here they won’t have to stand up from time to time to refill their plates.
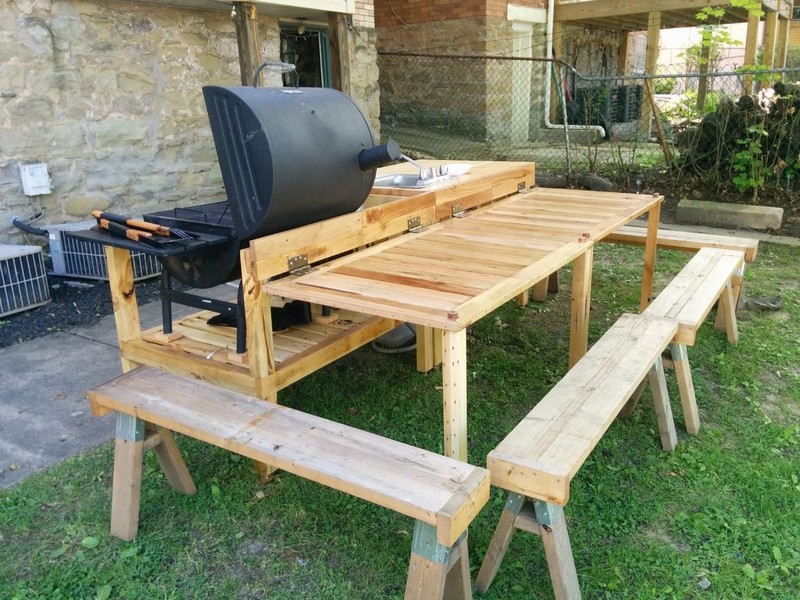
Want to know what comprises this cool kitchen? It’s made of two modular units, a hot unit and a prep unit, which feature:
- Charcoal grill and turkey fryer
- Butcher block countertop
- Cold water sink
- Fold-out/removable tables (seating for 6-10)
- Storage shelving
Building a Backyard Kitchen
Materials:
- Pallets and other reclaimed wood
- Grill
- Sink
- Turkey Fryer
- Markers
- Magnets
- Wood Glue
- Polyurethane Varnish
- Wood Screws
- Hinges
Tools:
- Kreg Jig
- Drill
- Wood Clamps
- Table Saw
- Planer
- Miter Saw
- Measuring Tape
- Hammer
- Nail Gun
- Paintbrushes
- Basic Plumbing Tools
Steps:

Because I chose to work almost exclusively with reclaimed materials, I found that it was impractical to do a complete design of the DIY backyard kitchen project first – I couldn’t count on there being enough of a given component to complete the design. But I also didn’t want to go grabbing materials willy-nilly, because I have a limited amount of storage space. In reality, the designing-sourcing cycle for this DIY backyard kitchen looked something like this:
Concept: I knew I wanted a DIY backyard kitchen made of several units, where the faces folded out to be tables, and I thought I wanted this to include a prep area, dish rack, sink, grill, smoker, turkey fryer, and chest cooler. That was enough to start.
Constraints: I already had certain materials for the DIY backyard kitchen (grill and leftover butcher block), so the units would have to be designed to incorporate those. In addition, I wanted the units to be able to be moved into my basement during the winter, so their width could not exceed that of the basement door (about 32″).
In terms of their length, they’d need to approximate a small 6-person kitchen table (about 48″). The height of the units would need to be close to a standard countertop (about 36″), and the fold-out tables would need to be close to a standard table (about 29″).
Using the concept and constraints, I started making rough designs of the project, eventually deciding that incorporating all of the things I thought I wanted would be WAY too much work. Instead, I chose to focus on the grill, turkey fryer, sink, and prep area, knowing that I could expand the units in the future.
With this design roughed out, I started sourcing materials.

With the broad concept in mind, I began collecting materials for the DIY backyard kitchen on the weekends.
We have a construction reuse depot called Construction Junction here in Pittsburgh, where I happened to find a small sink (the dimensions of which then became part of the constraints).
Additionally, I set up two alerts on Craigslist, one for free wood and the other for a turkey fryer. Doing this early was essential; it took only a few days to get some good structural wood from leftover garden timbers, but several weeks to find a turkey fryer.
After identifying these sources of reclaimed materials, I would check them on a regular basis for new and useful materials, until I felt I had collected enough to begin working on the DIY backyard kitchen project in earnest. Before designing the final project, however, I needed to create a consistent stock from the materials I had sourced.

Many projects I see that use reclaimed materials (especially pallets) end up incorporating materials without much modification, creating a hodge-podge aesthetic. I wanted a cleaner look for my DIY backyard kitchen project, and because I was using half-lap and tongue-and-groove joints, I needed wood of consistent sizes.

The pallet wood and garden timbers make up the carcass of the units – they’re the “bones,” and therefore were the pieces where consistent dimensions would be most essential. The important dimensions for consistency were width and thickness; since I didn’t have a complete design yet there was no reason to cut boards to a specific length, and I knew I could join boards to make them longer if necessary.

I jointed and planed the pallet wood to the largest “whole” thicknesses that were possible; 1″, 3/4″, 1/2″, and 1/4″. Additionally, I ripped the wood to the largest whole widths I could – this ranged from 5 1/2″ down to about 2″. The majority of the wood that I was able to source ended up being planed down to a 1/2″ thickness and ripped to about 3″ wide.

After taking inventory of the stock that I now had available for my DIY backyard kitchen project, along with the other constraints, I was ready to make the final design. I tried several methods to learn to design the units, including drawing them by hand, cutting the components out of paper, and actually laying out all of the materials to see what would work best.

Eventually, I gave up on making the drawings by hand; I’m not much of an artist and the overall construction of the units was complex enough that I was having difficulty visualizing it in my head.
I decided to use this as an opportunity to learn to use SketchUp, and I found that being able to manipulate the parts in 3D was exceptionally useful. Within about a day, I had learned enough to use SketchUp effectively, and within about another day I had produced a basic model for the project.

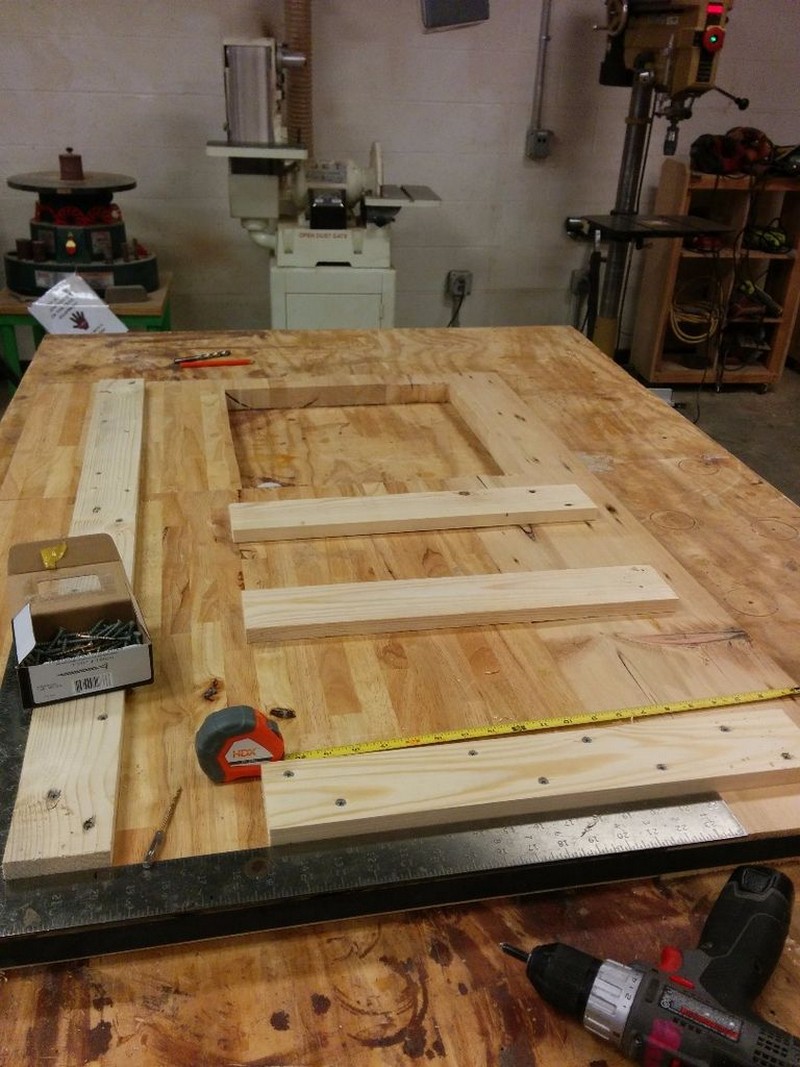
With the designs of the DIY backyard kitchen created and each part measured, I started marking my stock with cuts and joints. Because I had to make several identical or very similar components, it was great to be able to batch the work and do all of those components at the same time. With all of the components clearly marked, it was very easy to move quickly through cutting.

Since I work in a shared workspace, it was important to me that I didn’t completely take over the shop with my DIY backyard kitchen project – not only would it prevent others from using the workspace, it would significantly increase the chances that I would forget to cut a particular component or lose track of some of my stock. Doing the layout of the DIY backyard kitchen project ahead of time made that much easier.

The large garden timbers I had sourced for this project were eventually ripped down to consistent 2″x3″ beams. I cut eight upright posts about 34″ in length, each with a half-lap at the top and a dado at 18″ from the bottom (this dado was cut both to accept the crossbar and the span along the outside).

I also cut eight crossbars 47″ in length, and four spans about 30″ in length, each with half-lap joints on the ends.

Using 3×1/2″ pine pallet stock, I cut about a two-dozen slats for the middle shelf 28″ long and about 21 15″ side slats. I used a dado blade to cut a 1/2″x1/4″ tongue on each end of each slat.
I cut a 3/8″ groove along the inside of the middle crossbars, which would accept the 1/4″ tongues cut on the slats, to create the middle shelf. I also cut a 3/8″ groove along the top of the spans to accept the side slats – the wider grooves allow for wood movement.

I glued and screwed the uprights and crossbars together, then added the spans on one side using glue and pocket holes, and inserted the slats. On the prep unit, the shelf slats were about 1″ apart; on the hot unit, I spaced them more closely to make it easier to support the turkey fryer.

I added the other upright and crossbar frames of the DIY backyard kitchen to create a complete carcass for each unit. Lastly, I cut two supports out of 1/2″x3″x43″ pine stock for each shelf, attaching them to the underside of the shelf with pocket screws.
With the shelf complete I added side slats and a top spanner to two sides of the prep unit and the interior side of the hot unit (the outside of the hot unit was left open to accommodate airflow, a larger grill, or a small barrel smoker attachment).

Using 8 1″x3″x25″ hardwood pallet stock, I cut 3″ normal half-laps on one end and mitred half-laps on the other. I joined the pieces at the regular half-laps (gluing and clamping) to create the top and bottom pieces 47″ long.


I also took 4 more pieces of 1″x3″x29″ hardwood pallet stock and cut complimentary mitred half-laps on both ends to create side pieces for the tabletop of the DIY backyard kitchen (basically a frame for the slats, similar to the middle shelves on the carcasses).
Along the long pieces, I cut a 3/8″ groove 1/4″ from the top inside edge. Again, like the middle shelves, I cut a 1/4″x1/2″ tongues along about two dozen 1/2″x3″x23″ hardwood pallet stock.
I joined the mitred edges with glue and brads, fit the tongues of the slats into the grooves, and used a ~3/4″ spacer to set the spacing before securing them with more glue and brads.


I also cut two supports out of 1/2″x3″x41″ pallet stock for each tabletop, attaching them to the underside of the table with pocket screws and then to the table top slats with brads.

Recovering from Screwups:

Originally, I had intended for the table legs to be set inside of the table top with no hardware, only with a mortise and tenon joint in the corners of each table. I tried to cut the mortises by hand after assembling the table tops, but a combination of weak wood, sub-optimal chisels, and my own inexperience led to terrible joints.

I like symmetry, so I was really concerned about the table tops not being uniform. This really upset me; I had spent a ton of time working on the table tops of the DIY backyard kitchen, tried to do everything as precisely as possible, and had “ruined” one of my tables.

After a brief period of frustration and self-criticism, I lightened up. This DIY backyard kitchen project uses reclaimed wood, after all – perfect symmetry is impossible, and the only one who would really notice or care would be me.
I took this as an opportunity to practice patching and chose to use contrasting wood colours to highlight the patch, rather than trying to mask it. I glued and clamped the splintered pieces of the mortise, then made myself some blocks sized to fit the holes.
After sanding the blocks to a tight fit, I coated the blocks and holes with glue, then used a scrap piece of wood and a hammer to drive the blocks in.

The result looked surprisingly good – after filling in gaps with wood filler (I like a 1:1 mixture of sawdust and wood glue) and sanding them, the patches turned into a decorative accent to the tabletop. The few people who’ve even noticed the patches thought they were intentional and really liked the look of the contrasting wood.
I made several other screwups on this DIY backyard kitchen project that I’m glossing over (tenons on the slats were cut imprecisely, I failed to account for a design change and ended up with a piece of wood 1″ too narrow, filling gaps ended up discolouring parts of the surrounding wood, etc.).
The point is, trying to complete a DIY backyard kitchen project without a screwup is nearly impossible, especially on the first try. It’s been useful for me to practice recovering from screwups, and to use them as opportunities to learn how to improve my skills and practice new techniques.
Above all, screwups are opportunities to learn to love work that isn’t perfect, because it never will be.
This step of the DIY backyard kitchen project is probably the most useless for anyone attempting to create their own version since the prep unit top is made entirely of irregular pieces.
For anyone planning on creating their own outdoor kitchen, the most important thing to remember is to ensure any supports that run below your prep top are set at least 2″ in from the edge so that they clear the crossbars and the top will sit flush against the carcass.
After laying out the dimensions of the sink on the butcher block and cutting the hole for the sink, I lay the unit out upside down, glued the components together and then ran a ratcheting strap around the edge to compress the joints; I then used some 3/4″x3″ stock to create supports along the bottom, screwing the supports to link the three pieces of the top together to form a single component.
I drilled holes through the underside of the crossbars on one unit and screwed up into the underside of the prep top to secure the top to the carcass.

I didn’t have enough stock in the correct thickness to create the face boards (which sit above the table tops when folded) and the table legs. To create these components, I had to laminate smaller pieces together with glue.

For the face boards, I took several pieces of 1/2″x3″ hardwood stock and laminated them together to create 1″ thick pieces. I then joined these pieces on both their long and short sides and ripped them to width, creating a 1″x5″x47″ component created from 8 smaller pieces (for each unit).
The legs were comparatively simpler; I already had several pieces of appropriate length (28″), so I just laminated the 1″x3″x28″ hardwood stock together, then ripped to width, creating eight 2″x2″x28″ table legs.

In planning for this DIY backyard kitchen project, I intentionally gave myself about two weeks for sanding and finishing. I knew that if I didn’t, I’d be tempted to rush through the final elements of the build and end up letting the project go outside without appropriate protection from the elements.
After talking with several other woodworkers, I chose to sand the carcasses to 150 grit and the tabletops and face boards to 220; the slightly rougher sand would be on areas of the project that would be mostly hidden or expected to get a little roughed-up.
I also chose to coat the units in spar-urethane. I debated this for a long time (going for a more natural finish vs. something that would stand up better to the weather) and eventually opted for the polyurethane. After spending so much time on the DIY backyard kitchen project already, the prospect of re-finishing the units once or twice a year was unappealing.
I chose spar-urethane mostly as a matter of convenience (it was the most robust finish carried at the Home Depot near my house) but the product was well-reviewed so I felt pretty good about going ahead with it.
After completing the sanding, I transported the units home and spent a weekend finishing them; initially, I used a 3-inch brush for the finishing, but after a while opted for using a rag and wiping the poly on – I found this gave me more control and let me get into some of the narrower parts better with less dripping.
I gave the units two coats over about 48 hours; everything but the butcher block received a complete coating. Since the butcher block will come into direct contact with food, I’ll treat it regularly with food-grade mineral oil to keep it protected.

I went with a super-simple plumbing set-up, mostly for convenience. I don’t own my house, and the Backyard Kitchen isn’t designed to stay at this place permanently, so creating a sophisticated plumbing system was out of scope.
Instead, I created a simple cold water sink by running a hose from an outdoor spigot to a brass splitter, and then connecting the split hose ends to the faucet via female hose mending couplings and two garden hose adaptors.
I could have simply connected a single know to the hose, but I wanted both to operate to make the sink more convenient to use. Since the sink is exclusively cold water, I plan on having a light bleach solution on-hand for sterilizing hands and countertops that may come in contact with raw meat.

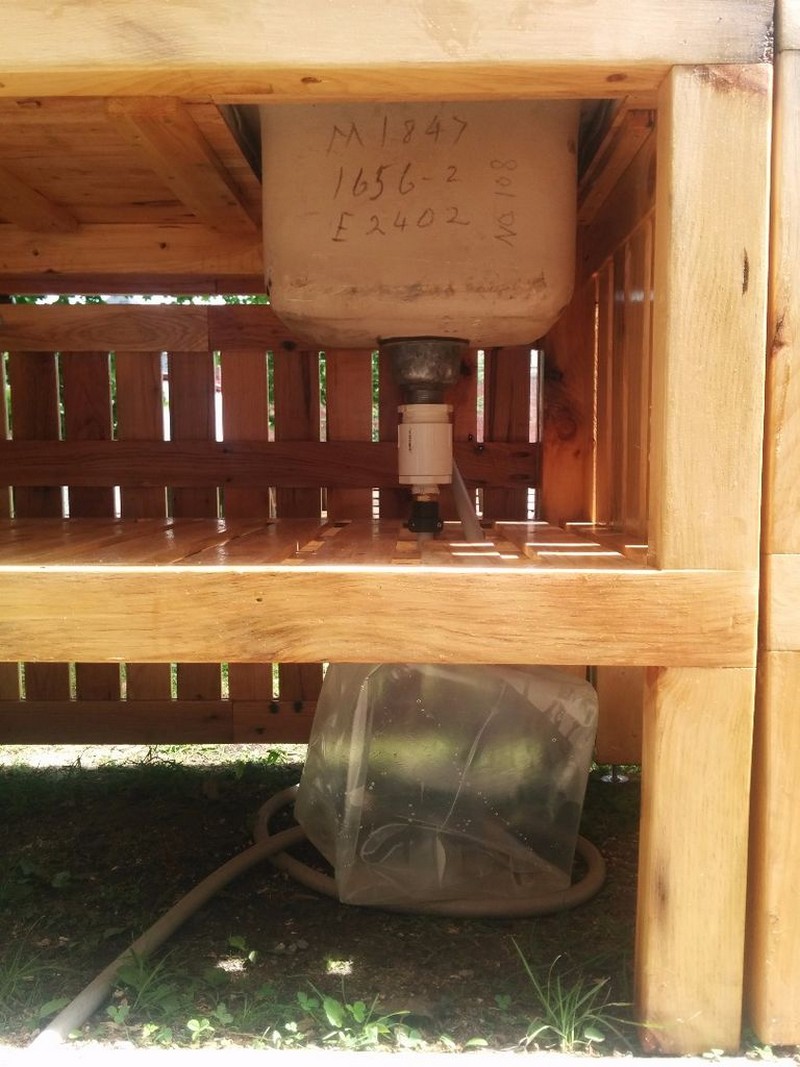
The sink of the DIY backyard kitchen drains to a flexible plastic basin below, which holds about 5 gallons (more than enough for a single evening). The photos show a flexible drainpipe; eventually, I switched to a series of PVC couplings and another length of hose to make it easier to remove and replace the basin when it needed to be emptied.

I didn’t seal (caulk) the sink DIY backyard kitchen to the countertop; I want it to be easily removable in the event I want to make some changes to the units. This sink has fittings for small bolt clamps below; I may decide to use them to make the sink slightly more permanent later in the summer.

The table legs and hinges are attached to the table tops using 1/4″ T-nuts. After drilling and countersinking the holes for the legs, I applied some JB Weld epoxy and drove the T-nuts into the legs with a small hammer.
(This is not an ideal setup for the legs, because the stress from tightening the screws wants to pull the T-nut out of the legs, rather than deeper in. I went this route after my initial attempt at mortising a square peg for the legs failed, and probably should have spent a little more time considering how to address it. A better solution would have been to use a combo wood/machine screw driven into the table leg, and then a nut on top of the table to hold it in place.)

I used T-nuts driven in from the backside of the faceboard and the underside of the tabletop to match the holes in the hinges. Bolts are driven in from the face of the hinge, sandwiching the wood and the hinge between the T-nut and the bolt – a much stronger union, because the direction of stress wants to pull the T-nut in deeper.


With the T-nuts set and epoxied, I clamped the face boards to the carcass and drove screws in from the backside of the crossbeam to secure it to the DIY backyard kitchen, then filled any gaps between the face board and carcass with wood filler. Once the face boards were installed I hung the tabletops from the hinges to create the fronts of the units.

Lastly, I cut my grill legs to the appropriate height and mounted them to the hot unit shelf using a few pieces of 1″x3″ scrap hardwood, with holes drilled for the grill legs. The blocks were attached to the DIY backyard kitchen unit with screws from the underside of the shelf.
Because the backyard isn’t level, I needed to make a couple of adjustments to the DIY backyard kitchen unit before it could be used regularly. I made some small levelling feet for the DIY backyard kitchen out of some 1″x2″ circular pieces of wood cut with a hole saw, with bolts running up the middle and epoxied to the feet.
I added T-nuts on the bottoms of the table legs and the carcass uprights to accept the levelling feet and then used a level to get the units as close as possible to level.
Because of the way the hinges are set and the slight angle of the yard, the tabletops of the DIY backyard kitchen have a tendency to flare out when they’re folded down. I fixed this by installing small neodymium magnets in the corners to keep the face flush.

I had a leftover piece of plywood from an earlier project, which was just big enough for me to create an extra-large lazy susan for the prep unit shelf of the DIY backyard kitchen. I used a ShopBot CNC router to cut out the lazy susan, a slightly smaller base, and a 1″ lip that would run around the edge of the lazy susan to serve as a grip and to help keep items from slipping out.

Before: A nice yard, some decent lawn chairs, and a few quick sawhorse tables and benches for enjoying dinner outdoors. Not bad, but could be better.
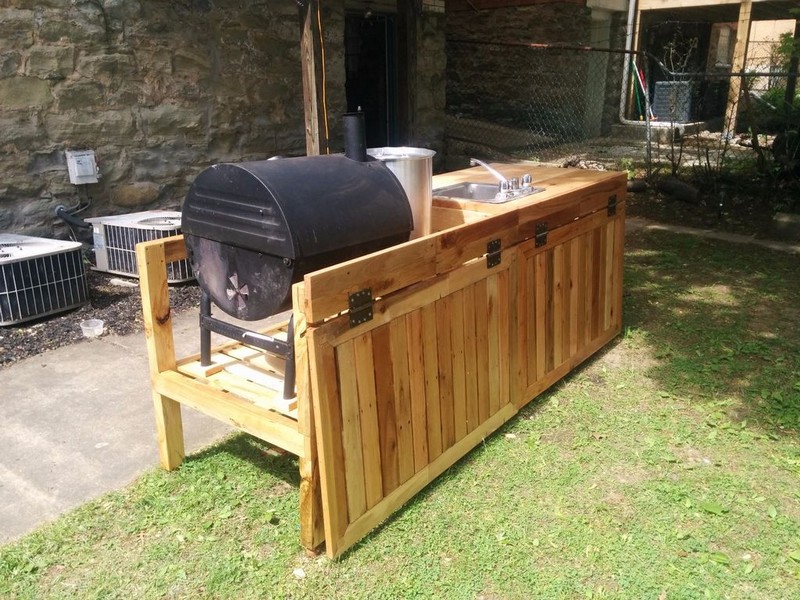
After: A Backyard Kitchen designed to bring people together to share food, drinks, conversation, and the delights of summer. I hope you have the opportunity to build something similar for your friends and family.
Thanks to
Smarter Systems: Sustainable Upgrades for Your Upcycled Backyard Kitchen
Upgrade your Upcycled Backyard Kitchen with resilient utilities, adaptive layouts, and circular systems that boost durability, comfort, and efficiency while preserving the salvaged soul and character of your outdoor space.
Closed-Loop Water: Rain Capture, Greywater, and Herb Irrigation
Harvest roof runoff into food-safe barrels with a first-flush diverter, then route overflow to a gravel-and-biochar filter. A foot-pump or low-flow faucet reduces waste at the prep sink.
Plumb greywater from rinsing (no harsh soaps) to drip lines for herbs a few feet from cooking zones. Always check local codes, elevate tanks for gravity flow, and label non-potable lines clearly.
Off-Grid Power: Solar Prep Stations and Efficient Appliances
Pair a 200-400W portable solar array with an MPPT charge controller, 12V lithium battery, and a pure-sine inverter for AC tools. Prioritize efficient gear: an induction burner, electric pressure cooker, or 12V cooler. Add motion-sensing LED task lights and a weatherproof switch box. Track usage with a smart watt meter and design shaded cable runs to keep batteries cooler and longer-lasting.
Material Sourcing Like a Pro: Salvage Yards, Decon, and “Free” Networks
Source stainless prep tables, pavers, and cabinets from restaurant auctions, building-material reuse depots, and deconstruction firms. Scan neighborhood swaps, curb alerts, and Buy Nothing groups for cast-off sinks and doors.
Favor solid wood or metal over MDF, and check for lead paint on older pieces. Bring a tape measure, magnet, and gloves. Match dimensions and fasteners to minimize new purchases.
Weatherproofing and Fire Safety Without Killing the Vibe
Seal reclaimed wood with plant-based exterior oils. Skin high-heat zones with cement board and tile. Set grills or pizza ovens on non-combustible pavers, add a spark screen, and keep a Class K extinguisher nearby. Use GFCI outlets and stainless fasteners in damp areas. Through-vent hoods properly, add ember-resistant mesh, and maintain clearances so creative finishes remain safe, durable, and beautiful.
Conclusion
An upcycled backyard kitchen can be as robust as it is resourceful when you layer systems, not just surfaces. Start small, prototype, and iterate with salvaged finds to fine-tune performance. The result is a beautiful, low-impact cook space that works hard, costs less, and tells a story worth sharing.