Last Updated on June 12, 2025 by teamobn
Are you a wine lover, looking for a rack to store your bottles? Why not make your own stylish wine rack?
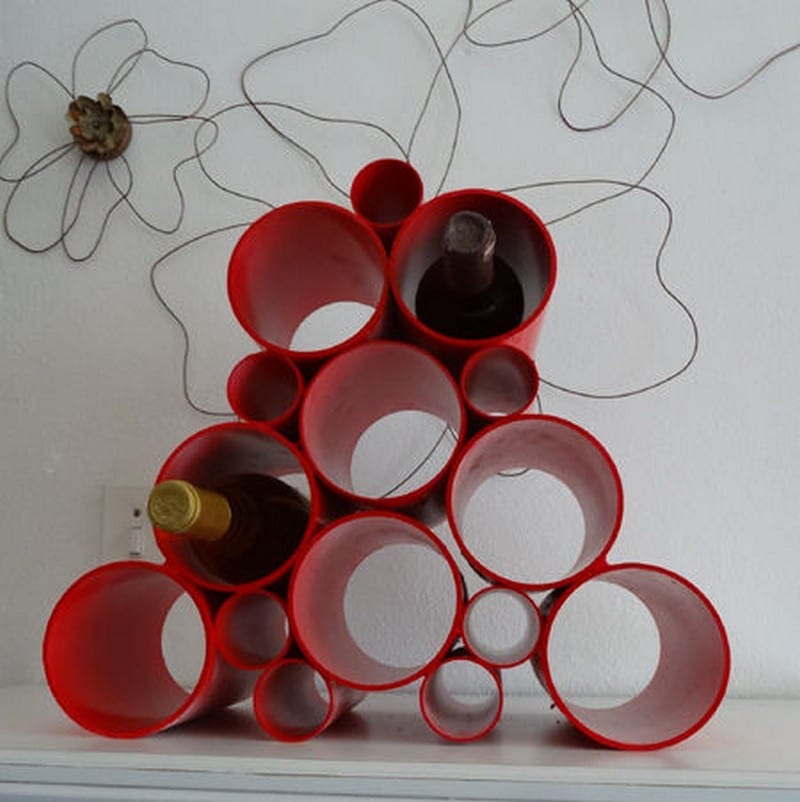
A PVC pipe wine rack is great because of its simple and modern look. Unlike the wooden racks, these are just light storage items – perfect if you don’t want anymore “heavy” elements in your kitchen or dining.
These would also be great gift ideas for the other wine lovers that you know. 🙂
Crafting a PVC Pipe Wine Rack
Materials:
- 110 mm diameter PVC Pipe
- 50 mm diameter PVC Pipe
- PVC Glue
- Spray Paint (your choice of colour)
- Sandpaper – 800 and 40 grit
- Damp Old Cloth
- Newspaper
Tools:
- Hand Saw or a Dremel Saw-Max
Steps:

Cut the PVC Pipes to 180 mm lengths. Sand the rough edges with 80-grit sandpaper, and the sides with the 400-grit. Wipe the pipes with damp cloth to remove dust.

Then on some sheets of newspaper in open air, spray paint the pipes, standing upright, with your chosen colour. Apply two coats, letting the first one dry before doing the second.

When the paint has dried completely, apply a thin strip of glue along the side of the bigger pipe.

Then attach a smaller pipe, making sure that the ends are aligned. Repeat these last two steps two or more times, depending on you, with the large and small pipes.

Glue the sections to form one whole wine rack, but try positioning them all first until you are satisfied with how it looks before applying glue. And you’re done!
Easy isn’t it? 🙂
Source: dezine
Why a PVC Pipe Wine Rack Beats Traditional Wood
PVC brings a lighter touch that still holds bottles with confidence. It costs less than hardwood and lets you splash bold colors that brighten any dining space.
Lightweight Strength for Easy Handling
A PVC pipe wine rack weighs a fraction of a cedar or oak frame, so moving it for cleaning or redecorating is painless. That reduced heft doesn’t weaken support because the cylindrical walls distribute load without sagging.
Homeowners who rent or rearrange furniture often will appreciate how effortless the shift feels. Less weight also means fewer scratches on counters and shelves when you slide the rack, protecting polished stone or lacquered wood surfaces from scuffs.
Moisture Resistance and Longevity
Wine cellars and kitchens rest above dishwashers, sinks, or humidifiers that throw off moisture. Wood absorbs that dampness, swells, and may crack over time. PVC shrugs it off because the plastic body blocks water entry.
That means labels stay cleaner, and mold can’t creep into joints. A quick wipe keeps every tube shining, so you won’t need yearly oiling or sealing. The rack’s lifespan stretches far beyond bargain timber units that warp after a single spill.
Design Flexibility for Modern Spaces
PVC pipes cut like butter with basic saws. Angled ends, staggered grids, and free-form honeycombs become weekend projects, not custom orders. Spray paint clings smoothly, so you can match cabinet doors, accent walls, or even team colors for game-day décor.
Want a countertop statement? Stack pipes into a spiral tower. Need drawer storage? Shorten lengths to fit shallow depths. This freedom turns the humble PVC pipe wine rack into a creative canvas, giving every home sommelier a chance to flaunt personal style.
Picking Pipe Diameters for Perfect Bottle Fit
Sizing tubes right prevents rattling bottles and sticky pullouts. Measure the widest part of your collection first, then pick one or two pipe diameters to balance grip and ease.
Standard Wine Bottles and 110 mm Pipe
Classic Bordeaux and Burgundy shapes average 75 mm across, so a 110 mm pipe gives enough wiggle room for quick grab-and-go service. That extra margin also fits wider foil capsules without rubbing. Cut pipes to 180 mm length, and you’ll cover the full bottle body, leaving the neck proud for a tidy display. The result looks like each vintage floats in its own alcove.
Accommodating Slim Shapes Like Riesling
German and Alsatian whites run closer to 70 mm at the shoulder. A 90 mm pipe hugs these tall cylinders, stopping side roll yet avoiding a tight squeeze. Pairing smaller tubes beneath larger ones produces a stepped façade that highlights visual differences. Guests can spot regional styles instantly, and every label faces forward instead of spinning out of sight.
Building Mixed-Size Racks for Versatility
Collectors rarely stick to one bottle width. Combine 50 mm off-cut couplers for mini sparkling splits, 90 mm tubes for sleek dessert wines, and 110 mm bodies for reds.
Arrange them in a honeycomb, widest tubes at the base for stability. This mix keeps the overall rack compact while housing every special-occasion pour. Planning diameter variety up front prevents future frustration as your cellar expands.
Prepping and Painting PVC for a Polished Finish
Proper surface prep turns construction material into décor piece. Rushing this stage leads to drips, chips, and paint that peels near seams. Take the time and your rack will shine.
Effective Cleaning and Surface Prep
Factory PVC carries oils that repel paint. Wash each cut pipe with warm water and dish soap, then rinse and dry thoroughly. Scuff the exterior lightly with 220-grit paper to create micro-grooves for primer to grip. Finish by wiping with isopropyl alcohol to lift any remaining dust. Clean prep blocks future bubbling and secures lasting color.
Primer Choices That Prevent Peeling
Use a plastic-specific primer in a rattle can. One light coat bridges the gap between slick PVC and your chosen topcoat. Let it cure per label instructions, usually thirty minutes to an hour. Skipping primer risks flakes after the rack meets kitchen heat swings. An even base coat also evens out tiny scratches, so final color lays smooth.
Spray Techniques for Even Coats
Hold the can about 20 cm from the pipe and sweep side to side past each end before reversing direction. Start spraying off the piece and release after clearing the opposite edge to dodge heavy spots. Apply two thin coats instead of one thick pass. Rotate the pipe between coats so seams stay covered. The result mirrors factory fiberglass rather than a DIY project.
Adding Non-Slip Liners to Protect Labels and Glass
Soft liners stop bottles rattling and shield delicate foils. This simple add-on keeps every vintage safe and your PVC pipe wine rack looking premium.
- Measure the inner circumference of each pipe with a flexible tape and note the length.
- Choose food-safe silicone, neoprene, or felt sheets in a color that matches your rack paint.
- Mark circles on the liner using a pencil, cutting each slightly smaller for a snug fit.
- Test-fit the piece, trimming slender slivers until the edge sits flat without curling upward.
- Run a thin bead of clear food-grade silicone sealant along the lower half of the pipe.
- Slide the liner inside, pressing it evenly with a dowel so the adhesive bonds all around.
- Wipe away any squeeze-out quickly with a damp cloth before it skins over.
- Let the sealant cure for the recommended time, then load bottles knowing every label stays pristine.

Troubleshooting Wobble, Uneven Cuts, and Alignment Issues
Nothing spoils a sleek display faster than tubes that refuse to sit flush. This troubleshooting guide tackles wobble, rough edges, and crooked stacks so your PVC pipe wine rack looks store-bought.
Stabilizing a Wobbly Base
A shaky rack often starts with a base that flexes under load. Set the assembled frame on a known level surface, then rock it gently to find high points. Slip a thin cork pad or rubber furniture foot under low pipes until the rack stands still. If gaps exceed three millimeters, trim the proud pipe ends with a fine-tooth pull saw, working slowly to preserve square faces.
Add a bead of clear silicone under each bottom tube once the stance feels rigid. The cured rubber locks everything in place while protecting countertops from scratches and vibration.
Fixing Uneven Pipe Cuts
Rough edges and mismatched lengths force pipes out of plane. Measure every cut with a combination square before sanding. If a tube is short, swap its position to an inner layer where the discrepancy hides.
Long pieces need trimming. Mark the exact excess with painter’s tape, cut along the tape, then smooth with 220-grit paper until the end sits flush against its neighbor. Finish by beveling each rim lightly to remove burrs that can chip paint or snag labels. Consistent lengths return the rack to symmetry and help load weight distribute evenly.
Correcting Misaligned Rows
Crooked runs usually mean glue set while pipes drifted. Break the joint carefully by slicing the seam with a fine hobby knife, twist the pipe free, and sand away old adhesive. Dry-fit the row again, using a straightedge pressed across all exposed pipe rims to verify alignment.
Apply fresh PVC glue sparingly and clamp each new joint with masking tape until it cures. Work in small sections instead of gluing the entire frame at once. Patience keeps rows true and prevents cascading errors further up the stack.
Re-gluing Loose Joints
Temperature swings and minor impacts can pop joints months later. Clean the mating surfaces with isopropyl alcohol to remove dust and old glue residue. Lightly roughen them with 400-grit paper to create texture for the fresh adhesive.
If the original PVC cement failed, use a two-part epoxy rated for plastics. Epoxy fills gaps and bonds stronger across painted surfaces. Support the repair with a simple strap clamp or loop of heavy elastic until the cure time passes. A solid re-bond stops bottles shifting and restores overall rigidity.
Preventing Future Alignment Problems
Prevention beats repair. Always dry-stack your design on a flat board before reaching for glue. Mark alignment lines across adjoining pipes with a permanent marker so pieces return to the same orientation after painting. Keep glue sessions short, wiping squeeze-out immediately, and wait the full cure period before loading bottles.
Store the rack away from direct sunlight and extreme heat that can warp plastic. Following these habits ensures your PVC pipe wine rack stays level, rock-solid, and ready to showcase new vintages for years.
Conclusion
Building a PVC pipe wine rack proves smart design doesn’t need pricey materials. You spend little, yet the finished piece looks sleek and modern. Its light weight lets you rearrange your bar in minutes. Water-resistant plastic keeps labels safe long after wood would warp. Grab some pipe, add color, and enjoy a custom rack that grows with your collection.
We have more ways to display your wines. Check out our single-bottle wine rack project!