Last Updated on October 15, 2025 by teamobn

You should never wear wet boots. When water seeps through your footwear, your skin absorbs the water. This can cause your feet to become waterlogged, cold, and wrinkly. The longer your feet are wet, the greater the damage to your skin.
This can lead to a number of problems, including blisters, Athlete’s foot, and even trench foot. The painful consequences can include the formation of blisters and deep cracks. So, if you’re out on a hike and your boots start to get wet, make sure to take a break and dry them off. It could save you a lot of discomfort in the long run.
So how do we solve the problem of wet boots before a hike? Well, have you got some leftover PVC pipes from your previous project? Here’s an idea to put them to good use – an all-seasons boot dryer!
Wet boots are a nuisance in summer where they can lead to fungal infections. In winter, they probably just lead to misery but either way, this clever boot dryer project will get them dry in almost no time! And the best part is that it’s easy and inexpensive to build.
You could also use it for your wet gloves, hats or bags. Just put your stuff in position, turn the hair dryer on, leave it and wait a few minutes for your things to dry!
When not in use, you can disassemble the boot dryer to save storage space. Read this tutorial to learn how to build your own.
Click on any image to start the lightbox display. Use your Esc key to close the lightbox. You can also view the images as a slideshow if you prefer 😎

Contents
Building a Boot Dryer
You’ll need these materials:
- 4 pcs – 2″ Elbows
- 2 pcs – 2″ T
- 1 pc – 2″ Y
- 1 pc – 2″ Fernco ci/plastic/copper/steel to ci/plastic/copper/steel
- 3 ft – 2″ PVC Pipe
- Glue
- Hair Dryer
And this tool:
- Hacksaw
Steps:
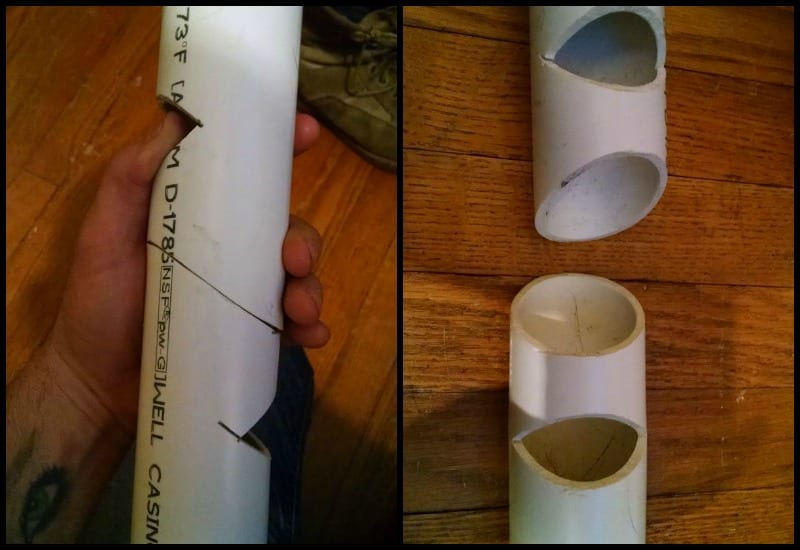
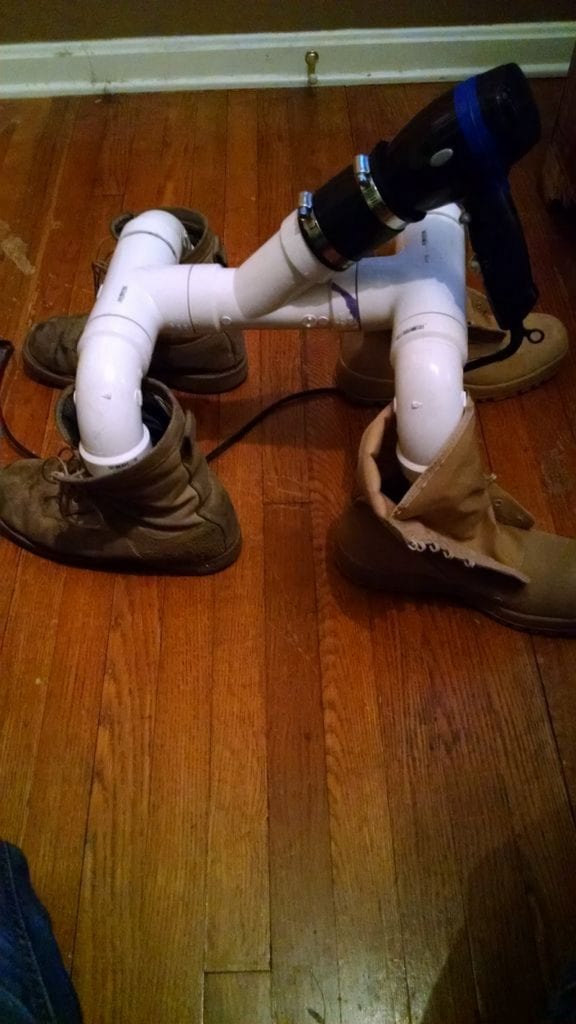
Cut one length of PVC pipe 16 inches long, then cut the 16 pieces in half at a 40° angle as shown on the left. Then cut wedges about an inch above the angled cut like in the right image. This will help unrestrict airflow when inside the boots.

Cut seven 2-inch PVC sleeves, 2 inches long, and connect everything together. Glue them in place as seen in the picture above.

Important: Do NOT glue your 8-inch angle cut lengths together. Just shove them in you’re 90° elbows as seen below. You will understand why later.
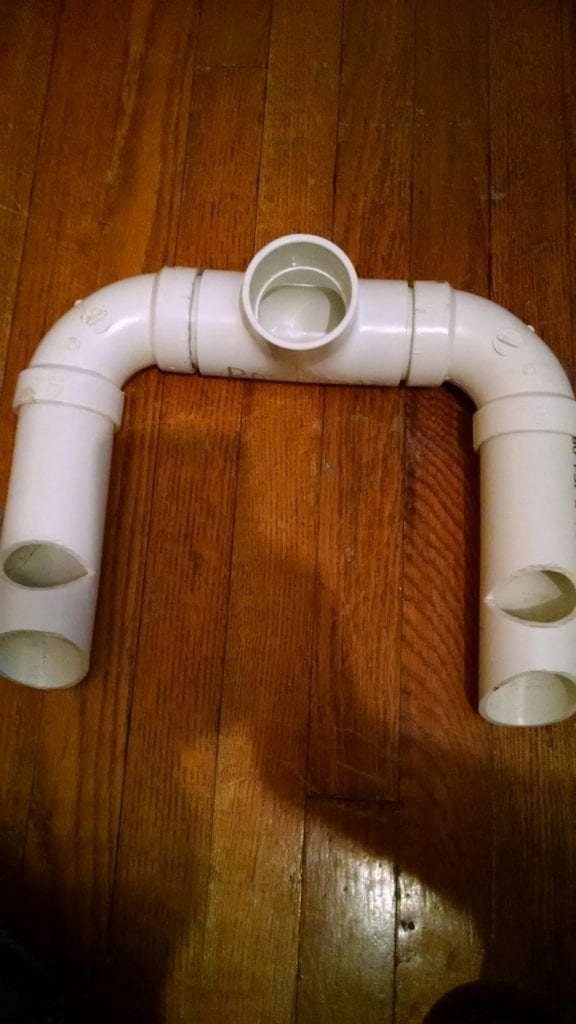
NOTE: Nothing else will be glued. Put the glue away so you don’t get overzealous and get ahead of yourself.
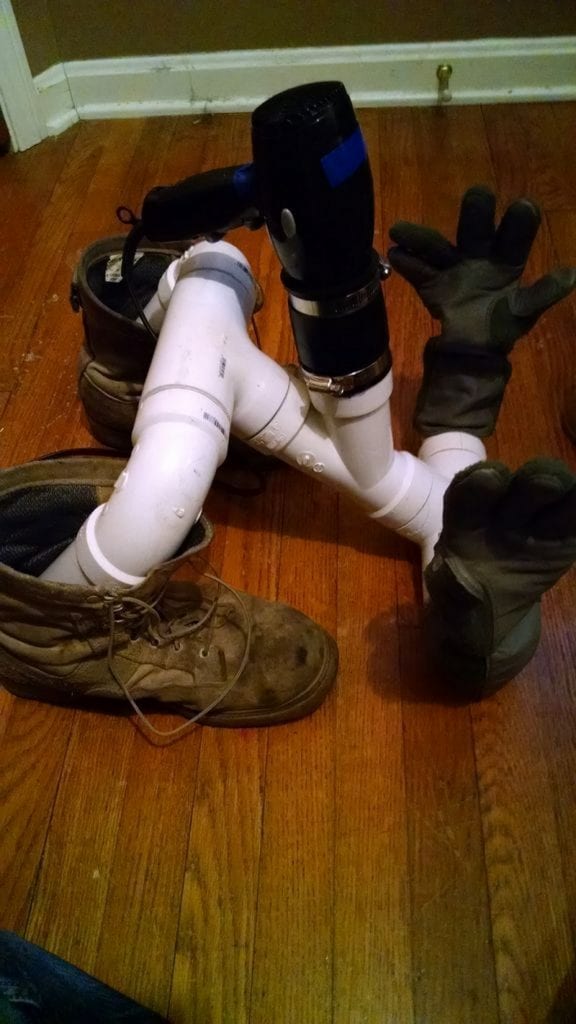
Shove the 2 arms into one of the T’s. No glue! 🙂

Next shove the remaining 2 elbows into the last remaining T. No glue!

Then connect the T’s to the Y. No glue!

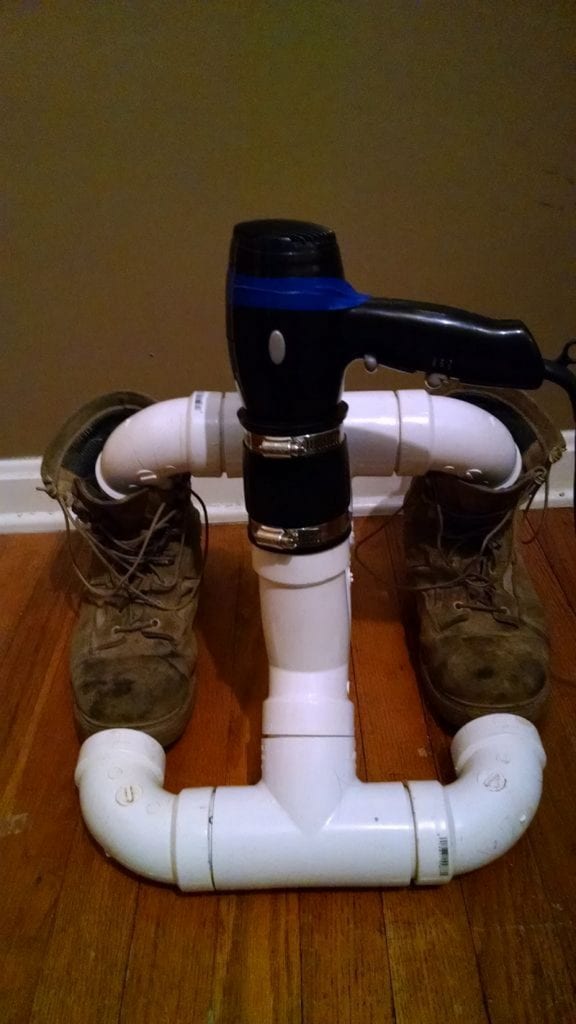
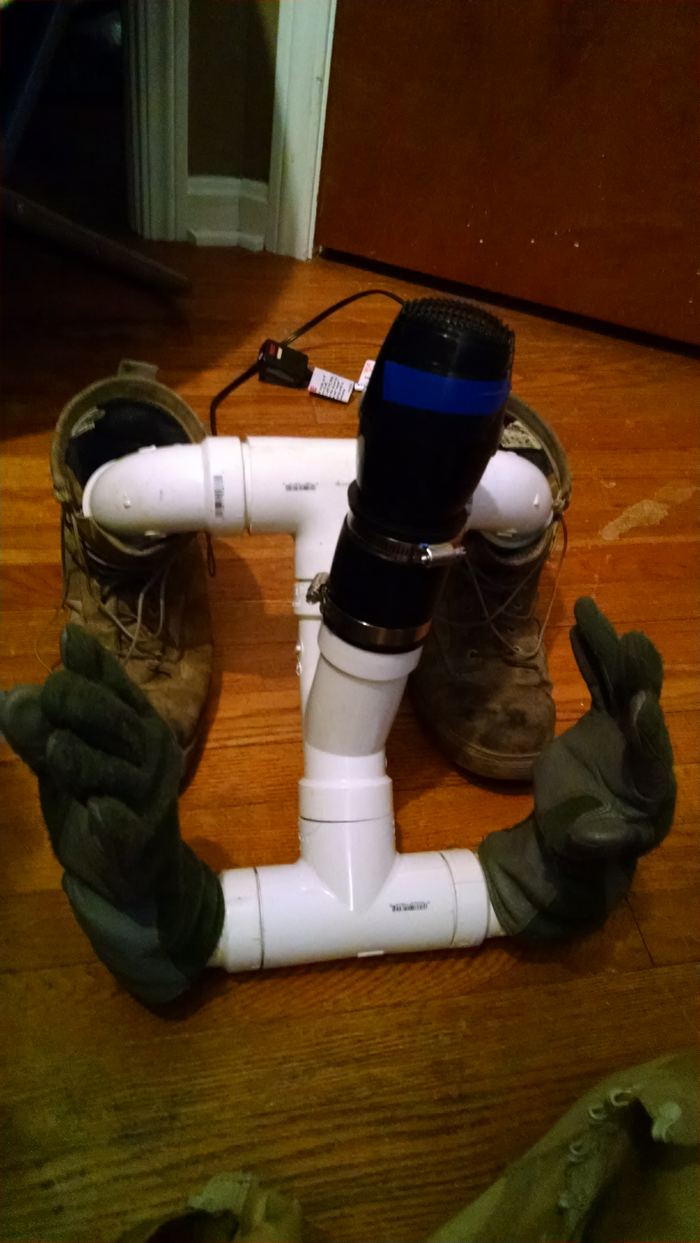
Add the fernco and a hair dryer, then tighten the clamps.

Having a non-glued connection on the rest of the parts allows the boot dryer to be adjusted to different sizes of boots, shoes, gloves, hats, etc. It also allows it to be torn down and stored.


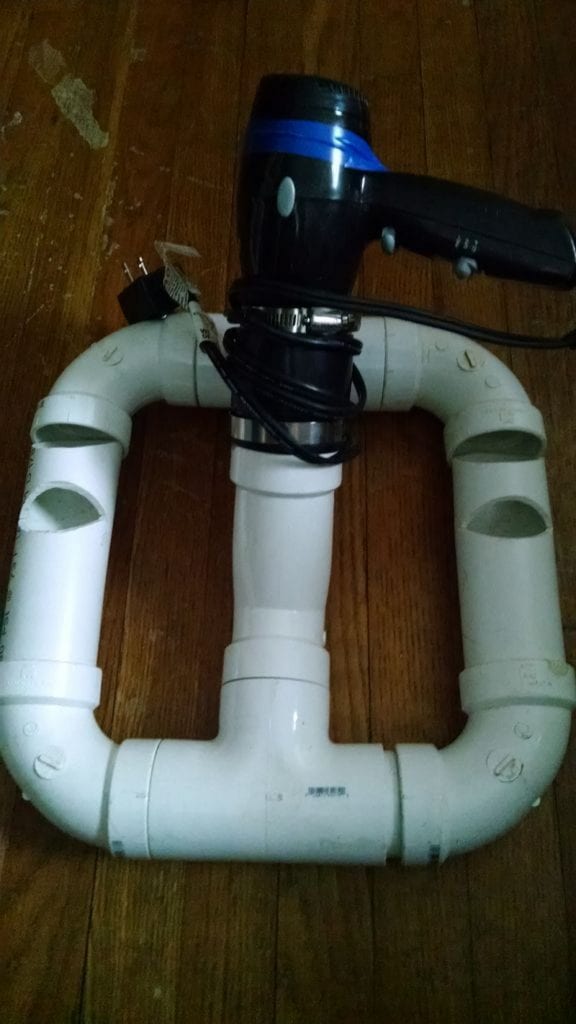
The hairdryer attached to the Y is directional, so whatever you think will take longer to dry you want to point the hairdryer towards.

There are four settings on the hairdryer: high, low, cool high and cool low. In order to use the cool air functions, you have to tape the cool button in the on position and select the high or low setting.
I made this boot dryer two years ago. I have used all the settings and the PVC has held up beautifully.
The only complaint I can give you is that it isn’t quiet but it dries fairly quick!
Could you use one of these in your home?
Smart Airflow and Gentle Heat
Fine-tuning how air moves and how much heat you use can cut drying times dramatically while protecting materials. These upgrades turn a basic boot dryer into a safer, energy-smart helper.
Selecting Fans and Heating Elements That Play Nice
Brushless DC fans in the 30–60 CFM range move plenty of air quietly for two to four boots. Pair them with self‑regulating PTC heaters or low‑watt heat tape to avoid hotspots. Keep outlet temperatures near 105–120°F (40–49°C) to protect adhesives and leather. Add a thermal fuse and thermostat in series for redundancy, and isolate wiring with heat‑shrink and strain relief for durable, safe operation.
Designing Ducts and Manifolds for Even Drying
Balanced manifolds prevent one boot from hogging airflow. Use equal‑length branches, gentle bends, and wide‑radius tees to reduce pressure loss. Perforated wands or downtubes push warm air to the toe box and heel counter. Add small bleed holes near the base to equalize flow across outlets. Removable tubes simplify cleaning and let you swap attachments for gloves, helmets, and smaller shoes.
Build In Safety and Efficiency from the Start
A countdown timer, thermostat, and tip‑over switch prevent over‑drying and accidents, especially in busy mudrooms. Insulate ducts and the plenum to keep heat where it belongs and reduce wattage. A washable intake filter traps lint and pet hair, improving airflow over time. Label heat and fan switches clearly, and consider a quiet night mode so your boot dryer can run while everyone sleeps.
Odor Control and Long-Term Care
Moisture breeds odor, bacteria, and material breakdown. Pair your boot dryer with smart odor control and maintenance, and you will protect gear, improve hygiene, and keep performance consistent through season.
Active Odor and Moisture Management
Combine airflow with absorbents and safe disinfection. Activated carbon or zeolite packets tucked near outlets capture smells, while silica gel speeds moisture removal between drying cycles.
UV‑C LEDs can reduce microbes when enclosed and shielded; avoid ozone generators around breathable materials. For a natural boost, place baking soda sachets in boots after drying. Skip essential oils, they can degrade adhesives and membranes.
Cleaning, Filters, and Seasonal Storage
Dust and lint restrict airflow and force heaters to run longer. Wipe the plenum monthly, rinse removable tubes, and vacuum the intake grille. Fit a reusable HVAC prefilter and wash it as needed. After winter, unplug the boot dryer, coil the cord loosely, and store it in a dry, covered spot. A quick vinegar‑water wipe deters mildew without leaving perfumes that transfer to gear.
Adapting to Different Footwear and Fabrics
Leather, suede, and heat‑sensitive glues prefer gentle, extended airflow. Use a low‑heat or fan‑only mode and increase time for heavy work boots.
For waterproof‑breathable membranes like Gore‑Tex, moderate warmth with strong airflow clears vapor quickly without stressing seams. Swap to glove or liner attachments for smaller items, and throttle airflow using adjustable vents so your boot dryer dries evenly without blasting delicate materials.
Conclusion
With a few thoughtful upgrades, a DIY boot dryer can match the performance and safety of premium models. Dialed‑in airflow, gentle heat, and prudent safeguards protect materials while speeding every cycle. Add odor management and routine care, and your gear stays fresher, longer. Build once, maintain well, and your boot dryer will quietly serve through mud season, ski trips, and everyday adventures.
We have more ways to organize your boots. Check out our guide on building a simple boot rack!