Last Updated on October 29, 2025 by teamobn
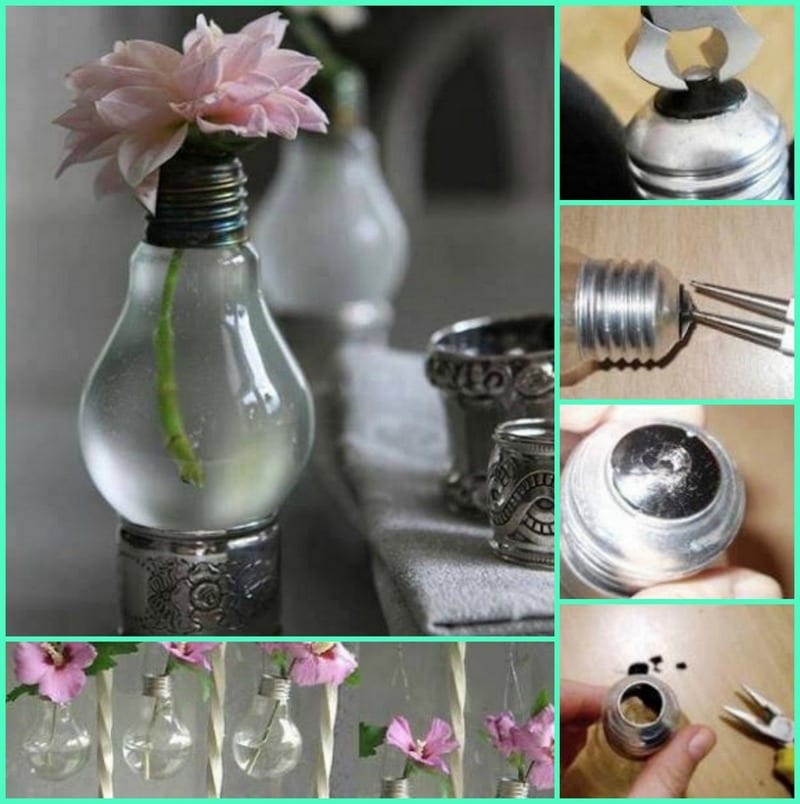
Transform a burned-out incandescent light bulb into a charming miniature vase in under 30 minutes. This simple upcycling project creates a unique display for single stems, propagating cuttings, or air plants — perfect for windowsills, desks, or as handmade gifts.
This guide adds detailed safety notes, a clear step‑by‑step method, stand ideas, and FAQs so beginners can do it confidently.
Contents
- 0.1 Project Overview
- 0.2 Safety first
- 0.3 What are the materials needed to make a safe Light Bilb Vase?
- 1 Step-by-Step Instructions: How to Hollow Out a Light Bulb Safely
- 1.1 Step 1: Prepare Your Workspace (2 minutes)
- 1.2 Step 2: Remove the Metal Contact (3–5 minutes)
- 1.3 Step 3: Break the Black Insulating Glass (5–7 minutes)
- 1.4 Step 4: Remove the Inner Glass Stem and Filament Assembly (5–8 minutes)
- 1.5 Step 5: Clean Out the Interior (3–5 minutes)
- 1.6 Step 6: Create or Choose a Stable Stand (2–3 minutes)
- 1.7 Step 7: Fill and Display Your Light Bulb Vase (2 minutes)
- 2 Creative Variations and Ideas
- 3 Tips for Success
- 4 Final Thoughts
Project Overview
- Difficulty: Easy (beginner-friendly)
- Time Required: 20–30 minutes per vase
- Cost: $0–$10 (mostly free with recycled materials)
- Skill Level: Beginner DIY
- Best For: Single stems, propagation cuttings, small air plants, or decorative displays
Safety first
Before you begin, please read these important safety guidelines:
- Use only standard incandescent bulbs (A19 size recommended). These are the traditional bulbs with visible filaments inside.
- Do NOT use CFL (compact fluorescent) or LED bulbs — they contain electronics, circuit boards, or hazardous materials (including mercury in CFLs) and are unsafe to hollow out.
- Always wear safety glasses and cut-resistant gloves throughout the entire process.
- Work over a folded towel, cardboard box, or shallow tray to catch and contain glass shards.
- Dispose of glass fragments carefully; use a damp paper towel to pick up tiny shards and vacuum the work area when finished.
- Keep children and pets away from your workspace during and after the project.
- Check local regulations for proper disposal of light bulb components.
What are the materials needed to make a safe Light Bilb Vase?
- 1 standard incandescent light bulb (A19 size, 40–100 watt — any wattage works)
- Water (for fresh flowers or cuttings)
- Napkin ring, wire stand, or small wooden base (to stabilize the bulb)
- Optional: small pebbles, decorative stones, or colored water
What are the tools needed for this project?
- Needle-nose pliers (essential for gripping small metal parts)
- Safety glasses (ANSI-rated eye protection recommended)
- Cut-resistant gloves (Kevlar or similar material; leather work gloves also work)
- Small flathead screwdriver (3–5 mm width)
- Hammer (small craft hammer or standard claw hammer)
- Folded towel or cardboard box (to contain glass fragments)
- Small funnel (optional, for filling with water without spills)
- Tweezers or long-nose forceps (optional, helpful for removing small glass pieces)
- Masking tape (optional, can wrap around bulb base to reduce shattering)
- Small bowl of water (for rinsing out debris) Vacuum cleaner (for final cleanup)
Step-by-Step Instructions: How to Hollow Out a Light Bulb Safely
Step 1: Prepare Your Workspace (2 minutes)
- Choose a well-lit, stable work surface like a kitchen table or workbench.
- Lay down a folded towel, place a cardboard box on its side, or use a shallow plastic tray to catch glass fragments.
- Put on your safety glasses and cut-resistant gloves before handling the bulb.
- Gather all tools within easy reach.
Optional: Wrap a single layer of masking tape around the metal base of the bulb to help contain small glass chips.
Pro tip: Working over a box allows you to tilt the bulb and let debris fall into the container, making cleanup easier.

Step 2: Remove the Metal Contact (3–5 minutes)
Removing the metal contact from the bulb base using needle-nose pliers
- Hold the light bulb firmly by the glass globe with your non-dominant hand (over the towel).
- Locate the small metal contact point at the very bottom center of the threaded base — it’s a small silver or brass solder blob.
- Grip the edge of the metal contact with your needle-nose pliers.
- Gently twist and pull to peel the contact away from the base. It may come off in pieces — that’s normal.
- You’ll see a small hole once the contact is removed, revealing the black insulating glass underneath.
What you’re removing: The solder contact and the thin metal eyelet that connects the filament to the base.
Troubleshooting: If the contact won’t budge, try wiggling it side-to-side while pulling. Avoid excessive force to prevent cracking the glass globe.
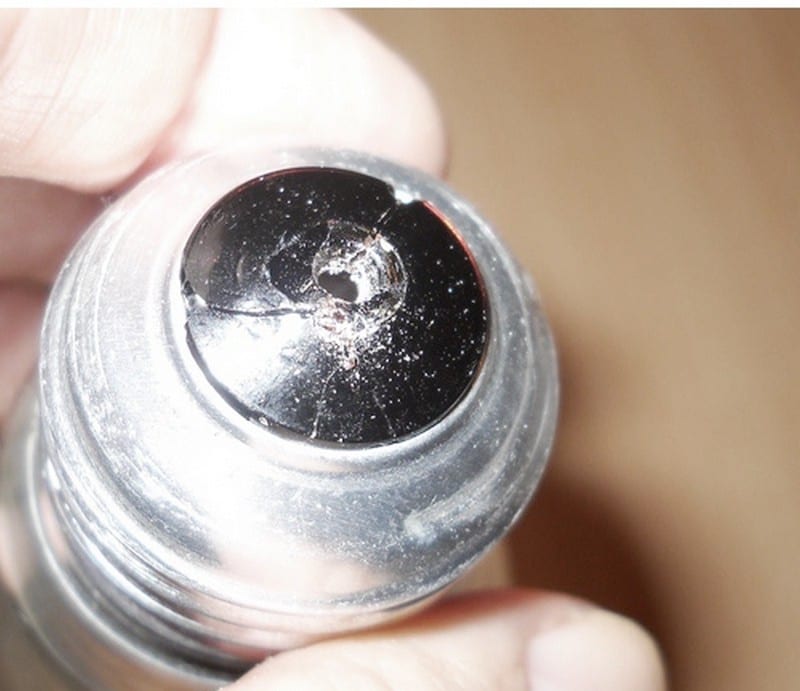
Step 3: Break the Black Insulating Glass (5–7 minutes)
Tapping the black insulating glass at the bulb base with a small screwdriver
- Look inside the hole you just created — you’ll see a black or dark purple glass insulator (also called the vitreous insulator).
- Place the tip of your small flathead screwdriver against the black glass.
- Lightly tap the screwdriver handle with a hammer — use controlled, gentle taps, not hard strikes.
- The black glass will crack and begin to break away in small pieces.
- Use your needle-nose pliers or tweezers to carefully pull out the broken fragments.
- Continue tapping and removing pieces until you’ve cleared away most of the black glass and can see the inner glass stem and filament wires.
Important: This step requires patience. The black glass is brittle and will shatter with too much force, sending shards into the bulb. Work slowly and tap gently.
What you’re breaking: A ceramic-like glass insulator that seals the base and protects the filament leads.
Step 4: Remove the Inner Glass Stem and Filament Assembly (5–8 minutes)
Contact and filament removed from inside the bulb]
- Once the black insulator is cleared, you’ll see a thin glass tube (stem) with metal wires (the filament support) attached.
- Insert your needle-nose pliers into the opening and grip the glass stem or one of the metal wires.
- Gently wiggle and pull to break the stem free from the base. It may snap—that’s expected.
- Carefully extract the filament assembly, including:
- The coiled tungsten filament wire
- Support wires
- Small glass or metal brackets
- Some pieces may fall into the bulb — don’t worry, you’ll rinse them out in the next step.
- Use tweezers or pliers to remove any remaining large fragments from inside the base opening.
Pro tip: If the stem is stubborn, try rotating the bulb and pulling from different angles. Avoid forcing it, as you don’t want to crack the outer glass globe.
Step 5: Clean Out the Interior (3–5 minutes)
Removing the base of the globe and rinsing debris
- Hold the hollowed bulb over a trash bin and gently shake to dislodge loose glass chips and wire fragments.
- Fill a small bowl with water.
- Carefully fill the bulb with water (use a funnel if available), swish it around, and pour it out into the bowl or sink. Repeat 2–3 times.
- Inspect the inside of the bulb for any remaining debris. Use tweezers to remove stubborn pieces.
- Pour out the final rinse water and let the bulb air-dry upside down on a towel, or gently shake out excess water.
- Check the rim of the base opening for sharp edges. If needed, carefully file or sand rough spots (optional).
Safety note: Pour rinse water through a fine mesh strainer or into a container you can inspect — never pour glass fragments directly down the drain.

Step 6: Create or Choose a Stable Stand (2–3 minutes)
The napkin ring adds to the uniqueness of your handiwork
Because the light bulb is round and top-heavy, you’ll need a stand to keep it upright. Here are several options:
Option 1: Napkin Ring (easiest)
- Slide a decorative napkin ring (metal, wood, wicker, or plastic) over the threaded base.
- The ring acts as a stable platform. Choose one with a diameter slightly larger than the bulb base.
Option 2: Wire Cradle
- Bend a piece of sturdy wire (12–14 gauge) into a circular or spiral stand.
- Create a loop that cradles the bulb at its widest point.
Option 3: Wooden Base with Drilled Hole
- Drill a shallow recess (about 1 inch diameter, ½ inch deep) into a small wooden block or slice of branch.
- Nestle the bulb base into the recess.
Option 4: Cork Ring
- Cut a wine cork in half lengthwise and hollow out a small depression to seat the bulb base.
Option 5: 3D-Printed Holder
- Search online for “light bulb vase stand STL files” and print a custom holder.
Pro tip: Test the stability before adding water. The bulb should sit securely without tipping.

Step 7: Fill and Display Your Light Bulb Vase (2 minutes)
Fill with water, add a flower, find a napkin ring and you’re done!
- Place your hollowed bulb into its stand.
- Use a small funnel (or carefully pour) to fill the bulb with water, leaving about ½ inch of space at the top.
- Add your choice of display:
- Single fresh flower stem (small blooms like daisies, baby’s breath, or a single rose work beautifully)
- Propagation cutting (pothos, philodendron, or herbs like basil root easily in water)
- Air plant (Tillandsia species — no water needed, just mist occasionally)
- Decorative elements (small pebbles, colored glass beads, or a few drops of food coloring for tinted water)
- Position your vase on a windowsill, desk, shelf, or table where it won’t be easily knocked over.
Care tips:
- Keep out of direct harsh sunlight to prevent water from heating up and damaging delicate stems.
- Change the water every 3–5 days to keep it fresh and prevent algae.
- Trim flower stems at an angle for better water absorption.
Creative Variations and Ideas
Given the vast range of shapes and sizes of light bulbs, the possibilities are limited only by your imagination! Here are some ideas to inspire you:
Different Bulb Shapes
- Globe bulbs (G25, G40): Create larger, statement vases
- Candelabra bulbs: Make tiny, delicate bud vases
- Vintage Edison-style bulbs: Hollow out for an industrial-chic look (if incandescent)
Alternative Uses
- Hanging vases: Attach wire or twine around the base and hang from hooks or a branch
- Terrarium: Add a layer of small pebbles, activated charcoal, soil, and a tiny succulent or moss
- Oil lamp: Fill with lamp oil and add a wick (requires additional safety precautions)
- Holiday ornament: Fill with glitter, fake snow, or small ornaments and hang on a tree
- Science display: Create a miniature ecosystem or display for small specimens
Decorative Touches
- Wrap twine, jute, or ribbon around the metal base
- Paint the metal base with metallic spray paint (gold, copper, or silver)
- Etch or frost the glass with glass etching cream for a frosted look
- Add a small label or tag with the flower name or a message
Tips for Success
- Practice makes perfect: Your first bulb may take longer or result in a few cracks. Don’t get discouraged—the technique becomes easier with practice.
- Save multiple bulbs: Hollow out 2–3 bulbs at once so you have backups and can create a matching set.
- Work slowly: Rushing increases the risk of cracking the glass globe. Take your time, especially when breaking the black insulator.
- Vacuum thoroughly: Even with careful cleanup, tiny glass shards can scatter. Vacuum your workspace and surrounding floor when finished.
- Gift idea: Light bulb vases make thoughtful, eco-friendly gifts. Package with a stand, a small flower, and care instructions.
Frequently Asked Questions (FAQs)
- Can I use LED or CFL bulbs for this project?
- No. You should only use traditional incandescent bulbs. CFL bulbs contain small amounts of mercury and electronic components that are hazardous. LED bulbs have circuit boards, drivers, and sometimes sealed components that make them unsafe and difficult to hollow out. Stick with standard incandescent A19 bulbs.
- How do I know if my bulb is incandescent?
- Look inside the bulb — if you can see a visible coiled wire filament (usually tungsten, looks like a spring), it’s incandescent. LED and CFL bulbs have plastic components, tubes, or LED chips visible inside instead.
- What if the bulb cracks while I’m working on it?
- If the outer glass globe cracks, stop immediately. Carefully dispose of the broken bulb and start with a fresh one. Small cracks in the base area can sometimes be worked around, but a cracked globe won’t hold water safely.
- How do I make the vase more stable?
- Choose a stand with a wide base and low center of gravity. Napkin rings made of metal or wood work best. You can also add a small amount of decorative pebbles or sand to the bottom of the bulb (before adding water) to lower the center of gravity.
- Can I use this for propagating plant cuttings?
- Yes! Light bulb vases work wonderfully for propagating cuttings from pothos, philodendron, spider plants, and herbs. Change the water weekly and place it in bright, indirect light. Once roots develop (usually 2–4 weeks), transplant to soil.
- What flowers work best in a light bulb vase?
- Small, delicate stems work best due to the narrow opening:
- Baby’s breath
- Single carnation or mini carnation
- Small daisies or wildflowers
- Lavender sprigs
- Single roses (cut short)
- Herbs like rosemary or thyme
- Small, delicate stems work best due to the narrow opening:
- How do I clean cloudy residue inside the bulb?
- If mineral deposits or algae build up, fill the bulb with a mixture of equal parts white vinegar and water. Let it sit for 30 minutes, then rinse thoroughly. For stubborn residue, add a teaspoon of uncooked rice and swirl — it acts as a gentle abrasive.
- Can I turn this into a hanging vase?
- Absolutely! Wrap sturdy wire (18–20 gauge) around the threaded base several times, then create a loop or hook at the top. You can also use macramé cord or fishing line. Make sure the hanger is secure before filling with water.
- Is it safe to use dyed or colored water?
- Yes, food coloring is safe and won’t harm most flowers. Use 3–5 drops per bulb. Avoid using dyes or additives not meant for food or plants, as they may contain chemicals harmful to cuttings or flowers.
- How long will fresh flowers last in a light bulb vase?
- With fresh water changes every 3–5 days, most cut flowers will last 5–10 days. Hardier flowers like carnations may last up to two weeks. Propagation cuttings can live indefinitely in water if you change it regularly.
Final Thoughts
Creating a light bulb vase is a rewarding beginner DIY project that combines creativity, sustainability, and functionality. With just a few simple tools and safety precautions, you can transform a discarded bulb into a charming piece of home décor or a thoughtful handmade gift.
The beauty of this project lies in its versatility — experiment with different bulb shapes, stands, and uses to make each vase uniquely yours. Whether you’re displaying a single bloom, rooting a plant cutting, or creating a miniature terrarium, your light bulb vase is sure to be a conversation starter.
Remember: Always prioritize safety by wearing protective gear and working carefully with glass. Happy crafting!Ready to give it a go? Or you can also try this DIY mason jar lighting tutorial for another creative way to upcycle everyday items into beautiful home décor.
Source: craftykaja