Last Updated on July 22, 2025 by teamobn
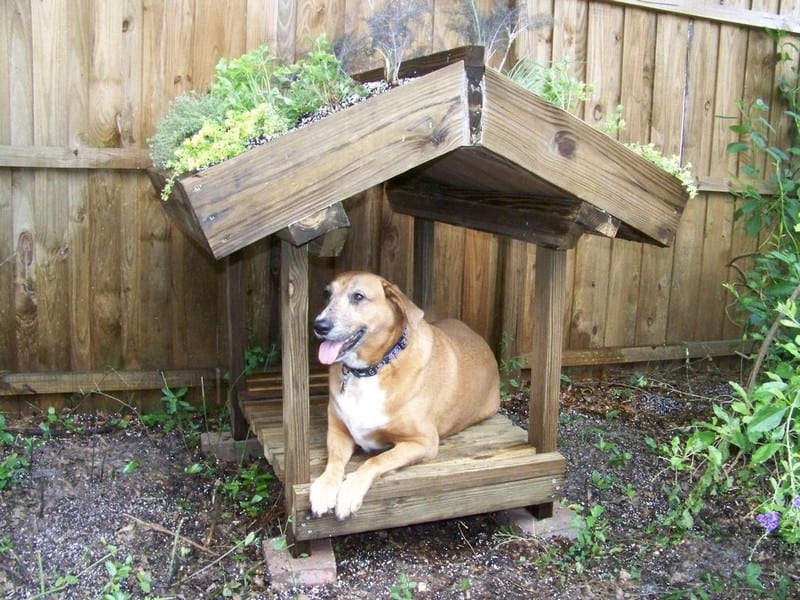
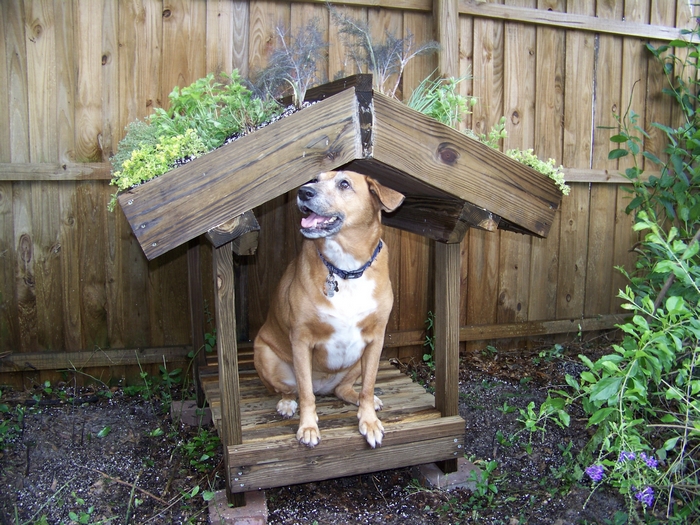
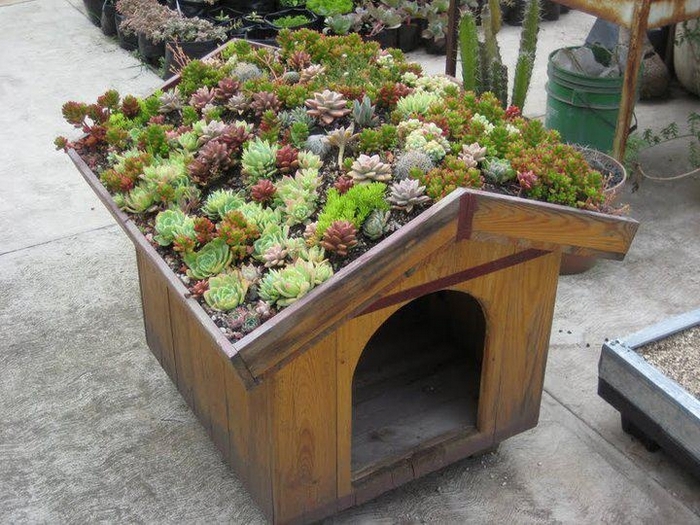
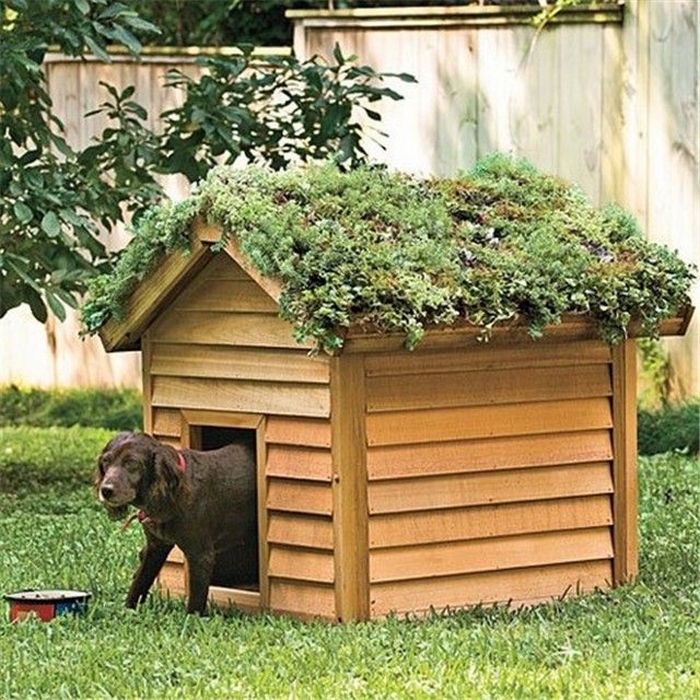
Hey, look! We’ve got green roofs too! Even the kennels are going green! Giving a green/living roof to a kennel provides the same benefits for your ‘best friend’ as it does for human homes.
The green roof keeps the kennel cool in summer and much warmer in winter. In fact, a green roof offers exceptional insulation properties.
As a side benefit, it also deadens the sound of rain, hail and even storms. That will help to calm your pet when the weather turns bad and will also help you sleep since a frightened animal is likely to wake you AND your neighbours.
Contents
Building a Green Roof Kennel
You’ll need these materials:
- 2×6 inch ACQ Pressure Treated Lumber
- 1/2 sheet of 1″ PT CDX Plywood
- 2 lbs of 3″ deck screws
- 2 lbs of 2″ Deck Screws
- Construction Adhesive
- Caulk
- Plants
- Soil
- Perlite
- Fertilizer
- Pavers
And these tools:
- Pocket hole jig (optional)
- Framing square
- Drill & bits
- Table saw
- Hole saw
- Screening
- Staple gun
- Assorted Woodworking Paraphernalia (clamps, cords, etc)
Steps:
We start by ripping some of the 2x6s down to 2x3s
From these 2x3s we cut;
2 24 inch pieces
2 32 inch pieces
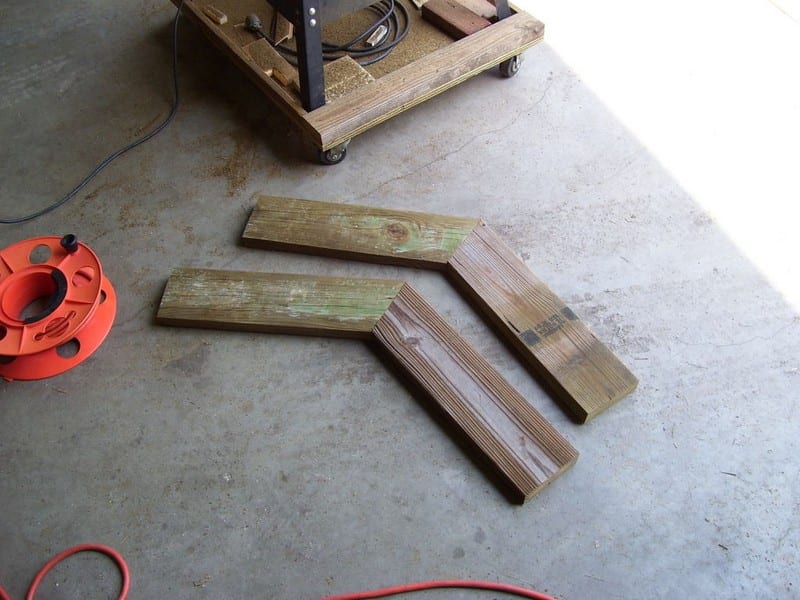
4 30-inch pieces with one end of each bevelled at 22.5 degrees. (uprights)
2 44-inch pieces with one long edge of each cut at a 22.5-degree angle and the ends snipped at 45 degrees. (stringers)
2 44-inch pieces
I want to add that proper precautions should be taken when working with PT lumber, use a dust mask when sawing, and wash your hands before eating and drinking.
First, note that all joints are secured with fasteners and adhesive unless otherwise noted, Also all holes are predrilled.
Build the frame by laying out the four 30-inch uprights in pairs, on edge, and securing the pairs together with the 24-inch pieces placed 4 inches up from the bottom (square end), the bevels on the uprights should appear as in the picture. Be sure to check for squareness.

Now join these two end pieces together with the 32-inch pieces placed on the inside of the frame. That is our basic structure.

The green roof support needs to be very strong because the green roof could weigh up to 300 lbs following a rain storm.

To build the green roof support, the 44-inch long bevelled stringers are attached to the centre with the bevels of the uprights on the outside. If we stopped here all the weight would be supported by 12 screws, bad idea.
The two additional 44-inch long pieces we cut are attached on top of the stringers and uprights, creating an L beam that transfers the load to the uprights. At this point I placed a scrap of wood across and sat on it to test the strength, everything was okey dokey.

The green roof is built from 2x6s to give depth to the garden bed. Start by cutting four rafter pieces 21 inches long with a 22.5-degree cross-cut at one end of each.
Also cut a ridge piece 44 inches long from a 2×6
Attach the rafters to either end of the ridge piece with pocket screws, alternately toe nailing is an option.
Place the roof on top of the house frame and square everything up and screw through the L beams into the rafters to attach the green roof. The edges of the green roof are cut from 2x6s to fit (approx 41 inches long.)
We will come back to the green roof in a bit.

The decking is cut from 2x3s 24 inches long, they’re spaced 1 inch apart, I used aluminium square stock to keep everything aligned (scrap lumber would work as well) and fastened with a single screw and no adhesive at each end. Some custom cuts are needed around the uprights.

Back to the green roof. Take the inside bottom dimensions of each side of the roof box, subtract half an inch and cut panels to fit from the sheet of CDX plywood. Fit the panels into the box and secure them to the L beams with a couple of screws.
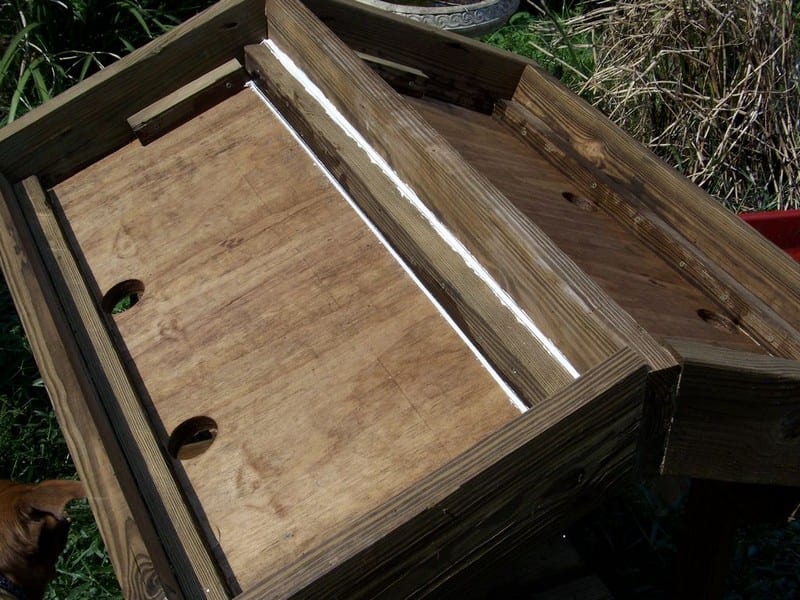
Back to the saw; using the panel measurements, cut some 2×2-inch battens to hold the panel in place. The batten for the top must be bevelled to match the roof pitch.
Using these battens to fix the panel to the roof frame, I attached the battens to the plywood with screws and construction adhesive but used only screws to attach it to the roof structure to allow eventual replacement if needed.
If you wish, additional waterproofing of the plywood can be done now. I applied a coat of water seal because the plywood had already spent three years sitting behind my shed.
For drainage, we’ll drill a couple of 2-inch holes along the bottom edge of the panel and fix nylon screening over. Along the top ridge, for the comfort of the dogs, caulk was used to seal the cracks to prevent dripping.

It’s important to have a lightweight, well-draining potting media, I’ve hopefully accomplished this by combining equal parts commercial potting soil with perlite, with the addition of a slow-release fertilizer, following label directions. The soil is spread into the box using care not to compress the media, moistening it to keep it in place. I used 6 cubic feet of total planting media.

The choice of plants will vary with geography; universally, the choice will need to be small, drought-tolerant plants.
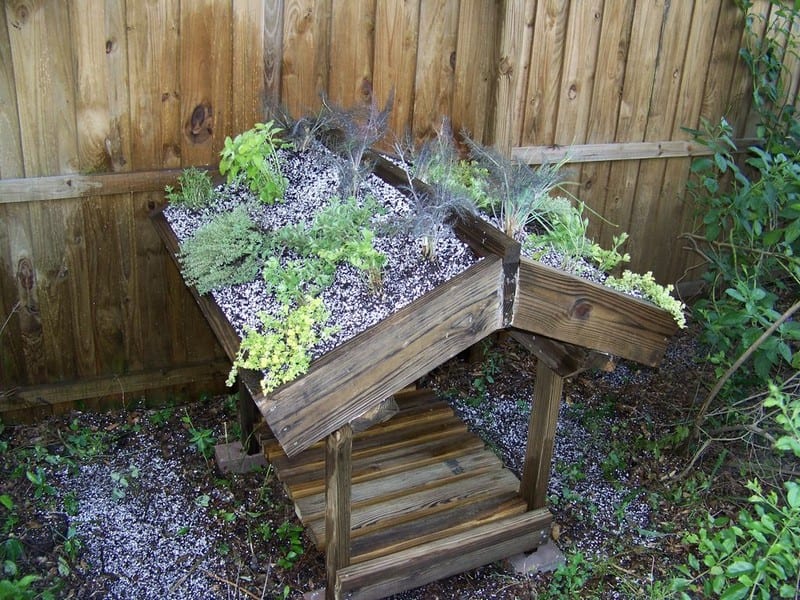
Watering. Because of the pitch of the roof, watering must be done with care until the roots tie the soil together. Use a fine rose watering can or, if using irrigation, micro sprays, and water the plants until established, 1-2 months.
Thanks to
Waterproofing and Root Barrier Solutions for Kennels
Creating a functional green roof kennel requires more than just building a sturdy frame. One of the most critical elements is making sure moisture and roots don’t compromise the structure. Waterproofing and root barrier layers protect the kennel from rot, mold, and long-term damage caused by aggressive root growth and excess moisture.
Layering for Protection
Start with a high-quality waterproof membrane. EPDM rubber or a PVC roofing membrane works well because they resist punctures and withstand temperature changes. These materials create a watertight seal between the soil above and the kennel below.
Overlap seams and seal all joints carefully using roofing adhesive or heat welding techniques, depending on the membrane type.
Choosing a Root Barrier
Once the waterproofing is in place, add a root barrier layer to prevent plant roots from penetrating and damaging the membrane. Polyethene sheets or specialised root barrier fabrics are designed to stop roots while still allowing water to drain through.
This step is essential in any green roof kennel build, especially if you’re planting aggressive herbs or ground covers with fast-spreading roots.
Drainage Considerations
Waterproofing only works when excess moisture has a place to go. Install a drainage mat or perforated pipe system above the root barrier. This will direct rainwater away from the structure and prevent pooling, which could lead to leaks or rot.
Lightweight gravel or expanded clay pellets can also help with drainage while adding minimal weight to the roof.
Protecting Edges and Seams
Don’t overlook the edges. Install metal flashing or treated wood borders around the edges of the green roof kennel to contain soil and water.
Flashing helps direct water away from structural seams, and also creates a clean separation between the planting area and the kennel’s walls. Be sure to seal any exposed screw holes or gaps with waterproof caulk.
Inspection and Maintenance
Regular checks are necessary to keep your green roof kennel safe and dry. Look for signs of moisture under the roof panels, inspect seams for cracks, and make sure plants aren’t breaching the root barrier. Early maintenance can prevent costly repairs and extend the life of the entire structure.
These waterproofing and root control measures ensure your green roof kennel stays beautiful and durable for years.
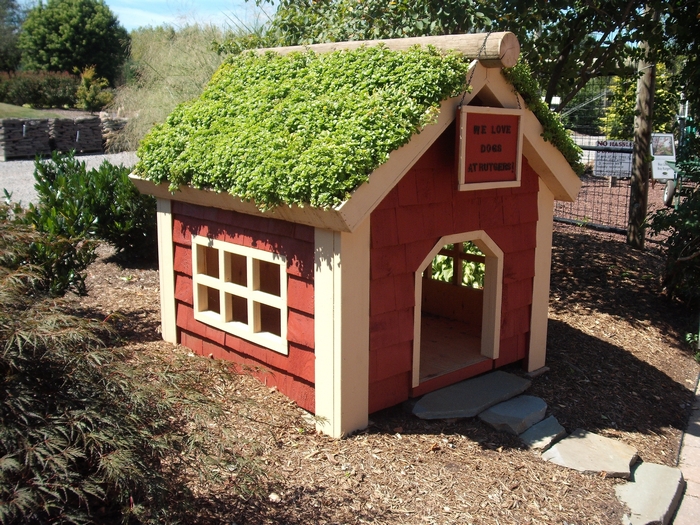
Green Roof Kennel Gallery
Click on any image to start the lightbox display. Use your Esc key to close the lightbox. ![]()


Selecting Pet-Safe Plants for Green Roof Kennels
A green roof kennel can be a cozy retreat for your dog and a small garden that adds beauty to your outdoor space. But not all plants are safe for pets. Choosing non-toxic, low-maintenance greenery ensures your dog stays healthy while your green roof thrives.
Understanding Pet Toxicity
Some plants, even common ones like lilies, azaleas, or foxglove, are toxic to dogs if ingested. When building a green roof kennel, stick to pet-safe species approved by veterinarians or animal welfare groups. Always cross-check plant names, as some have multiple varieties with different toxicity levels. It’s better to err on the side of caution.
Drought-Tolerant, Non-Toxic Picks
Since the green roof will be exposed to sun and wind, prioritize hardy, low-water plants. Good options include herbs like thyme, basil, and parsley. These are non-toxic, smell great, and attract pollinators. Other excellent choices include marjoram, oregano, and creeping thyme (not rosemary). These plants spread well and provide a soft texture without posing harm to pets.
Avoiding Sharp or Irritating Foliage
Skip plants with spiny, thorny, or stiff leaves. Agave, certain ornamental grasses, and succulents like aloe may be non-toxic, but their sharp edges can irritate your pet’s skin or eyes. A green roof kennel should be both comfortable and attractive. Stick to soft foliage with minimal risk of injury.
Ground Covers and Native Options
Low-growing plants like Irish moss, clover, or baby’s tears are gentle underfoot and pet-safe. If your local climate allows, native ground covers adapted to your region will need less water and maintenance. They’ll also support local insects and biodiversity. Native choices help the green roof kennel feel more natural and integrated into the surrounding environment.
Seasonal Interest and Color
You don’t need to sacrifice color for safety. Pet-safe blooms like calendula, snapdragons, and violets add seasonal charm. These flowers are generally safe for dogs and can handle mild rooftop conditions if watered regularly. Avoid bright, heavily scented flowers that may tempt curious chewers.
Maintaining a Safe Environment
Once planted, monitor your green roof kennel for weeds or invasive plants that may appear over time. Remove unfamiliar sprouts promptly. Also, avoid chemical fertilisers or pest control products unless they’re labelled as pet-safe. Even organic options can sometimes cause irritation in dogs.
The right plant selection ensures your green roof kennel stays both beautiful and safe, making it a true haven for your four-legged friend.
Conclusion
Building a green roof kennel offers insulation, style, and a touch of nature for your pet’s outdoor space. It’s a practical way to keep your dog comfortable through the seasons. With the right materials and pet-safe plants, it becomes both a cozy shelter and a living garden. This project blends eco-conscious design with thoughtful pet care.
We have more ways of creating a cozy space for your pets. Check out our guide on making a dog bedroom!