Last Updated on December 19, 2025 by teamobn
Contents
- 1 Project at a Glance
- 2 Why Build an Octagonal Deck?
- 3 Building an Octagonal Deck
- 3.1 What Materials Are Needed to Build an Octagonal Deck
- 3.2 How to Build a 12 Foot DIY Octagonal Deck: Step-by-Step Instructions
- 3.3 Step 5: Place Saddles and Pour the Outer Piers
- 3.3.1 Step 6: Install 4 X 4 Posts and Build the Base Rectangles
- 3.3.2 Step 7: Install the Eight Main Joists
- 3.3.3 Step 8: Install the End Joists Around the Circumference
- 3.3.4 Step 9: Add Cross Joists and Attach the Frame to the House
- 3.3.5 Step 10: Lay the Decking From the Outside In
- 3.3.6 Step 11: Modify the Center Clamping Bolt
- 3.3.7 Step 12: Finish the Inlays to Straighten Lines
- 3.3.8 Step 13: Bridge the Space Between Deck and House
- 3.3.9 Step 14: Finishing, Maintenance, and Long-Term Performance
- 3.3.10 If You Plan to Add a Aoof
- 4 Conclusion
Project at a Glance
- Size: 12-foot diameter octagonal deck
- Type: Attached, cantilevered deck with concrete piers
- Time: About 1 to 2 full days for two people
- Approximate cost: Around 1,500 CAD in materials (excluding tax and maintenance)
- Skill level: Intermediate DIY (comfortable with power tools and basic framing)

This guide shows you how to build a 12-foot octagonal deck that attaches to your house.
You will mark out an eight-sided shape 6 feet from your house, pour one center footing and eight outer footings, build two overlapping rectangles on 4 x 4 posts, add eight main joists and cross joists, then lay cedar decking from the outside edge toward the center and finish with cedar inlays.
The design is based on a real owner-built deck that has stayed sturdy for years, even under heavy use. If you can measure carefully, use a circular saw and drill, and follow the steps in order, you can build this deck.

Why Build an Octagonal Deck?
Spending time outdoors has real health and mood benefits. Sunlight helps your body produce vitamin D, and fresh air can reduce stress and improve your overall sense of well-being.
A deck gives you an outdoor room. It can be your spot for morning coffee, weekend barbecues, small parties, or quiet evenings. An octagonal deck adds visual interest because the eight sided shape feels like a special retreat rather than a plain rectangle.
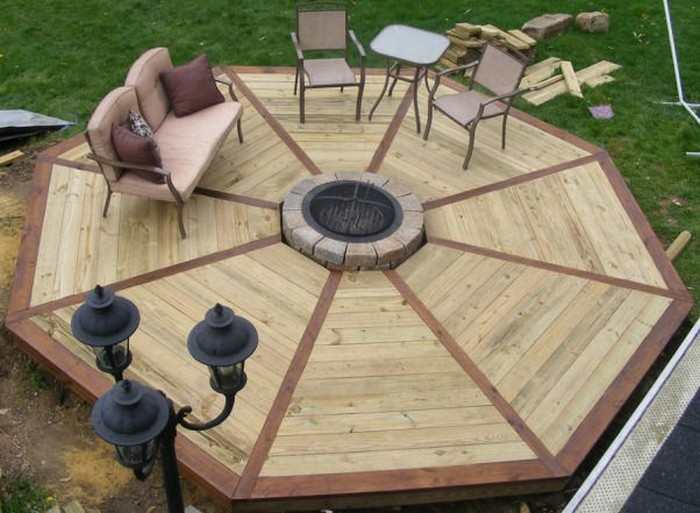
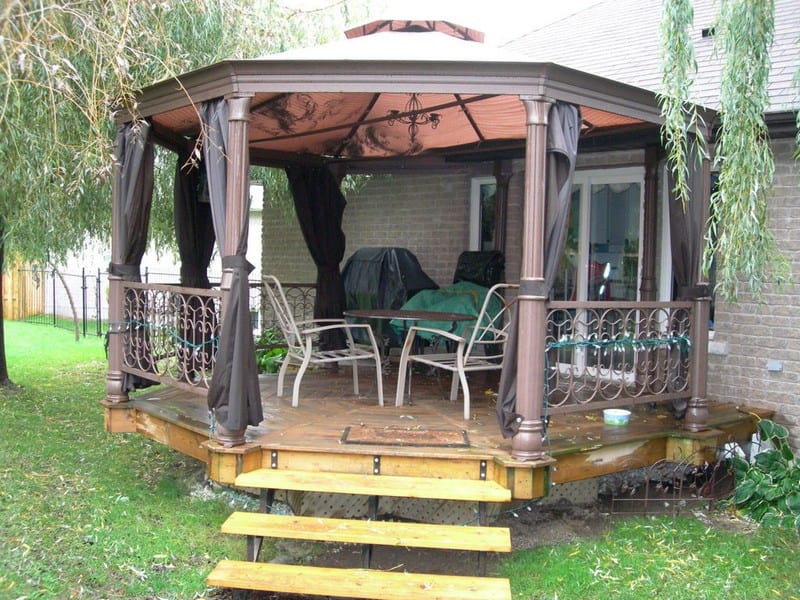
This 12 foot octagonal deck was built by the owner for around 1,500 CAD in materials. The unique shape and strong framing make it both attractive and durable.
Could you use one of these octagonal decks in your backyard?
Click on any image to start the lightbox display. Use your Esc key to close the lightbox.


Building an Octagonal Deck
What Materials Are Needed to Build an Octagonal Deck
Pressure-treated and cedar lumber
- 2 x 8 x 14-foot pressure-treated lumber
- 2 x 8 x 8-foot pressure-treated lumber
- 4 x 4 x 8-foot pressure-treated lumber
- 1 1/4 x 6 x 8 foot cedar decking
Concrete and footing supplies
- Cement mix
- 10-inch x 8-foot Sona tube for center pier
- 6-inch x 4-foot Sona tubes for outer piers
- Sona tube saddles or post bases
Hardware and fasteners
- 4-inch bolts, nuts, washers
- Deck screws
- Joist hangers
- Wall anchors
Finishes and adhesives
- Exterior deck coating or stain (for example, a high-quality deck coating product)
- Waterproof wood glue
Tools You’ll Need
- Hammer
- Clam Shell Shovel or Post Hole Auger
- Regular shovel
- Cordless drill and bits
- Hand Circular Saw
- Wheelbarrow for mixing concrete
- String Line
- Chalk or marking paint
- Measuring tape and level
How to Build a 12 Foot DIY Octagonal Deck: Step-by-Step Instructions
Step 1: Plan Your Deck and Check Local Rules
Before digging or buying materials, check local building codes.
- Ask about the required footing depth
- Confirm whether you need a permit for an attached deck
- Learn the setback distances from property lines
- Ask if there are special rules if you plan to add a roof later
Decide exactly where you want the deck to sit in relation to your house door. This design assumes the deck will be attached to the house and centered roughly on a main entrance.
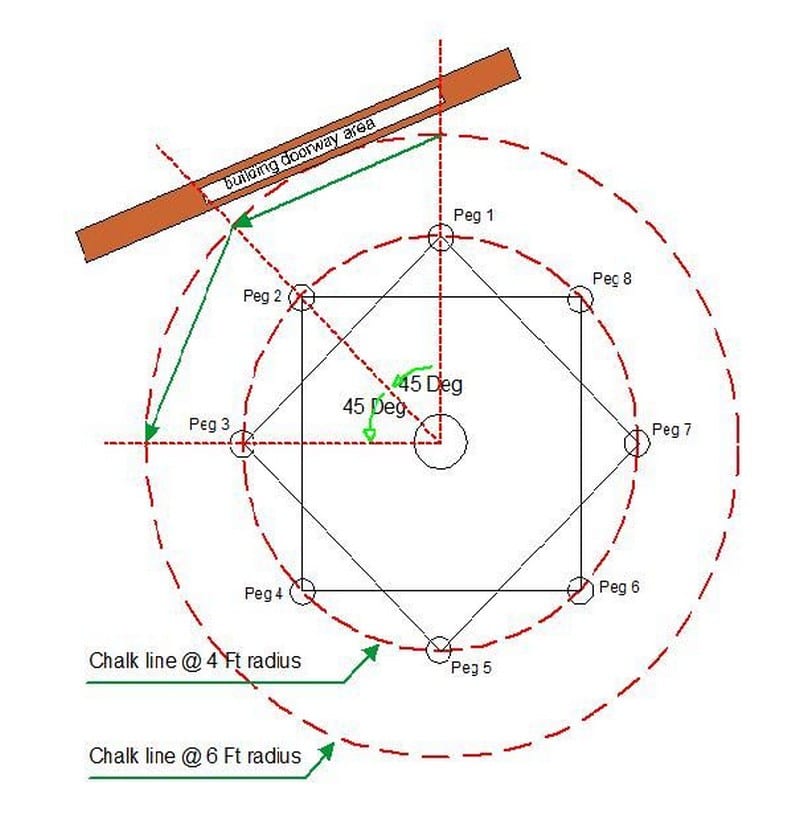
Step 2: Mark the Center and Outline of the Octagon
This is a 12-foot diameter octagonal deck. The radius is 6 feet from the center to the outer edge.
- Measure out from the house
- Find a point about 6 feet from the edge of your house, plus a small allowance for a ledger board.
- This point should be roughly centered on your door, where people will step out onto the deck.
- Drive a sturdy peg here. This will be the center support location.
- Draw two circles
- Tie a string to the center peg and make it exactly 6 feet long.
- Walk around the peg with chalk or marking paint, keeping the string tight, and mark a 6-foot radius circle. This is the outer edge of your deck.
- Shorten the string to 4 feet and draw a second circle. This helps you locate the positions of the outer posts.
- Mark the eight outer post locations
- Run a string line from the center peg to the right edge of your door, and see where it crosses the 4-foot circle. Drive a peg there for your first outer post.
- Now, rotate the string 45 degrees around the center peg and mark the next post. The deck has eight sides so the posts are 45 degrees apart.
- Check that the 45 degree arc covers the doorway the way you want. If not, adjust slightly and remark.
- Continue this pattern all the way around until you have eight outer post locations marked along the 4-foot circle.
You now have one center point and eight evenly spaced outer points that will support your deck.
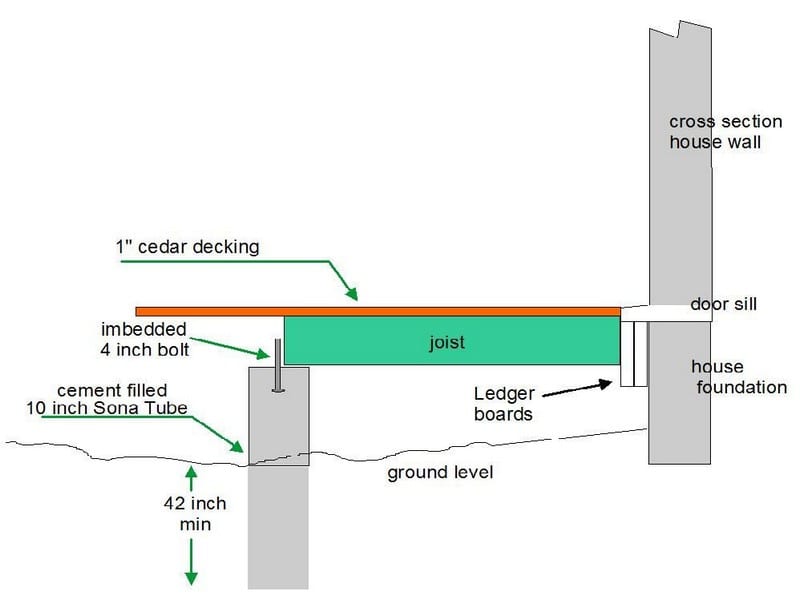
Step 3: Dig and Pour the Center Concrete Pier
The center support carries a lot of the deck load, so build it carefully.
A Sona tube is a round cardboard form you place in the ground and fill with concrete to make a solid footing.
- Dig the center hole
- At the center peg, dig down to at least your local frost depth. In the example build, frost depth was 42 inches.
- Make the hole wide enough to fit a 10-inch Sona tube.
- Cut and place the tube
- Place the 10 inch Sona tube in the hole.
- Mark the outside of the tube at a height that is one joist thickness plus one deck board thickness below your house door threshold.
- Cut the tube at this line so the finished concrete pier will sit at the right height relative to the house.
- Mix and pour concrete
- Mix concrete in a wheelbarrow following the instructions on the bag.
- Fill the Sona tube to the top and smooth it off.
- While the concrete is still wet, embed a 4 inch carriage bolt in the center. A 3/4 inch diameter bolt works well. Leave the threaded end up so it can lock down the joists later.
Allow the concrete to cure according to the instructions on the bag.
Step 4: Dig and Pour the Eight Outer Piers
These piers support the edges of the deck.
- Dig the eight holes
- At each peg on the 4-foot circle, dig a hole below frost depth.
- Use 6-inch Sona tubes for these outer piers.
- Set the tubes
- Insert a 6-inch tube in each hole.
- Set the tops of the tubes so they will sit about 3 inches above the final ground level. This helps keep the wood posts away from direct ground contact.
- Do not pour yet
- Before pouring concrete, plan how you will place the metal saddles or post bases. These hold the 4 x 4 posts.
- The saddles in certain positions need to align with the framing rectangles that form the base of the octagon. This is explained in the next step.
Step 5: Place Saddles and Pour the Outer Piers
To create a strong base, you will build two overlapping rectangles using the 4 x 4 posts. For that reason, the saddles on the outer piers are aligned in two patterns: odd numbered posts and even numbered posts.
- Label the outer posts 1 through 8
- Pick any post position and call it post 1.
- Number the rest around the circle: 2, 3, 4, 5, 6, 7, 8.
- Align the saddles on odd-numbered posts
- For posts 1, 3, 5, and 7, align the saddles so they form the corners of a rectangle.
- This rectangle will be one of the two main support frames.
- Align the saddles on even-numbered posts
- For posts 2, 4, 6, and 8, align the saddles according to the second rectangle, which overlaps the first one.
- Together, these rectangles form an eight-pointed base for the deck.
- Pour the concrete
- Once the saddles are correctly aligned, pour concrete into each 6-inch Sona tube.
- Set the saddles at the correct height and position while the concrete is still workable.
- Make sure all saddle tops are level with one another and at the right height relative to the center pier.
Allow all piers to cure properly before building on them.

Step 6: Install 4 X 4 Posts and Build the Base Rectangles
- Install the vertical posts
- Set a pressure-treated 4 x 4 post into each metal saddle on the eight outer piers.
- Use deck screws to secure the posts firmly in the saddles.
- Mark and cut the tops of all eight posts so that they are level with the top of the center concrete pier. Use a level and string line to check.
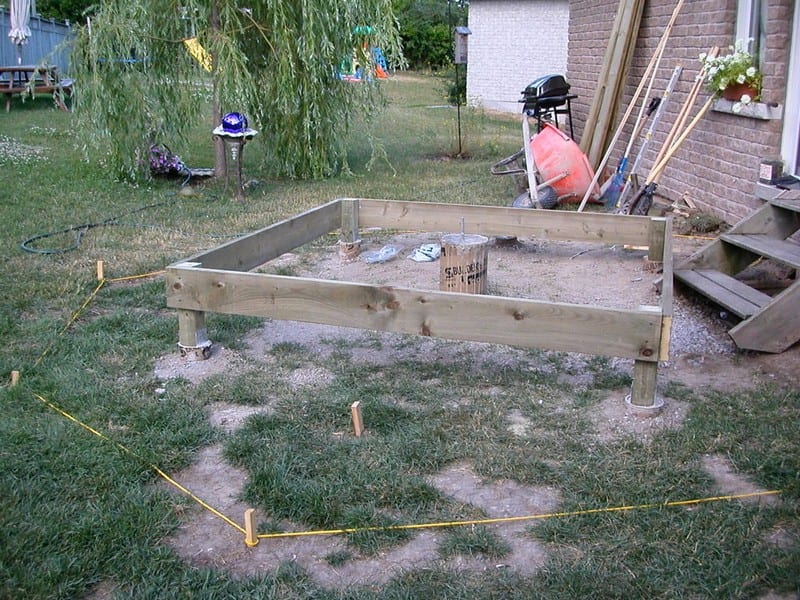
- Build the first rectangle on odd-numbered posts
- Attach pressure-treated 2 x lumber horizontally to posts 1, 3, 5, and 7 to form a rectangle.
- The top of this rectangle should be flush with the tops of the posts.
- Build the second rectangle on even-numbered posts
- Attach boards between posts 2, 4, 6, and 8 to make a second rectangle that overlaps the first one.
- Fasten securely with deck screws.
- Double up for strength
- Add extra boards to both rectangles to double them up and make the base very rigid.
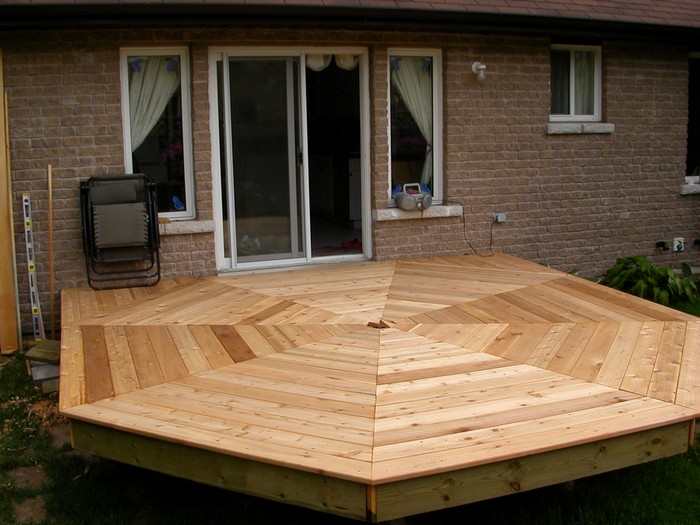
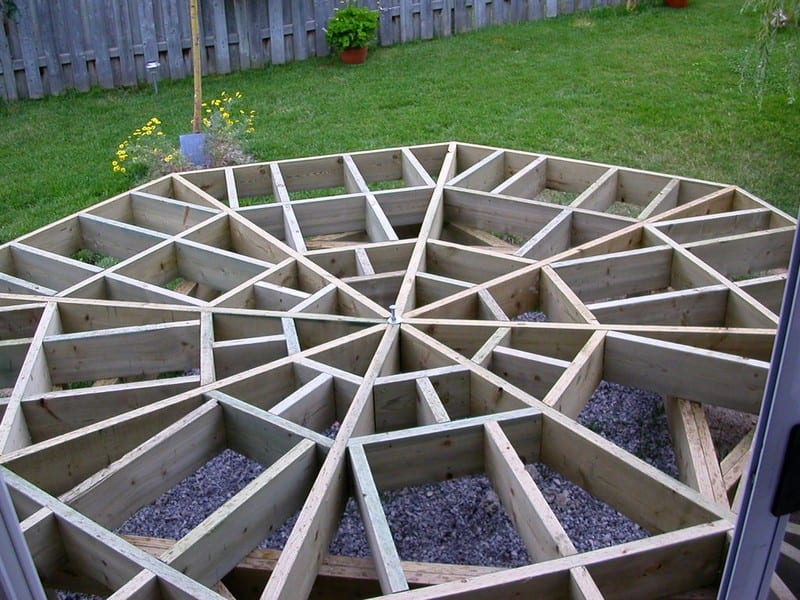
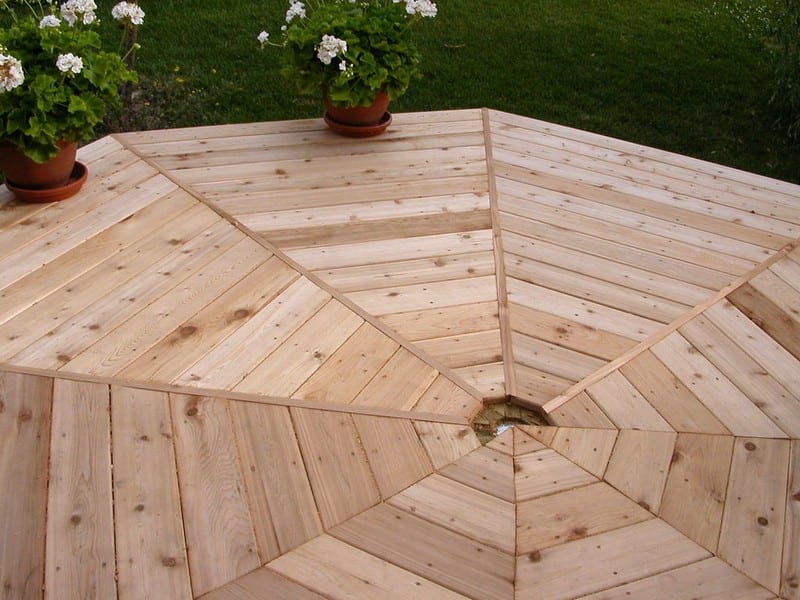
You now have an eight-pointed polygon that forms the foundation for your octagonal deck. Each point, or vertex, will support a main deck joist.
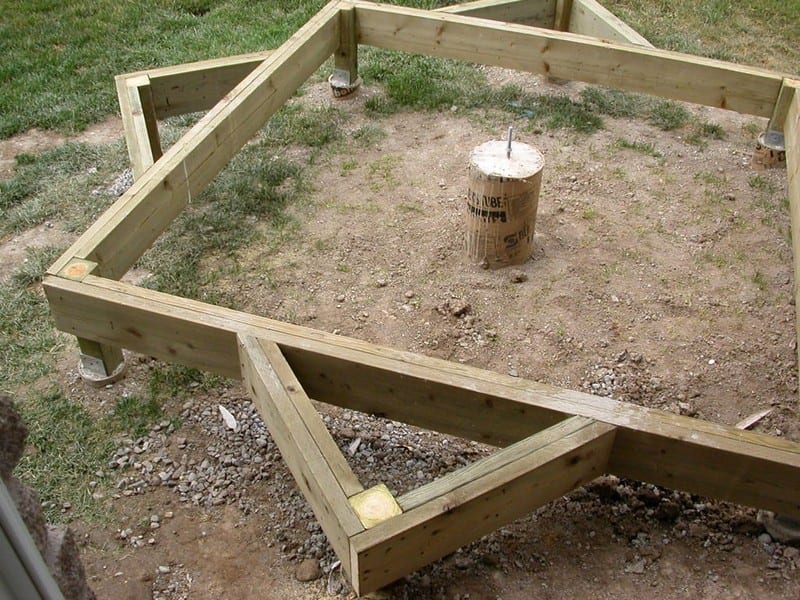
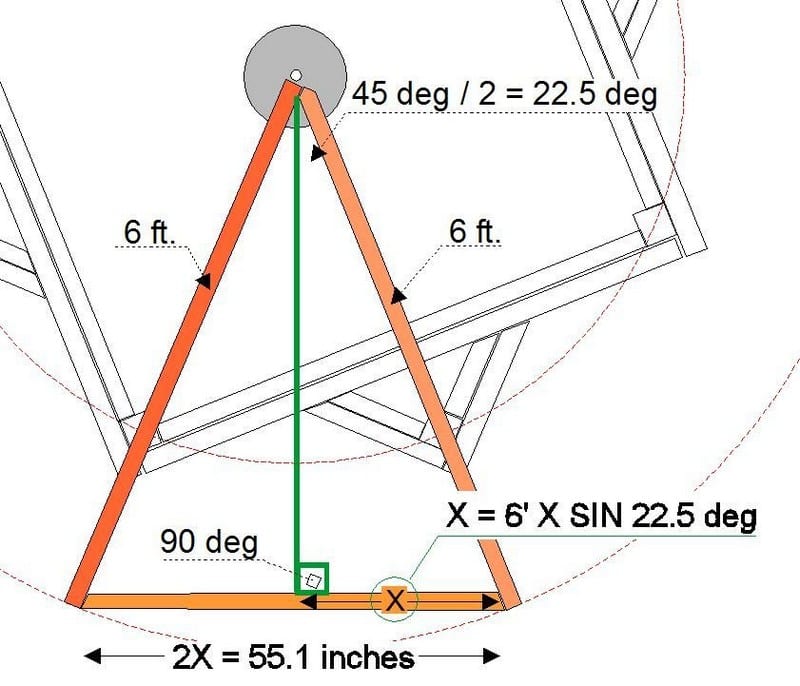
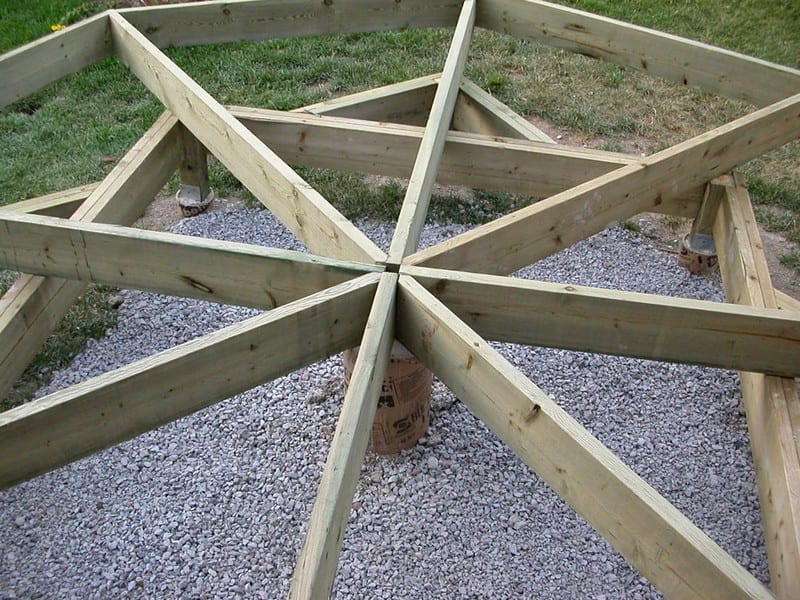
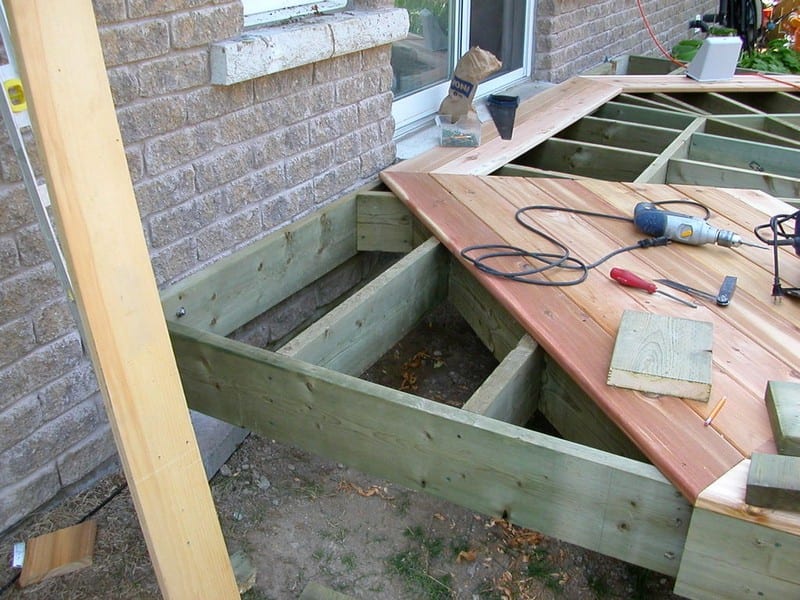
Step 7: Install the Eight Main Joists
A joist is a structural board that runs under the deck boards and carries the load. In this design, there are eight main joists that all meet at the center pier and extend out to the vertices.
The deck is cantilevered, which means the ends of the joists extend beyond the last support. In this case, there is about a 2-foot cantilever past the outer posts.
- Cut and place the main joists
- Cut eight joists to 6 feet each.
- Place one joist at each vertex so it runs from the outer frame to the center pier.
- Arrange the joists so they are 45 degrees apart around the circle.
- Fit at the center
- Push the inner ends of the joists tightly together around the center bolt.
- Four of the joists will need a 45-degree cut at the inner end for a tight fit.
- Temporarily clamp at the center
- The carriage bolt in the concrete pier may not be long enough to clamp the joists from above.
- One solution is to attach a second bolt upside down to the embedded bolt, with nuts and a large washer between them, to give enough length to clamp the joists.
- Tighten enough to hold the joists in place but leave room to adjust orientation later.
At this point, the eight main joists form the basic shape of the deck. The outer edges will later be joined by end joists to complete the octagon.
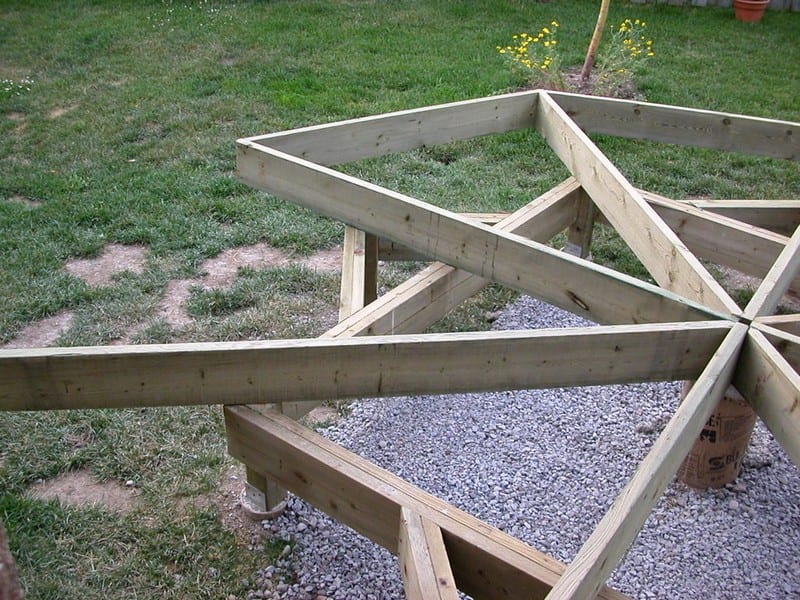
Step 8: Install the End Joists Around the Circumference
End joists join the tips of the main joists and create the final eight-sided outline of the deck.
- Measure and cut the end joists
- Each end joist connects two neighboring main joists.
- A practical method is to cut one end of a board at 22.5 degrees, hold it in place, mark the length, and then cut the other end at 22.5 degrees.
- The exact lengths may vary slightly because real lumber has thickness and variation.

- Keep the 45-degree angle between main joists
- The key is to keep the angle between main joists at 45 degrees.
- Use careful measuring and test fitting rather than relying only on calculation.
- Adjust deck orientation
- After the end joists are in place, but before you fully lock everything down, check the view from the house door.
- The assembled frame can rotate slightly on the center pier bolt.
- When you are satisfied with how the deck lines up with the doorway, tighten the connections at the vertices and at the center.
You now have a complete octagonal frame.
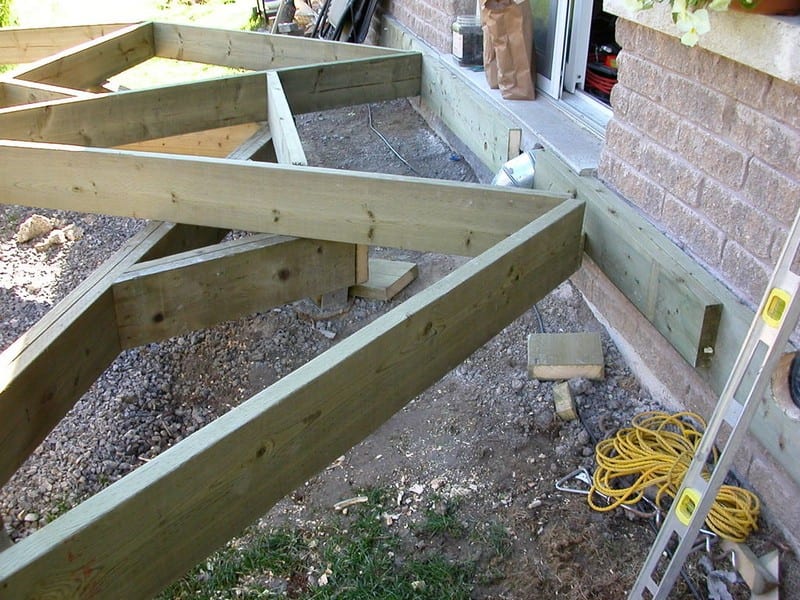
Step 9: Add Cross Joists and Attach the Frame to the House
- Install cross joists
- Cross joists run between the main joists and end joists to support the deck boards.
- Install cross joists at 16-inch centers, perpendicular to the end joists where possible.
- Fasten all joists and cross joists securely with deck screws and joist hangers where needed.
- The result should be a stiff, grid-like structure that does not bounce.
- Attach the deck to the house with ledger boards
- A ledger board is a strong, horizontal board that is bolted to the house framing. The deck joists attach to this ledger.
- If there are obstacles like vent pipes, you may need two ledger boards at different heights, as in the example build.
- Use appropriate wall anchors and lag bolts for your wall type.
- Make sure to flash the ledger correctly to keep water out of the house wall.
- Improve the ground under the deck
- Slope the soil slightly away from the house under the deck.
- Cover with several inches of gravel to control weeds and improve drainage.
Once this step is complete, the frame of your octagonal deck is solid and securely attached.
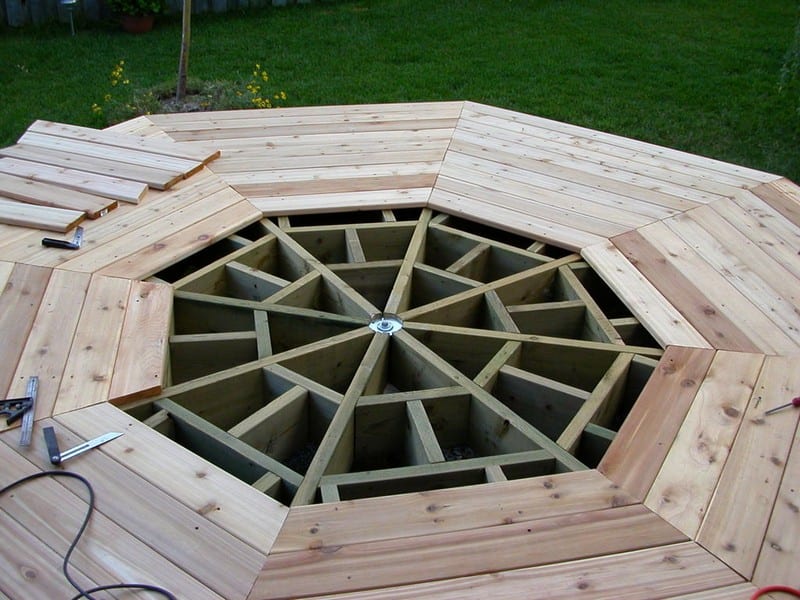
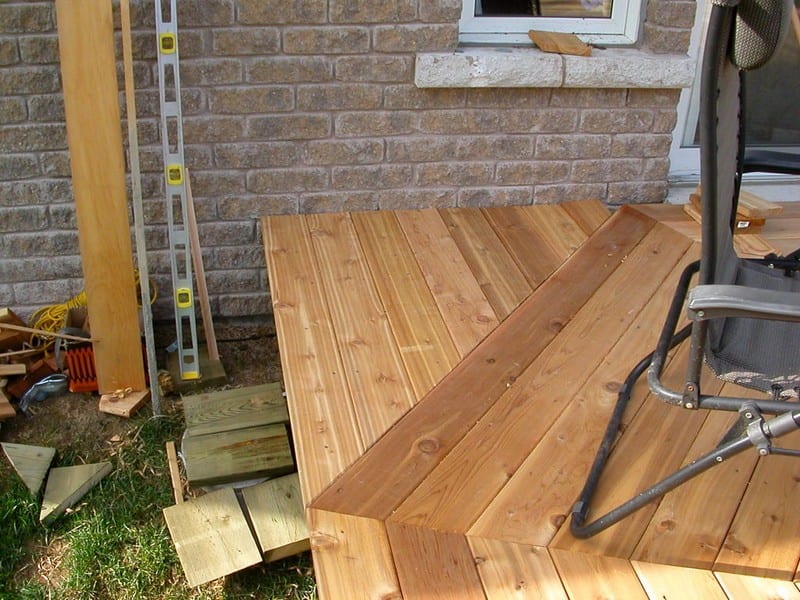
Step 10: Lay the Decking From the Outside In
You will install the cedar deck boards starting at the outer edge and working inward toward the center.
- Start at the outer edge
- Begin with the first row of decking around the outside of the deck.
- Let the boards overhang the end joists by about 1 1/2 inches.
- Keep the outer edge neat and consistent all the way around.
- Fasten boards between main joists
- Each piece of decking runs between two adjacent main joists.
- Use deck screws to fasten each board.
- For a stronger hold, you can place screws in a zigzag pattern, alternating closer to the front and back edges of the board.
- Keep joints tight at first
- Do not screw down the inner ends of the boards near the center yet.
- Push the boards together tightly with no gaps. Cedar will still shrink a little, but keeping them tight at installation reduces long-term gaps.
- From time to time, you may need to rip a board narrower to keep the pattern even. Save all offcuts. Many of them will fit closer to the center later.
- Support boards as you move inward
- As you get nearer the center, you may need to add short pieces of scrap joist underneath to support the inner ends of the deck boards.
- Keep the pattern consistent and the joints tight.
At this stage, the deck surface is nearly complete, but you still need to adjust the center bolt and add the decorative inlays.

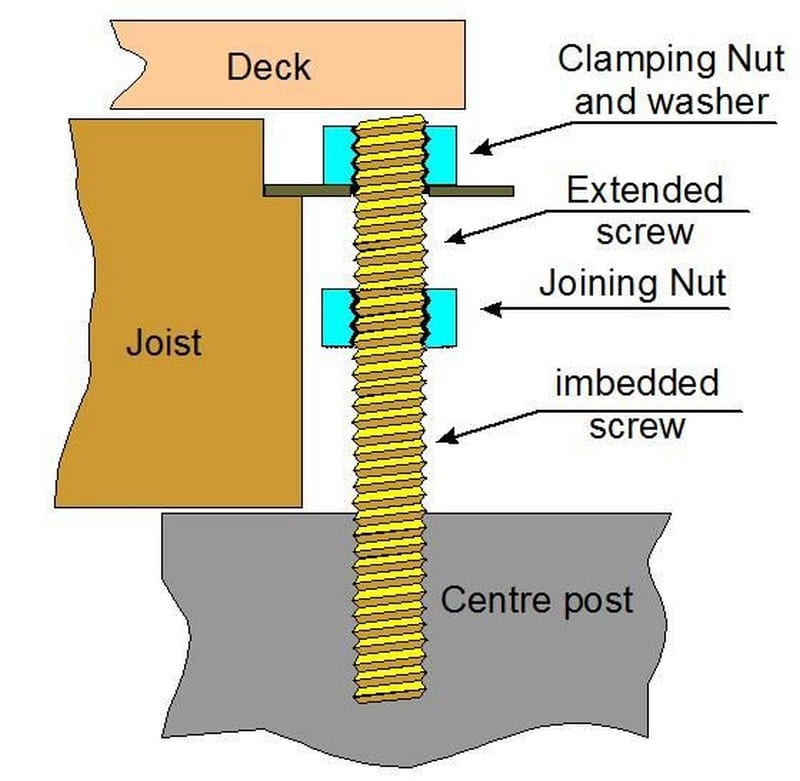
Step 11: Modify the Center Clamping Bolt
To allow deck boards to sit flat over the center, the clamping bolt and washers must sit below the surface of the joists.
- Create space for the washers
- Use a chisel to carefully remove wood around the center bolt area on top of the main joists.
- Cut just deep and wide enough to fit the large washer and a smaller reinforcing washer underneath it.
- Adjust bolt length
- Assemble the hardware with a large washer, a smaller washer on top of it, and the nut.
- Mark the excess length of the bolt above the nut.
- Remove the nut and washers, and cut the bolt to length with a hacksaw.
- Reassemble and tighten so the bolt and washers sit below the top surfaces of the joists.
When done correctly, the final deck boards can pass over the center without being blocked by the hardware.
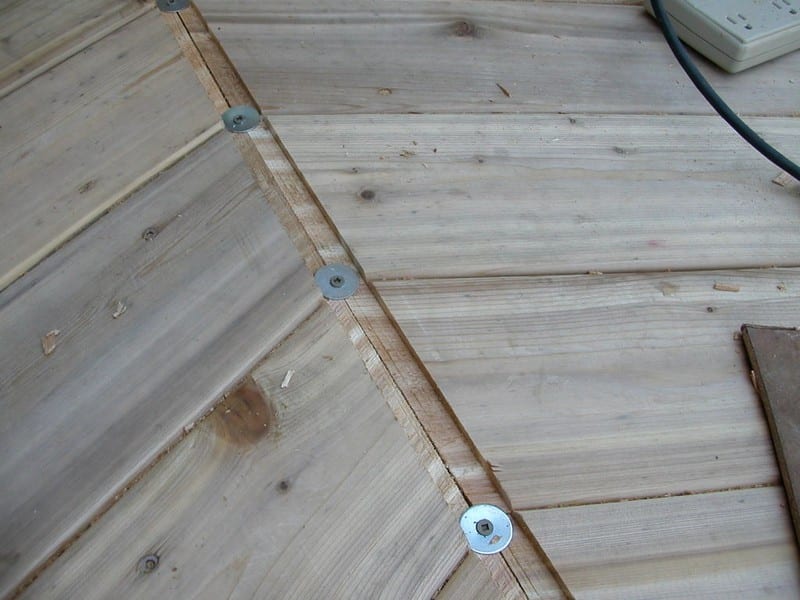
Step 12: Finish the Inlays to Straighten Lines
Because cutting all the deck boards by hand can leave slightly wavy lines, a cedar inlay can both hide minor flaws and emphasize the eight triangular sections of the octagon.
- Prepare cedar strips
- Rip a 6-foot piece of cedar decking into strips about 3/8 inch thick.
- These will be glued into channels cut along the main joists.
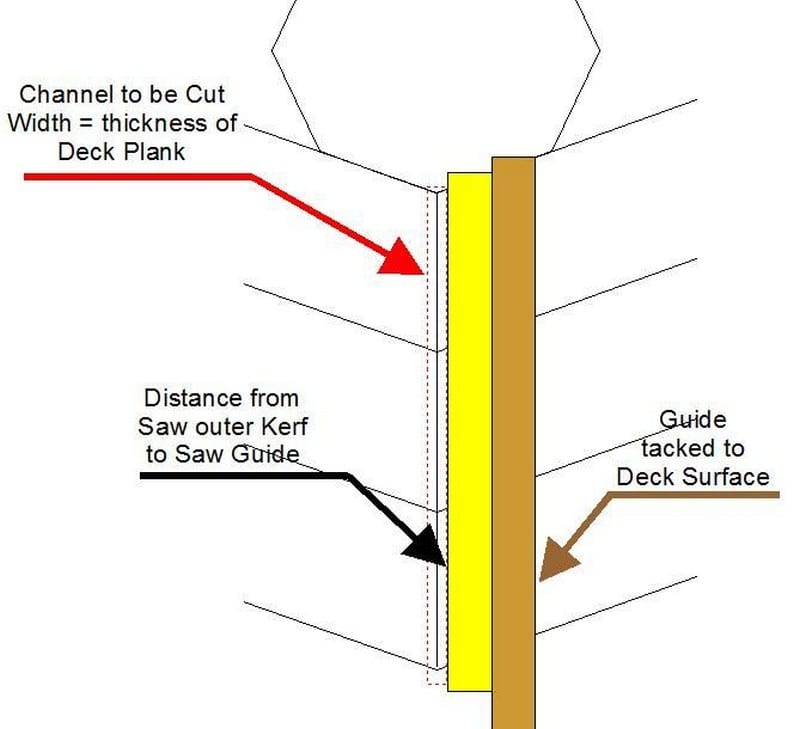
- Mark and cut the channels
- Place a cedar strip over a saw joint between two deck sections so it is centered along the line.
- Draw a pencil line along the right edge of the strip.
- Measure the distance from the edge guide of your circular saw to the closest side of the saw blade. This is often about 1 1/4 inches.
- Tack a thin scrap of wood onto the deck to the right of your pencil line at that measured distance. This acts as a straight guide for your saw.
- Make one shallow cut along the line to a depth of about 1/4 inch.
- Move the cedar strip to check the width of the channel and make a second cut as needed until the strip just fits.
- Clean out the waste between cuts with a sharp chisel.
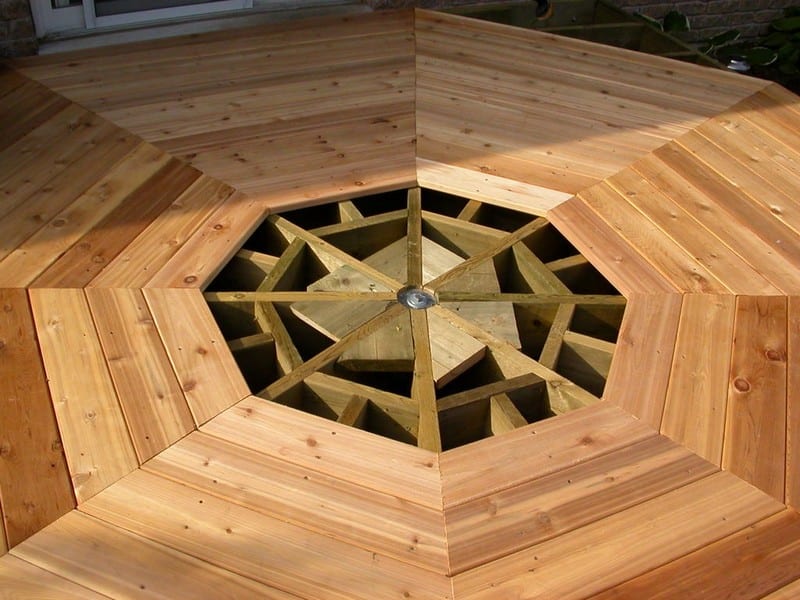
- Glue and secure the inlays
- Before gluing, make sure all deck board joints underneath are securely screwed down.
- Apply waterproof wood glue in the channel.
- Press the cedar strip into place.
- Use a few screws with washers if needed to hold the strip tightly while the glue cures.
- When dry, use a hand plane to bring the cedar strip flush with the deck surface.
Repeat for all main joist lines around the deck. The straight cedar inlays make the triangular sections of the octagon stand out clearly and give the deck a custom look.
Step 13: Bridge the Space Between Deck and House
If there is a gap between the main octagon and the house wall, you can frame and deck this area separately while keeping the octagon shape clear.
- Build simple framing between the deck edge and the house
- Use short joists and blocking to create a small subframe between the octagon and the wall.
- Make sure this area is well supported and attached to the main deck frame or ledger.
- Add decking
- Install boards in this area so that the octagon still reads clearly as a shape, but the space between the deck and the wall is fully covered.
This keeps the octagon visually prominent while providing a practical walking surface right at the door.
Step 14: Finishing, Maintenance, and Long-Term Performance
- Sand and coat the deck
- Lightly sand any rough spots or edges.
- Apply a high-quality exterior deck coating or stain according to the product instructions.
- Expect to refinish the deck every few years, depending on the climate and wear.
- Expect some shrinkage
- Cedar boards shrink less than pressure-treated boards, but will still move a little over time.
- Installing the boards tightly together at first reduces the size of later gaps.
- Long-term strength
- This particular deck has proven very stiff and stable. It has handled heavy use, including a full band with instruments, without noticeable bounce.
- The combination of concrete piers, doubled framing rectangles, and well-spaced cross joists creates a very solid structure.
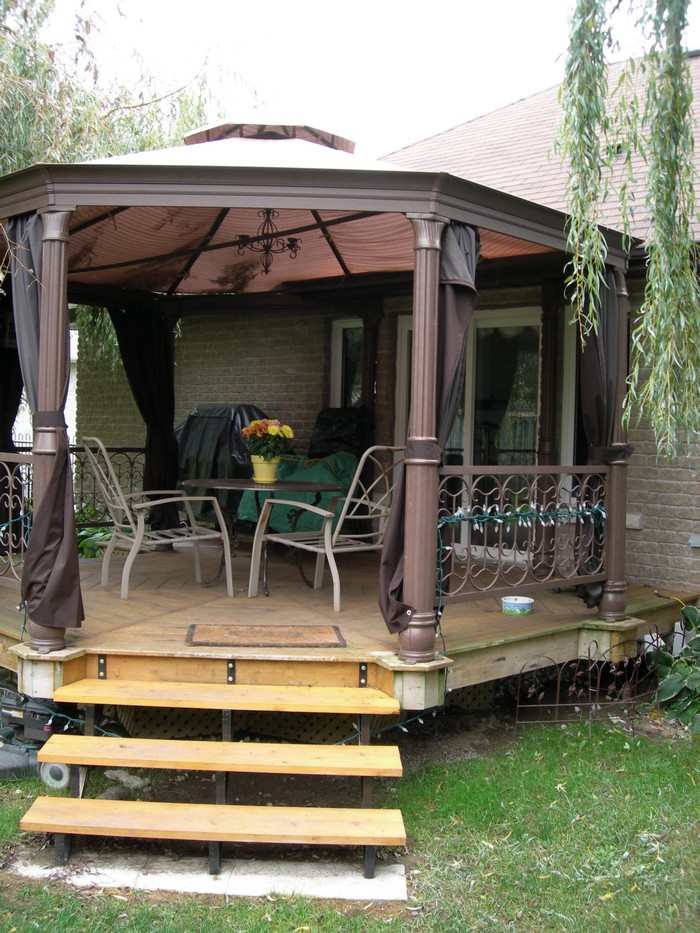
If You Plan to Add a Aoof
- In many areas, adding a solid roof over a deck changes the rules for setbacks and permits.
- In our county, the required setback increased from 4 feet to 23 feet once a hard roof was part of the design, so we used a removable garden tent instead.
- Always confirm roof rules with your local building department before planning a permanent roof on an octagonal deck.
Thanks to cobourgdave for this great tutorial!
Conclusion
Building an octagonal deck can transform your backyard into a stunning outdoor oasis, perfect for relaxation, entertainment, and enjoying nature. With the right materials, design considerations, and maintenance, your octagonal deck will not only enhance the beauty of your home but also provide a durable and versatile space for years to come
For more ways to improve your outdoor area, check out our kitchen expansion guide!
Frequently Asked Questions About Building an Octagonal Deck
- Do I need a permit to build an octagonal deck
- Permit rules depend on your local building authority. Many places require a permit if the deck is attached to the house, higher than a certain distance off the ground or covered by a roof. Always check your local rules before digging footings or attaching anything to the house.
- How much does a 12-foot octagonal deck cost?
- This 12-foot attached octagonal deck cost about 1,500 CAD in materials, not including tax or stain. Your cost will change with lumber prices, hardware choices and whether you add railings, stairs or a roof.
- How long does it take to build an octagonal deck like this?
- Two people with some DIY experience can usually build the footings, frame and decking in one to two full days of work, plus extra time for concrete curing and finishing. Adding stairs, railings, or a tent or roof will add more time.
- What skill level do I need for this deck?
- This is an intermediate project. You should be comfortable using a circular saw and drill, reading a tape measure, and working safely with framing lumber and concrete. If you have never built a deck before, consider getting advice from someone experienced or from your local building centre.
- What kind of wood is best for an octagonal deck?
- A common choice is pressure-treated lumber for the structure and cedar for the deck boards. Pressure-treated lumber holds up well in contact with concrete and moisture, while cedar looks better and feels better underfoot.
- Can I build this deck free-standing instead of attaching it to my house?
- Yes, you can build a free-standing octagonal deck by adding more posts and changing the framing so there is no ledger board attached to the house. However, footing layout, bracing and permits may be different, so check with your building department for the correct details.
- How do I maintain an octagonal deck over time?
- Sweep off debris regularly and wash the deck once or twice a year. Recoat with a good exterior deck stain or sealer every few years, depending on sun and weather. Check for loose screws, cracked boards and any signs of rot, and fix them promptly to keep the deck safe and strong.