Last Updated on April 23, 2025 by teamobn
There are various ways of attaching door and window bucks. On this dome, we made six anchors with small pieces of steel welded together in a T-shape. Drill holes in the anchors and pin them to the earthbags as shown with ¼” steel rod.
Distribute the anchors, three per side, so there are two near the bottom, two in the centre, and two near the top of the arched door opening. A steel door buck was welded to these anchors after the dome was built.

Remember to always use 4-point barbed wire between courses. We used one strand on this dome due to its small size. Use two strands of barbed wire between every course for domes larger than this one.

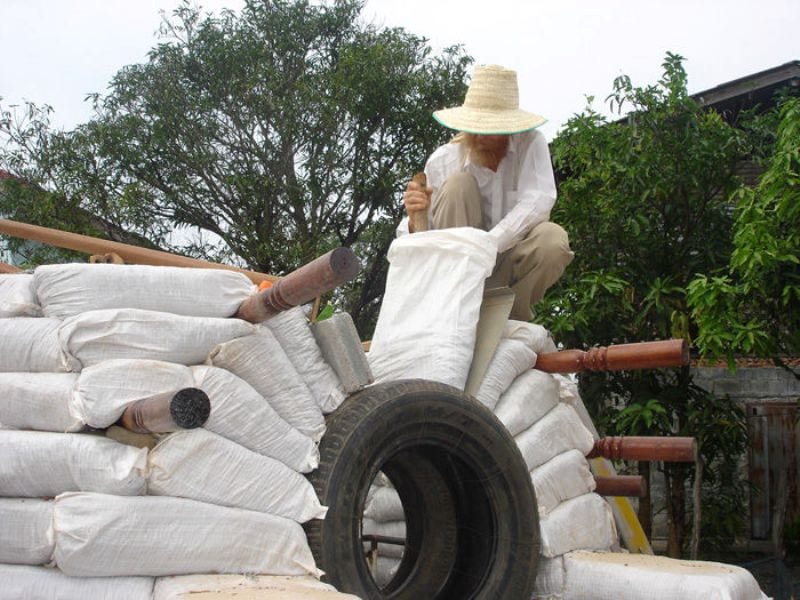
On straight earthbag walls, you can just butt the bags against each other. But for roundhouses and domes, you need to align the bag ends to the centre point so the bags sit tightly against each other. Hit the bottom of each bag with a board until it aligns with the centre of the dome. The second photo shows how the bag joints appear looking from above. (They look like mitred joints.) Repeat this process throughout the dome. At the top, the process becomes more pronounced as the radius decreases.


You need a way to support the bags as you build the arch over the door. You could build an elaborate wood and plywood form. This might be worthwhile if you’re building lots of arches the same size. But this dome has just one arch, so we lashed two used tires together for the form.
Build some supports on each side of the door opening to hold the tires at the correct height. Add some horizontal blocking to hold everything together, but leave enough space in the middle to squeeze through and for the string line that will determine your dome curvature.
Note: you could temporarily fill the space with adobes, bricks, etc. and remove them later, but then you lose access to the dome and can’t use the string line.
It looks complicated to build an arch, but it’s not. Make tapered earthbags about 12” high. Make sure you use the right soil mix that will withstand high pressure. Compact the bags from the sides and top as much as possible. The taper aligns with the centre point of your form (the centre of the tires in this case). You could use a string line for this or just eyeball it as I did.

It’s a good idea to include a protected overhang above entry doors to protect the door and shelter people going in and out. This eyebrow or overhang is made with hardwood table legs embedded between bags.
Then short pieces of insect-resistant eucalyptus wood were nailed to the table legs and covered with 6-mil plastic sheeting. The wood was varnished with polyurethane for greater durability. (The table legs were varnished in advance.)

Continue building the buttress at the same time as the dome. The bags and barbed wire interlock at every course. We added a few ½” pieces of rebar for added strength where it seemed it would do the best: down through the top of the bags to help to prevent overturning, and where the buttresses connect to the dome.
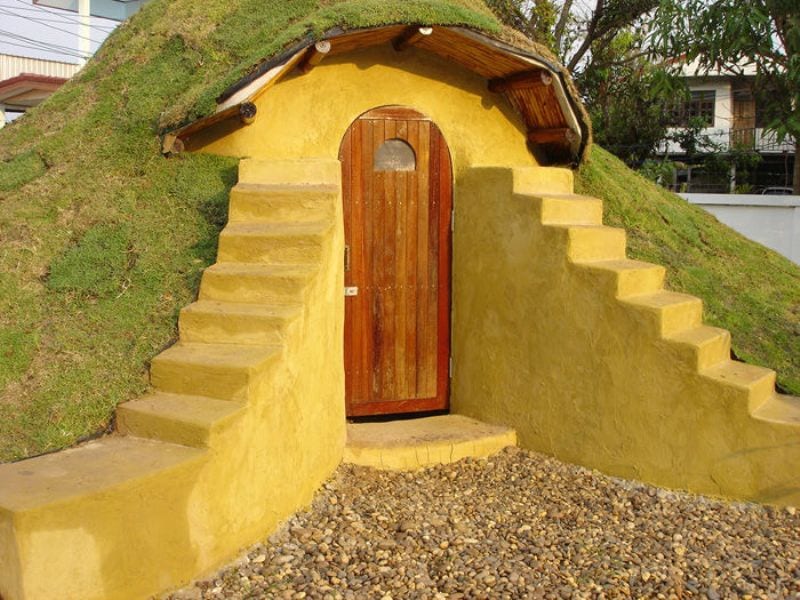
The buttresses are stepped to match the slope of the earth. The steps make it easy to climb on the dome. The lower part makes a nice bench.

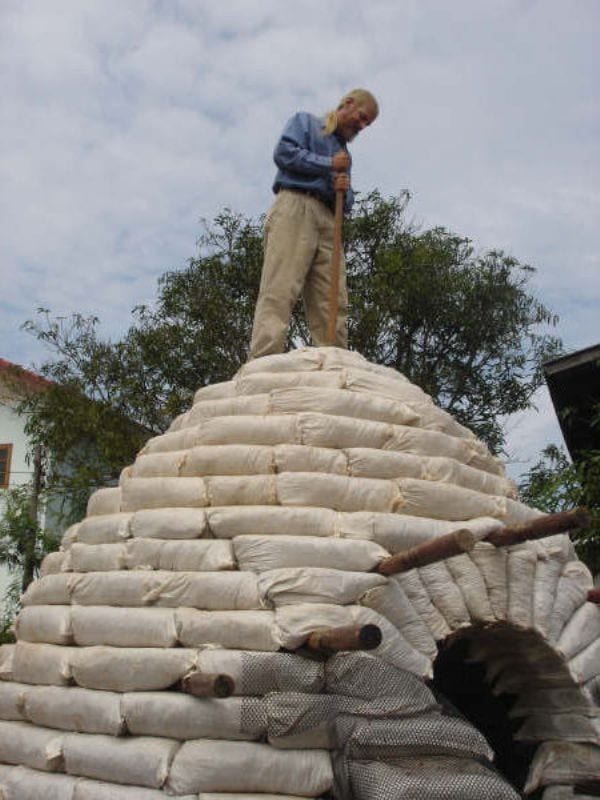
Continue the same process of laying and tamping bags. The corbel (overhang between courses) will increase the higher you go. Use the string lines at every course to arrive at the desired shape. Make sure each bag is angled toward the centre point and tightly butted to the next bag. (This is what makes the dome strong.)
The photo shows the last bag being put in place with a great feeling of accomplishment. The last bag looks like a mushroom cap.
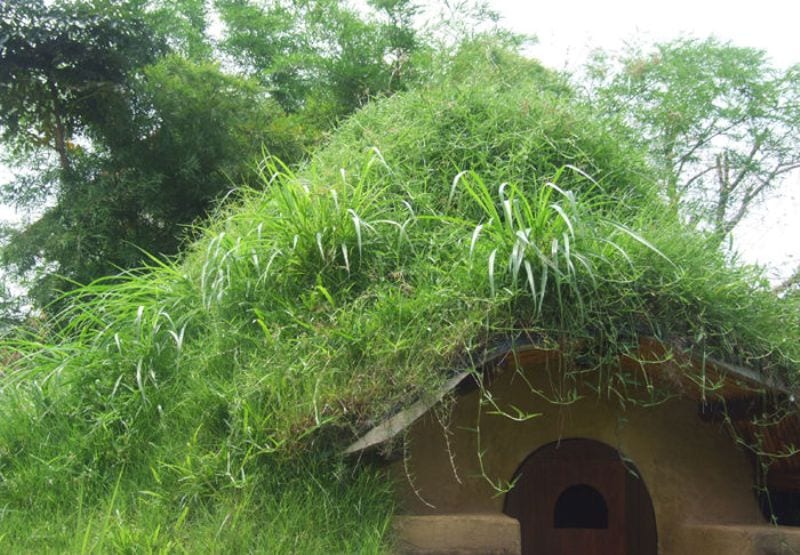
The easiest method of finishing the dome is plaster. We live in a rainy climate where a plastered dome might leak. Plus, we wanted a beautiful plant-covered dome in our backyard. Living roofs require a lot of regular maintenance just like gardening, so think long and hard before going this route. Without regular watering, weeding, and fertilizer the living roof will turn into a giant weed patch, die, or maybe even erode. We’ve worked hard to establish healthy grass, as you can see in the photo.
The main steps for the living roof include adding two or three layers of 6-mil plastic sheeting (“black poly”). I put one layer directly against the dome and the back side of the buttresses. Then I backfilled with earth (more road base) about halfway up and added another layer of plastic. I added a third layer of plastic on the top of the dome where the risk of water penetration is greatest.
Work carefully and try not to puncture the plastic. Gradually add soil on top of the plastic starting at the bottom and working up. Compact it slightly as you go. I used ‘field dirt’ – soil from rice fields for this step. It has enough clay to stay in place, but still enables grass to grow.
Add drought-resistant sod once the dome is covered in a layer of soil. Some pieces of sod require bamboo pins to keep from slipping. Time the project so the sod gets started during the rainy season. We have a lawn sprinkler on top of the dome and water it whenever it gets dry.
The outside (front area only) is plastered with cement plaster with yellow iron oxide pigment. All edges are rounded slightly to soften the look. Plaster mesh isn’t typically needed on earthbags, but we used plastic plaster mesh in this application due to the buttresses being exposed to the elements.
Plastic mesh won’t rust. We never plastered the inside since our dome is used as a tool shed. This allows people to come and see how the dome was built.
Domes have lots of other advantages. They create the most floor space for a given length of the wall. There are no wasted corners. The feeling inside is magical. Those who live in domes (and roundhouses) most likely never live in boxes again. Wind flows around domes and does not build up pressure against them.
You can build domes without wood. You can build domes with minimal tools and materials – no nails, no wood, no plywood, no shingles. This makes domes a good candidate for those who lack carpentry skills and for emergency shelters for disaster areas and war refugees.
Give people some rice or grain bags and a little training, and soon they can build their own sturdy, safe shelters.
Thanks to Owen Geiger for this great tutorial!
How to Plan an Earthbag Home Layout for Full-Time Living
Designing an earthbag home for full-time living goes beyond building a shelter. It means creating a livable, efficient space that supports your daily routine, comfort, and lifestyle. Whether you’re living off-grid or simply want a sustainable alternative, smart planning will make a big difference. Good earthbag home plans should balance natural building principles with practical functionality.
Start with Purpose and Lifestyle Needs
Before you draft anything, define how you’ll use your space. Will this be a family home, a solo retreat, or a two-person cabin? Decide on how many rooms you need and what kind—bedrooms, bathrooms, kitchen, workspace, or a greenhouse. Earthbag homes thrive on simplicity, so prioritize multi-use rooms and built-in features that save space.
Choose the Right Floor Plan Shape
The layout you choose affects both structure and efficiency. Circular designs work well with dome shapes and minimize material use. Rectangular layouts offer more flexibility and easier expansion. Clusters of smaller interconnected domes or rooms can create zones for different purposes while maintaining strength. Look at sample earthbag home plans for inspiration, then adapt them to your needs.
Maximize Passive Solar Design
Orientation is key to comfort. Position your home to take advantage of the sun’s path. South-facing windows provide natural warmth in winter. Roof overhangs or trellises help shade those windows in summer. Place thermal mass elements like inner earthbag walls or stone floors where they can absorb and store heat. Ventilation should encourage airflow, especially in warmer climates.
Plan for Plumbing and Utilities Early
Earthbag walls are durable but not easy to modify later. Identify where your kitchen and bathroom will go, then run plumbing and electrical conduit in advance. Decide if you’ll connect to a grid or rely on solar power and a water catchment system. Even if you’re building simply, earthbag home plans should include utility access to avoid major headaches down the road.
Optimize Storage and Interior Flow
Use curves and built-ins to your advantage. Benches, shelves, and storage nooks can be integrated into the walls. Avoid hallways where possible. Keep movement between spaces direct and intuitive. Natural lighting from skylights or clerestory windows helps reduce your need for electricity and makes the space feel larger.
Plan for Long-Term Expansion
You may want to grow your home in stages. Earthbag home plans can be modular—designing separate domes or wings allows you to add new rooms later without disrupting the original structure. Just make sure your layout can handle additional connections, especially if you’re sharing a bathroom or kitchen space.
Think Beyond the Walls
Include outdoor living in your plans. Covered patios, gardens, and shaded workspaces can extend your usable area without the need for more walls. A well-planned earthbag home integrates naturally with the land and encourages a connection to the outdoors.
Well-thought-out earthbag home plans lay the foundation for a home that’s not only resilient and low-cost, but also peaceful and purposeful.
Permitting and Legal Considerations for Building an Earthbag Home
Before you begin stacking bags and tamping earth, it’s important to understand the legal landscape. Building with earthbags isn’t mainstream in most places, so it often falls into a gray area of local regulations. Whether you’re building a simple shed or full-time residence, navigating the permitting process will help ensure your earthbag home plans move forward without delays or legal issues.
Check Local Zoning and Building Codes
Start by contacting your local planning or building department. Zoning laws dictate what kind of structures can be built in different areas. Some rural zones are more lenient and allow alternative building methods. Others might restrict residential use or require engineered drawings. Be honest about your project and ask if earthbag construction is recognized under existing codes.
Know What Triggers a Permit
In many areas, structures under a certain size or not used for habitation don’t require a permit. Earthbag storage sheds, greenhouses, or root cellars might qualify for these exemptions. But once your earthbag home plans include plumbing, electricity, or living quarters, you’ll likely need a permit. Even composting toilets or rainwater systems may be subject to review.
Structural Approval Challenges
The biggest hurdle is that earthbag buildings aren’t listed in most building codebooks. You may need to work with an engineer or architect familiar with natural building. They can create stamped plans or provide alternative compliance methods. Some areas allow testing or demonstration projects to prove structural integrity.
Using Earthbag Building Standards
Referencing established earthbag building guides can help. The California Earth Art and Architecture Institute and builders like Owen Geiger have worked to formalize best practices. If your area allows alternative construction methods, these resources can support your case. Including them with your earthbag home plans may show inspectors you’re building with safety in mind.
Insurance and Appraisal Considerations
Even if your project meets code, finding an insurer for an unconventional home might be tough. Earthbag homes aren’t always recognized by insurers or banks, which can complicate loans, refinancing, or resale. If long-term property value matters to you, consider how your structure will be appraised once it’s complete.
Get Everything in Writing
If an inspector gives you verbal approval for something, ask for it in writing. Changes in staffing or policy can put your project at risk if there’s no official record. Save copies of every approval, inspection, and email. This documentation protects your investment and shows that your earthbag home plans followed all local requirements.
Solid earthbag home plans include more than design and materials. They also factor in legal approval and long-term compliance. With the right preparation, your natural home can stand on strong regulatory ground.
Conclusion
Building with earthbag home plans offers a sustainable and affordable path to creating long-lasting shelter. With smart design and proper permitting, these structures can meet modern needs while staying rooted in natural building principles. A well-planned earthbag home delivers comfort, durability, and a strong connection to the land.
We have more interesting home plans. Check out our DIY Mongolian yurt article!


