Last Updated on November 21, 2025 by teamobn
Contents
- 1 Project Overview
- 2 The Ultimate Space-Saving Solution
- 3 Make Your DIY Bed With Drawers
- 3.1 Cutting List (Suggested for Queen Build as in Photos)
- 3.2 What Materials Are Needed to Build a Bed With Drawers?
- 3.3 Tools
- 3.4 How to Build Your DIY Bed With Drawers?
- 3.4.1 Step 1: Build the Base Frame
- 3.4.2 Step 2: Plan the Two-Halves Split and Drawer Layout
- 3.4.3 Step 3: Cut and Fit Top Rails with Half-Lap Joints
- 3.4.4 Step 4: Cut Plywood Floor Panels and Drawer Dividers
- 3.4.5 Step 5: Assemble Floor, Dividers, and Top Rails
- 3.4.6 Step 6: Install Remaining Floor Strips and Cross Members
- 3.4.7 Step 7: Install Remaining Drawer Dividers and Complete First Half
- 3.4.8 Step 8: Build Second Half, Construct Drawer Boxes, and Install Drawer Slides
- 3.4.9 Step 9: Install Face Panels, Fit Drawer Fronts, Fill, Sand, and Finish
- 3.4.10 Final Assembly and Quality Check
- 3.5 Frequently Asked Questions
- 4 The Wrap Up
Project Overview
Build a solid platform bed with four built-in drawers in 9 clear steps. This builder’s plan uses a Queen mattress (60″ × 80″), lists exact materials and tools, includes step times and practical tips. Total time ~10–18 hours. Budget roughly $300–$600, depending on materials and finishes.
Quick Facts
- Difficulty: Intermediate — basic woodworking + accurate layout
- Total time: 10–18 hours (most hands-on)
- Cost (Queen): ~$300–$600 (materials & hardware)
- Mattress used: Queen — 60″ × 80″
- Drawer layout: 2 large at foot, 2 smaller (one per side)
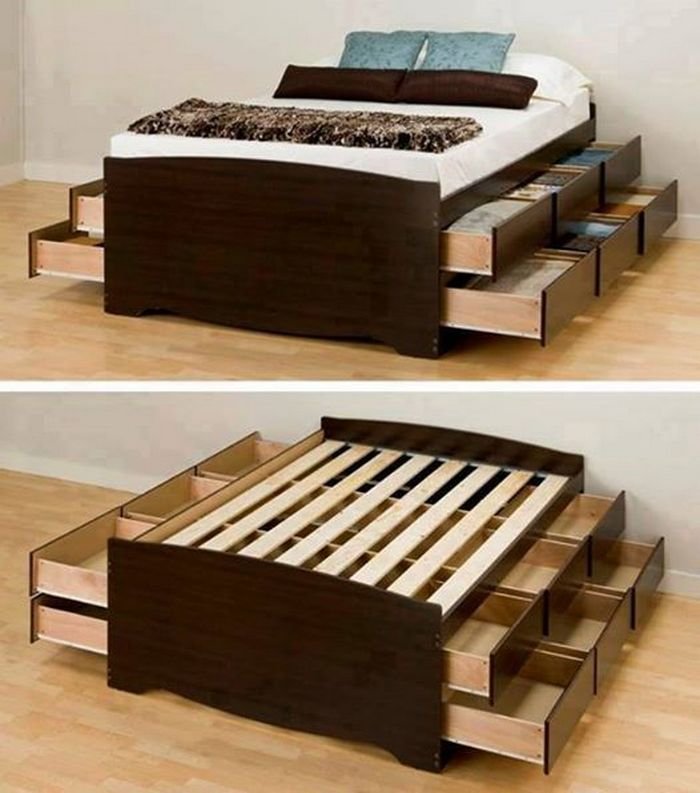
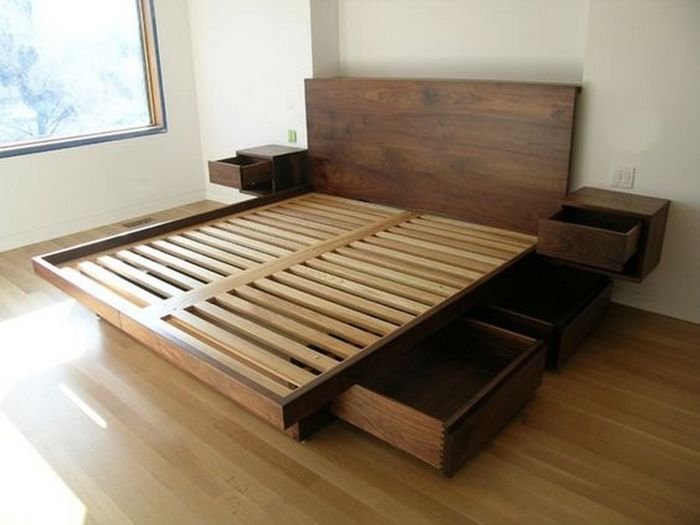
The Ultimate Space-Saving Solution
In any home, maximizing space is key, and the bedroom often presents the biggest challenge. The bed, while essential, can dominate a room, leaving little space for storage. That’s where a bed with drawers becomes an invaluable asset.
This isn’t just another piece of furniture; it’s a smart, functional solution that transforms often-wasted under-bed space into organized, accessible storage.
Why a Bed With Drawers?
- Unlocks Hidden Storage
- The area beneath your bed is prime real estate. Built-in drawers convert this dusty void into practical, easy-to-access compartments for clothes, linens, books, or seasonal items.
- Declutters Your Room
- By providing dedicated storage, a bed with drawers helps reduce clutter, making your bedroom feel more spacious and serene.
- Customization & Cost-Effectiveness
- Unlike store-bought options, building your own allows for complete customization to fit your exact space and aesthetic. Plus, it’s significantly more budget-friendly than purchasing a comparable retail unit.
- Durability & Craftsmanship
- A DIY build often results in a more robust and durable piece of furniture, crafted with care and attention to detail that mass-produced items often lack.
Before you dive into the detailed build, understanding these core benefits highlights the value and practicality of this project. You’re not just building a bed; you’re building a smarter, more organized bedroom.

Click on any image to start the lightbox display. Use your Esc key to close the lightbox. You can also view the images as a slideshow if you prefer.


Make Your DIY Bed With Drawers
Before you start
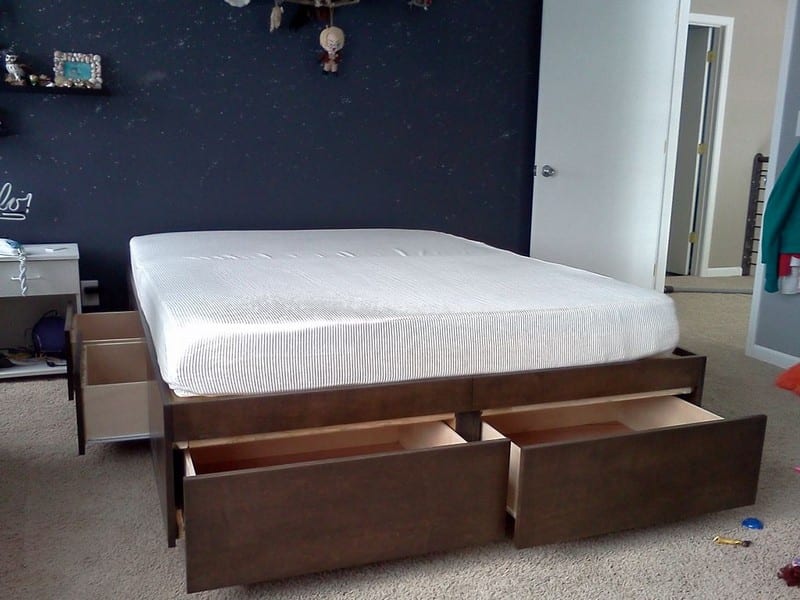
- Mattress used in the photos: Queen — 60″ × 80″. The builder used a 5″ overhang, so frame finished at 75″ × 50″. Adjust these numbers if you are building a different size.
- Work square, measure twice, cut once. Pre-fit parts dry before glue or final screws.
- Safety: eye & ear protection, dust mask for plywood cutting, push sticks for table saw, gloves for finishing.
So, pick up the essential materials and tools, and discover the art of making a DIY bed with drawers – a practical and stylish addition to your living space.
Cutting List (Suggested for Queen Build as in Photos)
- Lumber — 2×4 (actual 1.5″ × 3.5″):
- Outer frame rails: 2 @ 75″ (long sides)
- Outer frame rails: 2 @ 50″ (short sides)
- Top rails (inner rails that support mattress bay): 2 @ 75″ (or rip from 2×4)
- Cross members: 6 @ ~50″ (spacing to suit drawer dividers & mattress support — see layout)
- Head framing pieces for headboard area: 2 – 4 pieces as required (cut to match height)
- Plywood: (use 3/4″ construction-grade plywood for floors; 3/8″ – 1/2″ for dividers/back)
- 3/4″ plywood floor pieces: 2 × (30″ × 25″) [author used one 30″ × 25″ half-width piece; plus a second mirror piece for the other half]
- 3/4″ plywood edge strips: several @ 12″ wide × length as needed (ripped from sheet) to run along outer edges
- 3/4″ plywood long strips: ripped 12″ wide × ~75″ (for outer edge support)
- Drawer divider panels (3/4″): 3 @ 14″ high × 28½” long (side drawer dividers)
- Center end wall piece: 1 @ 14″ × 25″
- Drawer boxes: plywood for box sides (3/8″–1/2″ or 1/2″ for strength), plywood bottoms (1/4″ luan or 3/8″)
- Drawer box parts: size depends on openings; the builder used drawers ~20″ wide (box width = opening – 1″). Plan sizes per your drawer openings.
- Misc: veneer edging, filler, stain, polyurethane.
What Materials Are Needed to Build a Bed With Drawers?
- Wood glue (exterior-rated not necessary; PVA is fine)
- Screws: 2-1/2″ for structural 2×4-to-2×4 and 2×4-to-plywood joints; 1-1/4″ for plywood-to-plywood where appropriate
- Finish nails: 1-1/4″ for trim and drawer assembly (pneumatic nailer recommended)
- Wood filler (plastic wood; tint with stain if needed)
- Drawer slides: full-extension ball-bearing type; pick rating (e.g., 100 lb) appropriate for load
- Birch iron-on veneer edging for exposed plywood ends
Tools
- Table Saw
- Hammer
- Chisel
- Drill
- Mitre Saw
- Circular Saw
- Sander
- Pneumatic Nailer
- Foam Brush
- Iron
- Clamps
- Carpenters Square
How to Build Your DIY Bed With Drawers?
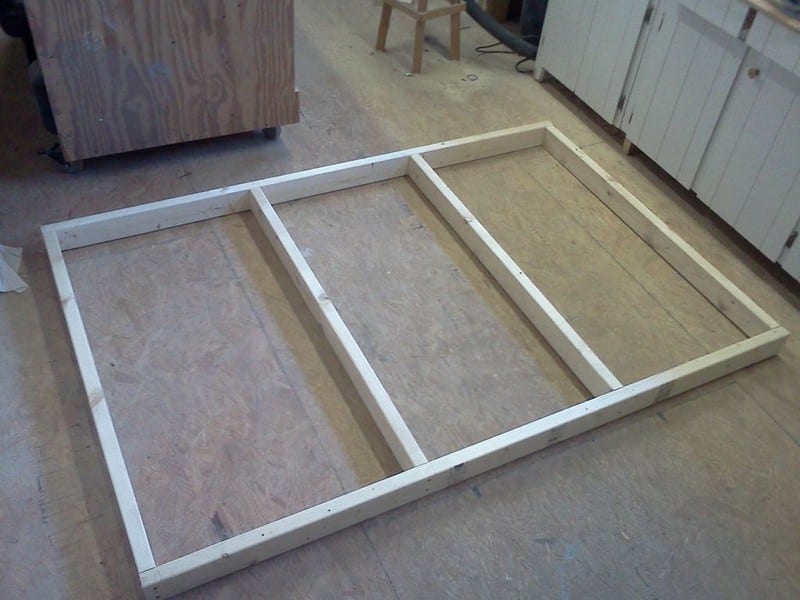
Step 1: Build the Base Frame
What you’re building: The outer perimeter base that supports the entire bed structure.
Action
- Cut four pieces of 2×4 lumber: two at 75″ (long sides) and two at 50″ (short sides). These dimensions are for a Queen mattress (60″ × 80″) with a 5″ overhang on all sides.
- Lay the 2×4s on edge (so the 3.5″ dimension is vertical) to create a sturdy, 3.5″-tall base frame. This orientation provides maximum strength and creates a deep recess for the mattress.
Assembly:
- Dry-fit the four pieces into a rectangle on a flat work surface.
- Use a carpenter’s square to check all four corners for 90° angles.
- Measure diagonals corner-to-corner-they; they must match exactly to confirm the frame is square.
- Apply wood glue to joints, then pre-drill pilot holes and drive 2-1/2″ screws through the long rails into the ends of the short rails (two screws per corner minimum).
- Use wood shims under the frame to level it on your work surface.
- Clamp the frame securely to your bench to prevent movement during the next steps.
Builder’s tip: Pre-drilling prevents splitting, especially near board ends. Always check the square before final fastening — a twisted base will cause problems later.

Step 2: Plan the Two-Halves Split and Drawer Layout
What you’re planning: A bed built in two mirror-image halves for easier transport through doorways.
Action:
Mark the centerline of your 75″ frame (at 37.5″). Each half will be built identically, then joined on-site.
Plan your drawer layout:
- Foot of the bed
- Two large drawers, each approximately 20″ wide.
- Sides of bed
- Two smaller drawers (one per side), also approximately 20″ wide.
- Head of bed
- Leave approximately 13″ of open space for a nightstand area (if adding a headboard later, plan 6″–8″ depth, leaving ~20″ usable nightstand space).
Materials for each half:
- 2×4 lumber for top rails and cross members
- 3/4″ plywood for floor panels and drawer dividers
- Drawer slides, screws, glue
Builder’s tip: Sketch your drawer layout on paper with exact measurements before cutting. This prevents costly mistakes and ensures drawers fit your storage needs.
Step 3: Cut and Fit Top Rails with Half-Lap Joints
What you’re building: Inner top rails that support the mattress and accept plywood floor panels via half-lap joints.

Action:
Cut inner top rails from 2×4 lumber to run the length of the bed (approximately 75″, or split into sections if building in halves).

Half-lap joint:
- The inner rail that meets the plywood floor panel needs a half-lap joint cut into its end.
- Measure the thickness of your 3/4″ plywood (actual thickness is often ~0.7″).

- Cut a notch into the end of the 2×4 that is half the depth of the board (approximately 1.75″ deep) and the width of the plywood thickness.
- The plywood panel will slide into this notch and sit flush with the top surface of the rail.
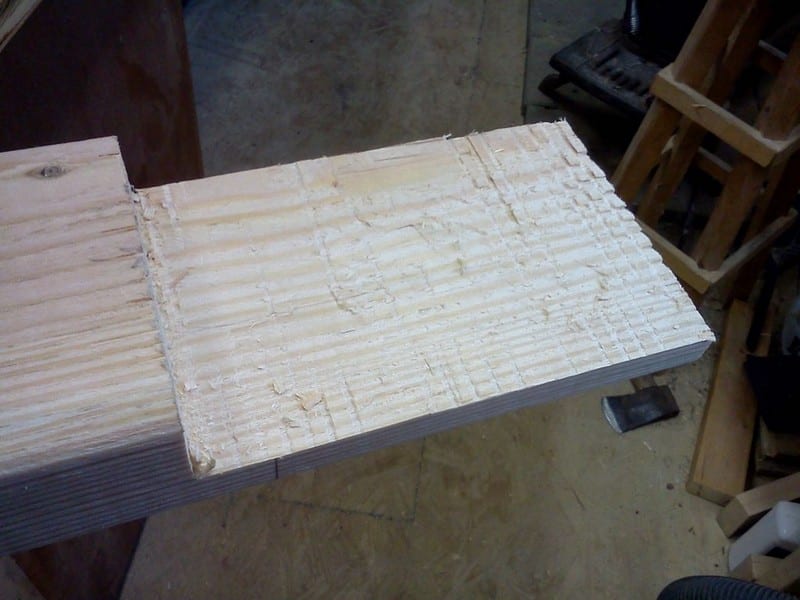
Test-fit:
Dry-fit the half-lap joint with a scrap piece of plywood. The plywood should sit perfectly flush with no gaps or high spots. Adjust the notch depth with a chisel if needed.
Builder’s tip: Use a handsaw or circular saw to make the shoulder cuts, then chisel out the waste for a clean half-lap. A router with a straight bit also works well for this joint.

Step 4: Cut Plywood Floor Panels and Drawer Dividers
What you’re cutting: Floor panels that form the base of the drawer cavities and vertical dividers that separate drawers.
Cutting list (for one half of the bed):
- Floor piece
- 1 piece at 30″ wide × 25″ long (this is half the bed width by the depth of the foot drawers)
- Vertical drawer dividers
- 3 pieces at 14″ high × 28.5″ long (for side drawer dividers)
- Center end wall
- 1 piece at 14″ high × 25″ long (separates the two foot drawers)
Action:
- Set up your table saw with a rip fence for accurate, repeatable cuts.
- Rip the 3/4″ plywood to the widths listed above.
- Use a circular saw with a clamped straightedge guide for crosscuts, or use a miter saw for shorter pieces.
- Use a carpenter’s square to mark cut lines and ensure perfectly square cuts.
Builder’s tip: Label each piece with its location (e.g., “Left side divider,” “Floor panel — half 1”) immediately after cutting. This saves confusion during assembly.

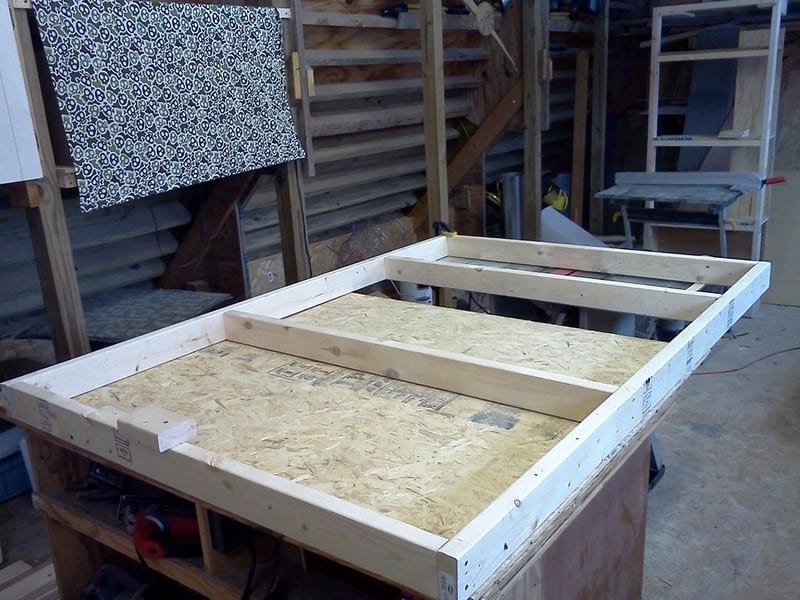
Step 5: Assemble Floor, Dividers, and Top Rails
What you’re assembling: The core structure of one bed half — floor panel, vertical dividers, top rails, and cross members.
Action (follow this sequence):
- Attach end wall to floor:
- Apply glue to the bottom edge of the center end wall piece (14″ × 25″).
- Position it perpendicular to the floor piece (30″ × 25″) at the foot end.
- Pre-drill and drive 1-1/4″ screws through the floor into the bottom edge of the wall (space screws every 6″–8″).
- Notch the vertical dividers:
- The top edges of the side dividers must be notched to accept the outer top rails (2×4).
- Measure the width and depth of the 2×4 (actual: 1.5″ × 3.5″) and mark notches on the top corners of each divider.
- Cut notches with a jigsaw or handsaw, then test-fit against a 2×4 scrap.
- Attach first side divider to floor:
- Glue and screw one side divider to the floor piece, perpendicular to the floor.
- Use clamps to hold it square while fastening.
- Position floor assembly on base frame:
- Place the floor assembly (with attached walls) onto the base frame.
- Align it carefully, then temporarily fasten with two screws through the floor into the base frame.
- Install inner top rail with half-lap:
- Slide the plywood floor panel into the half-lap joint on the inner top rail.
- Apply glue to the joint, then screw through the rail into the plywood panel.
- Support the opposite end of the top rail with a scrap block of 2×4 clamped to the work surface.
- Install first cross member:
- Cut a 2×4 cross member to span between the inner and outer top rails (approximately 50″ minus rail thicknesses).
- Position it adjacent to the side divider panel.
- Pre-drill pilot holes, then screw through the cross member into the side divider and into both top rails.
- Install outer top rail:
- Position the outer top rail along the outside edge of the frame.
- Fasten it to the cross member with screws.
- Install head-end cross member:
- Cut and install a 2×4 cross member at the head end of the bed, spanning between the two top rails.
- Pre-drill pilot holes to prevent splitting.
- Build head frame (instead of plywood panel):
- Instead of a solid plywood panel at the head, build a lightweight 2×4 frame.
- Cut 2×4 pieces to form a rectangular frame matching the head opening.
- Reinforce corners with triangular plywood gussets (cut from scrap).
- Glue and screw gussets to both sides of each corner joint.
- Attach edge strip to floor:
- Rip a 2.5″-wide strip of plywood.
- Glue and screw it to the outer side edge of the floor piece.
- This strip provides a fastening surface for the finished exterior panel later.

Builder’s tip: Work methodically and check square after each major assembly step. Use clamps liberally to hold parts in position before final fastening.
Step 6: Install Remaining Floor Strips and Cross Members
What you’re installing: Additional plywood floor strips along the outer edges to support drawer dividers, plus remaining cross members for structural support.
Action:
- Cut and install outer edge floor strips:
- Rip 3/4″ plywood into 12″-wide strips.
- Cut strips to run the remaining length of the bed frame along the outer edges.
- These strips only need to run along the perimeter where drawer dividers will land — you don’t need a full floor in the center (saves weight and material).
- Fasten floor strips:
- Position the strips on the base frame.
- To help secure the strips to the floor section already in place, cut small plywood scraps and screw them to the underside of the new strip, bridging the joint between old and new floor pieces.
- Screw through the strips into the base frame.
- Install remaining cross members:
- Cut 2×4 cross members to span between the top rails.
- Position them adjacent to where each drawer divider will be installed (this provides solid screw points for dividers and drawer slide mounting).
- Pre-drill and screw cross members to both top rails.
Builder’s tip: Cross members should align precisely with divider locations. Measure and mark all cross-member positions before cutting to ensure consistency.

Step 7: Install Remaining Drawer Dividers and Complete First Half
What you’re installing: The remaining vertical drawer divider panels that create individual drawer cavities.
Action:
- Notch remaining dividers:
- Cut notches in the top edges of all remaining divider panels to accept the outer top rails (same as Step 5).
- Space dividers for drawer openings:
- For two 20″-wide drawers at the foot, space the dividers to create openings slightly wider than 20″ (account for drawer slide hardware — typically add 1″ to drawer width for opening width).
- Measure carefully and mark divider positions on the floor and cross members.

- Install dividers:
- Apply glue to the bottom edge of each divider.
- Position the divider, check it’s plumb (vertical) with a level or square.
- Screw through the floor panel into the bottom edge of the divider.
- Screw through the divider into the adjacent cross member.
- Also screw through the cross member into the top edge of the divider from above.
- Verify drawer openings:
- Measure each drawer opening width and height.
- Confirm all openings are square by measuring diagonals.
Builder’s tip: Consistent drawer openings make drawer construction much easier. Double-check all measurements before final fastening.
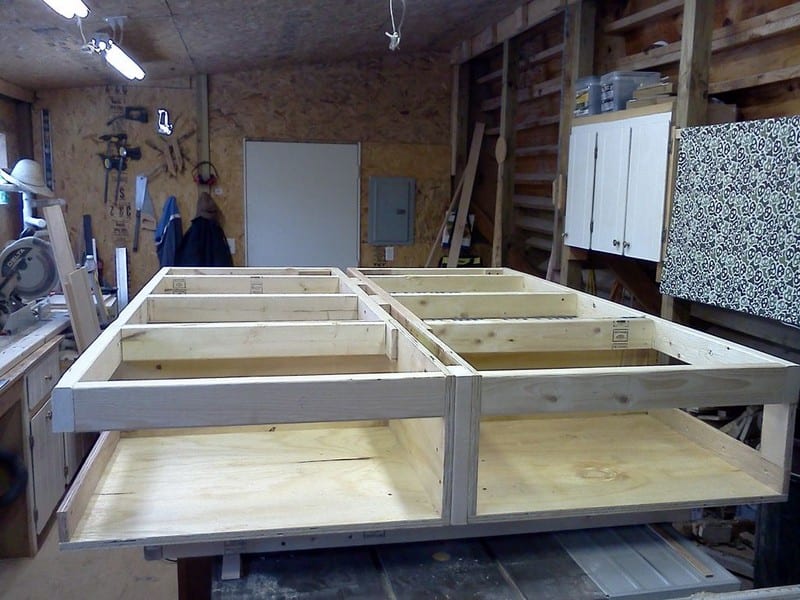
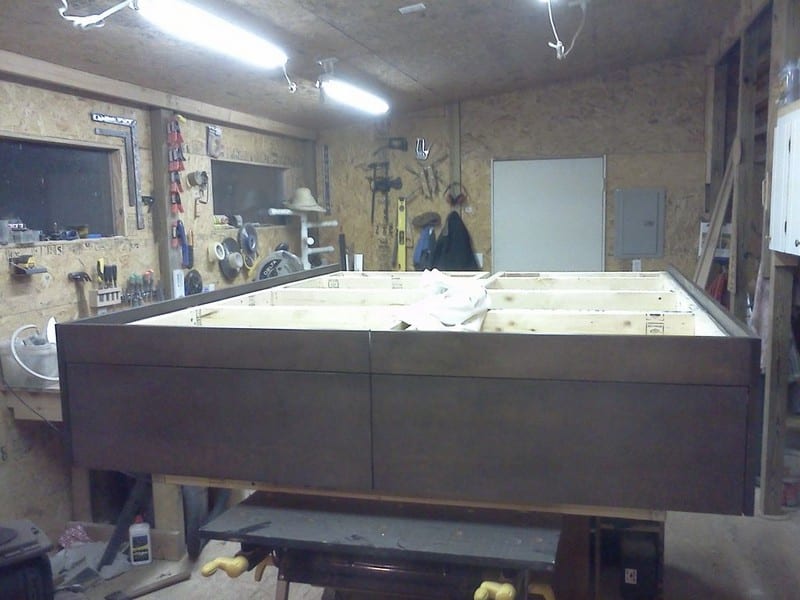
First half complete: This side of the bed frame is now structurally complete and ready for drawers.
This side of the bed with drawers is done for now.

Step 8: Build Second Half, Construct Drawer Boxes, and Install Drawer Slides
What you’re building: The mirror-image second half of the bed frame, plus all drawer boxes and hardware installation.
Part A: Build Second Half
Action:
- Repeat Steps 3 through 7 to build the second half of the bed frame. Build it as a mirror image of the first half so the two halves join at the centerline.
Builder’s tip: Use the first half as a template for measurements. Number and label parts for the second half to avoid confusion.
Part B: Build Drawer Boxes (2–3 hours)
What you’re building: Simple, sturdy drawer boxes using butt joints.
Drawer box dimensions:
- Width: Opening width minus 1″ (example: 21″ opening = 20″ box width). This provides 1/2″ clearance on each side for drawer slides.
- Depth: Depends on your drawer cavity depth (typically 20″–24″ for this build).
- Height: Drawer cavity height minus 1″–2″ for clearance (if dividers are 14″ high, make drawer boxes ~12″–13″ high including bottom thickness).
Materials:
- Drawer sides and front/back: 1/2″ or 3/4″ plywood
- Drawer bottoms: 1/4″ luan plywood or 3/8″ plywood
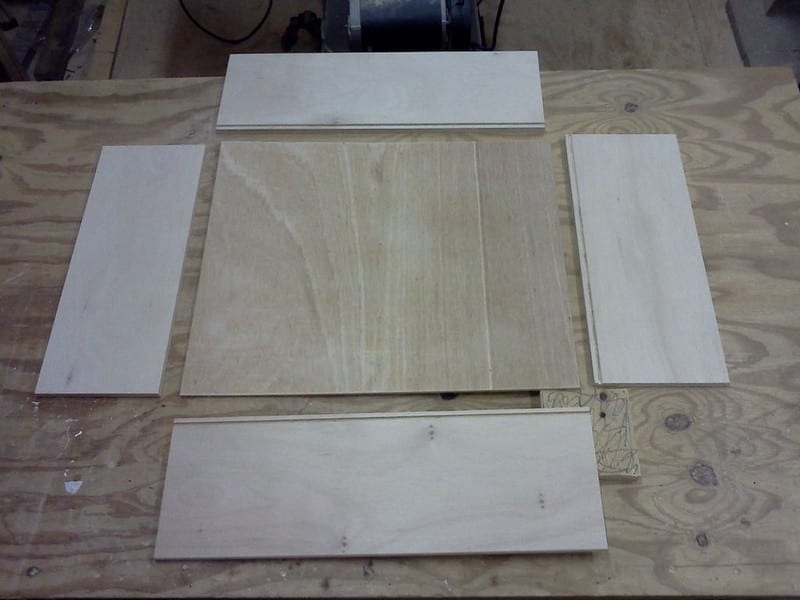
Assembly method (butt joints):
- Cut all drawer parts:
- Front and back pieces: cut to drawer width
- Side pieces: cut to drawer depth
- Bottom piece: cut to fit inside the assembled box
- Sand interior faces:
- Critical step: Finish-sand all interior faces of drawer parts with 220-grit sandpaper before assembly. Once the box is assembled, interior corners are nearly impossible to sand properly.
- Assemble the box:
- The front and back pieces fit inside the side pieces (this is the butt joint configuration).
- Apply wood glue to all joints.
- Use a pneumatic nailer with 1-1/4″ finish nails to fasten the corners (or hand-drive finish nails if no nailer available).
- Clamp the box and check that it’s square by measuring diagonals.

- Attach the bottom:
- Slide the bottom panel into the assembled box.
- Glue and nail or screw the bottom to the lower edges of all four sides.
- Apply veneer edging:
- Cut iron-on birch veneer edging to length for all exposed plywood edges (especially the top edges and front face).
- Use a household iron on medium-high heat to activate the heat-sensitive glue on the veneer backing.
- Press firmly and move the iron slowly along the edge.
- If repositioning is needed, reheat and adjust.
- Once cool, trim excess veneer with a sharp chisel or veneer edge trimmer, then lightly sand smooth.
Builder’s tip: Build one drawer first as a test fit, then adjust dimensions if needed before cutting all remaining drawers.
Part C: Install Drawer Slides
What you’re installing: Two-piece ball-bearing drawer slides (one piece mounts to drawer, one to cabinet).
Critical tolerances:
- Front edge of drawer-mounted slide: 1/16″ back from drawer front edge
- Front edge of cabinet-mounted slide: 1/16″ back from divider panel front edge
- Use a 1/4″ shim under cabinet-mounted slides to ensure they’re level during installation
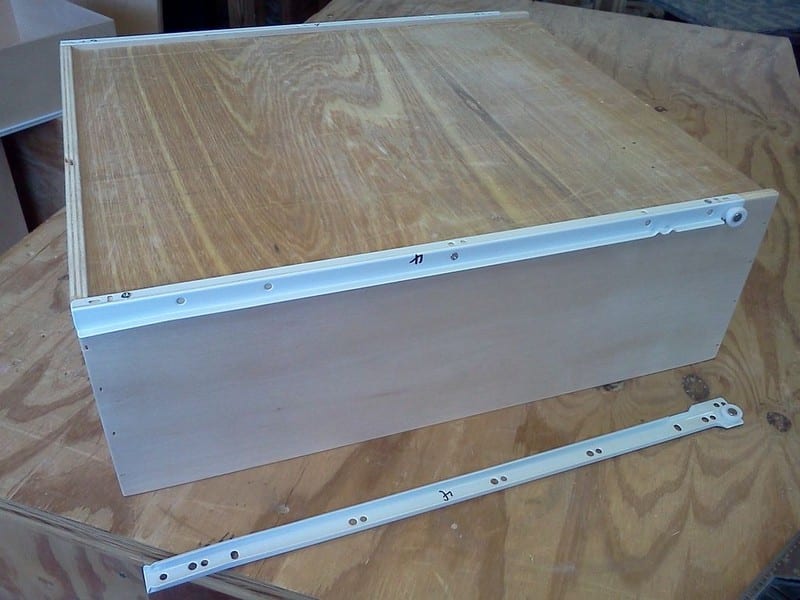
Action:
- Separate slide pieces:
- Each slide set has two parts: drawer-mount and cabinet-mount.
- Separate them per manufacturer instructions (usually a release tab).
- Install drawer-mount pieces:
- Position the drawer-mount piece on the lower side edge of the drawer box.
- Keep the front edge of the slide 1/16″ back from the front edge of the drawer.
- Pre-drill pilot holes (use the slide’s mounting holes as a guide).
- Drive the screws provided with the slides (typically #6 or #8 pan-head screws).
- Install slides on both sides of each drawer.

- Install cabinet-mount pieces:
- Position the cabinet-mount piece on the drawer divider panel at the same height as the drawer-mount piece.
- Keep the front edge of the slide 1/16″ back from the front edge of the divider panel.
- The bottom of the slide should sit on the floor of the drawer cavity at the front.
- Use a 1/4″-thick shim (rip a scrap piece of wood to exactly 1/4″) placed under the slide along its length to hold it perfectly level while you fasten it.
- Pre-drill and drive screws.
- Remove the shim after all screws are tight.

- Number drawers and locations:
- Use a pencil or marker to number each drawer (1, 2, 3, 4) and its matching opening on the bed frame.
- This ensures you always install the correct drawer in the correct location (slides may vary slightly).
- Test drawer operation:
- Slide each drawer into its opening.
- Check for smooth, full-extension operation.
- Adjust slide position if binding occurs.
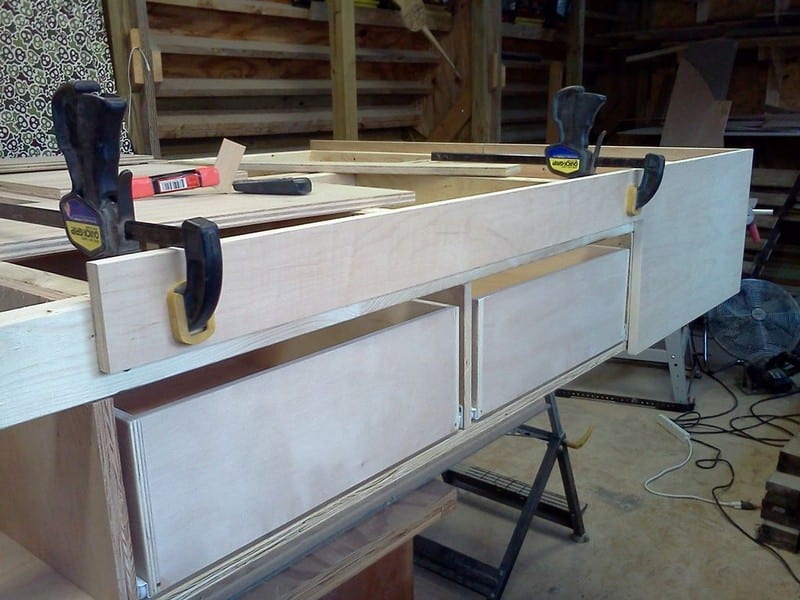
Step 9: Install Face Panels, Fit Drawer Fronts, Fill, Sand, and Finish
What you’re completing: Exterior face panels, drawer front alignment, surface prep, and final finish (stain and polyurethane).
Part A: Install Face Panels
Action:
- Cut face panels:
- Rip 3/4″ plywood to 14.5″ wide (or width that covers the front face of the bed frame and extends 1.5″ above the top surface).
- Cut panels to length to cover each section of the bed front.
- Apply veneer edging:
- Iron on birch veneer edging to all exposed plywood edges (top, sides, ends).
- Trim and sand smooth.

- Clamp panels in position:
- Position each face panel so the top edge extends 1.5″ above the top surface of the bed frame. This overhang will conceal the bottom edge of the mattress when the bed is complete.
- Use clamps to hold panels in place.
- Fasten from inside:
- Once satisfied with positioning, drive screws from the inside of the bed frame through the frame into the back of the face panel.
- Countersink screws so they don’t interfere with drawer operation.
Builder’s tip: The 1.5″ overhang is a design choice — adjust to your preference, but ensure it’s consistent around the entire bed.
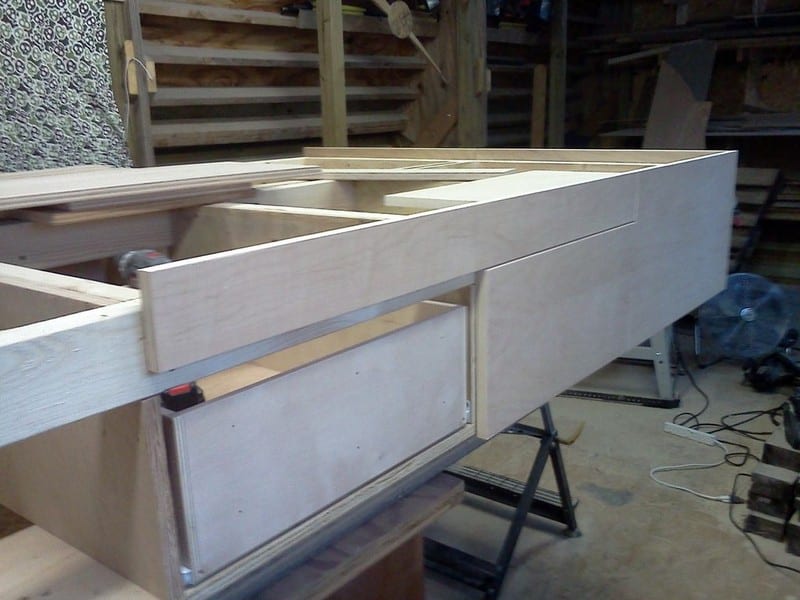
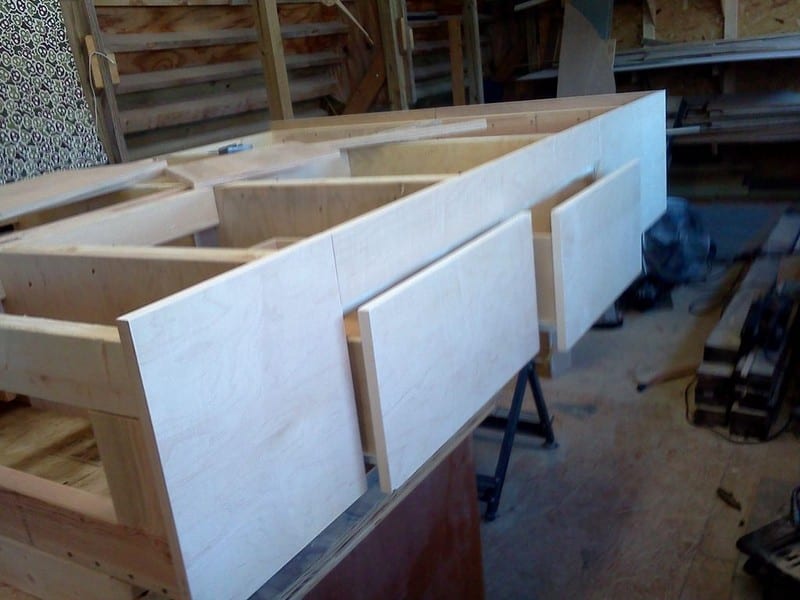
Part B: Fit Drawer Fronts
Action:
- Install drawer boxes in slides:
- Slide each numbered drawer into its matching opening.
- Position drawer fronts:
- The drawer front panels should extend approximately 5/8″ below the bottom surface of the bed frame. This creates a finger-pull area so you can open drawers without hardware.
- Clamp or temporarily tape the drawer front to the drawer box.

- Set consistent reveals (gaps):
- Use 1/8″-thick spacer sticks (cut from scrap wood or use commercial spacing shims).
- Place spacers between the top edge of the drawer front and the bed frame, and between the side edges of the drawer front and adjacent dividers.
- This ensures even, consistent gaps on all sides.
- Fasten drawer fronts:
- Once positioned with spacers in place, drive screws from inside the drawer box through the box front into the back of the drawer front panel.
- Use 1-1/4″ screws; pre-drill to avoid splitting.
Builder’s tip: Take your time with drawer front alignment. Consistent reveals make the finished bed look professional.
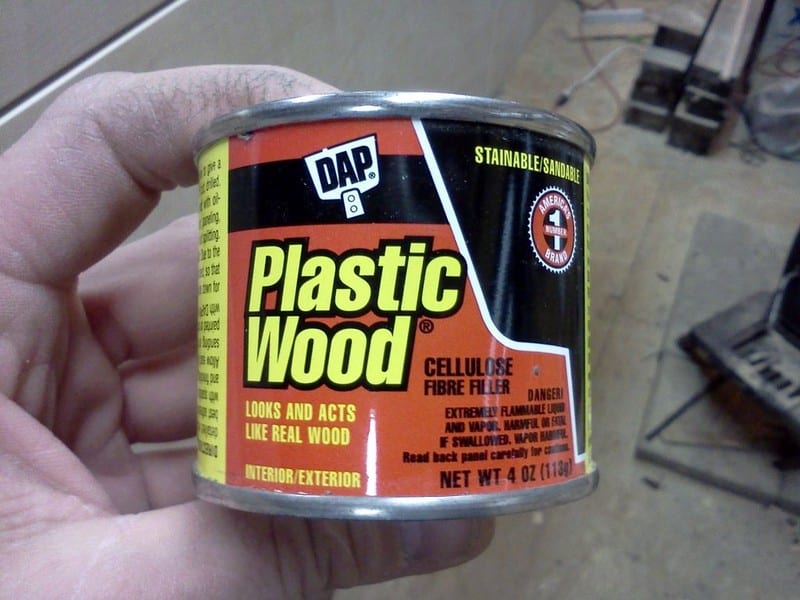
Part C: Fill, Sand, and Finish
Action:
- Fill blemishes:
- Inspect all visible surfaces for nail holes, small gaps, or imperfections.
- Mix DAP plastic wood filler with a small amount of your stain color to tint the filler (this helps it blend after staining).
- Apply filler with a putty knife, slightly overfilling holes.
- Let dry per manufacturer instructions (typically 30–60 minutes).
- Sand all exterior surfaces:
- Sand filled areas flush with surrounding wood using 220-grit sandpaper.
- Finish-sand all exterior surfaces (face panels, drawer fronts, top edges) with 220-grit.
- Wipe down with a tack cloth or damp rag to remove all dust.
- Apply stain:
- Use a foam brush or lint-free cloth to apply stain (Ebony or your choice).
- Work in sections, applying stain evenly and wiping off excess per product instructions.
- Allow stain to dry completely (typically 2–4 hours; check product label).
- Apply polyurethane topcoat:
- Use water-based polyurethane for easier cleanup and faster drying.
- Apply a thin, even coat with a foam brush or quality synthetic brush.
- Let dry per product instructions (typically 2–4 hours).
- Lightly sand with 320-grit sandpaper between coats.
- Apply 2–3 coats total for durability.
- Allow final coat to cure fully (24–48 hours) before heavy use.
Builder’s tip: Test your stain and finish on scrap plywood first to ensure you like the color and sheen. Thin coats of polyurethane dry faster and look better than thick coats.
Final Assembly and Quality Check
Action:
- Join the two halves:
- Position both bed halves in the final location.
- Align the centerline joint carefully.
- Clamp the halves together, then drive screws through connecting points (cross members, top rails) to join permanently.
- Final drawer check:
- Cycle each drawer fully open and closed several times.
- Confirm smooth operation and full extension.
- Check that all reveals (gaps) are consistent.
- Install mattress:
- Place your mattress on the bed.
- Verify that the face panels conceal the mattress edge as intended.
- Check for any movement or squeaks; tighten fasteners if needed.
Builder’s tip: Walk around the finished bed and inspect from all angles. Make any final adjustments to drawer alignment or finish touch-ups before calling the project complete.
What do you think of this DIY bed with drawers? Are there any areas for changes to better fit your needs? 🙂
Thank you VertDude for sharing insights into this DIY bed with drawers project.
Frequently Asked Questions
- How long will this build take from start to finish?
- A: Expect about 10–18 hours of hands-on work for an experienced DIYer; 16–26 hours is a safer estimate if you work alone, take careful setup time, or apply multiple finish coats. Break it into two full days (structural work) plus a day for finishing.
- What’s the realistic cost for a Queen-size build like the photos?
- Typical materials and hardware (3/4″ plywood, 2x4s, drawer slides, veneer, finish) run roughly $300–$600 depending on plywood grade, slide quality, and whether you already own tools. High-end plywood or heavy-duty slides will push the total up.
- Which drawer slides should I use?
- A: Full-extension ball-bearing slides are the best balance of durability and smooth action. For clothing/linen drawers choose slides rated ~75–150 lb depending on expected load. Follow the manufacturer’s clearance specs — our build used a 1″ total width gap (box width = opening – 1″).
- Do I need dovetail drawers or are simple butt joints OK?
- A: Butt-jointed drawers (glue + finish nails) are fine for light-to-moderate loads like clothing and linens — they’re quicker and adequate. Use dovetails, rabbets, or box joints if you want extra strength or a premium finish for heavy-duty storage.
- How do I scale this plan to Twin, Full, or King sizes?
- Keep the same overhang and proportions. Example: this Queen frame uses a 5″ overhang, so frame = mattress dimension + 2×overhang. Increase cross-member support on wider beds (King) to avoid sag — add more cross members or a center support beam for larger spans.
- How do I move the finished bed through doorways?
- Build the bed in two halves (as shown). Keep the halves light enough to carry and reassemble in the room. If you still have tight clearances, leave head/foot panels off until onsite and install as the final step.
- What finish and maintenance tips do you recommend?
- Use a tested stain on a scrap to confirm color. Apply 2–3 thin coats of water-based polyurethane for fast dry times and low yellowing. Keep drawers aligned by periodically tightening slide screws; touch up veneer edges and filler spots after seasonal movement. Avoid wet-cleaning — wipe with a damp cloth and dry immediately.
The Wrap Up
In a world where practicality meets elegance, your journey begins. Picture a bed that seamlessly combines the grace of refined design with the convenience of ample storage, all created by your own hands. In this article, you’ve explored the art of crafting your very own bed with drawers in just nine simple steps.
This is more than a DIY project; it’s an opportunity to infuse your unique style into your bedroom. Whether you’re a seasoned craftsman or a beginner eager to explore your creative side, these nine steps will lead you to a masterpiece of practical elegance.
Transform a humble bed into a functional work of art that will not only elevate your bedroom but also inspire a sense of accomplishment. It’s time to embark on the journey of creating a bed that blends form and function seamlessly, one step at a time.
For more beds that will give you storage space with minimum space requirements, check out our DIY bed under platform guide!