Last Updated on October 29, 2025 by teamobn
Picnic tables are the perfect addition to any outdoor space, providing a place for people to gather and enjoy the fresh air.
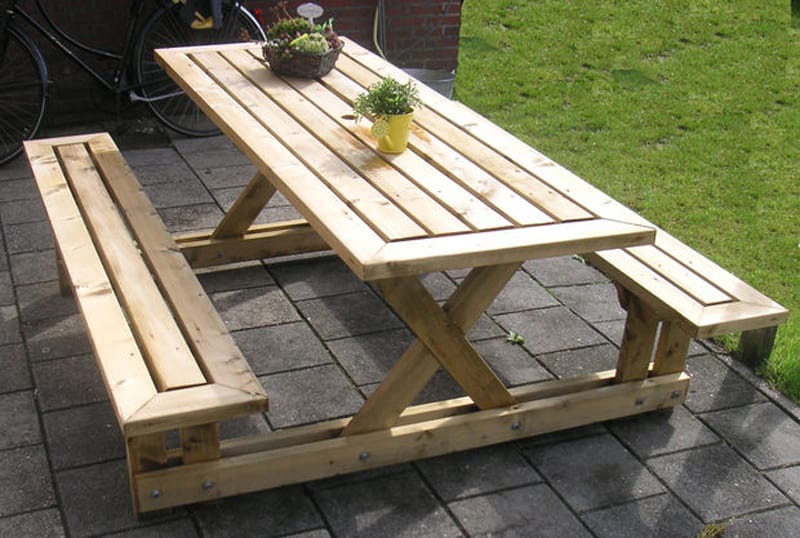
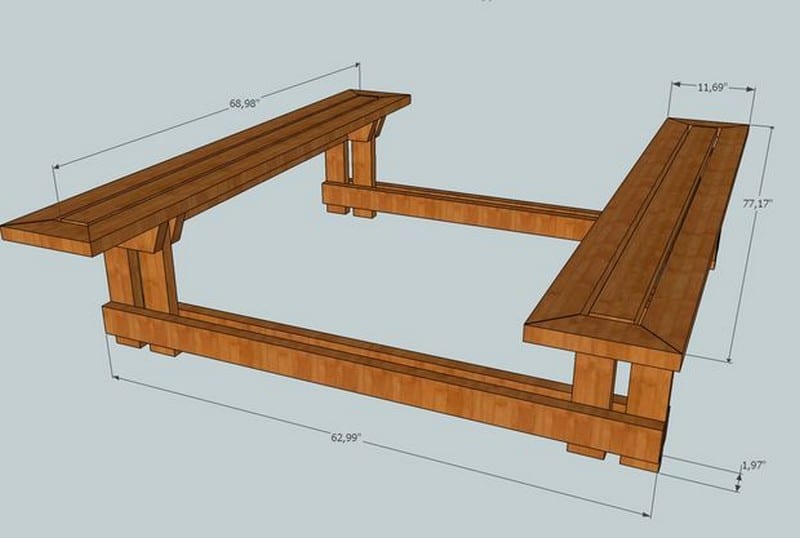
Like us, you’ve probably seen a lot of picnic tables in your life. But I think you’ll admit that this one gets a few extra points for the aesthetics. If you like it as much as we do, we figure you can make it for about a third of the cost of a store-bought picnic table. So gather with your family and maybe a friend or two and get started. This sturdy-looking picnic table will comfortably seat a whole family but if you need something bigger, there’s a three-meter (10′) version shown here as well!
It’s easy to make as you can see from the provided plans, materials list, and instructions. If you have a lot of big gatherings, you might even prefer to make two! With just a few tools and some basic woodworking skills, you can have this project completed in no time.
Materials:
- 2×4 Lumber
- m8 Threaded Rods and Nuts/Bolts
- 80mm Wood Screws
- Sander
Contents
Steps to make your own picnic table:
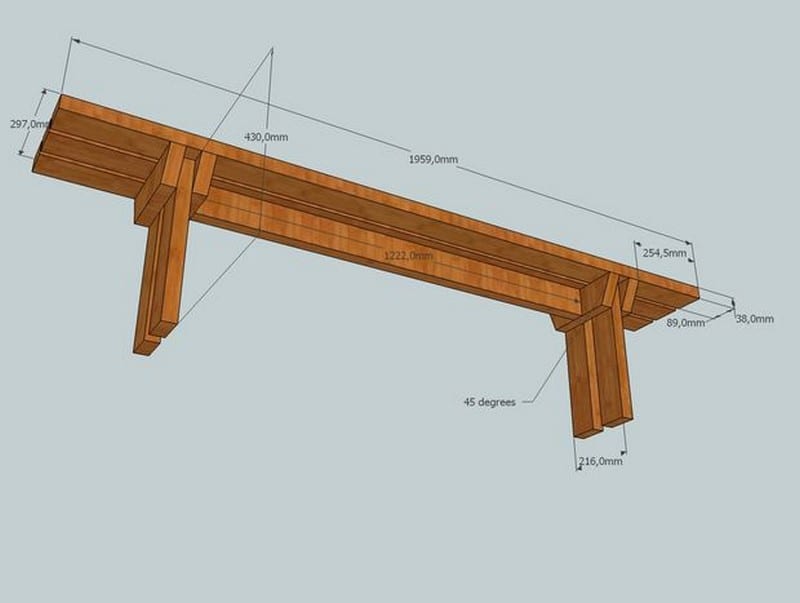
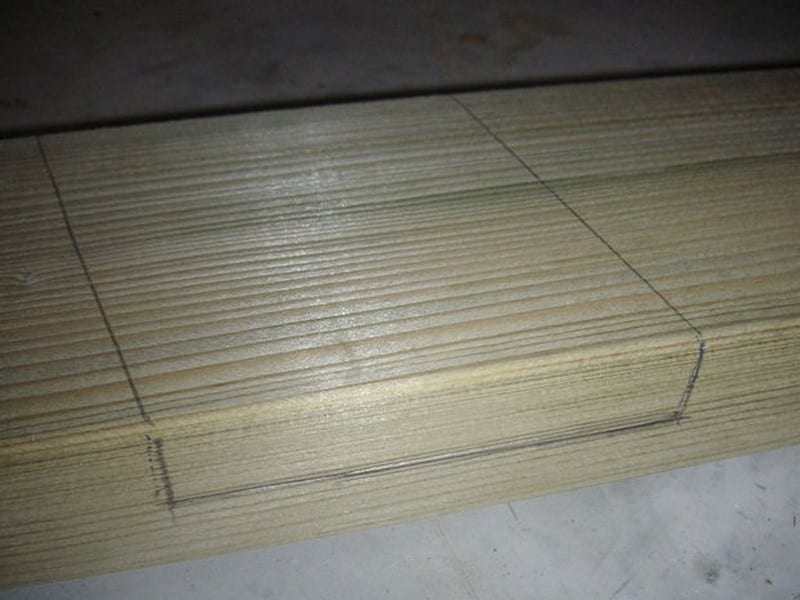
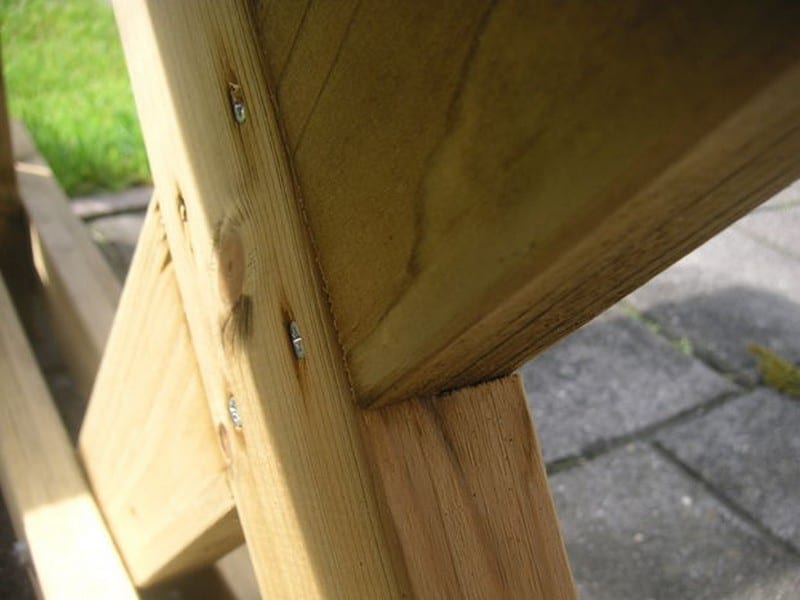
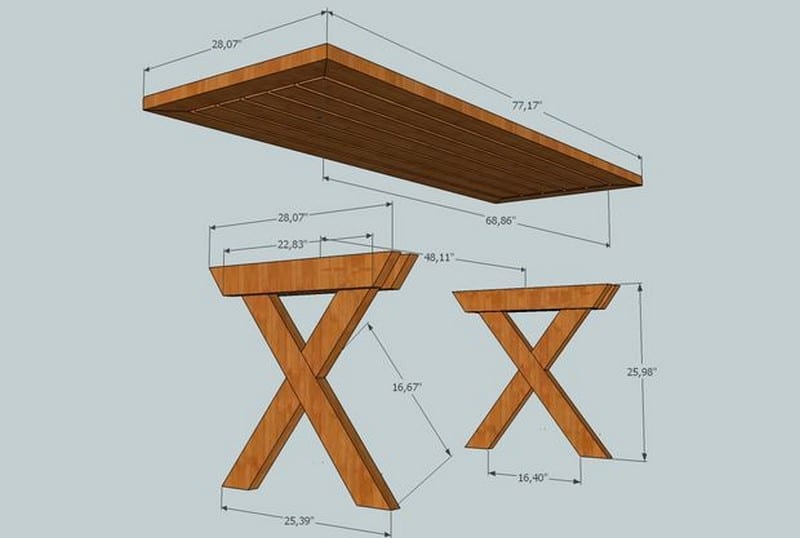
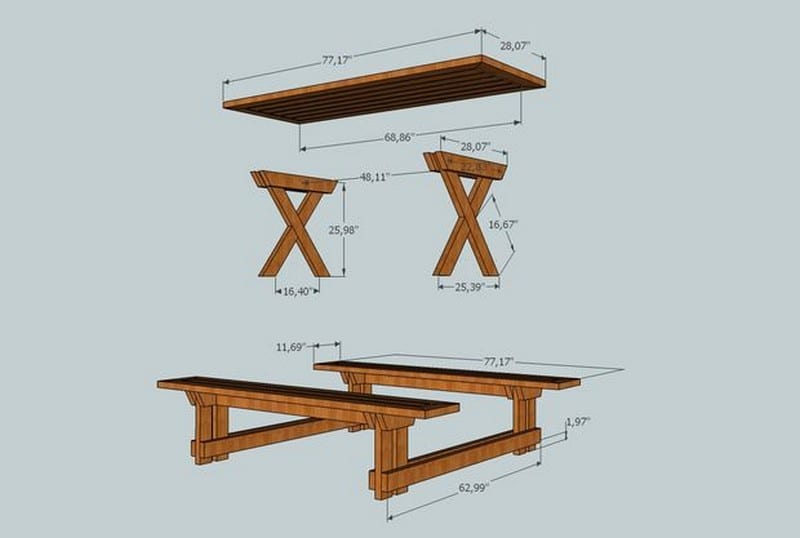
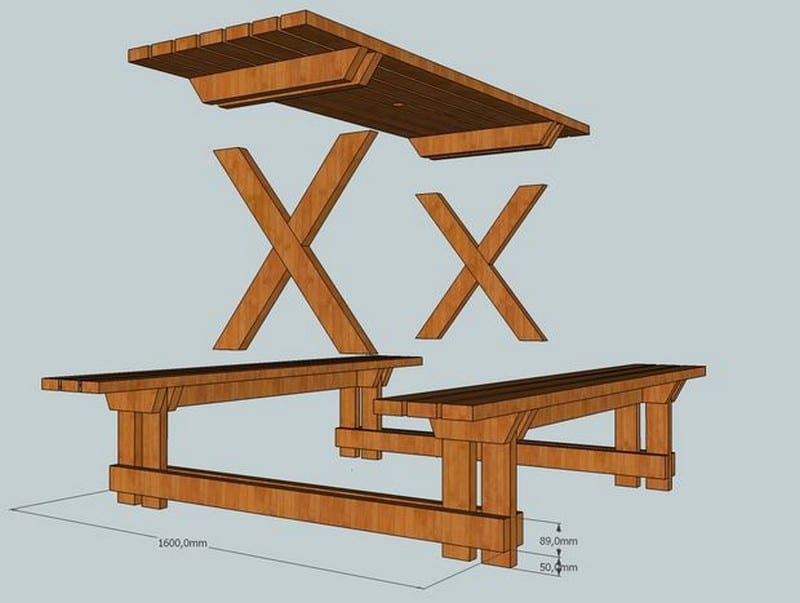
To begin this project, start with the benches. Cut wood pieces to the dimensions indicated in the pictures below. When cutting the corners of the bench seat, you can choose to use a mitre cut. This type of cut is just like the one shown in the first photo. To do this, you’ll need to take three equal measurements. However, if you prefer, you can simply cut the corners without using a mitre cut. Once all the pieces are cut, use a drill to make pilot holes in the boards.
This will make it easier to assemble the benches later on. After the pilot holes are drilled, use screws to attach the boards together. Make sure the screws are inserted tightly so the bench will be sturdy. Repeat this process for the other bench. You can choose to mitre cut the corners of the bench seat (just like in the first photo here) or you can simply cut three equal measurements as shown in the metric plans here.
Use sandpaper to smooth the edges of the wood pieces for your picnic table project. This will help create a professional and polished look for your finished product. Depending on the size of your project, you may want to use a power sander to make the job go faster. Just be sure to go slowly and evenly around all the edges to avoid damaging the wood.
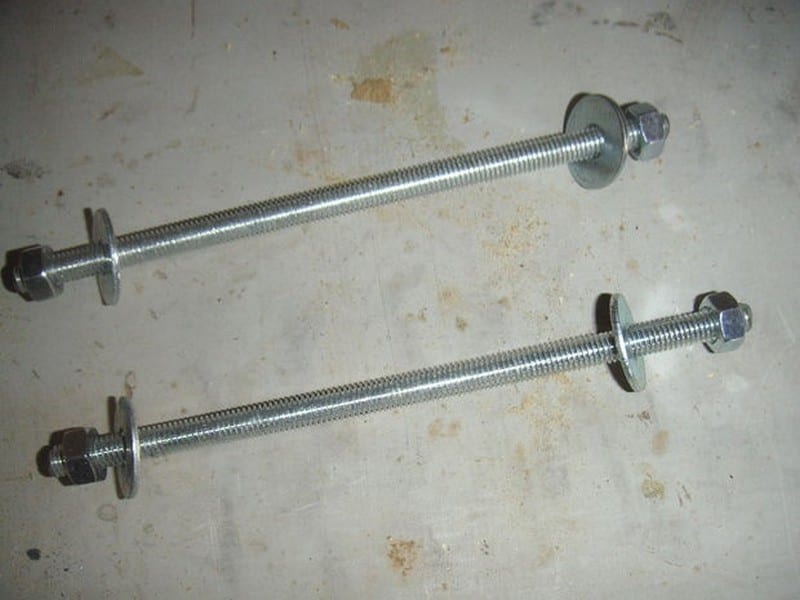
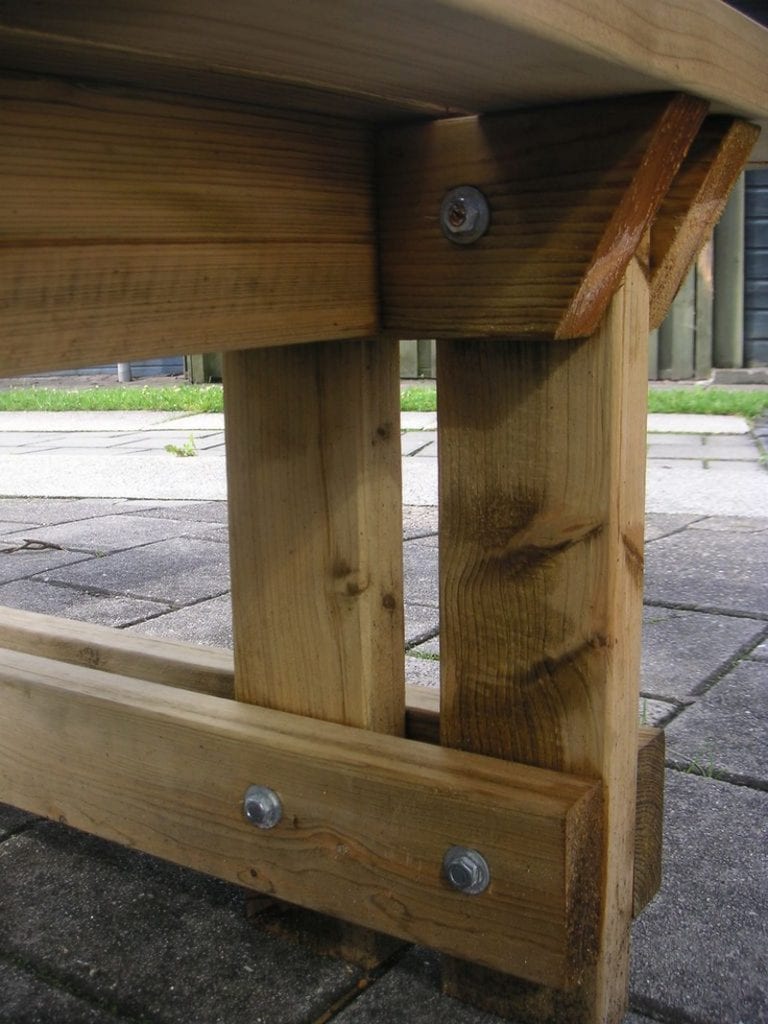
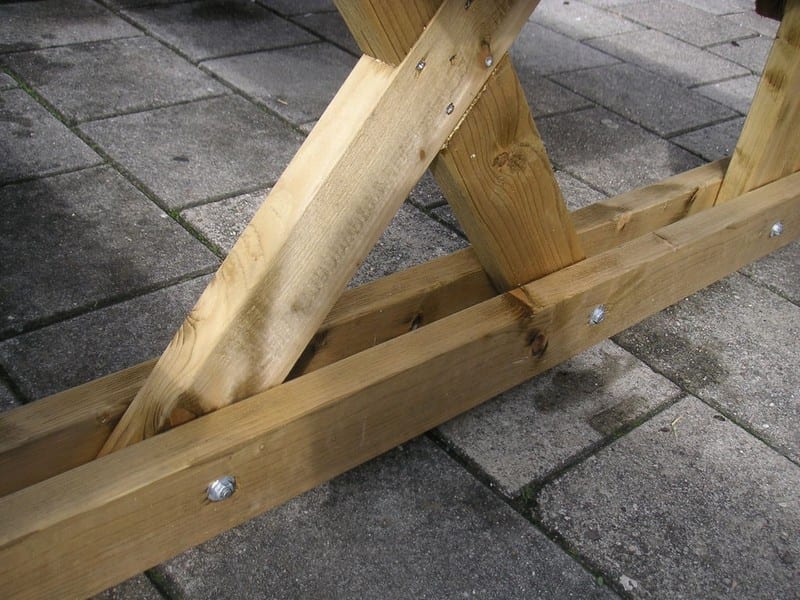
Assemble the benches by screwing them into the connecting wood. To do this, use threaded rods in order to ensure a sturdy connection. Use a wrench to screw the rods in until they are tight.
Screw the connecting wood 2 inches from the ground. This will ensure that the wood is properly secured and will not come loose.
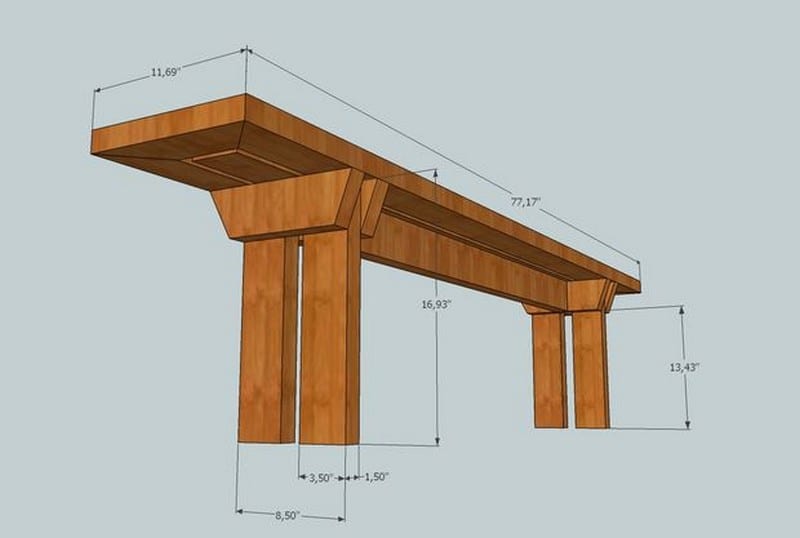
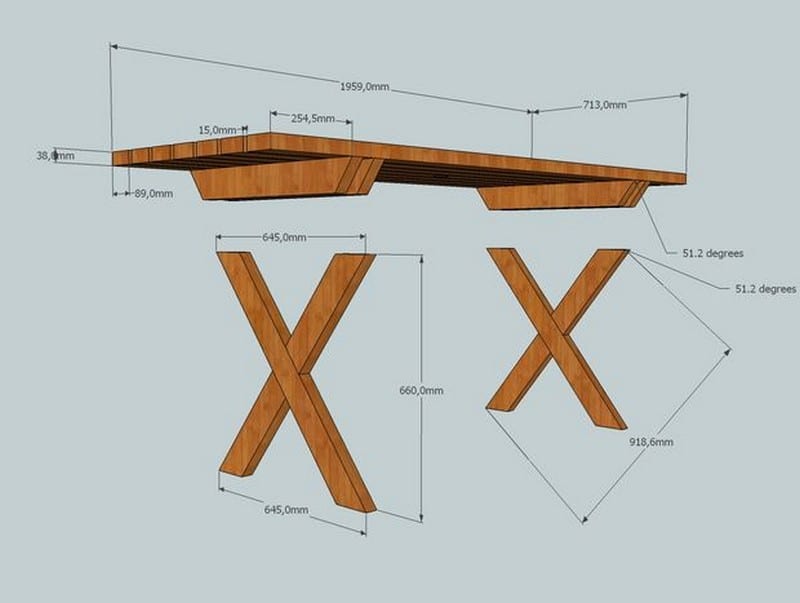
Now that you have the benches together, you can go next to the table, starting with the “X” legs. Form an “X” following the measurements given and mark the wood with a pencil. Make a groove with these marks which should be about 2/3 deep.
Join them together and secure them with wood screws. And then attach the tabletop.
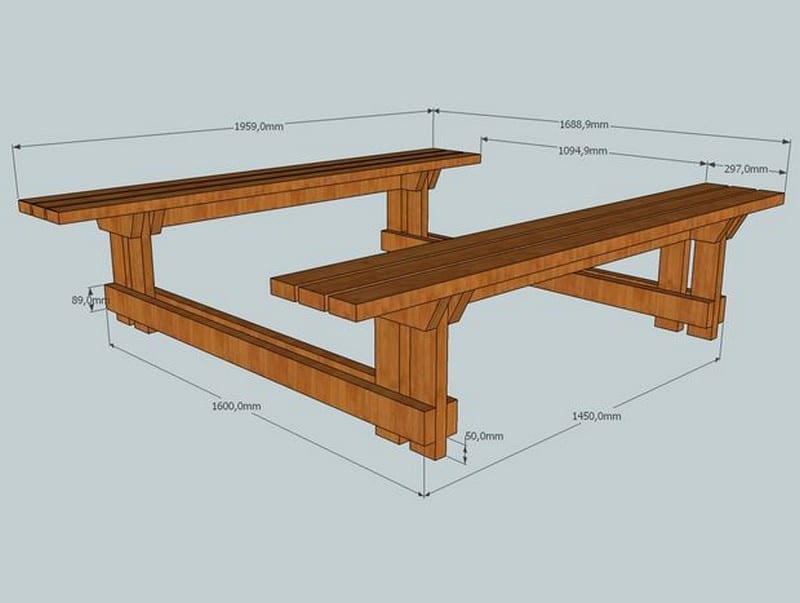
Lastly, connect the table with the bench set. The underside of the table’s legs should be level with the underside/edge of the connecting wood. Therefore, the “X” legs should also be 2 inches high from the ground. This will create a more sturdy and stable structure for your outdoor picnic table.
Imperial Measurements:
Metric Measurements:
Thanks drean, for the great idea!
Choosing Cost-Effective Wood Species That Still Last Outdoors
Investing in a cheap picnic table should never mean settling for flimsy lumber. Pick budget-friendly species that shrug off rain, sun, and backyard spills.
Pressure-Treated Pine: Budget Strength
Builders reach for pressure-treated pine when every peso counts. Chemical infusions push rot and termites away for years. Keep cuts sealed with an outdoor wood preservative. Your cheap picnic table stays solid even if legs sit on damp grass after a storm.
Cedar and Cypress: Natural Resistance on a Budget
Cedar and cypress cost a bit more than pine yet outlive many hardwoods in humid climates. Both woods contain natural oils that repel mold and insects. Choose narrow boards to avoid paying premium prices for wide planks. A fast coat of penetrating oil locks in color and protects a cheap picnic table through sweltering summers.
Sealing Softwoods for Extra Protection
Softwoods dry fast but check and split unless sealed. Brush on a water-based exterior stain as soon as assembly ends. Two light coats outlast one heavy coat and prevent runs. This simple step adds seasons of service to even the cheapest picnic table plan.
Sourcing Reclaimed Lumber for Eco Savings
Scan demolition yards, shipping skids, and old fence panels. Many boards only need light sanding to shine again. Confirm the wood is free from lead paint or chemical spills. Reclaimed beams bring unique grain and help your cheap picnic table stand out without stretching the wallet.
Simple Joinery Tricks That Skip Fancy Hardware
Skip pricey saw stops and pocket-hole systems. Clean cuts, careful pilot holes, and smart bracing keep a cheap picnic table steady under weekend feasts.
The Classic Lap Joint with Screws
Lap joints give wide glue areas and strong face-to-face contact. Mark half the board depth, remove waste with a handsaw, then chisel flat. Clamp, pilot, and drive exterior screws. This joint resists racking when adults lean across the table.
Using Pocket Holes Without Expensive Jigs
A basic ninety-degree drill guide costs pocket change. Angle the bit at fifteen degrees, stop at two-thirds depth, and back out slowly. Drop in self-tapping screws. The result looks clean from the top and holds like factory joinery on any cheap picnic table.
Half-Lap Cross Braces for Rigid Frames
Cross braces take wobble out of long benches. Cut shallow notches where braces cross. The two pieces interlock flush and sit below the seat slats. One brace each side stops sway without metal brackets.
Threaded Rod Alternatives for Bulk Strength
If threaded rod raises costs, replace it with carriage bolts cut to length. Countersink the bolt heads so they vanish under stain. Oversize washers spread load across soft grain and keep your cheap picnic table tight through constant use.
Smart Upgrades
Tiny add-ons lift comfort and organization without hurting the budget. Each upgrade bolts on in minutes and makes a cheap picnic table feel custom-built.
Drop-In Cup Holders from PVC Fittings
Cut 75-millimeter PVC couplings flush with the tabletop. Glue small drain holes in the base to release rainwater. Sand edges for a smooth grip. Cold drinks stay upright during rowdy birthday parties.
Center Pole Sleeve for Universal Umbrella Fit
Drill a neat hole through the table center. Glue a short galvanized pipe inside the hole. A flange below the top keeps the pipe locked upright. The sleeve accepts any garden umbrella and shades diners at noon.
Under-Seat Hooks for Bags and Kids’ Gear
Screw stainless cup hooks beneath the bench overhang. Guests hang backpacks, purses, or picnic totes below their knees. Hooks remove clutter from the tabletop and add no noticeable weight to the cheap picnic table.
Quick-Detach Accessories for Seasonal Storage
Use wing nuts on every add-on. Twist two turns and accessories pop off before winter. Store them in a labeled bin with touch-up stain and spare screws. Next spring, reattach them in seconds and the cheap picnic table looks brand new.
Common Money-Draining Mistakes and How to Avoid Them
A smart build stretches every peso without cutting quality. Keep the budget intact by steering clear of these common missteps that quietly drain cash while you craft a cheap picnic table.
Guessing Board Footage Instead of Measuring
Many DIYers eyeball lumber needs and end up buying twice. Measure every rail, seat, and brace. Add a modest ten-percent buffer. One accurate purchase unlocks bulk pricing and spares repeat fuel costs.
Paying for Premium Clear Lumber You Don’t Need
Sound knots in construction-grade pine rarely weaken edge-mounted two-by-fours. Select straight boards with tight grain. Spend the savings on a high-quality exterior stain that shields wood and extends service life outdoors.
Choosing Stainless Fasteners When Galvanized Works Fine
Stainless screws resist coastal salt but cost triple. Hot-dip galvanized hardware shrugs off rain in most backyards. Reserve stainless only for spots that stay damp like umbrella sleeves or ground-touching foot pads.
Skipping a Cut List and Wasting Off-Cuts
Random cutting turns good timber into fireplace scraps. Sketch a quick cut diagram on graph paper. Group identical lengths. Rip narrow slats out of wide leftovers to harvest hidden value.
Cutting Angles Without a Guide Block
Freehand miters drift off line. Clamp a scrap block at the desired angle to guide the saw. Accurate slices avoid recuts and save another trip to the hardware store.
Leaving End Grain Exposed During Breaks
Fresh end grain drinks water fast. Dab on clear sealer the moment a piece is cut. Sealed ends resist splits, which means fewer costly replacements down the road.
Using Thick Film Finishes That Peel
Glossy outdoor varnish looks sharp at first then cracks under UV and foot scuffs. Choose a breathable oil or penetrating stain. Recoat with a rag each spring instead of stripping layers later.
Ignoring Delivery and Haul Costs
Renting a truck for a single sheet of plywood can equal the plywood’s price. Borrow a trailer, car-pool lumber runs, or wait for the store’s free delivery day.
Skipping Simple Yearly Maintenance
Dirt, sun, and moisture eat exposed fibers. Give the table a mild soap wash, thorough dry, and fresh oil coat every spring. Ten minutes of care blocks rot and expensive rebuilds.
Avoid these traps and every saved peso can fund the next backyard upgrade instead of repairing preventable damage.
Conclusion
Building a cheap picnic table proves you do not need deep pockets to enjoy sturdy outdoor furniture. Smart wood selection, simple joinery, and small upgrades stretch every peso while raising durability. Careful measurements, sealed end grain, and yearly oil top-ups preserve the table against weather and wear.
Do you still need more outdoor seating options? Check out our 2-in-1 picnic table and bench project next!