Last Updated on November 18, 2025 by teamobn
Electroculture is a niche gardening approach that uses simple antennas, coils, and natural atmospheric electricity in hopes of boosting plant growth. Interest has surged as gardeners share anecdotes of bigger harvests, faster germination, and hardier plants. In this guide, we cover how electroculture is proposed to work, tools and step-by-step setups, safety best practices, and how to evaluate results like a scientist.
Key Takeaways
Contents
- Electroculture uses passive copper antennas or coils to interact with atmospheric electricity, aiming to boost plant growth without external power or replacing core gardening practices.
- Effects are unproven and likely small, so treat electroculture as a low-cost experiment with proper controls rather than a guaranteed yield booster.
- Success depends on maintaining strong horticultural fundamentals, healthy soil, balanced nutrition, consistent watering, and IPM, so any antenna effects can be clearly isolated and measured.
What Is Electroculture?
Electroculture is a gardening practice where simple metal antennas or coils (often copper) are placed above beds to passively interact with the atmosphere’s natural electric field, with the goal of improving plant vigor, germination, and yield. It’s typically low-cost and passive, relying on wire, wood stakes, and careful placement, without plugging anything into mains power.
- What it is: passive antennas/coils above or near crops, sometimes with a ground connection, intended to influence the plant/soil environment subtly.
- What it isn’t: powered electroculture/electrostimulation that uses batteries or mains electricity, fertilizer replacement, a guaranteed “miracle” method.
- Common materials: copper wire (various gauges), wooden or non-conductive stakes, optional ground rod or buried metal plate, coil direction and antenna height vary by practitioner.
- Safety note: avoid proximity to power lines, don’t connect to mains, and consider taking tall metal structures down during thunderstorms to reduce lightning risk.

Step‑by‑Step Electroculture Builds
These beginner-to-advanced builds help you test electroculture safely and cheaply. They’re passive, low-voltage concepts that don’t connect to mains power, emphasizing simple materials, sound installation, and comparisons against controlled plots.
Simple Copper Coil Stake (Beginner)
- Tools and materials:
- Wooden or bamboo stake (60–120 cm / 2–4 ft)
- Bare copper wire, 14–18 AWG (1–2 m / 3–6 ft)
- Zip ties or electrical tape
- Wire cutters and pliers
- Optional: exterior clear varnish
- Safety: gloves, eye protection
- Prepare the stake: Smooth splinters and optionally seal the lower half with varnish for weather resistance.
- Wind the coil: Near the top third of the stake, wrap 8–12 turns with 5–10 mm spacing. Leave a 10–15 cm tail at the top.
- Form a small “whip”: Bend the top tail straight upward (5–10 cm). Secure coil and whip with ties/tape without cutting the insulation if present.
- Install in the bed: Drive the stake so the whip tip sits roughly 60–100 cm (2–3 ft) above soil. Keep the antenna above the plant canopy as crops grow.
- Spacing: Use about one coil stake per 1–2 m² (10–20 ft²). Keep several meters from power lines and metallic fences.
- Label and compare: Mark this plot “coil” and maintain an equivalent control area without a stake for fair comparison.
- Maintenance and safety: Inspect ties monthly, re‑position for plant height, and temporarily remove during severe thunderstorms.
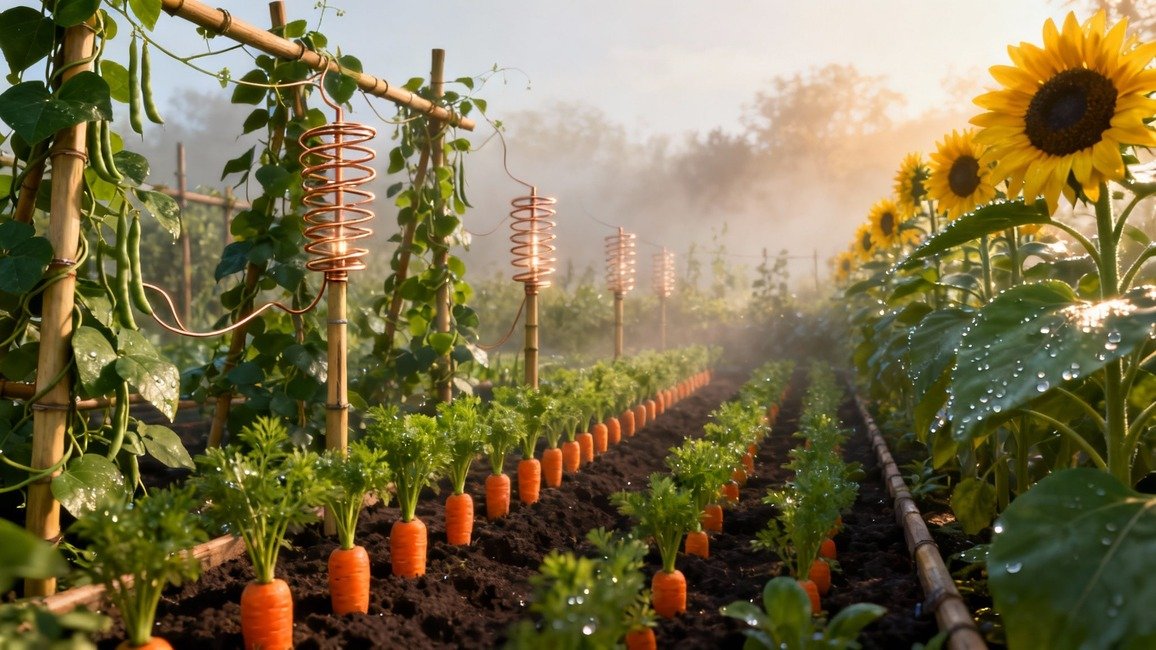
Small Whip Antenna with Passive Ground (Intermediate)
- Tools and materials:
- Fiberglass/wood stake (1.2–1.8 m / 4–6 ft)
- Bare copper wire, 12–16 AWG (1.5–2.5 m / 5–8 ft) for the whip
- Copper‑clad ground rod or short copper pipe (30–60 cm / 1–2 ft)
- Copper wire lead (0.5–1 m / 1.5–3 ft) and a ground clamp
- Mallet/hammer, cutters, pliers, zip ties/tape
- Safety: gloves, eye protection, check for buried utilities before driving any rod
- Place the ground: Drive the ground rod 20–30 cm (8–12 in) into moist soil where you’ll test, leaving the clamp area accessible.
- Mount the stake: Set it 30–60 cm (1–2 ft) from the rod.
- Make the whip: Straighten copper wire and fasten it vertically along the stake so the top extends 80–120 cm (2.5–4 ft) above soil.
- Connect (optional) ground: Clamp a short copper lead from the whip’s bottom to the ground rod. Alternatively, leave the whip isolated and test both variants in paired plots.
- Secure and tidy: Ensure firm mechanical support and corrosion‑resistant connections, avoid sharp wire ends.
- Spacing: Position whips every 2–3 m (6–10 ft) along a row, leaving several meters from power lines or tall metal structures.
- Label and monitor: Tag “whip + ground” vs. “whip isolated” vs. control. Track germination, height, and yield.
- Storm caution: Remove or lay flat during severe weather.
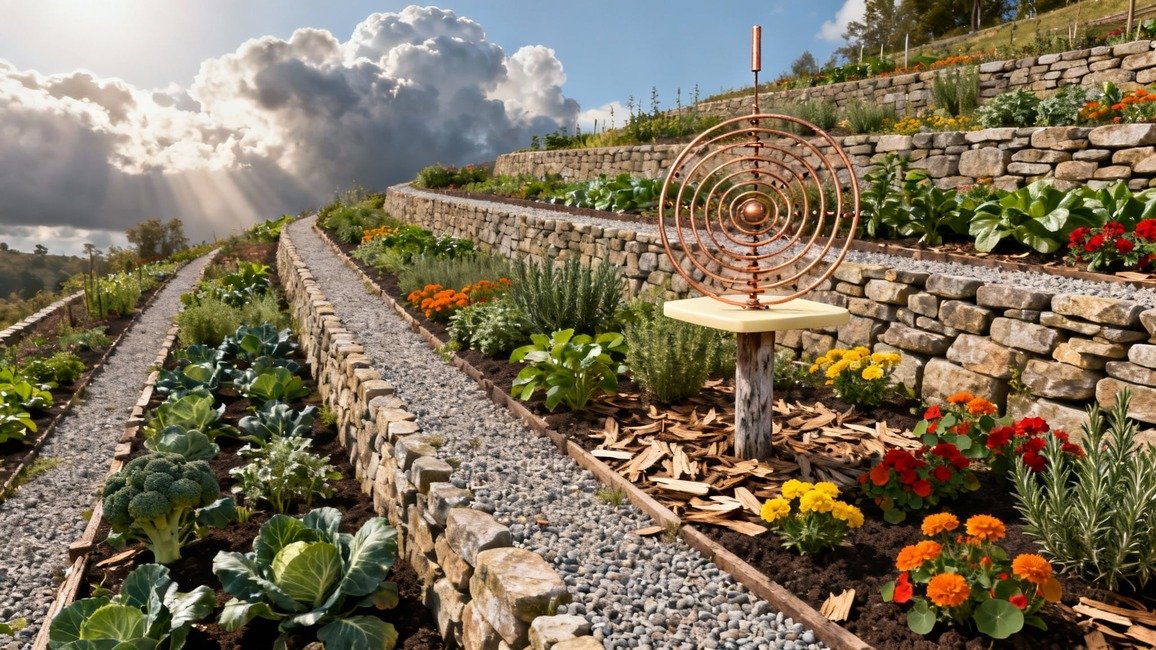
Lakhovsky‑Inspired Open‑Ring/Spiral (Advanced, Passive)
- Tools and materials:
- Bare copper wire, 14–16 AWG (2–4 m / 6–13 ft)
- Non‑conductive mounting plate (polycarbonate or sealed plywood, 20–30 cm / 8–12 in diameter)
- Small plastic standoffs/spacers, zip ties, epoxy or screws
- Wood/fiberglass stake (1.2–1.8 m / 4–6 ft)
- Drill, cutters, pliers, optional exterior sealant
- Safety: gloves, eye protection
- Lay out rings: Mark 2–3 concentric circles (e.g., 10 cm, 16 cm, 22 cm diameters) on the plate.
- Bend open rings: Shape copper into each circle but leave a 3–5 mm gap so each ring is not a closed loop.
- Mount the array: Fix rings to the plate with standoffs so they’re parallel and separated by 10–15 mm. Keep all rings electrically isolated.
- Add a short whip (optional): A 5–10 cm vertical wire above the top ring can be attached to the same plate, left ungrounded.
- Install: Attach the plate to the stake so the rings face sideways (like a target). Position the center ~80–120 cm (2.5–4 ft) above soil.
- Placement: Keep several meters from metallic fences and overhead lines. Use 1 array per 2–4 m² and maintain consistent orientation across replications.
- Test vs. simpler builds: Compare to coil stakes and controls, there’s no strong evidence this geometry outperforms simpler antennas.
Quick Testing Tips
- Keep horticultural factors identical between treatment and control plots (soil prep, water, fertilizer, cultivar).
- Use photo points, measure plant height weekly, and weigh harvests.
- Change one variable at a time (grounded vs. isolated, coil vs. whip) and replicate.
- Never connect to mains power, remove tall metal structures during severe storms.
How It’s Supposed to Work (Theories)
Electroculture theories propose that passive metal antennas subtly interact with atmospheric electricity, soil chemistry, and microclimates. These hypotheses remain debated, but they outline plausible mechanisms worth testing alongside horticultural practices.
Atmospheric electric field coupling
An elevated conductor weakly couples to the fair‑weather electric field, redistributing charge between air and soil. Advocates suggest microcurrents could influence ion transport or nutrient availability in the rhizosphere.
Local field and bioelectromagnetic effects
Weak electric fields can modulate biological processes in some contexts, including ion channels and germination. Coil geometry may shape local fields, but garden‑scale, geometry‑specific effects remain sparsely evidenced.
Galvanic pairs in soil
Dissimilar metals (for example, copper and zinc) in moist soil create tiny galvanic currents. This electrochemical mechanism can alter redox conditions and nutrient solubility, alongside corrosion and potential trace‑metal concerns.
Microclimate influences
Antennas may subtly affect dew formation, condensation, and airflow, altering moisture retention or temperature near plants. These effects are plausible yet typically modest and highly site‑ and weather‑dependent.
Claims beyond established physics
Assertions of “free energy” or universal life‑force radiation lack credible support. Treat extraordinary claims skeptically and prioritize mechanisms compatible with known physics and agronomy.
Practical takeaway
If present, effects are likely small and context‑dependent. Core horticultural fundamentals, soil biology, balanced nutrition, water management, and light, usually matter far more than coil direction or antenna height.
Integrating With Good Horticulture
Electroculture is a complement, not a replacement. Pair antennas with healthy soil, balanced nutrition, consistent watering, smart spacing, and integrated pest management to isolate effects, minimize confounders, and strengthen resilience.
Soil Health and Biology
Start with living soil: ample compost, diverse organic matter, and minimal disturbance. Maintain ground cover and add mulches to foster fungi and beneficial microbes that cycle nutrients efficiently.
If needed, amend with minerals guided by a recent soil test, not guesses. Avoid overusing salts and synthetic quick fixes that disrupt biology. Electroculture antennas, if used, should augment a soil food web already primed to support roots, moisture retention, and steady nutrient exchange.
Watering and Mulching
Deliver even moisture with deep, infrequent irrigation matched to crop stage and soil texture. Use drip lines or soaker hoses to reduce evaporation and leaf wetness. Mulch 5–7 cm with straw, leaves, or chipped wood to regulate temperature, suppress weeds, and buffer rainfall extremes.
Avoid waterlogging, improve drainage with organic matter and raised beds where appropriate. Stable moisture reduces confounders, ensuring any electroculture effect isn’t mistaken for simple improvements in water management.
Nutrient Management and pH
Base fertilization on soil tests and realistic yield goals. Prioritize slow-release organic sources, balanced N‑P‑K, and micronutrients where deficient, avoiding heavy, unbalanced doses that mask root issues.
Monitor pH, most vegetables prefer 6.0–7.0, and correct gently with lime, sulfur, or targeted amendments. Foliar feeds can help during stress but won’t fix poor soil structure. Clear nutrition plans separate real fertility gains from any perceived electroculture benefit and prevent nutrient burn or hidden shortages.
Light, Spacing, and Airflow
Match spacing to mature plant size to ensure full sun exposure, airflow, and easy access for weeding and harvest. Prune or trellis vining crops to reduce shading and humidity pockets that invite disease.
Orient rows with prevailing winds and sun angle, avoid placing antennas where they cast persistent shade. Healthy canopy architecture maximizes photosynthesis, limits foliar disease, and keeps microclimates consistent, preventing shading changes from being misattributed to electroculture hardware.
Companion Planting and Biodiversity
Design polycultures with complementary root depths, nutrient use, and pest interactions. Flowers like alyssum, calendula, and dill support beneficial insects, herbs such as basil and thyme can disrupt pest cues. Rotate families annually to break disease cycles and vary exudates, strengthening soil biology.
Biodiversity buffers against weather and pest swings, making results more resilient and reducing the chance that a single species’ response, positive or negative, is mistaken for a universal electroculture effect.
Integrated Pest Management (IPM)
Scout weekly and act early using thresholds. Combine sanitation, exclusion, habitat for predators, and targeted, least‑toxic interventions like soaps or Bt when necessary. Avoid routine broad-spectrum sprays that disrupt natural enemies and skew trials.
Keep records of pest pressure, interventions, and weather so you can separate IPM wins from antenna effects. Healthy, unstressed plants resist pests better, narrowing variables and making any incremental electroculture signal clearer.
Seasonality, Weather, and Structures
Time plantings to local frost dates, soil temperatures, and day length. Use row covers, low tunnels, or shade cloth to reduce stress spikes from wind, heat, or cold snaps.
Secure antennas to prevent them from becoming hazards in storms, and remove tall metal elements during lightning events. Consistent protection and timing reduce noise in your data, highlighting whether antennas contribute anything beyond robust season extension and stress moderation.
Data, Controls, and Replication
Design side‑by‑side plots with and without antennas, randomized and replicated. Keep all other variables identical. Record planting dates, varieties, inputs, irrigation, and weather, photograph at fixed intervals and angles.
Track germination, height, leaf area, disease incidence, and marketable yield. Analyze season totals and averages, not single snapshots. Clean data helps you decide whether electroculture merits scaling, or if solid horticulture alone delivered the outcomes you observed.
Conclusion
Electroculture shows intriguing promise, but current evidence for passive antennas is mixed, so treat it as a low-cost experiment rather than a guaranteed yield booster. Prioritize strong horticultural fundamentals, healthy soil, balanced nutrition, consistent watering, and IPM, so any incremental effects are clear and reproducible. Test with controls, document results rigorously, and scale only if benefits persist without compromising safety.
FAQ: Electroculture Gardening
- Can I use electroculture in container gardens or raised beds, and does the setup differ from in-ground installations?
- Electroculture works in containers and raised beds with adjustments. Use shorter stakes (30–60 cm) proportional to container size, one coil per large pot or per 2–3 smaller pots. Grounding is optional in containers; test both grounded and isolated setups. In raised beds with liners, ensure ground connections penetrate to native soil. Containers offer controlled conditions ideal for side-by-side comparisons.
- What wire gauge and coil direction (clockwise vs. counterclockwise) should I use, and does it actually matter?
- Use 12–18 AWG bare copper wire; thicker gauges (12–14) resist corrosion, thinner (16–18) bends easier. Coil direction, clockwise versus counterclockwise, lacks scientific validation despite claims about magnetic alignment. Pick one direction, document it, and test both if curious. Copper is preferred for conductivity; avoid aluminum (corrodes quickly). Wire material matters more than coil direction for atmospheric interaction.
- How long does it take to see results, and what crops respond best to electroculture?
- Germination effects may appear within 1–3 weeks; yield differences emerge over full growing seasons (8–16 weeks). Fast-growing crops, lettuce, radishes, spinach, herbs, make excellent test subjects with 30–60 day cycles. Anecdotal reports suggest fruiting crops (tomatoes, peppers, cucumbers) show improved flowering. Start with 2–3 crop types, replicate with controls, and track germination, harvest timing, and total yield.
- Are there any negative side effects or risks to plants, soil, or beneficial organisms from electroculture?
- Passive electroculture is low-risk but monitor copper toxicity, test soil copper annually with numerous antennas. Avoid mixing metals (galvanic corrosion) and stick to copper-on-wood. No evidence shows harm to earthworms or soil bacteria. Remove tall antennas during thunderstorms to prevent lightning strikes. Keep 10+ meters from buildings and power lines. Maintain control plots to catch unexpected negative effects early.
- Can I combine electroculture with other alternative gardening methods like biodynamics, aquaponics, or permaculture, and are there synergies or conflicts?
- Electroculture integrates well with holistic methods. Pair with biodynamic calendars and preparations, use in permaculture Zone 1 intensive beds, or install above aquaponic grow beds (keep away from pumps). Compatible with no-till and regenerative practices, install stakes without disturbing soil. Avoid combining with heavy synthetics that mask subtle effects. Document interactions carefully and maintain comparison plots across all integrated systems.