I’ve always loved making pizza straight from my own backyard harvest. Creating my pizza garden lets me grow ripe tomatoes, sweet peppers, pungent onions, and fresh herbs like basil and oregano. I start each season by planning sunlight exposure and garden layout, then prepare rich soil before planting. This step-by-step guide shows how I plant a pizza garden in my home, plus tips on harvesting, storing, and baking with homegrown ingredients.
Planting and Growing Your Pizza Garden Plants
Contents
With planning and soil ready, I plant each vegetable and herb in turn, following climate-tailored steps.
Tomatoes
I start tomato seeds indoors six to eight weeks before the last expected frost, sowing them in seed-starting mix and keeping the tray under grow lights. Once nighttime temperatures consistently exceed 50°F, I harden off seedlings by setting them outside for increasing daylight hours over a week.
I plant them three feet apart, burying most of each stem to encourage strong root development, and secure young plants with stakes or cages. After planting I water deeply—soaking the soil six to eight inches down—then mulch around the base and apply a balanced fertilizer at transplant and again when fruit appears.
As vines grow, I pinch off side shoots below the first flower cluster to channel energy to fruit production. I remove any lower leaves that touch the soil to improve air circulation and reduce disease pressure. Throughout the season I watch for pests and water consistently, adjusting irrigation if weather turns hot or dry. I harvest tomatoes when they reach full color and yield slightly to the touch for peak flavor.
- Pinch off suckers and remove leaves touching the ground for better air circulation.
- Stake or cage plants immediately to prevent damage later.
- Mulch heavily to keep soil evenly moist and suppress weeds.
- Let tomatoes ripen fully for sweetest flavor; pick when uniformly colored.

Bell Peppers (Sweet Peppers)
I sow pepper seeds indoors eight to ten weeks before frost in a warm, well-lit spot, then thin seedlings to the strongest plant in each cell. Two weeks before transplanting, I harden them off by placing them outdoors during the day and bringing them in at night. When nighttime lows stay above 50°F,
I plant peppers 18–24 inches apart in rows 30–36 inches apart, setting them at the same depth as in their pots and gently firming the soil around each root ball. I mulch and water immediately, then install cages or stakes to support heavy fruit later.
To prevent blossom-end rot, I water evenly—about one inch per week—and side-dress with a balanced fertilizer once the first fruits set. I monitor soil moisture closely during hot spells, avoiding both drought stress and waterlogging.
As peppers mature, I enjoy harvesting them at the green stage or allow them to ripen to red, yellow, or orange for a sweeter taste. Regular picking encourages the plant to produce more fruit through the season.
- Keep soil evenly moist; dry spells weaken plants and cause defects.
- Ensure warm conditions; very cool or very hot weather can delay fruit set.
- Support plants with cages or stakes if fruit weight is heavy.
- Harvest when fruits are firm and full-sized for best flavor.
Onions
I choose long-day onion sets since these are great in norther climates where I live. I press each set or seed cluster about a quarter to a half-inch deep in rows spaced 12–18 inches apart, leaving three to four inches between each plant. Before planting, I enrich the bed with two inches of compost worked into the top six inches of soil for steady nitrogen release. Once shoots appear, I side-dress the row with a nitrogen-rich fertilizer to promote bulb development.
I keep the bed weed-free since onions struggle to compete, and I water just enough to keep the top six inches of soil moist—about an inch per week. When roughly one-third of the tops have yellowed and fallen, I stop irrigating to let bulbs mature and prepare for harvest. I lift bulbs carefully with a fork, shake off excess soil, and cure them in a shaded, ventilated spot for one to two weeks. Finally, I trim the tops and store onions in mesh bags in a cool, dry place.
- Thin seedlings carefully so remaining bulbs swell fully.
- Keep the onion bed weed-free to minimize competition.
- Cure bulbs in the sun for a few days, then trim tops.
- Store cured onions in a cool, dry spot in mesh sacks.

Basil
I start basil seeds indoors four to six weeks before frost or plant young transplants when all danger of frost has passed. I transplant them into rich, well-drained soil in full sun, spacing plants 10–18 inches apart to allow good airflow.
From the first signs of growth, I pinch each stem just above a leaf pair to encourage bushiness and delay flowering. I water basil regularly, keeping the soil evenly moist without waterlogging.
Each week I harvest by cutting stems about two inches above the soil, which stimulates new leaf growth. I remove any flower buds immediately to maintain flavor and productivity. When plants grow leggy, I pinch back the tallest shoots to restore compact shape. For winter, I take cuttings to root indoors or dry leaves in small bunches.
- Pinch tips to encourage branching and a fuller plant.
- Harvest frequently; cutting stems stimulates new leaves.
- Pick in the late afternoon or evening while leaves are cool and dry.
- Avoid refrigerating whole basil; freeze chopped leaves for later use.
Oregano
I plant oregano seedlings in spring after the last frost in a sunny spot with well-drained soil, spacing them about 12 inches apart. Because oregano prefers leaner ground, I only enrich the soil lightly and avoid over-fertilizing.
Once roots are established, I harvest by pinching stems back to a pair of leaves, which keeps plants full and productive. Each spring, I divide older clumps to rejuvenate growth and fill bare spots in the garden.
During the growing season I cut back the plant by half before flowers form to preserve strong flavor and prevent lanky growth. In colder regions I mulch heavily in late fall or dig up pots to overwinter indoors. After blooms appear, I trim and hang stems in a shaded, dry area to dry for later use. Fresh oregano stems can also be frozen in small bundles.
- Plant in a sunny, well-drained spot; oregano dislikes soggy soil.
- Remove flower buds to maintain robust flavor.
- Pinch tips often to stimulate fuller foliage.
- Divide mature plants in spring to renew growth.
Garlic
I break garlic bulbs into individual cloves in fall, two to three weeks after the first expected frost, and plant them pointy end up, one to two inches deep and four to six inches apart in rows 12–18 inches apart.
I enrich the planting rows with compost before setting cloves and then cover them with mulch to insulate through winter. In spring, as shoots appear, I remove excess mulch and fertilize with a balanced organic feed.
I water garlic consistently through spring, ensuring the soil remains moist but never soggy, then taper off irrigation as the bulbs swell and the lower leaves start to yellow. Once about half the foliage has died back, I stop watering completely and lift bulbs with a garden fork.
I cure garlic heads for one to two weeks in a shaded, ventilated spot, then trim roots and tops before storing bulbs in a cool, dry place.
- Plant cloves four to six inches apart in loose soil.
- Water evenly until tops begin to yellow, then stop to prevent rot.
- Lift bulbs when one-third of leaves have died back.
- Cure for a week or two, then store in a cool, dry place.

Planning Your Pizza Garden (Layout & Sunlight)
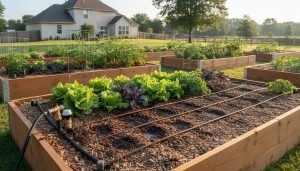
Before I plant a single seed, I always take the time to plan the layout of my pizza garden. A thoughtful setup makes everything easier—from watering and weeding to harvesting—and ensures every plant gets the sunlight it needs to thrive.
I look for a sunny spot in my yard that gets at least six to eight hours of full sun each day. Shade is the enemy of a productive pizza garden, so I make sure no trees, fences, or walls block the light. If I’m working with a smaller space or growing in containers, I still prioritize that sun exposure by keeping the garden portable or close to a south-facing wall.
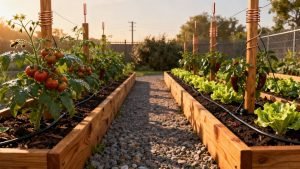
I lay out the garden with height in mind. I place taller plants, such as tomatoes and peppers, in the back or center, depending on the shape of the plot. This way, they don’t cast shadows on my low-growing herbs like basil and oregano. I usually place garlic and onions along the outer edge, as they grow in neat rows and don’t require staking.
I also think about airflow. I leave enough space between plants so they don’t grow crowded, which helps reduce moisture buildup and keeps diseases away. For example, my tomato plants are spaced at least two and a half to three feet apart. That way, air can move freely through the vines, and I can easily reach in to prune or harvest.
Another thing I do early is set up access to water. I always position my garden close to a hose or drip system so watering doesn’t become a chore. I’ve found that adding a good layer of mulch after planting helps retain soil moisture and keeps weeds from taking over. In hotter months, drip irrigation under mulch helps conserve water while keeping the roots cool and happy.
Finally, I use companion planting whenever possible. I like to tuck basil and oregano near my tomatoes because they don’t just belong together on pizza—they also help each other in the garden. Basil, in particular, is known to deter pests like aphids and hornworms, and oregano’s strong scent seems to confuse unwanted bugs. By placing them strategically, I get better growth and fewer issues later on.
- Give all plants full sun (at least six hours) to maximize yields.
- Group tall vines so they don’t shade low herbs.
- Plant basil and oregano among veggies to help deter pests.
- Place the garden near a hose or irrigation system; mulch or drip irrigation reduces evaporation
Flavor-Enhancing Baking Methods
Using homegrown ingredients elevates pizza nights. Preheat a pizza stone or steel in a very hot oven (450–500°F) for at least 30 minutes to achieve a crisp crust. Stretch dough thin and bake quickly until golden.
Add fresh herbs after baking to preserve their bright aroma. Mix dried herbs into sauce or sprinkle on top before baking. Make sauce from garden tomatoes, cook down with garlic and herbs for the freshest flavor.
- Preheat the oven or grill to its highest setting for best results.
- Use a pizza peel or parchment to transfer pizza onto the hot surface.
- Finish with a garnish of torn basil or chopped oregano post-bake.
- Drizzle extra-virgin olive oil or balsamic glaze before serving for extra flavor.
Conclusion
Plant a pizza garden to enjoy the freshest toppings straight from your backyard. Tomatoes, peppers, onions, basil, oregano, and garlic will bring vibrant flavor to every slice. With proper planning, soil prep, and care, you’ll harvest an abundant crop. Savor each homemade pizza knowing you grew every ingredient yourself.