Last Updated on November 14, 2025 by teamobn
There’s nothing more satisfying than harvesting your own fresh, healthy produce — without the supermarket price tag. A cinder block raised garden bed is a durable, budget-friendly way to grow vegetables, herbs, and flowers, especially if your native soil is poor or you want a neat, low-maintenance garden.
Project Overview:
- Project type: DIY cinder block raised garden bed
- Difficulty: Beginner–intermediate
- Time needed: 3–5 hours (for a 4×8 ft bed)
- Estimated cost: Depends on local prices, but typically lower than timber beds over time
- Best for: Vegetables, herbs, flowers, and small fruits
- Key benefits: Great drainage, improved soil quality, less bending, long-lasting structure
In this guide, you’ll get step-by-step instructions, a clear materials and tools list, planting strategies, and answers to the most common questions about cinder block raised garden beds—including safety, depth, and what to plant.
There’s nothing more peaceful than knowing your kids are well-fed and healthy. But expenses can go crazy high with vegetable prices at the supermarket, especially if you plan to go full-on salad recipe and smoothie snacks for the whole week.
Thankfully, you can save money with various DIY projects, including a cinder block raised garden bed.
Why Choose a Cinder Block Raised Garden Bed?
A raised bed is simply a garden bed that’s built up above the native soil using some type of wall or frame. Unlike in-ground beds, raised beds let you:
- Fill with high-quality soil instead of fighting poor native soil
- Improve drainage and reduce waterlogging
- Reduce bending and kneeling, making gardening easier on your back
- Control weeds and pests more effectively
- Organize your garden into clean, attractive planting areas
Garden boxes and raised beds are often used interchangeably, but raised beds can be any size or shape and may not have a bottom, allowing roots to grow down into the ground.
Why Cinder Blocks?
Cinder blocks are:
- Very sturdy
- They’re designed to support structures, so they easily handle the weight of soil.
- Long-lasting
- They don’t rot, warp, or decay like untreated timber.
- Thermally stable
- Concrete acts as an insulator, helping retain warmth in cooler months and moderating soil temperature.
- Low maintenance
- Once set, you don’t need to worry about repainting, replacing rotten boards, or frequent repairs.
Concrete blocks are generally considered stable and inert once cured. For most gardeners, they are a practical, economical choice for building raised beds that will last many years.
Build it once, and you’ll enjoy repeated harvests of fresh fruits, vegetables, and herbs from a structure that holds up season after season.
DIY Cinder Block Raised Garden Bed Guide
What sort of produce will you be growing in your cinder block raised garden bed?
What materials are Needed to Build a DIY Cinder Block Raised Garden Bed?
- Cinder blocks (about 32 pieces per layer for a 4×8 ft bed) .
- Stakes and string (for marking the layout)
- Hardware cloth (to deter burrowing pests)
- Landscape fabric (to help with weed control)
- Soil mix (topsoil and compost or a quality raised bed mix)
Optional but useful:
- Gravel or coarse sand for improved drainage and leveling
- Mulch (straw, wood chips, or leaves) for the soil surface
What Tools are Needed to Build a DIY Cinder Block Raised Garden Bed?
- Shovel
- Trowel
- Hand Tamper
- Rake
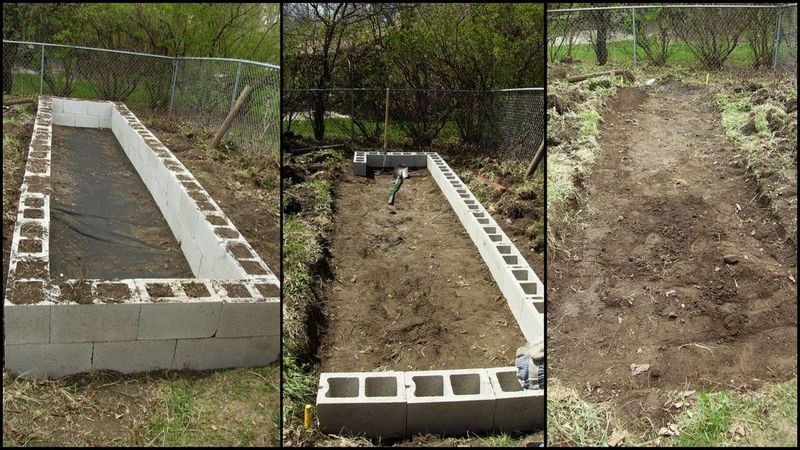
How to Build a DIY Cinder Block Raised Garden Bed Guide
Step 1. Plan Your Bed Size and Layout
- Decide what you want to grow first (e.g., tomatoes, herbs, leafy greens).
- Choose a size that:
- Fits your space
- Let’s you reach the center from the sides (4 ft width is ideal)
- Common beginner layout (similar to the gallery):
- Rectangle: about 4 ft × 8 ft
- Height: 1–2 blocks high (8–16 in)
Write down:
- Final bed dimensions
- Number of layers (single or double height)
- Approx. number of blocks (about 32 blocks per layer for a 4×8 ft bed)
Step 2. Choose and Mark the Location
- Pick a spot with:
- At least 6 hours of full sun (more is better for veggies)
- Good drainage (no standing water after rain)
- Use stakes and string to mark the outline of your bed:
- Measure the length and width
- Drive stakes at each corner
- Run a string between stakes to define the edges
- Stand back and check:
- Is there room to walk around all sides?
- Is it close enough to a water source (hose, tap)?
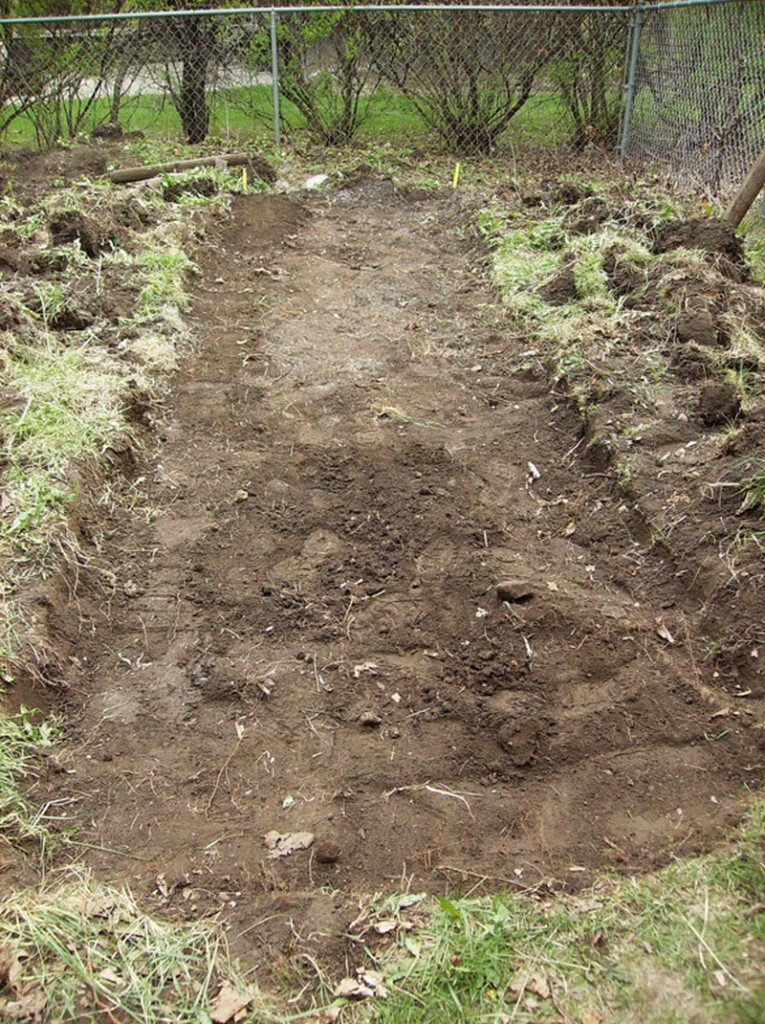
Step 3. Clear and Level the Ground
- Within the marked area:
- Remove grass, weeds, and rocks with a shovel
- Strip down to bare soil
- Use a rake to roughly level the area.
- If you have a hand tamper:
- Compact the soil so it’s firm and even
- For sloped ground:
- Dig into the high side rather than building up the low side
- Aim for a level perimeter so the blocks sit flat
This step is key: a level base means your cinder block walls won’t shift or lean over time.
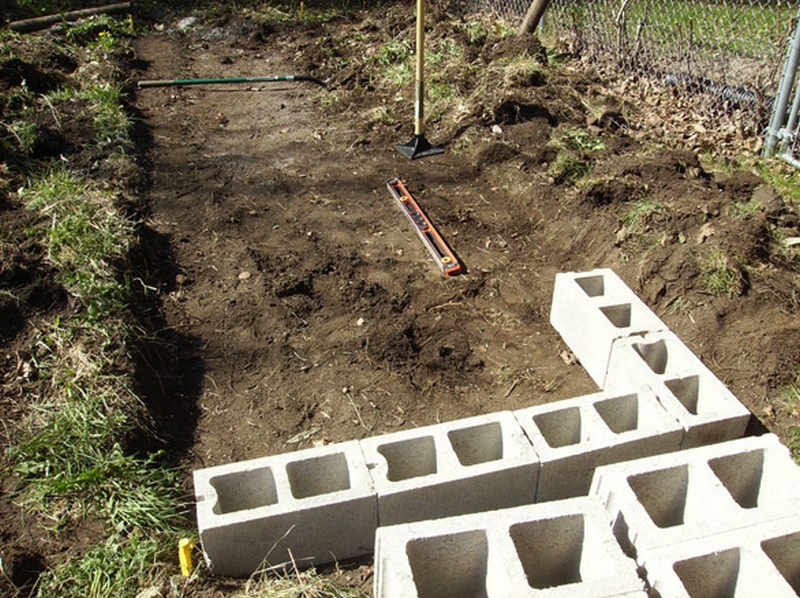
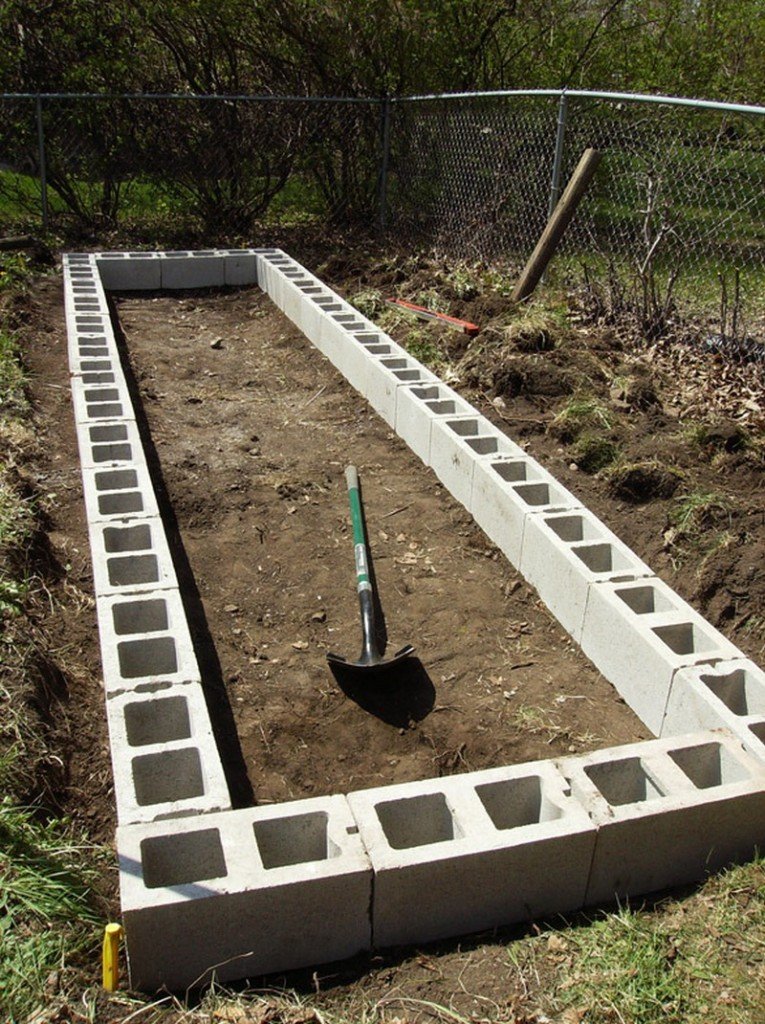
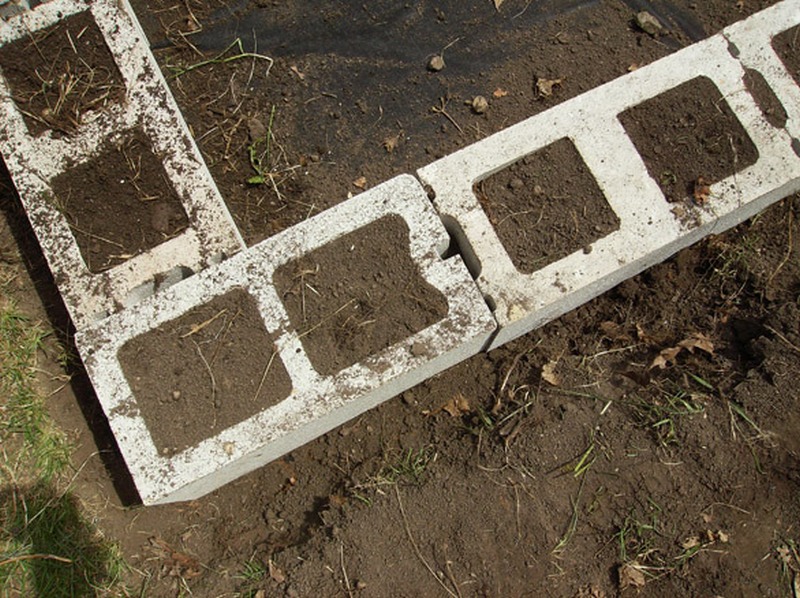
4. Lay Out the First Course of Cinder Blocks (Dry Fit)
- Start at one corner:
- Place the first block with its hollow cores facing up
- Work your way around the rectangle:
- Butt each block snugly against the next
- Adjust the soil under each block so the tops line up fairly evenly
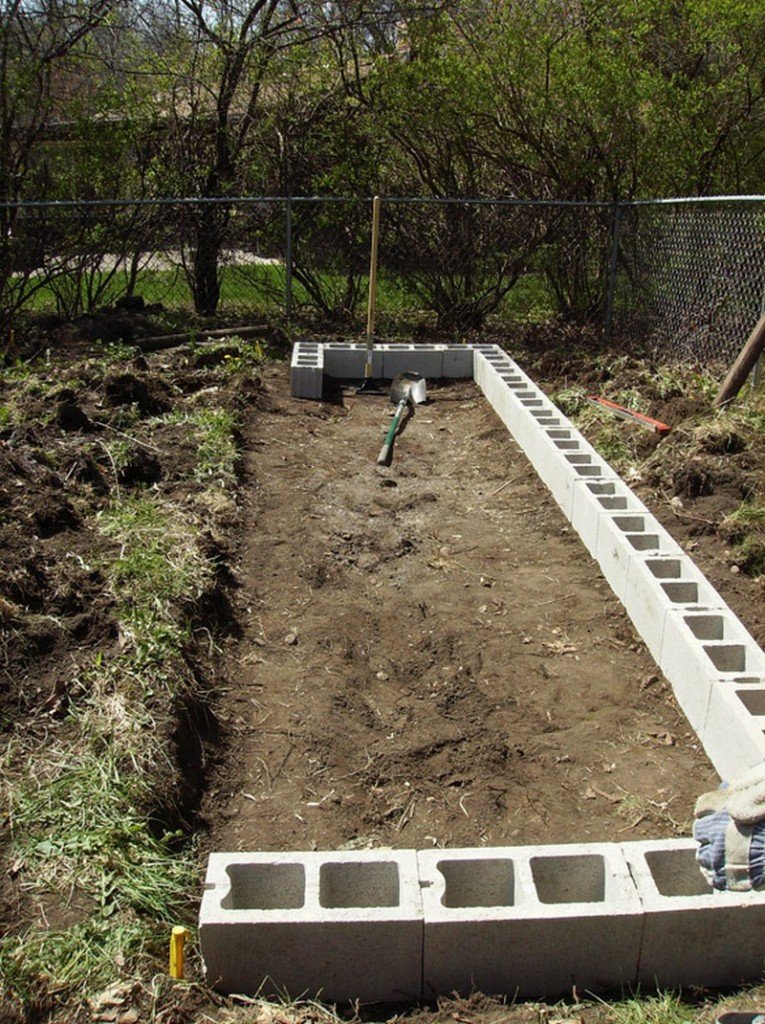
- Check:
- Corners are square (measure diagonals; they should be equal)
- Sides are straight (use your string line as a guide)
Don’t worry about perfection yet — this is your trial fit to confirm the size and block count.
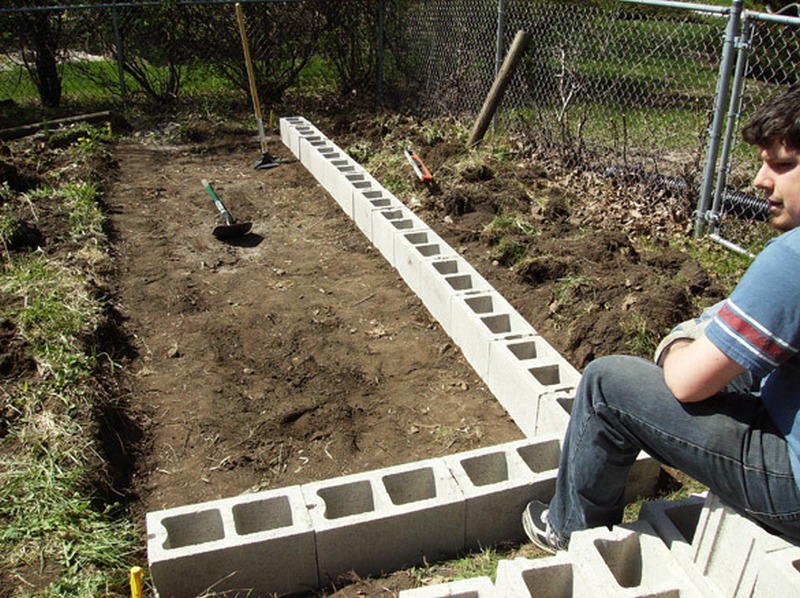
5. Level and Finalize the First Course
- Once you’re happy with the layout:
- Lift each block, sprinkle a bit of sand or fine soil under low spots
- Set the block back and tap it into place
- Use a spirit level across adjacent blocks:
- Adjust until each run is as level as you can reasonably get it
- Double-check the entire loop:
- Corners aligned
- No wobbly or rocking blocks
This first layer is your foundation. Take your time here; everything above will follow this line.
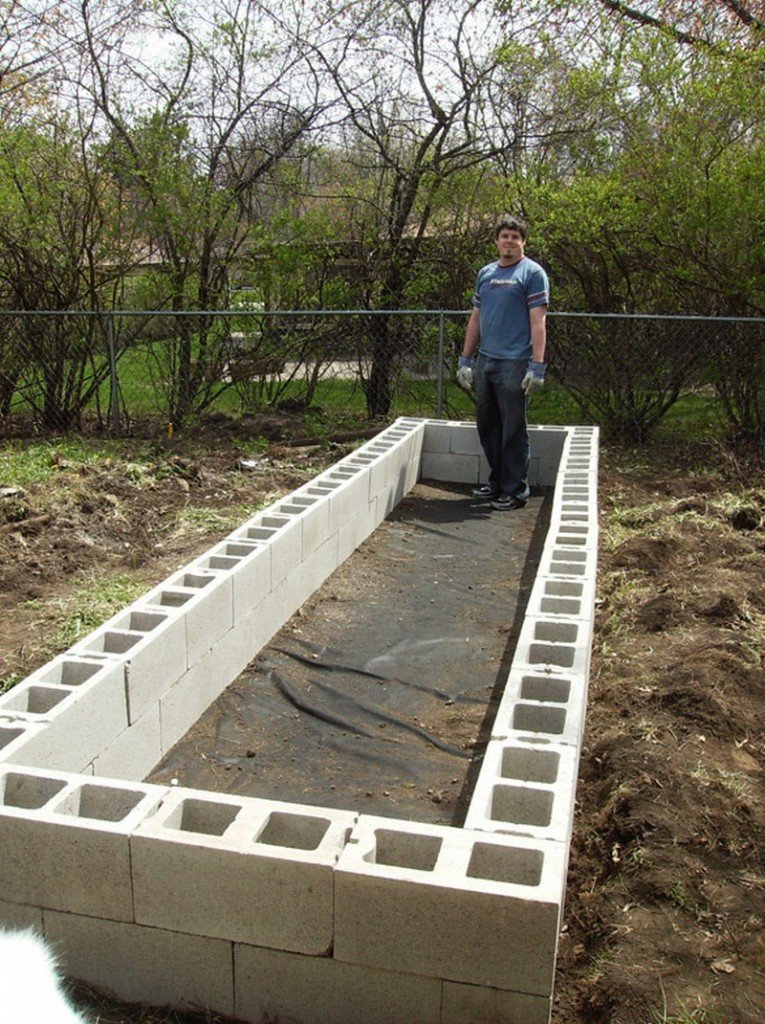
6. Add a Second Layer (Optional for More Depth)
If you want a deeper bed (great for root crops and easier on the back), add a second course:
- Place the second layer of blocks directly on top of the first:
- Keep the cores facing up
- Align them carefully so the edges match and the wall is straight
- For extra stability (optional):
- Stagger joints if your layout allows
- Use a bead of construction adhesive or masonry adhesive between layers to lock them together
- Recheck level:
- Run the level along the tops again and adjust if needed
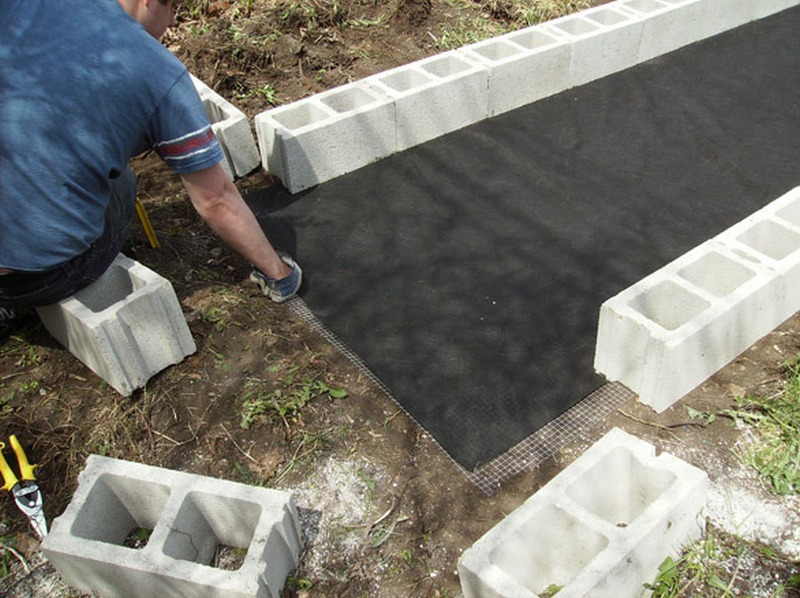
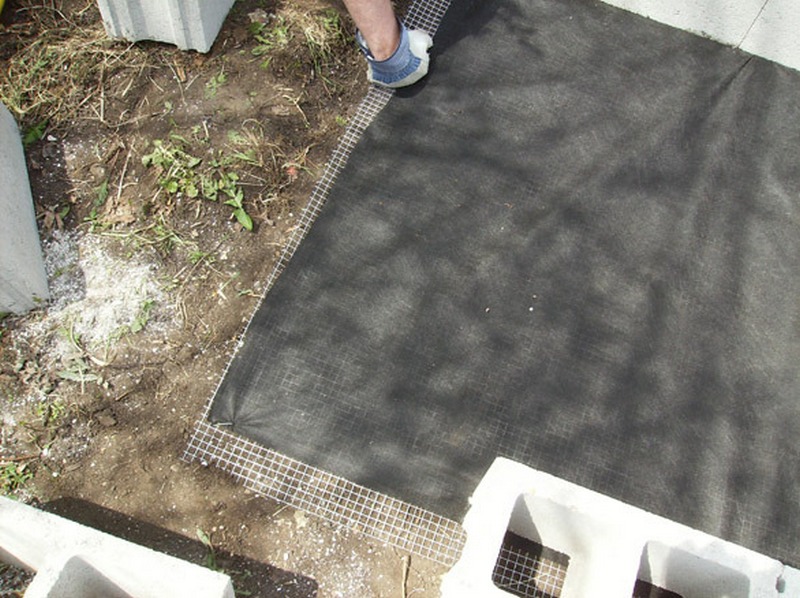
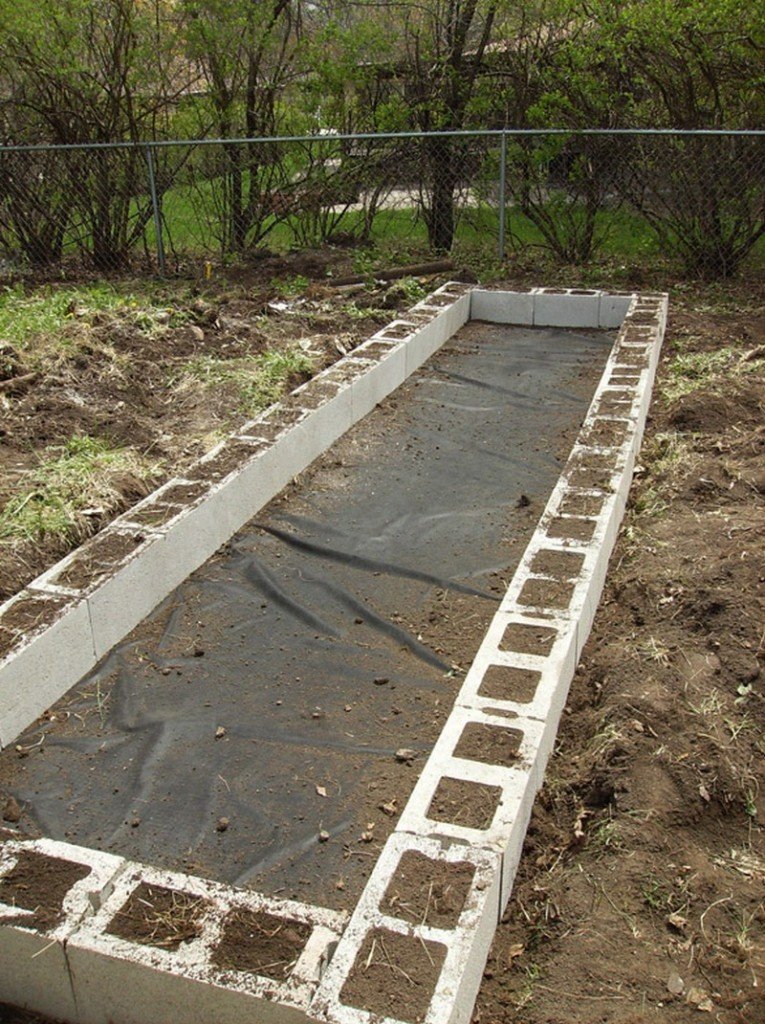
7. Install Hardware Cloth and Landscape Fabric
This step helps combat burrowing pests and weeds.
- Hardware cloth (bottom layer):
- Cut pieces to fit the footprint of the bed
- Lay them directly on the bare soil inside the bed
- Overlap pieces by a few inches if needed
- Bend edges up slightly against the inner side of the blocks to seal gaps
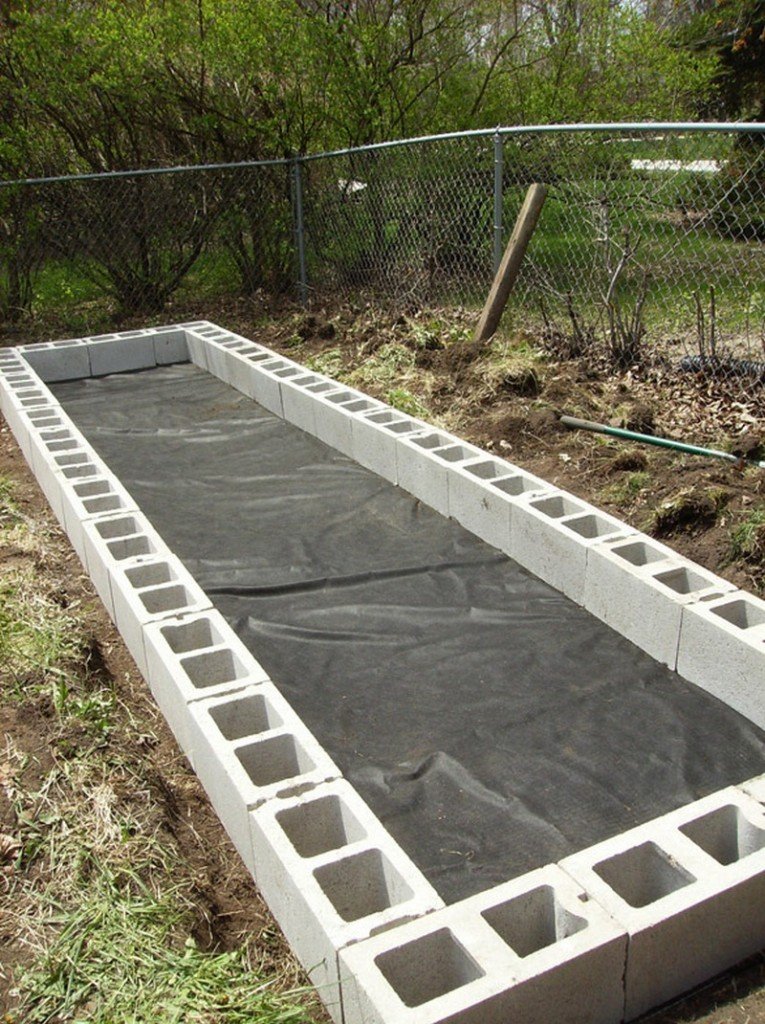
- Landscape fabric (above hardware cloth):
- Lay fabric over the hardware cloth
- Cut to fit and overlap seams
- This helps reduce weeds growing up from below while still allowing drainage
Make sure both layers lie flat so they don’t interfere with filling the bed later.
8. Fill the Bed with Soil Mix
- Aim for a well-draining, fertile mix, for example:
- 50% quality topsoil
- 30 to 40% compost (homemade or bagged)
- 10 to 20% other organic matter (well-rotted manure, leaf mold, etc.)
- Shovel soil into the bed:
- Fill in layers of 4 to 6 inches
- Lightly rake and tamp each layer so it settles evenly
- Stop filling when:
- The soil level is a few inches below the top of the blocks
- This “lip” helps keep mulch and soil from washing over the edges
If you’re using a double-height bed, aim for 12–18 inches of good-quality soil for most vegetables.
9. Plant the Bed (Including Cinder Block Holes)
- Plan your layout:
- Tall plants (tomatoes, trellised cucumbers) at the back or north side
- Medium plants (peppers, bush beans) in the middle
- Low plants (lettuces, herbs, strawberries) at the front and edges
- Use the cinder block holes:
- Fill each block core you want to use with soil
- Plant:
- Herbs (thyme, oregano, chives, parsley)
- Low flowers (marigolds, alyssum, nasturtiums) for pollinators and pest control
- Follow spacing guidelines on seed packets or plant tags:
- Don’t overcrowd; raised beds allow slightly closer spacing, but plants still need airflow
Finish by adding a 2 to 3inch layer of mulch on top of the soil inside the bed to conserve moisture and reduce weeds.
10. Water, Maintain, and Enjoy
- Watering:
- Water deeply right after planting until the soil is evenly moist
- In raised beds, soil dries out faster — check moisture with your finger and water when the top 2–3 cm (about 1 inch) is dry
- Consider a simple soaker hose or drip line snaked through the bed for even watering
- Ongoing care:
- Top up mulch as it breaks down
- Add compost to the surface each season (top-dressing) to keep the soil fertile
- Watch for pests and remove them early
- Season to season:
- Rotate what you plant in each area to keep the soil healthy
- At the end of the season, remove dead plants and add a fresh layer of compost
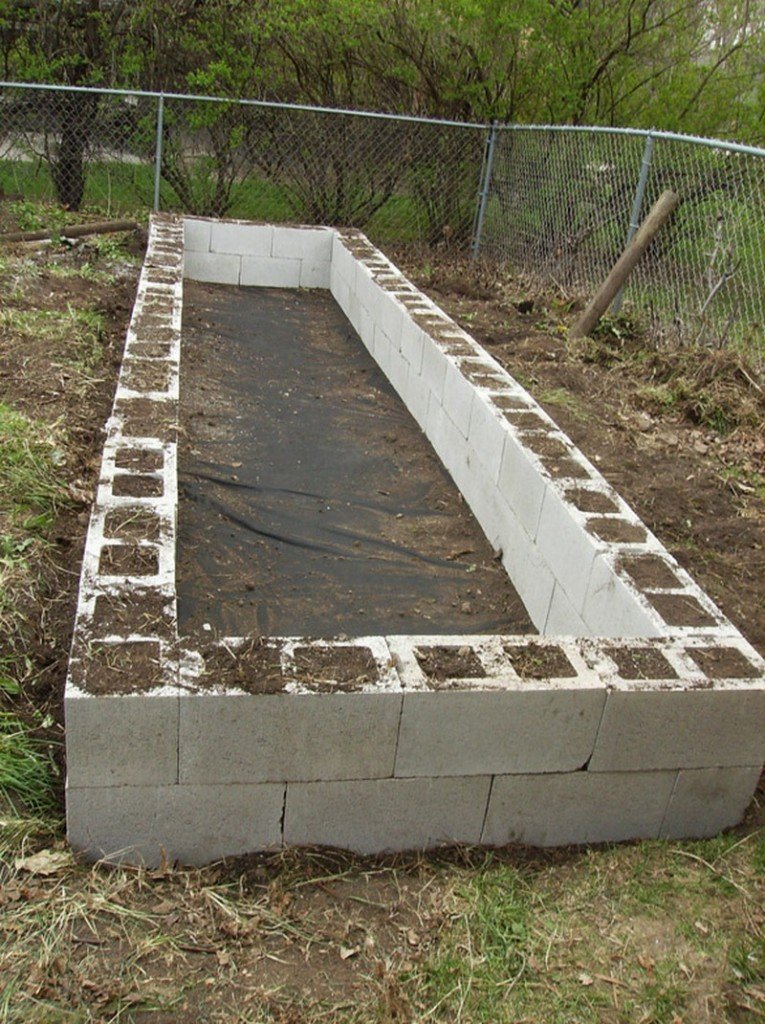
With these 10 steps, you’ll have a sturdy, low-maintenance cinder block raised garden bed that matches the style of the one shown in the gallery and should last for many seasons.
Click on any image to start the lightbox display. Use your Esc key to close the lightbox. You can also view the images as a slideshow if you prefer 😎
Thanks to Retro Ranch Revamp for this great project. You can get step-by-step instructions here…

Choosing the Right Location
Finding the right spot is key to a successful cinder block raised garden bed. The location influences how well your plants grow. Here are factors to consider when choosing the perfect location.
Sunlight Exposure
Sunlight is vital for the growth of most garden plants. Vegetables and flowers generally need full sunlight to flourish. This means they require direct, unfiltered sunlight for at least six hours daily.
The intensity and duration of sunlight directly impact plants’ health, flowering, and fruiting in your cinder block raised garden bed.
- Assessing Your Garden’s Sunlight
- To find the ideal location, observe your yard’s sunlight patterns. Do this over several days to get an accurate understanding. Notice how the sun moves across the space. Remember, the sun’s path changes slightly with the seasons, so consider this in your planning.
- Morning vs. Afternoon Sun
- The quality of sunlight varies throughout the day. Morning sunlight is generally cooler and less intense, while afternoon sun can be harsh, especially in summer.
- A spot receiving morning sun and afternoon shade can be ideal for plants sensitive to intense heat. Conversely, plants that thrive in heat and light will do best in areas that receive prolonged afternoon sunlight.
- Utilizing Sunlight Maps
- If you find it challenging to track the sunlight manually, consider using online sunlight calculator tools or apps. These can help you map the sun’s path over your property and identify the best spot for your cinder block raised garden bed.
- Adjusting for Limited Sunlight
- If your yard lacks areas with full sun, don’t worry. Many plants can grow in partial sun (about three to six hours of direct sun) or partial shade (dappled sunlight all day). You can choose plant varieties that are less demanding in their sunlight needs.
Soil and Drainage
Effective drainage is essential for the health of plants in a cinder block raised garden bed. Waterlogged soil can lead to root rot and other plant diseases. Choosing a location where water does not pool after rain ensures good drainage.
- Assessing Your Yard’s Drainage
- Before setting up your cinder block raised garden bed, observe how water behaves in your potential garden area. Look for signs of pooling or slow-draining soil, especially after heavy rainfall. Areas where water accumulates are not suitable for placing a raised garden bed.
- Enhancing Drainage with Elevation
- Consider elevating your cinder block planters if your yard has generally poor drainage. Raising the bed’s height with additional cinder blocks can significantly improve drainage. This elevation ensures that excess water drains away from plant roots quickly.
- Utilizing a Slope to Your Advantage
- A slight slope can be beneficial for a cinder block raised garden bed. Position the bed to enhance water runoff if your yard has a natural slope. Ensure the slope is gentle enough to prevent soil erosion within the bed.
- Creating an Ideal Soil Mix
- Apart from the physical location, the soil mix in your cinder block planters plays a vital role in drainage. Use a well-draining soil mix that retains enough moisture for plant roots but allows excess water to drain away efficiently.
- Installing Drainage Systems
- In extreme cases, where drainage is a significant issue, consider installing a drainage system beneath your cinder block raised garden bed. This can involve laying gravel or perforated pipes at the base of the bed to facilitate better water movement.
Wind Protection
Protecting your cinder block planters from strong winds is crucial, especially for delicate plants. Winds can dry the soil, damage plant structures, and even uproot young seedlings. Finding a sheltered spot or creating windbreaks can shield your garden from these harsh elements.
- Selecting a Sheltered Location
- When planning the placement of your cinder block raised garden bed, look for areas in your yard that are naturally protected from wind. This could be near a building, fence, or natural landforms. A location that blocks or slows down the wind will create a more stable environment for your plants.
- Using Fences as Windbreaks
- Fences are effective windbreaks for a cinder block raised garden bed. They can significantly reduce wind speed and its impact on plants. If you’re installing a new fence, consider its height and permeability for optimal protection.
- Planting Wind-Resistant Barriers
- Tall, sturdy plants can serve as natural windbreaks for your cinder block raised garden bed. Trees and shrubs with dense foliage can absorb wind force and act as a buffer. Arrange these plants strategically around your garden bed to minimize wind exposure.
- Building Structural Windbreaks
- For additional protection, consider building structural windbreaks. This can include trellises, lattice panels, or temporary wind shields. These structures can be placed on the windward side of your cinder block raised garden bed to deflect strong gusts.
- Considering the Direction of Prevailing Winds
- Understand the direction of prevailing winds in your area. Position your cinder block planters perpendicular to these winds for maximum protection. This orientation helps to reduce the wind’s impact on the entire garden.
- Balancing Sunlight and Wind Protection
- While protecting your cinder block raised garden bed from the wind, ensure it still receives adequate sunlight. The balance between wind protection and sunlight exposure is key for the health and growth of your plants.
By considering these factors, you can ensure your cinder block planters have the best conditions for growing healthy plants.
FAQ on Cinder Block Raised Garden Bed
- Are cinder blocks safe to use for vegetable garden beds?
- Modern concrete blocks are generally considered safe; the main documented issue is lime slowly raising soil pH rather than proven toxin transfer into crops, according to an extension source.
- How deep should a cinder block raised garden bed be?
- Aim for 12–18 inches of soil for most vegetables, with 18 inches or more for deep-rooted crops like tomatoes and carrots so they can develop strong root systems.
- Do I need to line a cinder block raised bed?
- You don’t have to, but adding hardware cloth on the bottom (for pests) and landscape fabric or plastic against the inner walls can reduce soil loss and limit direct contact with the blocks while keeping the bottom open for drainage.
- Will cinder blocks change my soil pH?
- Concrete can slowly leach lime and make soil more alkaline over time, so it’s smart to test pH yearly, add compost, and adjust with sulfur if needed.
- What’s the best soil mix for a cinder block raised garden bed?
- A dependable mix is about 50% quality topsoil, 30–40% compost, and 10–20% other organic matter (like well-rotted manure, leaf mold, or coir) to balance drainage, moisture, and nutrients.
- Can I plant in the holes of the cinder blocks?
- Yes — fill the cores with soil and use them for herbs or flowers; many gardeners keep deep-rooted edibles in the main bed and reserve the holes for shallow-rooted plants or ornamentals.
- How many cinder blocks do I need for a 4×8 raised bed?
- A simple 4′×8′ rectangle usually takes about 16 standard blocks per layer, so a one-block-high bed uses ~16 blocks and a two-block-high bed uses ~32 blocks.
Conclusion
Building and maintaining a cinder block raised garden bed offers numerous advantages for gardening enthusiasts. It’s an efficient, cost-effective way to grow various plants, from vegetables to flowers. You can enjoy a thriving garden by carefully selecting the right location, ensuring proper soil and drainage, protecting against wind, and employing effective planting strategies.
If you liked this project, you will also like viewing these easy DIY projects…