Last Updated on December 5, 2025 by teamobn
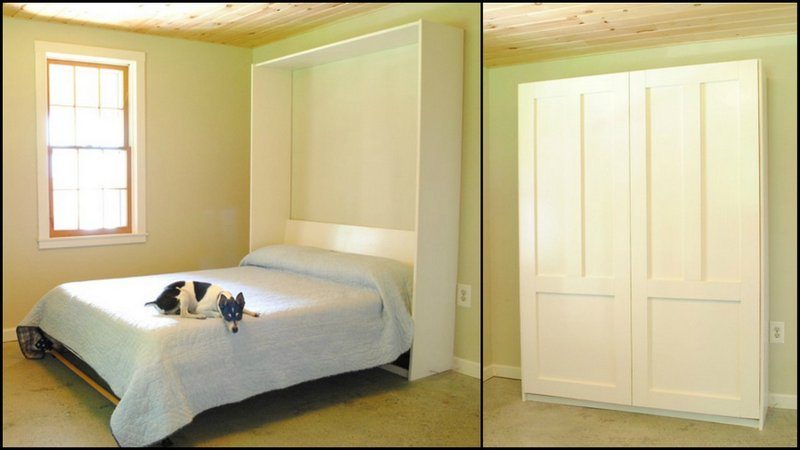
When you have more people in the house than you have bedrooms, every square foot matters. A Murphy bed is one of the best ways to turn one room into two. You can use the same space as a bedroom at night and a home office, craft room, or playroom during the day.
A Murphy bed is also called a wall bed or fold down bed. It folds up vertically into a cabinet when you are not sleeping on it. This guide shows you how to plan and build a simple DIY Murphy bed step-by-step that is safe, sturdy, and space saving.
This project is for confident DIYers who can measure accurately, use power tools, and mount heavy furniture to a wall.
Quick answer: How do you build a DIY Murphy bed?
To build a DIY Murphy bed, you:
- Choose the bed size and location, and check that there is enough floor and wall space for the bed to fold down safely.
- Gather materials such as ¾ inch plywood or solid wood, a Murphy bed hardware kit, strong screws and bolts, and wall anchors that match your wall type.
- Build the bed frame box that will hold the mattress.
- Build the cabinet or headboard that the bed folds up into.
- Install the lifting mechanism and rail system according to the hardware kit instructions.
- Anchor the cabinet to wall studs, test folding the bed up and down, and adjust the mechanism so it operates smoothly.
Read on for detailed steps, materials, safety tips, and common mistakes to avoid.

Benefits Of A DIY Murphy Bed
A Murphy bed can be a smart choice for:
- A spare room that is also a home office or craft room
- A studio apartment or bedsit where every bit of floor space counts
- A granny flat or guest room that doubles as a playroom
- Teen rooms that need both sleeping space and studying space
Buying a premade Murphy bed can be very expensive. Building your own Murphy bed can cut costs and allows you to fit it exactly to your space and style.
Planning Your DIY Murphy Bed
Before you pick up a saw, spend time planning. Good planning makes the build safer and easier.
Choose Bed Size and Location
- Decide on the bed size: twin, full, or queen
- Measure the room height, width, and depth
- Check that the room has enough space:
- For the bed to fold down completely
- For people to walk around the bed
- For doors, windows, and other furniture to remain usable
A typical Murphy bed cabinet for a small room is about 17 inches deep. If you want a thicker mattress, you can build the cabinet up to about 20 inches deep.
Check Wall Structure and Power Points
Murphy beds must be fixed to strong parts of the wall, called studs, or to solid brick or concrete. Use a stud finder to locate the studs. Also look for electrical outlets and switches so you do not drill into them.

Building a Murphy Bed
The very first step of building a Murphy bed is gathering all the necessary materials needed for your project. Make sure you already have a design on your hand on how your folding bed would look like and follow these steps.
What Are the Materials Needed to Build a DIY Murphy Bed
Choose materials that are strong, safe, and suitable for frequent movement.
Wood selection
- Plywood
- ¾ inch plywood is a common choice for Murphy beds.
- It is strong, relatively affordable, and easy to work with.
- Choose good quality plywood with a smooth surface so it is easy to paint or stain.
- Solid wood
- Woods such as oak, maple, or cherry are strong and attractive.
- Solid wood costs more and weighs more than plywood.
- Make sure your wall and floor can safely support the extra weight if you choose solid wood.
Metal components
- Aluminum
- Lightweight and resistant to rust.
- Works well for certain moving parts.
- Steel
- Use high quality steel hinges, brackets, and screws for strength.
- Stainless steel or powder coated steel resists wear and corrosion.
Fasteners and hardware
- Screws and bolts
- Choose strong, high quality screws and bolts that will not strip or rust easily.
- Use the right length and diameter for your materials. They should grip solidly without poking through surfaces.
- Hinges, springs, and lifting hardware
- It is safer and easier to buy a Murphy bed hardware kit than to try to design your own mechanism.
- A good kit will include hinges, pivot points, springs or gas struts, and detailed instructions designed for a specific bed size and weight.
Finishes
- Paint
- Satin or semi gloss paint is a good option for a modern look.
- It is easy to wipe clean and holds up to regular handling.
- Wood stain and clear coat
- Stain highlights the natural grain of the wood.
- Follow with a clear protective finish, such as polyurethane, for durability.
What are the tools needed to build a DIY Murphy Bed
- Tape measure and pencil
- Stud finder
- Hammer or mallet
- Power drill and drill bits
- Screwdriver bits
- Table saw or circular saw with a straight edge guide
- Sander or sanding block
- Level
- Safety gear: safety glasses, hearing protection, and dust mask
How To Build A DIY Murphy Bed: Step-By-Step Instructions
The photos on this page show what each stage looks like from raw frame to finished, fold away bed. Use them as a visual check as you work through these steps.
Before you start, read through all the steps once so you understand the whole process.
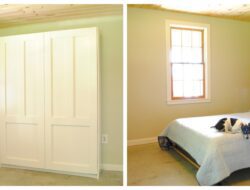
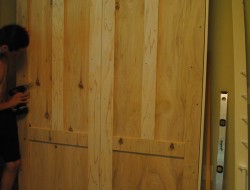
Step 1: Build the Headboard Cabinet
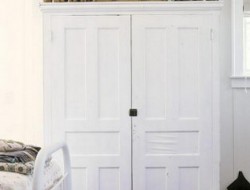
The headboard of your Murphy bed is really a shallow cabinet fixed to the wall. When the bed is folded up, it hides inside this cabinet.
- Plan the size
- Decide what size mattress you will use, such as twin, full, or queen.
- Measure the mattress length and width.
- Add a few centimeters (or about 1 inch) extra on each side so the frame and bedding can fit and move freely.
- Decide how tall you want the cabinet to be on the wall. It usually matches the height of the mattress plus the thickness of the bed frame.
- Mark the cabinet position on the wall
- Hold a tape measure and pencil and lightly draw the outline of the cabinet on the wall where you want the bed to live.
- Use a level so your lines are straight.
- Use a stud finder to locate the wall studs inside the wall and mark them. You will need these marks when it is time to fix the cabinet in place.
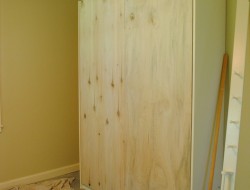
- Cut the cabinet panels
From ¾ inch plywood, cut:- Two tall side panels. These form the left and right walls of the cabinet.
- One top panel. This joins the two side panels at the top.
- One bottom panel. This joins the side panels at floor level.
- Optional: one back panel for a fully enclosed cabinet, or narrow strips (cleats) to stiffen the back.
- Assemble the cabinet frame
- Lay the two tall side panels flat on the floor, inside faces up.
- Position the top panel between the side panels at the correct height.
- Apply wood glue along the edges where the pieces touch.
- Screw through the side panels into the edge of the top panel, using clamps if you have them to keep everything square.
- Repeat this with the bottom panel.
- If you are using a back panel, lay it over the frame, make sure all edges line up, then screw it in around the perimeter.
- Stand the cabinet upright. It should look like a shallow wardrobe or bookcase, open at the front.
- Test fit against the wall
- Move the empty cabinet to the wall marks you made earlier.
- Check that the cabinet sits flat against the wall and does not rock.
- Adjust the bottom edge with shims if your floor is not perfectly level.
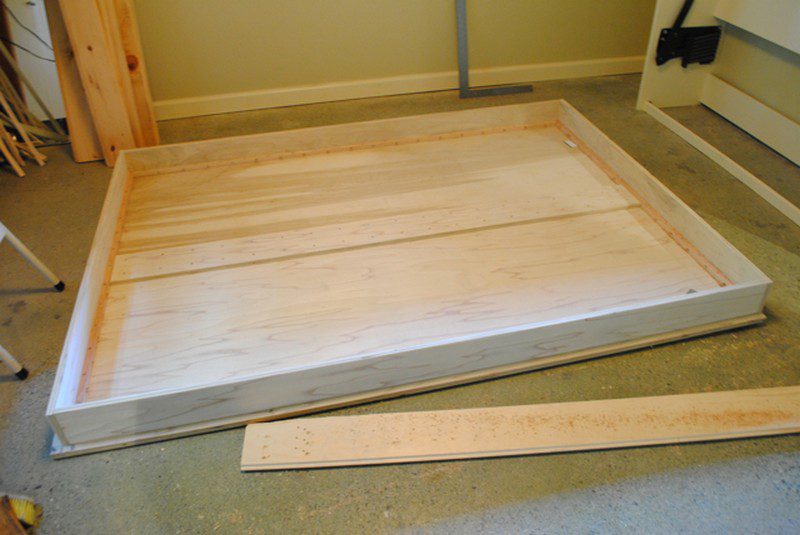
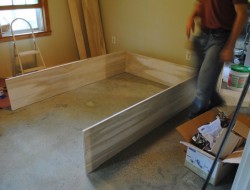
Step 2: Build the Bed Frame That Holds the Mattress
Now you will build the actual bed that folds in and out of the cabinet.
- Measure and plan the frame size
- Measure your mattress again.
- Plan for the inside of the bed frame to be slightly larger than the mattress size, by about 1 to 2 centimeters (about ½ inch) on each side.
- Add the thickness of the side boards when you plan the total outside size of the frame.
- Cut the frame pieces
From ¾ inch plywood or solid boards, cut:- Two long side rails
- One head board piece
- One foot board piece
- Either a large flat base panel, or several narrower slats to support the mattress
- Assemble the rectangular frame
- Lay the two long side rails parallel on the floor.
- Place the head board piece across one end and the foot board across the other end to form a rectangle.
- Check that the corners are true right angles using a carpenter’s square or a simple triangle check.
- Apply wood glue at each joint, then drive screws through the long boards into the ends of the shorter boards.
- Wipe up any excess glue that squeezes out.
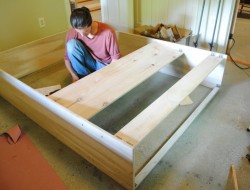
- Add the mattress support
- Option A: Solid base
- Cut a sheet of plywood to fit inside the frame.
- Drop it into the frame so it rests on small support cleats or ledges screwed along the inside of the sides.
- Screw the base panel down to those cleats or directly into the frame.
- Cut several slats of equal width.
- Space them evenly across the width of the frame, leaving small gaps between slats so air can flow around the mattress.
- Screw each slat down into the side rails.
- Option A: Solid base
- Smooth and test the fit
- Sand all exposed edges so there are no sharp corners or splinters.
- Place the mattress inside the frame. It should sit flat and snug without being forced.
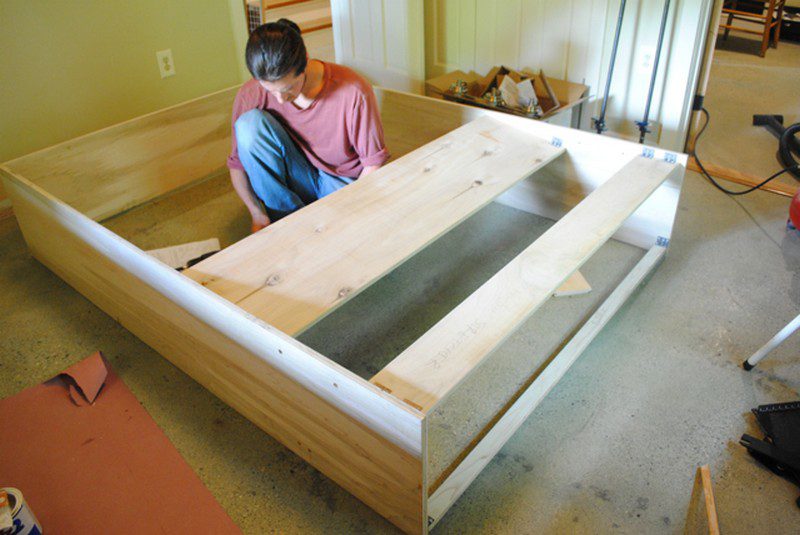
Right now, your bed frame should look like a low, simple platform bed without legs. In the photos, this is the bare frame that will later be lifted into the cabinet.
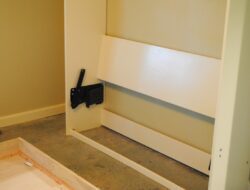
Step 3: Build and Attach the Rail and Hinge System
The rail system and hinges connect the bed frame to the cabinet so it can fold up and down safely.
Most builders use a Murphy bed hardware kit. These steps describe the general idea. Always follow the exact instructions that come with your kit.
- Read your hardware kit instructions
- Lay out all the metal parts from the kit.
- Identify each piece by name: hinges, side rails, brackets, springs, or gas struts.
- Read the instructions from start to finish before attaching anything.
- Mark hinge and pivot points on the bed frame
- Your kit instructions will show how far from the bottom and ends the hinge brackets should be mounted.
- Measure carefully and mark the positions on both sides of the bed frame.
- Use a square to make sure your marks are straight across the thickness of the board.
- Attach the brackets to the bed frame
- Drill small pilot holes for each screw to prevent the wood from splitting.
- Hold the bracket firmly on the marks, line up the screw holes, and drive the screws in.
- Make sure both sides match in position and angle. A mismatch here can cause the bed to twist when it moves.
- Mark and attach brackets inside the cabinet
- Measure the same distances given in the instructions inside the cabinet, along the lower side walls.
- Mark where the cabinet brackets need to be installed.
- Drill pilot holes, then screw the brackets in place.
- Check that both sides match and are level with each other.
- Install side rails or guide rails if included
- Some systems include metal rails that run along the sides of the bed frame or cabinet.
- Attach these where the instructions show, using the right length screws.
- Make sure the rails are straight and smooth so they do not catch when the bed moves.
- Add springs or gas struts
- If your kit uses springs or gas struts, attach them last, after the main pivot points are installed.
- Connect each spring or strut to the bed frame end and the matching point on the cabinet.
- Be careful, because springs can be under tension. Wear eye protection and keep your fingers away from any pinch points.
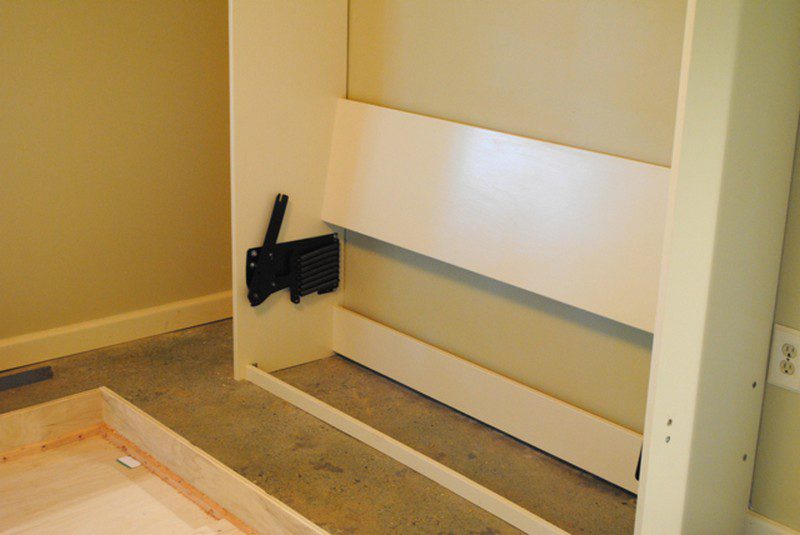
Your hardware should now be ready for the bed frame to be connected. In the photos, this is the stage where you can see metal parts fixed to both the cabinet and the frame.
Step 4: Assemble the Bed, Anchor It, and Test It
Now it is time to bring all the parts together and mount the bed safely to the wall.
- Anchor the empty cabinet to the wall
- Slide the cabinet into its final position against the wall.
- Use a level to check that it is straight from side to side and front to back.
- Drill through the back of the cabinet into the wall studs you marked earlier.
- Use strong screws or lag bolts long enough to reach deep into the studs.
- Tighten all fasteners firmly so the cabinet cannot move.
- Attach the bed frame to the cabinet hardware
- Ask at least one other adult to help. The frame and hardware are heavy.
- Lift one side of the bed frame into the cabinet, align the hinge brackets with the cabinet brackets, and insert the bolts or pins that join them.
- Repeat on the other side.
- Tighten all nuts and bolts so there is no wobble, but do not overtighten to the point where the hinge cannot move.
- Never attach a Murphy bed only to drywall. Drywall is not strong enough to hold the weight of a person sleeping on the bed.
- Test the folding motion slowly
- With both of you holding the bed, gently lower it out of the cabinet and toward the floor.
- Watch and listen for any scraping, binding, or strange noises.
- If the bed sticks, lightly loosen the relevant brackets and adjust their position until the motion is smooth.
- Once the bed reaches the floor, check that it is level and that both sides touch down evenly.
- Adjust spring or strut tension if your kit allows it
- Lift the bed back up and see how heavy or light it feels.
- If it is too heavy to lift, increase tension following the kit instructions.
- If it wants to fly up by itself, decrease tension.
- Always adjust a little at a time, then test again.
- Add safety features and finishing touches
- Attach mattress straps if your kit includes them, so the mattress and bedding stay in place when the bed is folded.
- Add any safety latches that hold the bed securely in the upright position.
- Install trim, handles, or knobs on the cabinet doors or bed face panel, matching the style in your room.
- Sand any remaining rough spots and apply paint or stain, letting each coat dry fully.
- Final checks
- Open and close the bed at least five to ten times, watching the hardware closely.
- Tighten any screws or bolts that loosen slightly.
- Make sure children understand that the bed should never be climbed on or played with while it is moving.
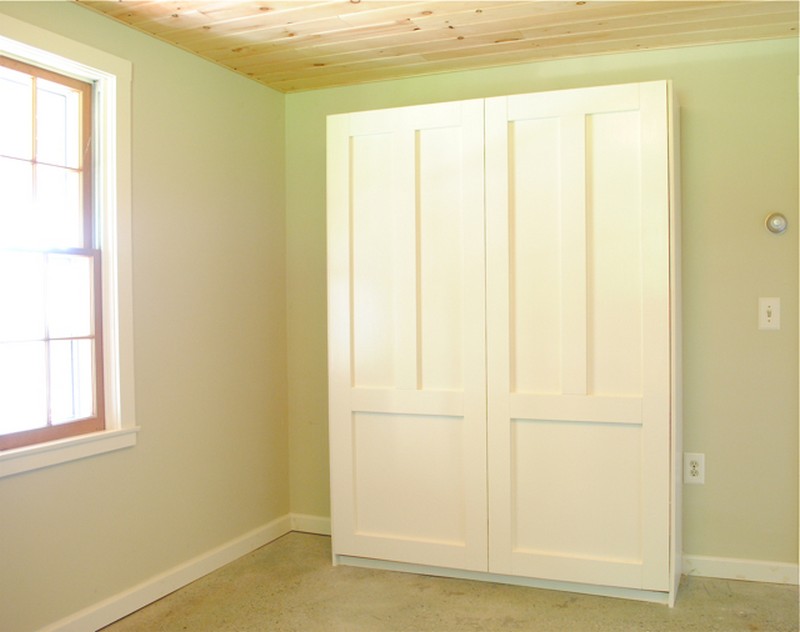
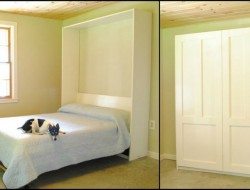
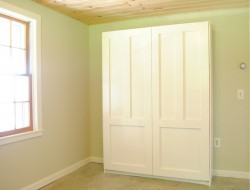
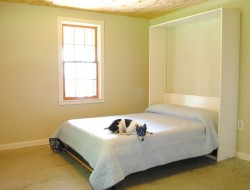
When you are finished, your Murphy bed should fold up into a neat cabinet just like the example photos, and fold down into a comfortable, safe place to sleep.
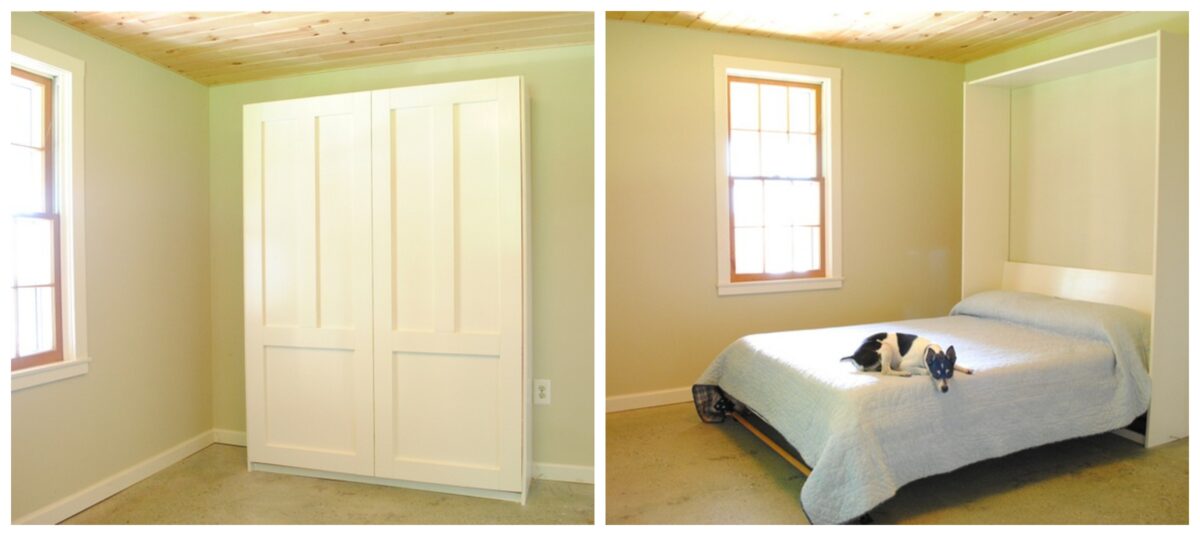
Do you want a simple-looking Murphy bed like this?
Click on any image to start the lightbox display. Use your Esc key to close the lightbox. You can also view the images as a slideshow if you prefer 😎


Thanks to Little Dog Vintage for their free murphy bunk bed plans. You can get the step-by-step instructions here…
Common Mistakes To Avoid With DIY Murphy Beds
Building a Murphy bed can be very satisfying, but certain mistakes can lead to safety issues or frustration. Here are common problems and how to avoid them.
Incorrect measurements
Not Double Checking Room Dimensions
Many DIYers skip careful measuring and run into trouble later. Always measure:
- Room height
- Floor depth required when the bed is down
- Cabinet width and depth
- Clearance for doors, windows, and closets
Measure twice before you cut any wood.
Ignoring Clearance Space
Even if the bed fits in theory, it may be hard to move around it in real life. Leave enough space to walk around the bed, and to open drawers or doors nearby.
Choosing the Wrong Materials
Using Low Quality Wood or Thin Panels
Thin or poor quality wood can flex, squeak, and wear out faster. For most DIY Murphy beds:
- Use at least ¾ inch plywood for the main structure
- Avoid warped boards or sheets with many voids inside
Skimping on Hardware
Cheap hinges, brackets, and screws may bend, strip, or break. Use a reputable Murphy bed hardware kit and follow its guidance on fasteners.
Inadequate Wall Support
Failing to Secure the Bed to Wall Studs
Attaching the bed only to drywall is dangerous. The wall can fail, and the entire unit can pull loose.
- Always attach to solid studs or appropriate masonry anchors
- Use a stud finder to locate studs and confirm by drilling a small test hole if needed
Using the wrong mounting hardware
Different wall types need different fasteners. For example:
- Wood stud walls usually need long wood screws or lag bolts
- Brick or concrete needs expansion anchors or masonry screws
If you are not sure, ask a local builder or hardware expert for advice.
Overlooking the Lifting Mechanism
Choosing a Mechanism That Does Not Match the Bed Weight
A lifting system that is too weak or too strong creates problems. It may slam shut, be too heavy to lift, or wear out early.
Pick a Murphy bed hardware kit that is designed for:
- Your bed size
- The approximate weight of your frame and mattress
Not Adjusting Tension
Many kits allow tension adjustments. Take time to tune the system so it moves smoothly and feels well balanced.
Neglecting Appearance and Storage
Not Planning the Finished Look
When the bed is folded up, it looks like a cabinet. Plan how that cabinet will look in the room.
- Consider panel design, handles, and trim
- Match or complement existing furniture and colors
Overlooking Extra Storage
You can add:
- Side cabinets
- Bookshelves
- Overhead storage
- A small fold down desk for a home office
These additions can make the Murphy bed area more useful without taking much extra space.
Safety Tips For DIY Murphy Beds
Safety should guide every step of your Murphy bed project.
- Know your skill level. If you are not comfortable with power tools or structural work, hire a professional for part or all of the build.
- Always wear safety glasses, hearing protection, and a dust mask when cutting or sanding wood.
- Use proper lifting techniques and get help when moving heavy panels or the assembled bed.
- Keep children and pets out of the room during installation and early testing.
- Test the bed with two adults present the first few times you use it.
- Check fasteners, hinges, and springs regularly and tighten or replace any that loosen or wear out.
Conclusion
Building a Murphy bed requires careful planning and attention to detail, ensuring both safety and functionality. Choosing the right materials and following precise construction steps are crucial for a successful project. Once completed, a well-built Murphy bed can significantly enhance the versatility and space efficiency of any room.
If you liked this project, you will also like viewing these space-saving ideas…
FAQ About DIY Murphy Beds
- What bed sizes and wood types can I use for a DIY Murphy bed
- You can build a DIY Murphy bed in common sizes such as twin, full, or queen. Most DIY builders use ¾ inch plywood for the main structure, sometimes with solid wood trim for a more decorative look. Solid woods like oak, maple, alder, or cherry can be used for face frames and doors if you want a higher end finish, but they will increase the weight.
- What is a typical weight limit and mattress size for a Murphy bed
- The weight limit depends on the hardware kit and design, but many systems are designed to handle a standard mattress and an adult sleeper safely. For a twin Murphy bed, this is often around 250 pounds total, including mattress and person. Always follow the weight and mattress thickness limits provided by your hardware kit manufacturer.
- Can I build a Murphy bed without a hardware kit
- It is possible but not recommended for most DIYers. Designing your own lifting and pivot system requires engineering knowledge and careful testing. A purpose made Murphy bed hardware kit has tested components, clear instructions, and safety features that are difficult to re create on your own.
- How deep should a Murphy bed cabinet be
- A common cabinet depth is about 17 inches for a slim design that fits a standard mattress. If you want a thicker or more luxurious mattress, you can build the cabinet to about 20 inches deep or slightly more. A deeper cabinet uses more material and sticks out farther into the room, but it provides extra comfort and space for bedding.
- How much does a DIY Murphy bed usually cost
- The cost depends on size, materials, and finishes. In general, a DIY Murphy bed with plywood, a mid range hardware kit, and basic paint or stain can cost less than a comparable premade wall bed. Prices can increase if you choose solid wood, built in cabinets, high end hardware, or custom trim work.
- Do I need a professional to install a Murphy bed
- Many experienced DIYers can build and install a Murphy bed on their own or with the help of a friend. However, if you are unsure about wall structure, load limits, or safe anchoring methods, it is wise to hire a professional carpenter or contractor to at least handle the mounting and final safety checks.
- Can I add storage or a home office to my Murphy bed setup
- Yes. You can add side cabinets, wardrobe units, shelves, or a floating desk around the Murphy bed cabinet. These can include features like power outlets, built in lighting, and drawers. Plan these elements when you design the bed so everything fits together in the available space.