Last Updated on May 13, 2024 by teamobn
A toadstool is any of a large number of fungal and mushroom-like organisms that grow in the legs of terrestrial animals and cause them to become sick.
Toadstools are also known as mushrooms but this name is usually restricted to edible fungi. When you see one, the first thing that comes to mind is ‘toad’.
The reason for this is that the most common toadstool in the UK and USA is the Fly Agaric, which is bright red and often grows in clumps that resemble a group of toads.
If you’re looking to put some magic into your garden, then this project could be for you.
You could set tree logs on your yard at varying heights for all members of the family!
These great little stools are sure to be a hit with both the young and the young at heart.
Building a DIY Toadstool
Materials
- Old Wooden Salad Bowl
- Newspaper
- Spray Paint
- White Duct Tape
- Screws
- Logs
Tools
- Drill
- Screw Drivers
Instructions
Prepping your materials
An old wooden salad bowl with a relatively smooth, flat bottom will often make a good stool. Since these wooden salad bowls have already smooth surfaces, you don’t need to sand them so you will save time.
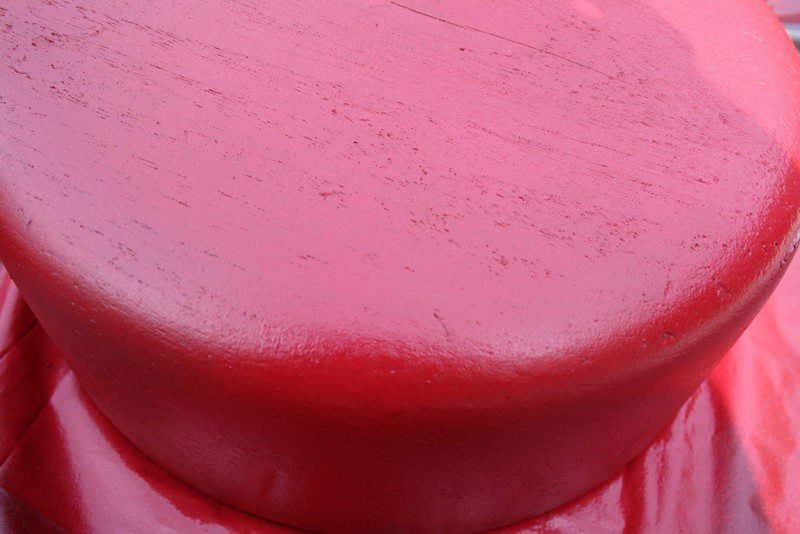
Paint your wooden bowls
Since toadstools are bright red, you need to paint the outside part of your wooden salad bowls red. After painting it red, you can start painting white dots to complete the look of your toadstool. 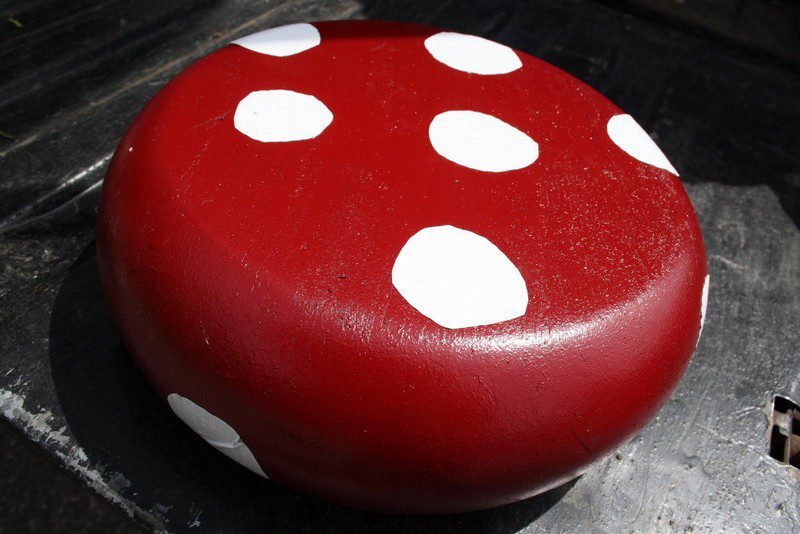
Drill your wooden bowls
Drill holes in the centre of the wooden salad bowls, it is where you should attach the screws to attach them to the logs.
You should drill holes in the centre of the salad bowls because you are going to attach them to the logs using screws. Avoid using nails, as you may damage or break your wooden bowls.
Two to three screws will hold your wooden salad bowl securely to the logs.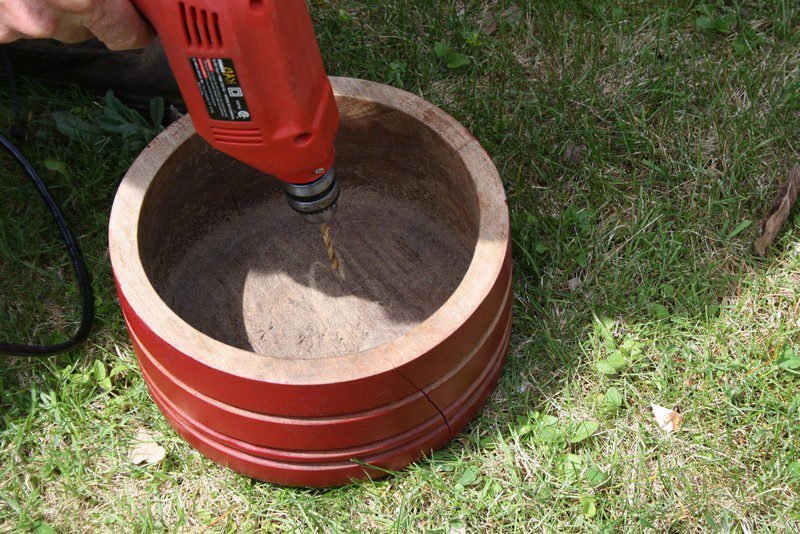
The Logs
The logs will serve as the legs of the stool. You need to set them in your yard, depending on the height of the seat that you want. Or, if you have an existing tree stump, it would be great to make use of them.
The diameter of the log or the tree stump should be a little shorter than the diameter of the wooden bowl. This is to make sure that if you attach the wooden bowl to the log or to the tree stump, it will perfectly fit. 
The Toadstool
Attach the wooden salad bowls to the logs using the screws. Secure them tightly, to the logs to avoid accidents. Leave the screws loose until you have managed to attach the other screws of the salad bowls to a log.
Drill the first hole and tighten the screw. Use the second screw to drill in a second hole that is located about an inch away from the first one.
Complete this process on the second log. Now go to the third log and complete the process from the beginning. Make sure you drill holes at even intervals, as this will ensure that the bowls are securely attached to the logs.
Do you think these toadstools are great? Well, start making yours now!
Click on any image to start the lightbox display. Use your Esc key to close the lightbox. You can also view the images as a slideshow if you prefer 😎


Thanks to Twig and Toadstool for this great project. You can get step by step instructions here…
Types of Toadstools for Garden Themes
Creating a whimsical and enchanted garden setting can be wonderfully achieved by integrating DIY toadstools. These magical elements are not only visually appealing but can also inspire creativity in garden design.
Here, we explore various types of toadstools that you can mimic in your DIY projects, each with unique characteristics that can enhance different garden themes.
Fly Agaric
The Fly Agaric toadstool is easily recognizable by its bright red cap with white spots and is often associated with magical or fairy-tale themes in gardens. Its striking appearance makes it a popular choice for adding a touch of whimsy and color. When creating DIY versions, consider using vibrant red paint and adding white polka dots to capture its iconic look.
Earthstars
Unlike the high-domed cap of the Fly Agaric, Earthstars feature a star-shaped base that opens up to reveal the spore-sac. This type of toadstool is perfect for more natural and woodland-themed gardens. For DIY projects, use materials that can be molded or cut into star shapes and painted in earthy tones to blend seamlessly with the garden environment.
Birch Polypore
Known for its smooth, shelf-like structure, the Birch Polypore can add a rustic touch to garden settings. This toadstool grows predominantly on birch trees and is characterized by its creamy white to brown coloring. DIY versions can be made from salvaged wood or eco-friendly resins, painted to mimic the subtle hues of the natural fungus.
Morel
Morels are distinguished by their honeycomb-like appearance on the cap, making them an interesting textural element in gardens. These toadstools are well-suited for more adventurous garden themes. Crafting DIY morels might involve using materials that can be manipulated to create a lattice effect, offering a unique aesthetic unlike the typical smooth caps.
Ink Caps
Ink Caps are fascinating due to their transient nature; they dissolve into a black, ink-like liquid after a few days. Their ephemeral beauty can be symbolized in gardens that embrace change and natural processes. While challenging to represent in a durable DIY form, using temporary structures or black water-soluble paints could provide a metaphorical representation in the garden.
Each do-it-yourself project that includes these many kinds of toadstools into your garden not only improves its aesthetic appeal but also gives your outdoor area a depth of story and theme. Any garden theme can be accommodated by a toadstool type, whether your goals are the natural beauty of Earthstars or the fanciful charm of Fly Agaric.
Decorative Techniques for More Realistic Toadstools
Crafting DIY toadstools for your garden offers an opportunity to bring a slice of fairy-tale enchantment right into your backyard. However, making these whimsical creations look realistic requires a bit more attention to detail in the decorating process.
Here are some decorative techniques that can help you achieve a more authentic look for your garden toadstools.
Texturing Techniques
To give your toadstools a more natural appearance, consider adding texture to the caps and stems. You can use materials like papier-mâché to create irregular, organic surfaces or employ painting techniques such as stippling with a sponge to mimic the natural imperfections found in wild fungi. Texturing not only enhances realism but also adds depth and interest to your toadstools.
Color Gradients
Rather than painting your toadstools in solid colors, apply gradients to create a more lifelike effect. Start with a darker shade at the base of the cap and gradually blend into lighter tones towards the top. This technique reflects how natural light plays on real toadstools, giving your DIY versions a more three-dimensional look.
Adding Gloss or Sheen
Many real toadstools have a glossy or wet-looking surface, especially after rain. To replicate this effect, apply a high-gloss varnish or resin coating over the painted mushroom. This not only makes them look more realistic but also helps protect them from the elements when placed outdoors.
Faux Moss and Lichen
Incorporating faux moss or lichen around the base of your toadstools or on the stems can make them seem as if they have naturally grown in your garden. Use green paint and textured materials like felt or actual preserved moss to achieve this look. This adds a layer of authenticity and helps integrate your mushrooms into the garden environment.
Weathering Effects
For mushrooms that look like they’ve been part of your garden for years, try adding weathering effects. Lightly brush over the edges and raised surfaces with a bit of white or gray paint to simulate the effects of sun fading and exposure. This subtle aging technique can make a significant difference in the realism of your DIY toadstools.
Use of Natural Embeddings
Incorporate elements from nature directly into your toadstool designs. Embedding small twigs, leaves, or stones into the base or the cap of the mushroom before the final paint or sealant application can give a more organic feel. This method is particularly effective for creating a base that looks like it has naturally merged with the garden soil.
Shadowing with Paint
To add depth and dimension to your mushroom, use shadowing techniques with darker shades of paint in the creases and underneath the cap. This can mimic natural shading and give the illusion of curvature and weight to the structure. It’s an excellent way to enhance the three-dimensional appearance of flat surfaces.
Speckling and Flecking
Simulate the spore patterns seen on many real mushroom by using a fine brush or even a toothbrush to speckle or fleck your paintwork. Lightly dip the brush in paint and flick the bristles to create random patterns of small dots over the cap. This is effective for replicating the textures and details that give wild mushrooms their characteristic look.
Metallic Highlights
A subtle touch of metallic paint can mimic the natural sheen some mushroom have, especially when wet. Use a very light hand to brush metallic gold, silver, or copper highlights on areas that would naturally catch the light. This technique is particularly striking when used sparingly on the edges or ridges of the toadstool cap.
Creating Indents and Irregularities
Before the painting stage, sculpt small indents and irregularities into the surface of your mushroom to mimic imperfections found in nature. You can use tools like a stylus or the back of a paintbrush to press or carve subtle indentations into the material you’re working with, whether it’s clay, resin, or wood.
Using these decorative techniques, you can transform simple DIY projects into stunning, realistic garden features that capture the magic and mystery of natural toadstools.
Conclusion
Crafting DIY toadstool decorations offers a delightful way to infuse your garden with whimsy and enchantment. These creative projects not only enhance the aesthetic of outdoor spaces but also provide a fun, engaging activity for gardeners of all ages. With a range of techniques to boost their realism, homemade toadstools can become charming focal points in any garden setting.
If you liked this project, you will also like viewing these outdoor furniture ideas…